| Table of Contents |
|---|
1. Introduction
The purpose of this Deployment guide is to demonstrate the way in which Dbvisit Standby 8.0 software can be installed on an Amazon AWS EC2 instance. In this guide, we focus on both the Primary and Standby databases being in AWS. In another document, we focus on 'On-Premise Primary' to Standby in AWS. A link that document can be found here
...
| Info |
|---|
| The setup will be from Single Instance Primary Database to Single Instance Standby Database with Datafiles stored on standard filesystems on a Linux Platform. However, the options for configuring Dbvisit Standby are in no way limited to this. |
2. Initial Setup and Configuration
2.1 Provisioning the Severs
The primary server dbvaws01 has been provisioned in the equivalent section of the guide "On-Premise Primary" to AWS EC2. This documentation will reference the same server. This section will focus on the provisioning of the 2nd server: dbvaws02 which will be launched from the snapshot taken of dbvaws01 after the Oracle environment had been prepared and the Dbvisit Standby binaries had been copied to the server. The AMI ID is ami-cdcb5cb5
...
| Primary Server Details | Standby Server Details |
|---|---|
Name: dbvaws01 Hosted: Amazon AWS EC2 vCPUs : 1 OS: Oracle Linux EL7 Memory : 2G Storage : 30G Version: 11.2.0.4 Edition: Enterprise Edition Database : XE Dbvisit Base: /usr/dbvisit/standby Standby Version: 8.0.20 | Name: dbvaws02 Hosted: Amazon AWS EC2 vCPUs : 1 OS: Oracle Linux EL7 Memory : 2G Storage : 30G Version: 11.2.0.4 Edition: Enterprise Edition Database : XE Dbvisit Base: /usr/dbvisit/standby Standby Version: 8.0.20 |
2.2 Preparing the Servers: dbvaws01 and dbvaws02
The binaries were copied and the /usr/dbvisit directory was in place as part of the image, so we can proceed directly to the installation. The server dbvaws01 will be reconfigured in this guide to be a primary server and server dbvaws02 will be configured to be the standby server with the GUI binaries installed.
3. Install, Configure and Run the Standby software
3.1 Installing and Configuring the Software
3.1.1 dbvaws01 (hostname : ip-172-31-13-235)
This server, dbvaws01, will be the primary server so install the core components. Here is the link to the full installation guide. It is summarized below. Navigate to where the unpacked files are
...
| Code Block | ||
|---|---|---|
| ||
[oracle@ip-172-31-13-235 ~]$ cat dbv_start #!/bin/bash cd /usr/dbvisit/dbvnet ./dbvnet -d start cd ../dbvagent ./dbvagent -d start ps -ef|grep -i dbv [oracle@ip-172-31-13-235 ~]$ ./dbv_start dbvnet process started with pid: 11548 dbvagent process started with pid: 11550 oracle 11546 11242 0 19:29 pts/1 00:00:00 /bin/bash ./dbv_start oracle 11548 1 0 19:29 ? 00:00:00 ./dbvnet -d start oracle 11550 1 0 19:29 pts/1 00:00:00 ./dbvagent -d start oracle 11552 11546 0 19:29 pts/1 00:00:00 grep -i dbv |
3.1.2 dbvaws02 (hostname : ip-172-31-30-113)
This server will be configured to be the Standby Server. As both of these servers are launched within the same VPC and Security Group. The hostnames ip-172-31-30-113 and ip-172-31-13-235 should be resolvable from each other without the need to update the local host's files.
...
| Code Block | ||
|---|---|---|
| ||
[oracle@ip-172-31-13-235 ~]$ telnet ip-172-31-30-113 7891 Trying 172.31.30.113... Connected to ip-172-31-30-113. Escape character is '^]'. |
3.2 Start the GUI and Create the DDC
| Info |
|---|
The following browsers are supported when using the Dbvisit Standby Web Based interface (latest versions recommended)
Future support for the following browsers are planned:
|
...
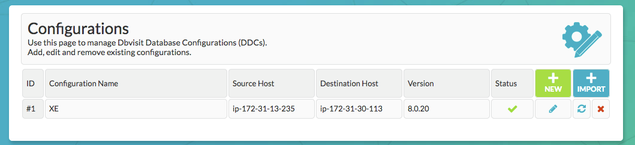
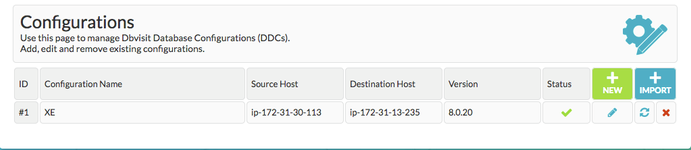
The new configuration, 'XE' can be viewed and edited from the 'Manage Configurations' Tab.
3.3 Create the Standby Database
3.3.1 Creating the Standby with the GUI
Choose the Create Standby Database Tab from the Home Screen.
...
The task has completed when a small green 'tick' appears on the task icon.
3.3.2 Creating the Standby with the CLI
To Create the Standby database with the command line is shown below
| Code Block | ||
|---|---|---|
| ||
[oracle@ip-172-31-13-235 standby]$ ./dbvctl -d XE --csd

>>> Running pre-checks please wait... done
What would you like to do:
   1 - Create standby database (and optionally save settings in template)
   2 - Help
   3 - Terminate processing
   Please enter your choice [1]: 1

-------------------------------------------------------------------------------
Answer Yes to transfer the datafiles directly to the standby server (not
recommended for large database or slow networks)
Note tablespaces will be placed in backup mode for direct copy.
Answer No (recommended) to create an RMAN backup of primary datafiles in a
temporary location and transfer the backup to the standby server

=>Do you want to copy database files directly to the standby server? [N]:
Your input: N

Is this correct? <Yes/No> [Yes]:

-------------------------------------------------------------------------------

=>Do you want to use TRANSPORTABLE MEDIA to transfer the database backup to the
standby server? Transportable media is an external device such as a USB drive
that is first plugged into the primary server and then manually transferred to
the standby site and plugged into the standby server to continue the process.
It can be used for large databases or slow networks.
Specifying No means the network will be used to transfer the database backup.
[N]:
Your input: N

Is this correct? <Yes/No> [Yes]:

-------------------------------------------------------------------------------
A temporary location must be specified on ip-172-31-13-235 where the database
will be backed up to first.
This location must be big enough to hold RMAN backup of the whole database
(1.40GB).

=>Specify the location on this server: [/usr/tmp]:
Your input: /usr/tmp

Is this correct? <Yes/No> [Yes]:

-------------------------------------------------------------------------------
A temporary location must be specified on ip-172-31-30-113 where the database
backup will be copied to before moving to specified locations.

=>Specify location on remote server: [/usr/tmp]:
Your input: /usr/tmp

Is this correct? <Yes/No> [Yes]:

The following oracle database parameters will be set in the standby database pfile or spfile:
-------------------------------------------------------------------------------
SID            NAME                                    VALUE

*              audit_file_dest                         /u01/app/oracle/admin/XE/adump
*              compatible                              11.2.0.4.0
*              control_files                           /u01/app/oracle/oradata/XE/control01.ctl,/u01/app/oracle/fast_recovery_area/XE/control02.ctl
*              db_block_size                           8192
*              db_domain
*              db_name                                 XE
*              db_recovery_file_dest                   /u01/app/oracle/fast_recovery_area
*              db_recovery_file_dest_size              4007657472
*              db_unique_name                          XE
*              diagnostic_dest                         /u01/app/oracle
*              dispatchers                             (PROTOCOL=TCP) (SERVICE=XEXDB)
*              open_cursors                            300
*              pga_aggregate_target                    268435456
*              processes                               150
*              remote_login_passwordfile               EXCLUSIVE
*              sga_target                              805306368
*              spfile                                  OS default
*              undo_tablespace                         UNDOTBS1

-------------------------------------------------------------------------------
What would you like to do:
   1 - Proceed with creating the standby database
   2 - Edit oracle database parameters for the standby database pfile/spfile
   3 - Terminate processing
   Please enter your choice [1]:

Validating oracle database parameters... please wait
=>SUCCEEDED

-------------------------------------------------------------------------------

=>Create standby database template for XE using provided answers? [Y]:
Your input: 1

Is this correct? <Yes/No> [Yes]:

-------------------------------------------------------------------------------

=>Continue with creating a standby database? (If No processing will terminate,
the saved template will be available for future use) [Y]:
Your input: 1

Is this correct? <Yes/No> [Yes]:

>>> dbvctl will now run a pre-flight check for standby database creation. An attempt will
    be made to create a standby (s)pfile using oracle standby database parameters, followed
    by trying to start the standby instance. If this step fails, then please double-check
    the following items before re-running dbvctl again:

    1) Review the standby database parameters you have supplied and provide valid values
    unless a template is used.
    2) Recreate the template to provide valid values for standby database parameters if a
    template is used.

>>> Running pre-flight check for standby creation, please wait... done

WARNING: FORCE_LOGGING is disabled in the primary database!

>>> Total database size for XE is 1.40GB

>>> Backing up primary database...

    Backing up datafile 1...
    Backing up datafile 2... done
    Backing up datafile 3... done
    Backing up datafile 4... done

>>> Creating standby control file... done

>>> Transferring backup from ip-172-31-13-235 to ip-172-31-30-113...

    Transferring /usr/tmp/dbv_XE_csd_dbf_1_1rsta0sm_1_1.rman... done
    Transferring /usr/tmp/dbv_XE_csd_dbf_1_1ssta0tp_1_1.rman... done
    Transferring /usr/tmp/dbv_XE_csd_dbf_2_1tsta0tr_1_1.rman... done
    Transferring /usr/tmp/dbv_XE_csd_dbf_3_1usta0ub_1_1.rman... done
    Transferring /usr/tmp/dbv_XE_csd_dbf_4_1vsta0uc_1_1.rman... done

>>> Restoring standby control files... done

>>> Starting standby database XE on ip-172-31-30-113 mount... done

>>> Restoring datafiles on ip-172-31-30-113...

    Restoring datafile 1... done
    Restoring datafile 2... done
    Restoring datafile 3... done
    Restoring datafile 4... done

>>> Renaming standby redo logs and tempfiles on ip-172-31-30-113... done

>>> Completing standby database creation... done

>>> Standby database created.


>>> Performing checkpoint and archiving logs... done

>>> Synchronising standby... done

PID:12608
TRACE:12608_dbvctl_csd_XE_201803082100.trc
[oracle@ip-172-31-13-235 standby]$ |
3.4 Performing Basic Tasks
Some examples of basic tasks are outlined below. Please refer to the online documentation for more details on each command.
3.4.1 Log Gap Report
Run a log gap report from the Primary Site
| Code Block | ||
|---|---|---|
| ||
[oracle@ip-172-31-13-235 standby]$ ./dbvctl -d XE -i ============================================================= Dbvisit Standby Database Technology (8.0.20_0_g7e6bd51b) (pid 12870) dbvctl started on ip-172-31-13-235: Thu Mar 8 21:09:10 2018 ============================================================= Dbvisit Standby log gap report for XE thread 1 at 201803082109: ------------------------------------------------------------- Destination database on ip-172-31-30-113 is at sequence: 185. Source database on ip-172-31-13-235 is at log sequence: 186. Source database on ip-172-31-13-235 is at archived log sequence: 185. Dbvisit Standby last transfer log sequence: 185. Dbvisit Standby last transfer at: 2018-03-08 21:06:30. Archive log gap for thread 1: 0. Transfer log gap for thread 1: 0. Standby database time lag (DAYS-HH:MI:SS): +00:00:12. ============================================================= dbvctl ended on ip-172-31-13-235: Thu Mar 8 21:09:13 2018 ============================================================= [oracle@ip-172-31-13-235 standby]$ |
Also from the GUI


3.4.2 Log Transfer
Sending the logs from the Primary via the CLI
...
Apply Logs at the Standby Site via the GUI

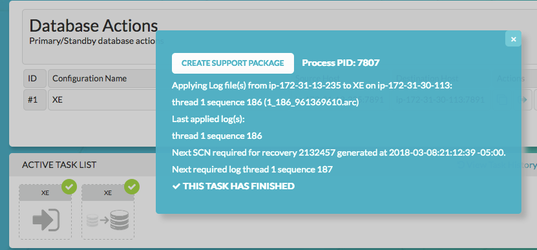
3.4.3 Daemon Status
Start the Daemons for automatic send/apply from the GUI Database Actions Tab.
...
https://dbvisit.atlassian.net/wiki/display/DS8QSG/Dbvisit+Standby+Scheduling
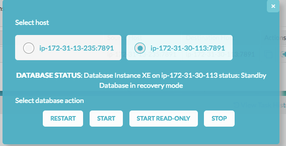
3.4.4 Starting Standby Database in Readonly Mode
From the Database Actions Tab choose the Database Icon. This allows the user to perform database actions on each node.
...
Now the Standby is back in recovery mode and the logs can be applied as normal.
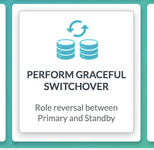
3.5 Performing Graceful Switchover
The following screenshots show a Graceful Switchover from one Cloud Standby to the other using the GUI. A first pre-requisite is to ensure that the daemons started earlier are not running whilst the switchover is in progress.
3.5.1 Check the Status of the Daemons
If the daemons have been started in the previous step, they need to be stopped before performing a graceful switchover.
3.5.2 Graceful Switchover Icon GUI
3.5.3 Check Log Gap is Zero and Click Submit

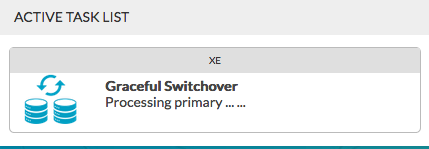
3.5.4 Locate the Task on the Task Bar
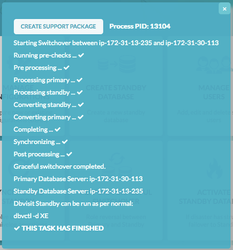
3.5.5 Monitor the Activity
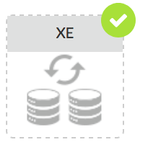
Verify the Switch of hosts in the Configurations tab.
3.5.6 Verify the New Roles within each of the Databases
Verify the new database roles within the database
| Code Block | ||
|---|---|---|
| ||
[oracle@ip-172-31-13-235 ~]$ sqlplus / as sysdba SQL*Plus: Release 11.2.0.4.0 Production on Thu Mar 8 21:25:48 2018 Copyright (c) 1982, 2013, Oracle. All rights reserved. Connected to: Oracle Database 11g Enterprise Edition Release 11.2.0.4.0 - 64bit Production With the Partitioning, OLAP, Data Mining and Real Application Testing options SQL> select database_role from v$database; DATABASE_ROLE ---------------- PHYSICAL STANDBY [oracle@ip-172-31-30-113 ~]$ . oraenv ORACLE_SID = [XE] ? [oracle@ip-172-31-30-113 ~]$ sqlplus / as sysdba SQL*Plus: Release 11.2.0.4.0 Production on Thu Mar 8 21:26:24 2018 Copyright (c) 1982, 2013, Oracle. All rights reserved. Connected to: Oracle Database 11g Enterprise Edition Release 11.2.0.4.0 - 64bit Production With the Partitioning, OLAP, Data Mining and Real Application Testing options SQL> select database_role from v$database; DATABASE_ROLE ---------------- PRIMARY SQL> |
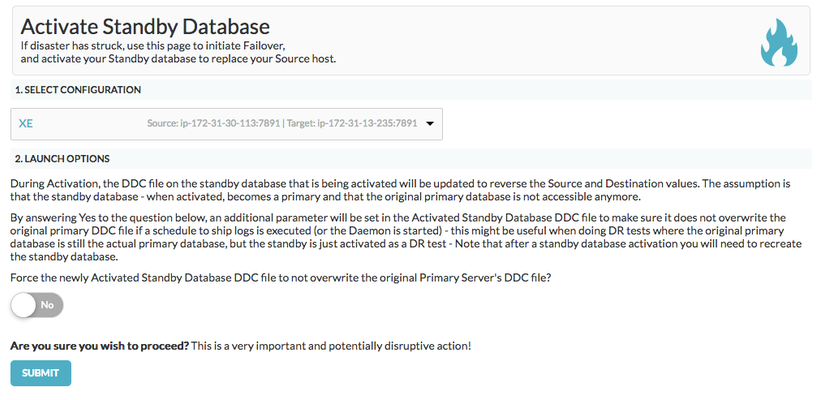
3.6 Activate the Standby Database
It is possible to activate the Standby Database and make it become the new Primary. This is also called failover to the standby database.
...
From the Central Console/GUI Choose the "Activate Standby Database Command"
3.6.1 Choose the Activate Standby Database
3.6.2 Select the Configuration
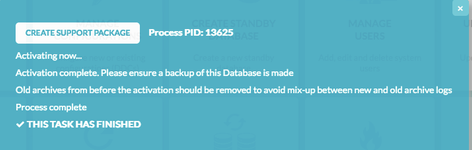
3.6.3 Monitor the Task from The Task Bar
3.6.4 Verify the Status within the Database
| Code Block | ||
|---|---|---|
| ||
[oracle@ip-172-31-13-235 ~]$ sqlplus / as sysdba SQL*Plus: Release 11.2.0.4.0 Production on Thu Mar 8 21:33:33 2018 Copyright (c) 1982, 2013, Oracle. All rights reserved. Connected to: Oracle Database 11g Enterprise Edition Release 11.2.0.4.0 - 64bit Production With the Partitioning, OLAP, Data Mining and Real Application Testing options SQL> select database_role from v$database; DATABASE_ROLE ---------------- PRIMARY SQL> [oracle@ip-172-31-30-113 ~]$ . oraenv ORACLE_SID = [XE] ? The Oracle base remains unchanged with value /u01/app/oracle [oracle@ip-172-31-30-113 ~]$ sqlplus / as sysdba SQL*Plus: Release 11.2.0.4.0 Production on Thu Mar 8 21:26:24 2018 Copyright (c) 1982, 2013, Oracle. All rights reserved. Connected to: Oracle Database 11g Enterprise Edition Release 11.2.0.4.0 - 64bit Production With the Partitioning, OLAP, Data Mining and Real Application Testing options SQL> select database_role from v$database; DATABASE_ROLE ---------------- PRIMARY SQL> |
3.6.5 Manage Configurations Tab Implications
Now the Manage Configurations Tab has the option to choose the hosts. This allows you to either accept the current configuration with the new Primary (old Standby site) or start again with the original Primary site and depends on the circumstances of the Activation.
...