Introduction
Internally the Dbvisit Standby Snapshot Option is known as the RoSH project - which stands for Read-Only Standby Herd.
This all started in the Dbvisit R&D team with a number of ideas which resulted in a proof of concept which was then reviewed by Development and taken on as a project to implement as a feature in Dbvisit Standby version 10.x. This document will provide an overview of the Dbvisit Standby Snapshot Option and its various use cases.
The next step is to get into snapshots, what is this you may ask? Snapshots is actually a common technology concept that is used and implemented by many vendors of various different products. Some of these come with a large price tag, but they do provide a lot of advanced features of which many are focussed on the enterprise. One of Dbvisit's goals is to take complex things and make it simple, such as the creation and management of an Oracle Standby Database environment. When we started looking at Snapshots - this is no different. We looked at capability available in the Linux Operating System (OS) - with a specific focus on Oracle Linux - but note that these options are available on almost all Linux distributions - especially the ones that are supported by the Oracle Database which include RHEL and SLES.
One of the options available to you on Linux is the use of Logical Volumes (LV) - or Logical Volume Manager (LVM) - for more detail on this technology please see the documentation of the Linux distribution you are using - example - https://docs.oracle.com/cd/E37670_01/E41138/html/ch17s03.html
Now there are high level two new options introduced in Dbvisit Standby Snapshots. These are:
- Reporting Replicas
- Test/Dev Snapshots
| Table of Contents |
|---|
Option 1: Reporting Replicas
Snapshot Groups can be described as follow:
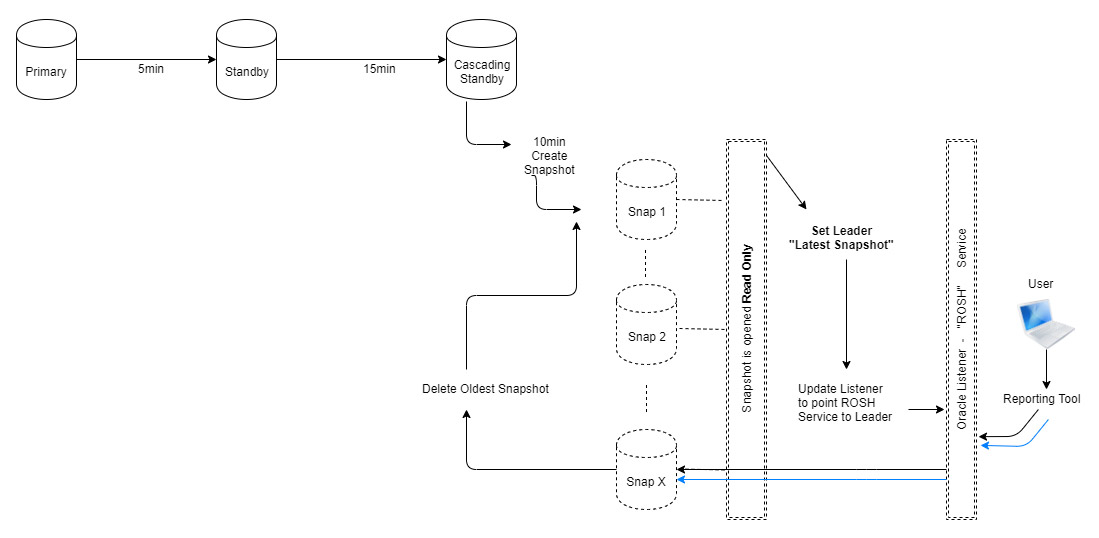
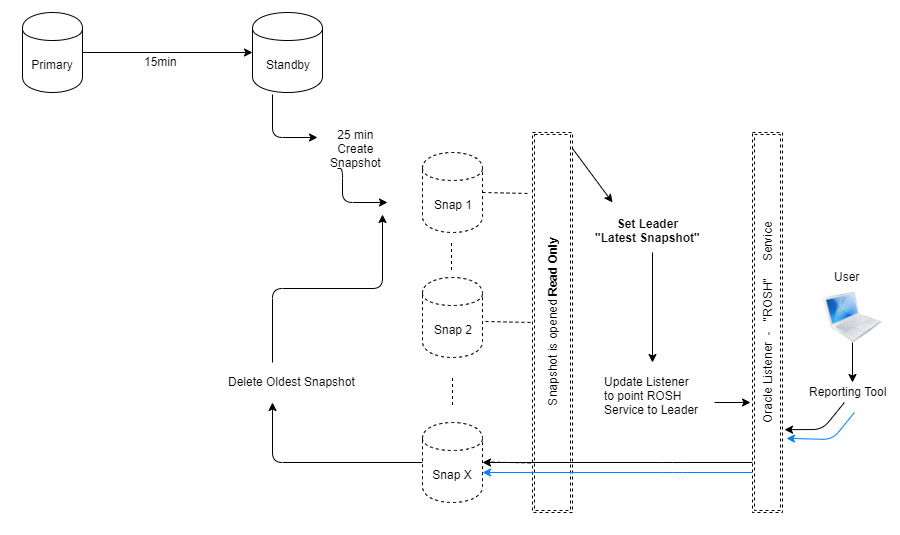
- This option is ideal for companies that are using Oracle Standard Edition (SE,SE1, SE2) where they would like to have a "database that is read-only/read-write, but also being kept up to date" - we are not talking logical real-time replication here, but using an actual standby database to create a "logical container" consisting out of 2 or more (up to 4) read-only snapshots of a standby database at a time interval. In short, a snapshot is created and it is opened read-only, then the listener on the system is updated with a new service that points to this latest read-only snapshot. Then at a time interval, the next snapshot is created, opened read-only and the listener service is updated to point to this latest one. This process continues and the oldest snapshot is removed once the limit set (2,3 or 4) is reached. The effect that this creates is a logical database that is perceived to be updated. This is due to the standby (or cascading standby) database being updated on a regular basis. This is perfect for companies that need to run reports or data extractions on a regular basis.
The diagram below provides and overview of how the Snapshot Group option work. It is described of the Cascading Standby database, but can also be configured from the 1st Standby database.
Using a Cascading Standby Database
- This option is ideal when you have a strict RPO/RTO where you do not want a big difference between the primary and standby database. The best is to then off-load the snapshot option onto a cascading standby database.
- This can also be a good option if you cannot meet the requirements on the standby server for the snapshot option - example you do not have the Database on a dedicated Logical Volume inside a Volume Group with free space for the snapshots. You can then create a cascading standby database that meets these requirements and then use the snapshot option there.
Using the Standby Database
- When using this option keep in mind the time difference between the primary and the standby database.
Option 2: Test/Dev Snapshots
Single Snapshots can be described as follow:
- The second option is to allow for read-only as well as read-write snapshots to be created of the database. This is to cater for a number of use-cases including the following:
- Allowing reporting or data extraction from a snapshot (read-only) of the database at a particular point in time - the snapshot can be recreated on a regular basis if required as the process only takes a minute or two to complete.
- Application Testing - when you need to test the upgrade of an application or new changes, you can create a read-write snapshot of the standby database, which is a copy of the primary and the ideal place to test an upgrade. Once done you can remove the snapshot, run the test again or when ready continue to doing the actual upgrade - remember to follow the recommended approach of testing and following change control.
- Development or Test environments - many sites do not really use their Standby Database environment. Now you already have licensed this environment for Oracle (Remember a standby database site must be fully licensed similar to your primary - if not sure please discuss with your Oracle Partner or Account Manager). Now what you can do is get more value of your standby database environment investment by not having the environment idle, but using it for Development and Testing. You can create a full blown test or development environments on this system, but why not make use of Snapshots. Test and Development environments tend to be short term, meaning they are refreshed on a regular basis - a process that can take a lot of time. Using snapshots of the standby database is another way to get more value of this. As Copy-on-write technology is used (see LVM snapshot documentation for more in-depth knowledge on this) you will not require large amounts of disk space - now this depends on how long lived the snapshots will be, if they are short term, you might not need much storage, but if you use the longer term and your snapshots are used heavily, you might need more disk space.
- Quick and easy DR testing. When testing your DR site, many will activate the standby database, run the application test and then recreate or restore the standby database. This can be a complex long process, why not make use of a snapshot - remember this is a snapshot of your standby database at a given point in time, meaning you can activate the snapshot, run your tests and then remove it. In effect, you did test the standby database validity as a DR site. Thi sis a much faster approach and can save time.
- The diagram below provides an overview of the various use-cases of the Single Snapshot option
Single Snapshot - Reporting and Data extraction
Single Snapshot - Development / Test environments
Single Snapshot - Disaster Recovery Testing
Single Snapshot - Application Upgrade Testing
Licensing
Before we get into the details of how you can use the Dbvisit Standby Snapshot functionality it is important to mention that this is an additional option that can be added to Dbvisit Standby.
An additional License will be required. To obtain this please contact Dbvisit Sales.
Once you have this option purchased, you will be given a new license key. Now the new license key will obtain internally a flag that will enable this option in the product - without this, this new option will not be available and will be disabled.
Licensing will be per database, meaning if you have this option purchased for database X then you cannot use this for database Y. The license key is added to your DDC (Dbvisit Standby configuration) on both primary and standby.
When you receive the license key, you will apply it the same way you normally apply a license key in Dbvisit Standby.
Pre-Requisites
Before starting with this new option, it is important to understand what the requirements are.
| Note |
|---|
Snapshots are making use of copy-on-write, which means they are ideal for short lived scenarios and not long term. Long term snapshots will require more disk space to keep the consistent copy (view). This needs to be taken into account when planning the storage allocation for the snapshots. |
As mentioned Dbvisit is aiming to make technology available in Linux to our users by implementing an easy to use interface to allow the use of these features. Now in this case the first version of the Snapshot functionality is based on Linux LVM (Logical Volume Manager) which allows for snapshots to be created of Logical Volumes (LV). Now we will not go into the details of LVM as this can get really complex fast, but having an understanding of what LVM is - which most Linux Administrators do, can be useful. We will however aim to provide a few high level examples here to get you started.
The key requirements for using this new option are:
- The Operating System (OS) must be Linux:
- Supported distributions include Oracle Linux, RedHad Linux, and SLES - we highly recommend using Oracle Linux or Red Hat version 6 or 7 with the latest updates applied.
- Please make sure the OS used is also a valid supported OS for the Oracle Database software - running unsupported configurations is not supported
- The Standby Database (which can be a cascading standby database) must be located on a single Logical Volume (LVM)
- Example:
Filesystem layout - in the example below we see that filesystems /u01 and /u02 are making use of Logical Volumes. In the example we will discuss here, the Oracle Database software or ORACLE_HOME as most DBAs will know it as, is installed and configured in /u01. The database files (including recovery area and controlfiles) are located on /u02. This is important as when we are looking at snapshots, we want to focus on /u02 filesystem. It is a Logical Volume (LV) contains only the Standby Database - created using Dbvisit Standby.
No Format oracle@dbvrosh02 ~ : df -h Filesystem Size Used Avail Use% Mounted on devtmpfs 2.3G 0 2.3G 0% /dev tmpfs 2.3G 0 2.3G 0% /dev/shm tmpfs 2.3G 8.5M 2.3G 1% /run tmpfs 2.3G 0 2.3G 0% /sys/fs/cgroup /dev/sda3 6.3G 4.2G 1.9G 70% / tmpfs 2.0G 4.0K 2.0G 1% /tmp /dev/sda1 488M 279M 175M 62% /boot /dev/mapper/oradatavg-u02 21G 1.5G 19G 8% /u02 /dev/mapper/orahomevg-u01 16G 5.2G 9.7G 35% /u01 tmpfs 469M 0 469M 0% /run/user/501
Later in this section, we will provide a quick overview of Logical Volumes - how they can be created and used, but for now, the key is to take into account that to use the Dbvisit Standby Snapshot options you will have to use a single logical volume where the standby database is located.
- You must have sufficient IO capability in the Volume Group underlying storage (Physical Disks - Using SSD based storage is always recommended for Database Storage)
- Databases will perform IO and if you create snapshots there will also be IO requirements for these. Make sure you test your configuration and have sufficient IO capacity - especially if you are looking at using snapshots for Development or Testing environments.
- Make sure your Volume Group (VG) in which the Logical Volume (LV) is located has sufficient disk space
- When creating a Logical Volume (LV) it is created in the Volume Group which you can kind of see as a storage pool, made up of a number of disks - now please note this is just a simplification of it.
- Make sure that the Volume Group have sufficient free space, this is important. Snapshots will initially not take much space, but if left long term and if you have a busy origin (source of the snapshot) then more disk space will be required.
- When you create snapshots based on the specific Logical Volume, a small portion of storage will be used for the snapshot. Now the beauty of snapshots is that it does not require a lot of disk space, it is however depending on how much the database from which the snapshot was created is changing as well as if you are using a read/write snapshot - which means the snapshot will use more storage for new changes.
- When you create the snapshot you have to specify a size for the snapshot, this should be set to an appropriate value to allow the snapshot to keep enough data to stay valid (consistent). Example, if you do not expect more than 30% changes to your database during the life time of the snapshot, then setting the snapshot size to 30% of the standby database (source/origin) size is a good start.
- IMPORTANT: The ideal is to use snapshots for short term - and not days or weeks. Again the longer they are used - more storage might be required.
- Memory
- You may ask, why is the memory required, the answer is easy - for every new snapshot, you are going to mount and start an Oracle Database instance, and this will require memory. When Dbvisit Standby creates the snapshot, you will be asked to supply the memory to be used for the SGA. Now in most cases, you might want to keep this small, but depending on what you are planning to do with the snapshot, whether it is for reporting or development or testing, you might want to allocate a lot more memory to it. So make sure you have sufficient memory on the system you are planning to use the snapshot option. You do not want to run out of memory and start using SWAP space as this is really bad for database environments and will slow the whole system down. You should aim to always have a little bit of free memory on the system, never over allocate.
- The Dbvisit Standby executable - dbvsnap - must be able to execute the LVM commands as the root user.
- There are a number of ways you can do this. Normally the Dbvisit Standby software is run as the "oracle" software owner (usually the "oracle" UNIX user). And many sites will have provided this user with the permission to run commands as the super user via "sudo" rights. Now to allow the Dbvisit Standby Snapshot option, you will be required to allow this "oracle" UNIX account running Dbvisit Standby to execute the following commands as the root user: lvcreate, lvremove, lvs and vgs
- For more detail on how to do this, please review the "sudo" option provided by Linux where you can add the "oracle" user to the "sudoers" file with the required permission to execute these commands.
- Sufficient disk space under the DBVISIT_BASE folder
- When creating the snapshots there will be metadata written to the DBVISIT_BASE/standby/meta folder for each snapshot.
Recommendations
There are a number of ways you can go about using this new Dbvisit Standby Snapshot option. The first is that you can run it on your current standby database environment - if you meet the above requirements, most important having the standby database fully located on a Logical Volume (LV).
The second option is that you can also create a new configuration, using the Dbvisit Standby Cascading option on a second Standby Database Server where you have created a specific area for the database using a Logical Volume.
Important Warnings & Best Practice
Following these rules & suggestions will ensure you have a trouble-free experience using the Dbvisit Standby Snapshot Utility:
- Do not use the APPLY_DELAY_LAG setting/feature when using Snapshot Groups - this is not supported.
- Do not use Dbvisit Standby Snapshots on RAC-to-RAC environments - this is also not supported. You are however able to use Dbvisit Snapshots on RAC-to-single environments.
- Ensure the lvs, mount & lsof functions are in your environment PATH.
- After pausing or stopping a Snapshot Group (i.e. stopping the snapshot creation daemon), make sure to check the status of your standby database. If you stop the daemon while it is in the middle of a snapshot creation process, it does not have the opportunity to restore the standby database back to recovery mode, and thus all future attempts to apply logs will fail. If you find your standby database is in read-only mode, you will need to restart it. You can do this from the Central Console by going to the Manage Databases page, clicking Database Actions, selecting the standby host, and clicking Restart.
- Use common sense when preparing to run major actions on your Dbvisit DDC configuration. For example, if you are planning to perform a Graceful Switchover, recreate a standby control file, or Synchronize after a major log gap, you should pause or stop the Snapshot Group daemon so that it does not interfere. Keep in mind also that major updates to the standby database will cause significant increases to the sizes of your existing Snapshots, potentially putting your system at risk of running out of resources. If in doubt, it is always best to stop the Snapshot daemon and delete all Snapshots before commencing major actions. Remember: you can always create new Snapshots immediately after you have finished.
- Try to keep the Snapshot Creation Interval as long as is possible while still meeting your requirements. We recommend at least 10 minutes (600 seconds), however you should try to increase this if possible.
- Ensure you have space on your system for at least "+1" Snapshot to the number you have specified. For example, if you are running a Snapshot Group with 2 Snapshots each 3Gb in size (so 6Gb in total), make sure you have at least another 3Gbs available. This is because the Utility waits new Snapshots are created successfully before deleting old ones. So, even though you have specified 2 Snapshots in your Group, you will occasionally see a third Snapshot appear (and take up some space), while the Utility creates the newest and then removes the oldest Snapshot.
- Keep an eye on your system resources. Snapshot creation can be resource-intensive, especially if you have more than a couple of Snapshots in play at any one time. You should also occasionally clear the /trace and /log folders to ensure these are not filled up unnecessarily.
Installation
As mentioned in the pre-requisites, this option is only supported on Linux.
To install the Snapshot option is actually really easy, in fact, the option is installed by default when you select the Dbvisit Standby Core option during installation. When this is done, there will be extra files installed into the DBVISIT_BASE/standby sub folder.
These include:
- New directories: meta and snap
- The snapshots will be mounted under the DBVISIT_BASE/standby/snap sub folder
- Metadata for each snapshot will be created in the DBVISIT_BASE/standby/meta sub folder
- New executable: dbvsnap
Below is a summary of the new directory structure - some files have been removed in the output to keep it short.
The DEV sub folders are folders that were created for the DEV standby database snapshots - more on these later.
- You will see below that there are now a new dbvsnap utility
- The Snapshot option log and trace files will be located in the standby/log and standby/trace files. The file names will include an identifier that will highlight it is used by the dbvsnap utility
- The meta sub folder is where metadata fill be stored for the snapshots being created
- The snap sub folder will be used as the location where the various snapshots will be mounted.
| No Format |
|---|
oracle@dbvrosh02 /usr/dbvisit/standby : tree . . ├── conf │ ├── dbv_DEV.env │ ├── dbv_drtest.db │ ├── dbv_error.html │ ├── dbv_message.html │ └── dbv_notify.db ├── dbvctl ├── dbvhost_dev.sh ├── dbvsnap ├── doc │ ├── .... <-- files removed for easy display of key files and folders ├── gs ├── lib │ ├── .... <-- files removed for easy display of key files and folders ├── log │ ├── .... <-- files removed for easy display of key files and folders │ ├── dbvsnapd_DEV.log │ └── dbvsnap_install.log ├── meta │ └── DEV ├── pid │ └── dbvsnap_DEV.pid ├── snap │ └── DEV ├── support ├── tmp └── trace ├── .... <-- files removed for easy display of key files and folders |
The next step that will be required before you can use the new Dbvisit Standby Snapshot option is to make sure the user which in most cases will be the "oracle" UNIX account have the appropriate entries in the /etc/sudoers file.
There are a number of options available to you, you can add the "oracle" user to have full permission, but this will give it full permission, which is not something you might want to do, or you can give it only the specific permissions you want.
Below are the options you can follow:
Option 1: Give "oracle" UNIX account full admin permission
| Code Block |
|---|
/etc/sudoers ... oracle ALL=(ALL) NOPASSWD:ALL |
Option 2: Give the "oracle" UNIX account only permission on certain commands:
| No Format |
|---|
/etc/sudoers ... oracle ALL = (root) NOPASSWD: /usr/sbin/lvs oracle ALL = (root) NOPASSWD: /usr/sbin/vgs oracle ALL = (root) NOPASSWD: /usr/sbin/lvcreate oracle ALL = (root) NOPASSWD: /usr/sbin/lvremove oracle ALL = (root) NOPASSWD: /usr/bin/mount oracle ALL = (root) NOPASSWD: /usr/bin/umount |
Note that the snapshots will be created, then mounted, and when not required anymore will be unmounted then removed, which is why the above options are required.
Configuration
It is important to mention early on that when you are looking at using this new Dbvisit Standby Snapshot option, you should use the Central Console (GUI).
Even though most of the options are available via the Command Line Interface (CLI) utility - dbvsnap, using the Central Console is strongly recommended as it is easy to use and get started. Using the CLI option (dbvsnap) is only recommended for experienced users.
Before you can create any Snapshots or Snapshot Groups there are a few important things to take into account:
- You must have a Primary => Standby configuration (DDC)
- You must have the standby database created and it should be located on a Logical Volume (LV)
- You can also create a Cascading Standby database on a new environment if your existing environment does not cater for Logical Volumes or meet the requirements. Using Cascading Standby databases does provide you with a number of extra flexible options and protection and would be a good approach to using the new Dbvisit Standby Snapshots on.
- The new License Key that include the Snapshot option must be applied for the particular DDC.
Once these requirements are met, we recommend using the Central Console (GUI) to configure and use the new Snapshot option.
| Note |
|---|
The Dbvisit Standby Snapshot option can only be used on a Standby or Cascading Standby Database - you cannot and will not be allowed to use this on the Primary Database server. |
| Note |
|---|
If the standby server is restarted while the snapshot is running. Please clean up the snapshots after the server restart and create a new snapshot. |
Using the Central Console (GUI) - recommended
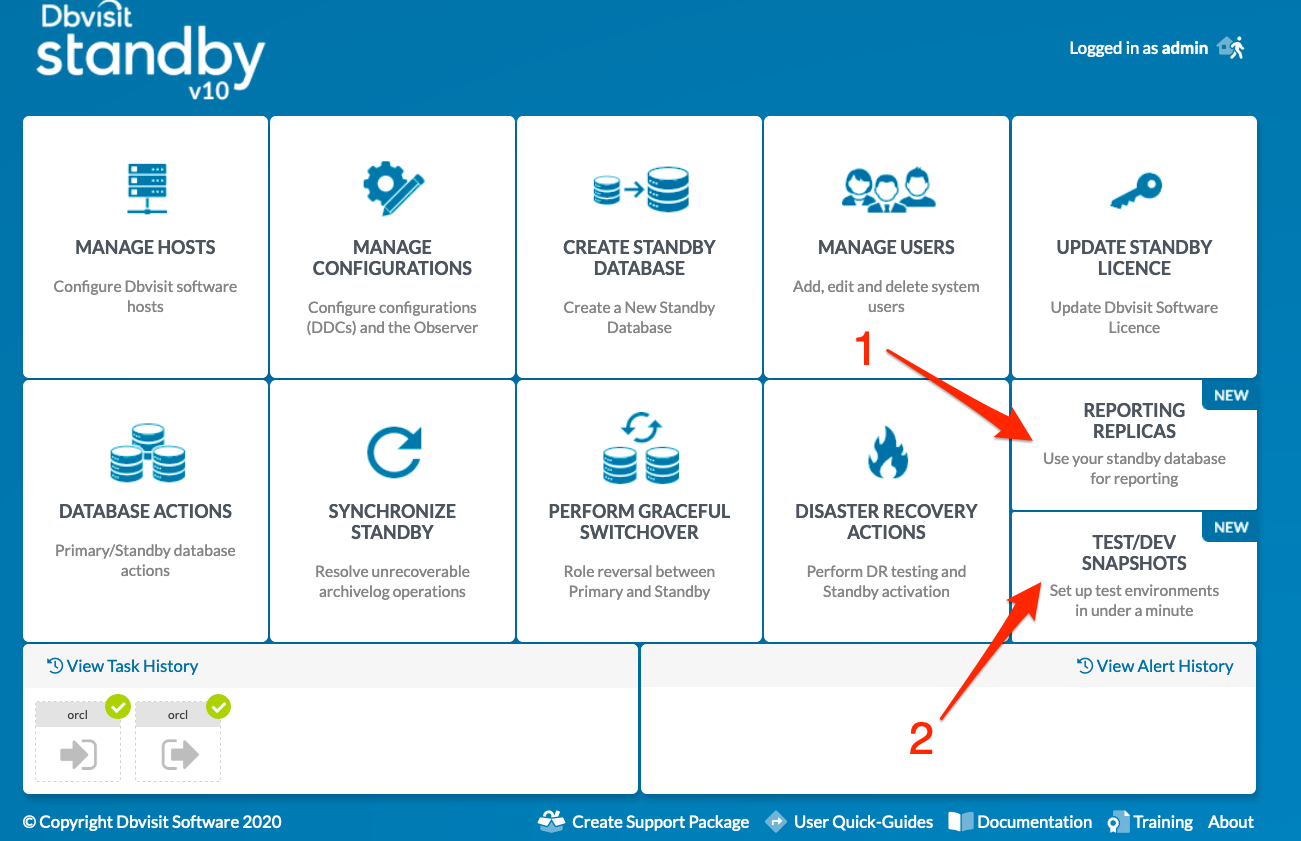
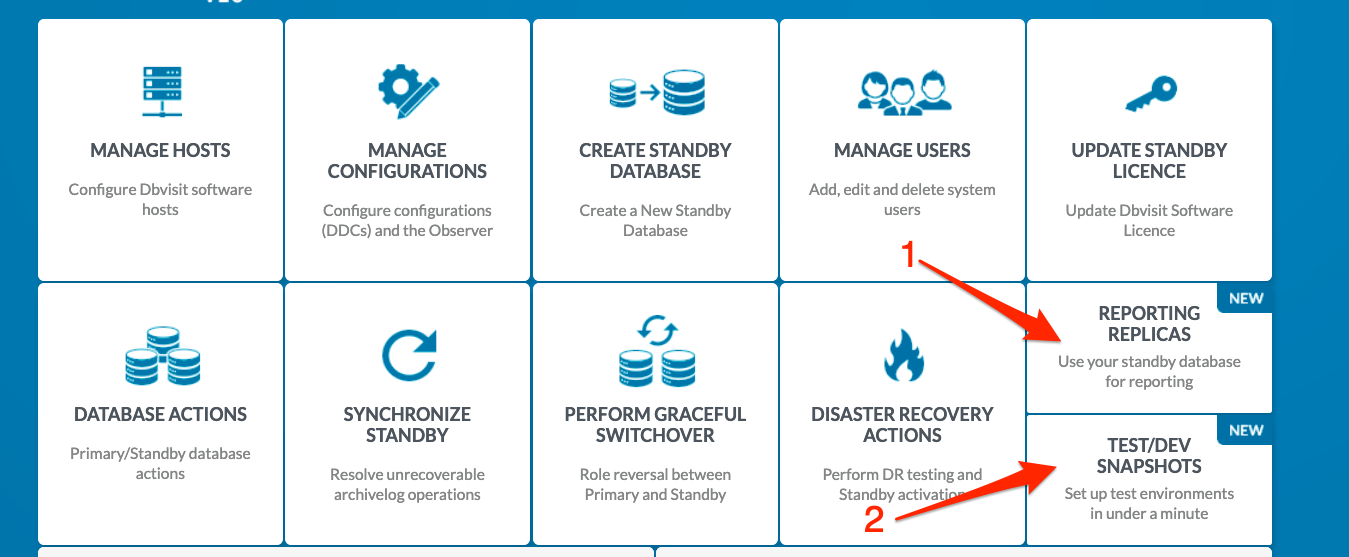
From Dbvisit Standby you will notice a couple of new options in the main screens Reporting Replicas [ 1 ] and Test/Dev Snapshots [ 2].
Before you navigate to the new "Standby Snapshots" Main menu option, it is important to make sure you already have a Dbvisit Standby Configuration (DDC) configured for a Primary => Standby pair, a Standby Database is configured (could be a Cascading standby database, but doesn't have to be), and that you have applied the licence key that will allow you to use the new option.
Once you select the new menu option "Standby Snapshots" you will be presented with the following screen:
Now you will notice the following as highlighted in the image above:
- Dbvisit Standby Snapshot Group
- This is the option you will use to create a logical grouping of Read-Only standby databases that will give you the effect of an updated read-only environment that can be used for reporting purpose or data extraction
- Dbvisit Standby Single Snapshots
- The second option is where you can create Single Snapshots which can be read-only or read/write.
Before we get into the details of each of these options, it is important to know that each of these configurations are linked to a specific DDC (Dbvisit Standby Configuration) - you must also have already applied the Licence Key with the new option enabled before you will be able to create snapshots. All pre-requisites must also be met - in short, the Standby Database is on a Logical Volume and Linux is used.
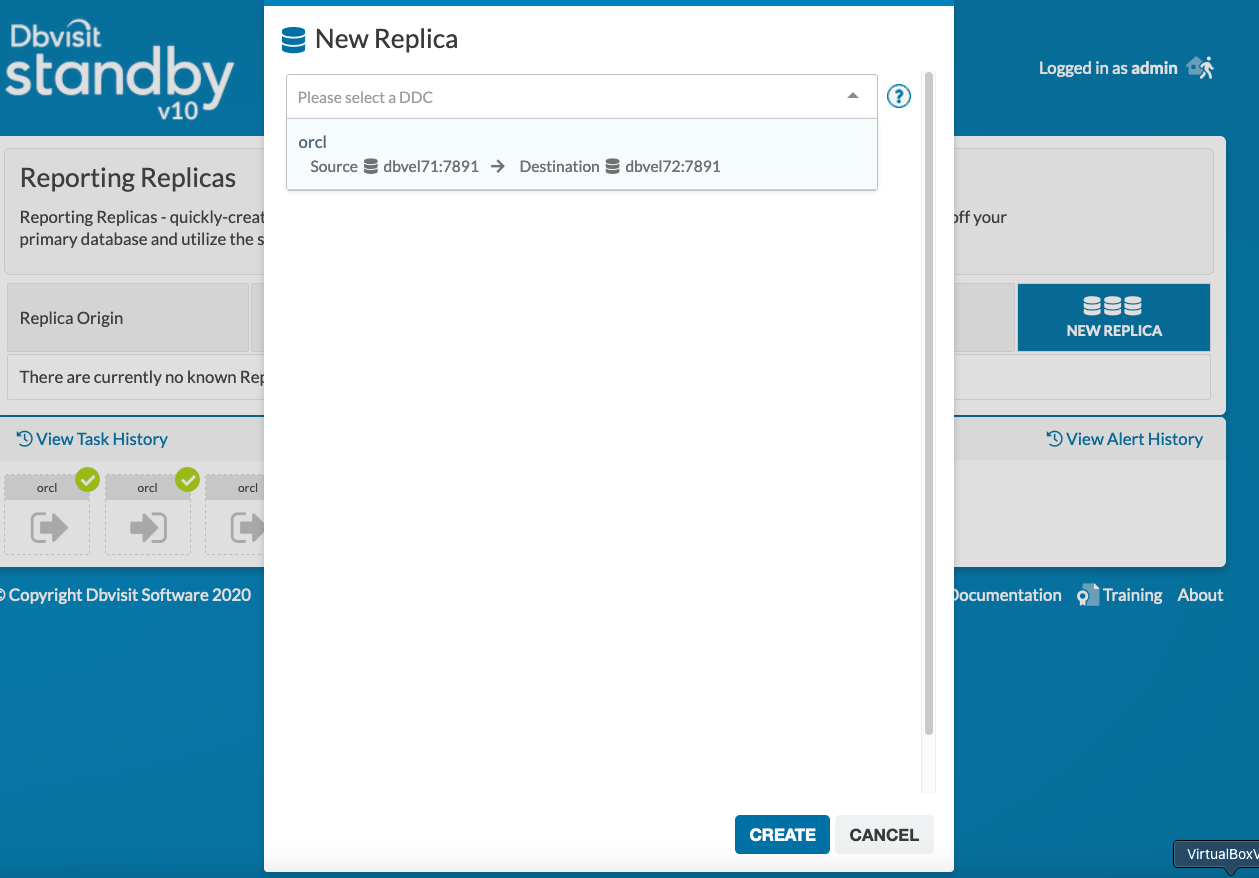
Clicking either the New Snapshot Group or New Single Snapshot button will bring up a DDC selection dialogue:
After choosing the DDC, a number of pre-checks are performed:
- Is the environment suitable for Snapshot creation (looks for Linux + LV)
- Is the chosen DDC licensed to use Dbvisit Snapshots
- (For Snapshot Groups) Is there already an existing Snapshot Group configuration on the chosen DDC. You cannot have more than 1 Snapshot Group on a single DDC.
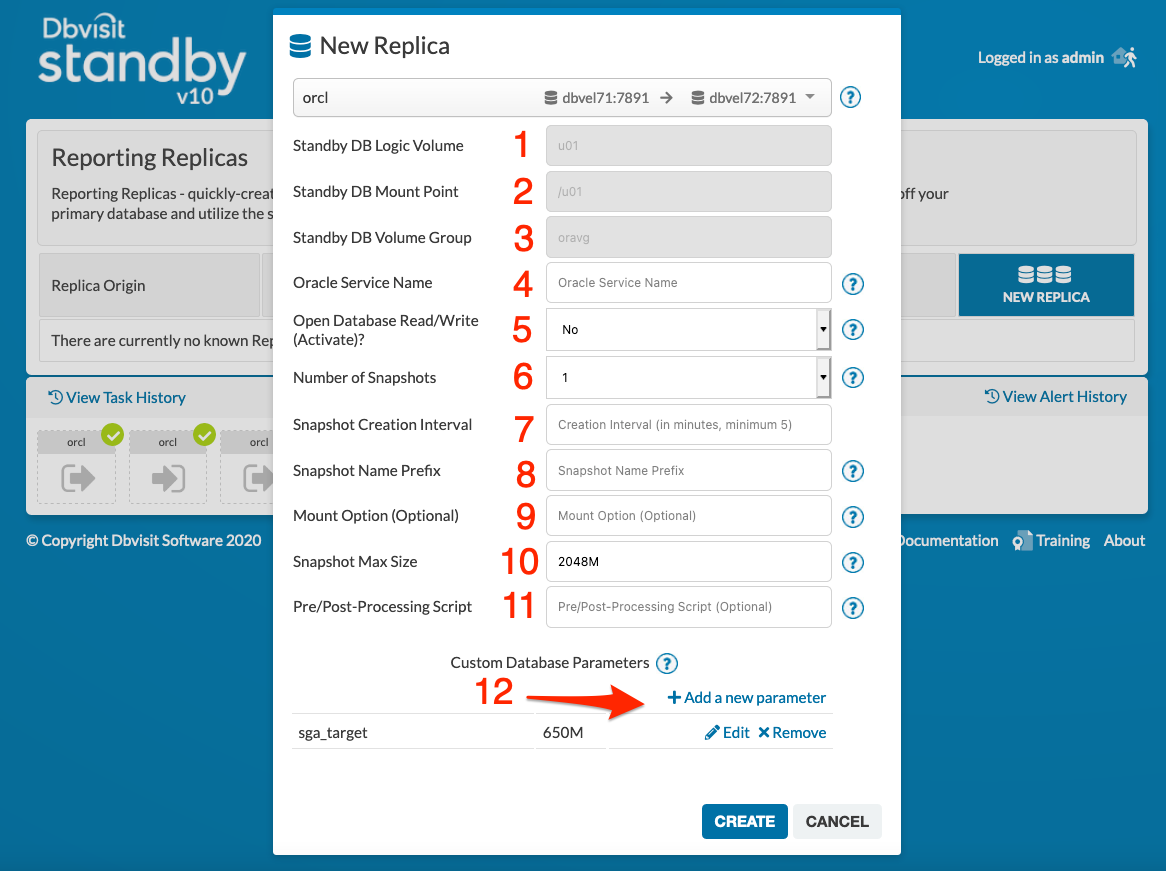
If any of these fail, an appropriate error message is displayed. Otherwise, a form is shown with some basic input required from the user:
Snapshot Groups
- (Not user editable) The Logic Volume that will be used for the Snapshot.
- (Not user editable) The Mount Point that will be used for the Snapshot. This is always the same as the mount point of the standby DB, for simplicity's sake.
- (Not user editable) The Volume Group that the Snapshot will belong to. This is also the same as the standby DB.
- The Oracle Service Name is chosen by the user. This is the name that will execute the dbvsnap utility.
- If you need your snapshot groups to be in read-only or read-write mode (The database is activated)
- The desired number of Snapshots to create/maintain. Allowed values are currently 1 - 4. This is the number of Snapshots that will be kept and switched between every Creation Interval setting (below).
- Snapshot Creation Interval - in minutes, how frequently to create new Snapshots (and potentially delete old ones). We recommend this is no less than 10 minutes.
- A prefix that will be applied to the names of all created Snapshots. This is provided so that users can easily tell which Snapshots on their system were created by this utility. This is limited to 5 characters, alphanumeric only.
- An optional field you can use to specify custom parameters for the mount operation. For advanced users.
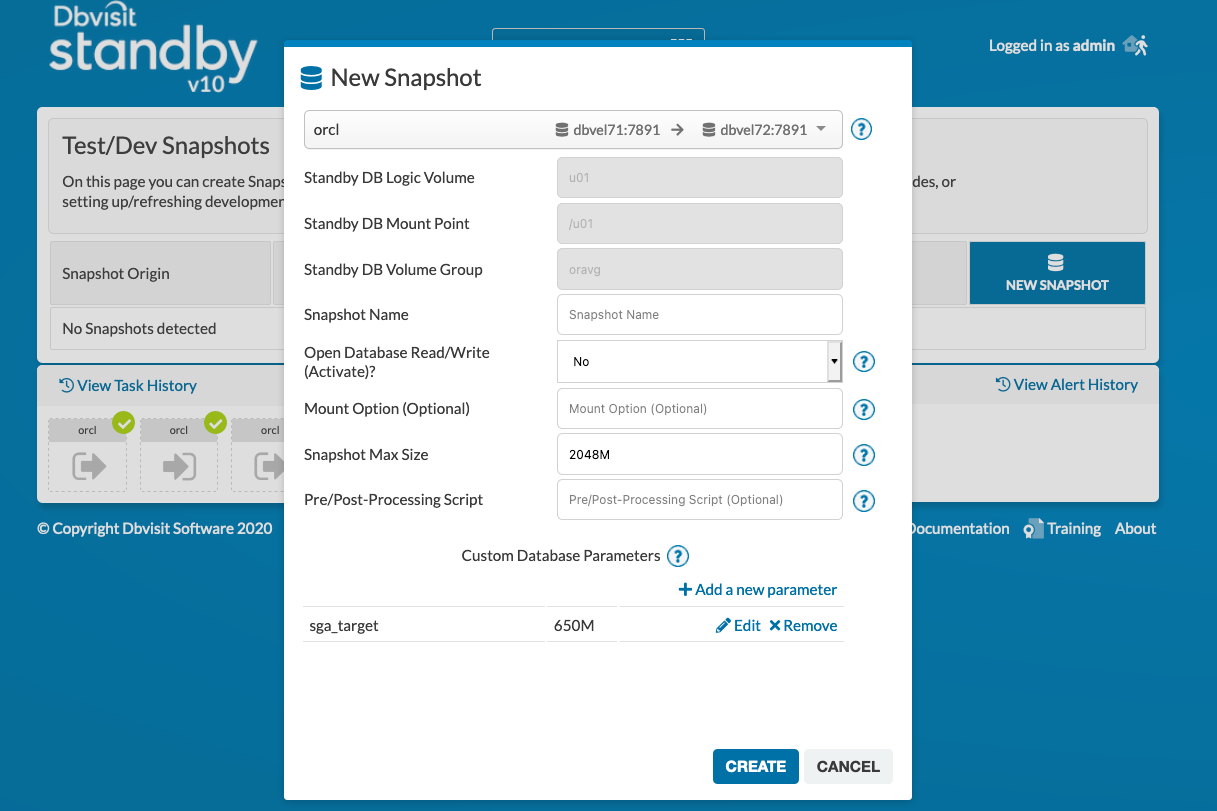
- The maximum allowed size for a Snapshot to reach. A default value is provided, but it is up to the user to ensure this is set appropriately to their intended use for the Snapshot. Make sure this is not too small - you wouldn't want your Snapshots to run out of space!
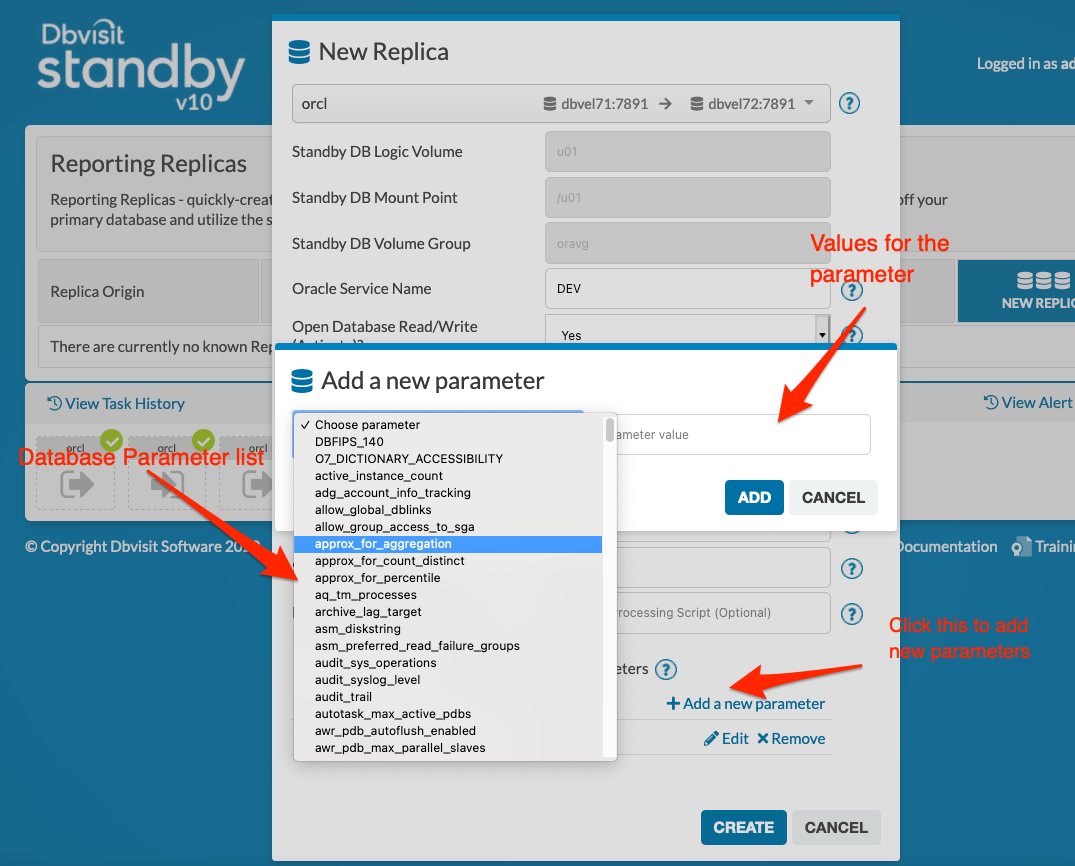
- Advanced option to provide custom database parameter. The default value is provided for sga_target, should only be changed by expert users. The other database parameters can be added/modified. Below figure shows how.
| Note |
|---|
When using XFS filesystem you have to specify to "Mount Option" field value: "-o nouuid" (without quotes) otherwise snapshot creation would fail |
After all parameters are set, click the Create button to create a new Snapshot Group.
At this stage you can see the Group is created, but the daemon that manages the Snapshots is not yet running, and no Snapshots yet exist. Click the green Play button to initiate the Snapshot Group with accordance to the settings you provided.
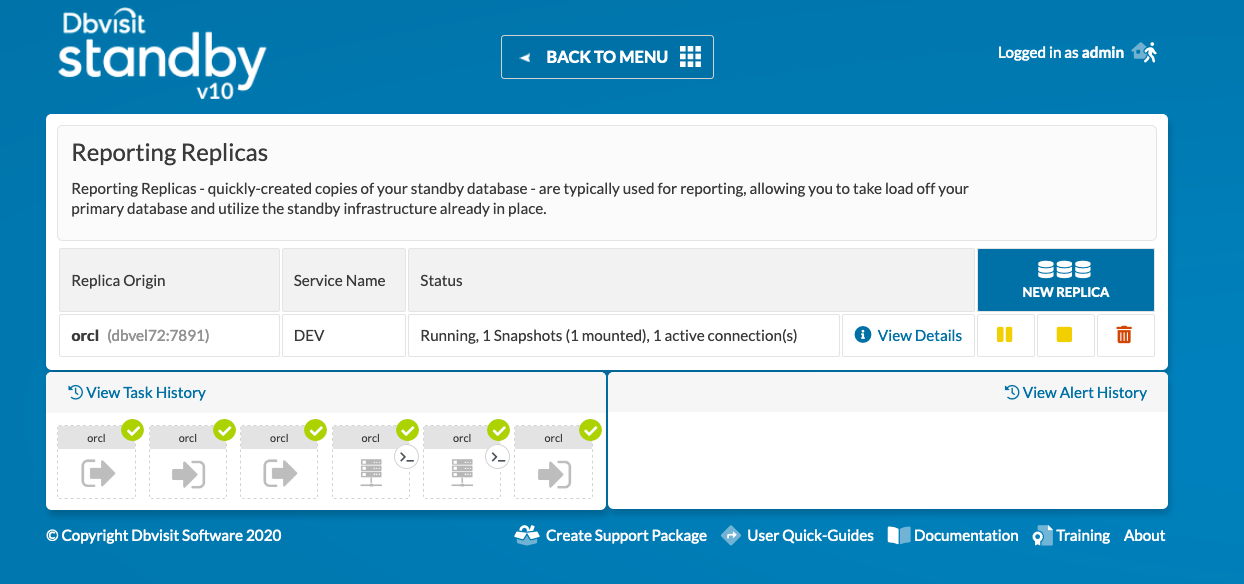
The Snapshot Group is now running, and new Snapshots are being created every Creation Interval. Initially, the numbers may show 0 Snapshots (0 Mounted), but you will see them change very quickly as the first Snapshot is created & mounted, and thereafter as the process runs. If an active (i.e. running) Snapshot Group exists, this page is continually updated (every few seconds) to ensure the shown information is always correct.
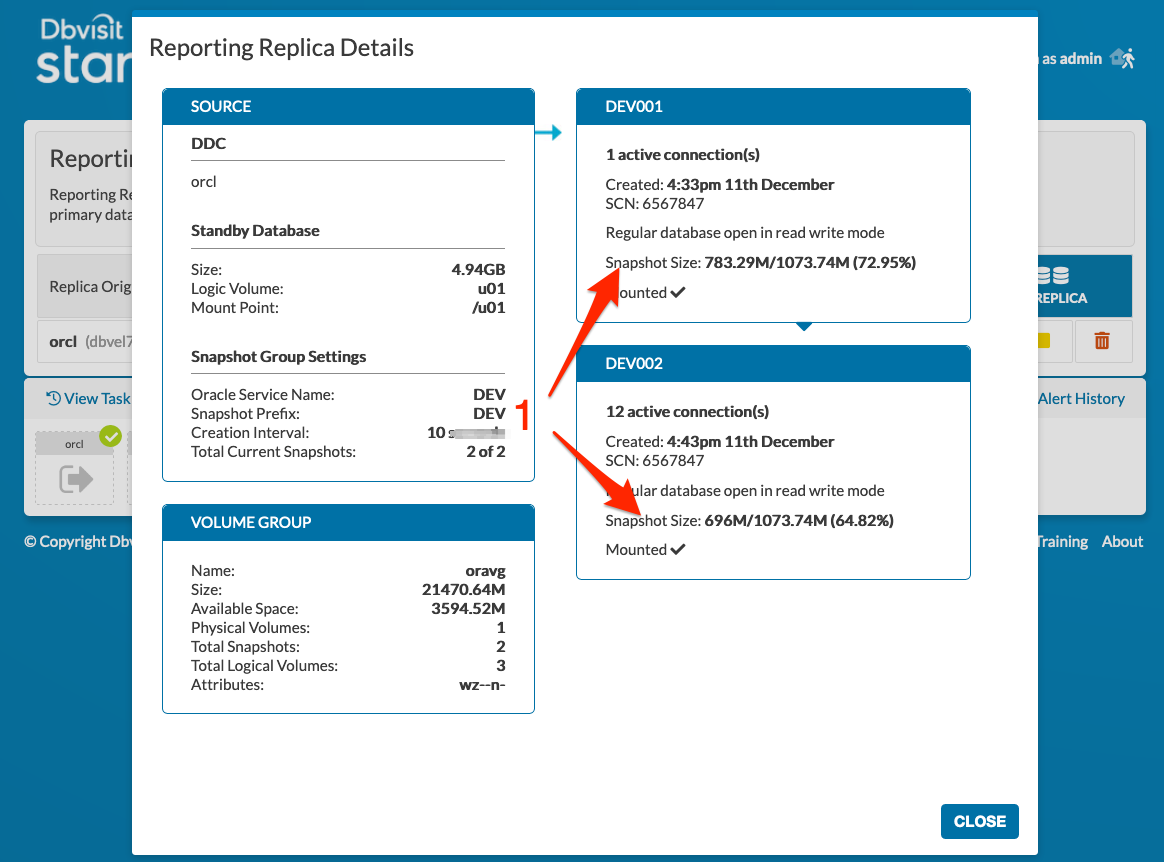
To get more detailed information about the Snapshot Group, click the View Details button to bring up the diagram view.
| Note |
|---|
The space allocated 665MB/2147MB. The 665M indicated will be the initial size of the snapshot which is nothing but the space occupied by redolog groups and the controlfile which gets created for the activated read-write and read-only snapshots which should be taken into consideration when creating snapshots both single and group. |
Here you can see the origin and settings of the Snapshot and Volume Groups in the information boxes on the left, and detailed information for each Snapshot in the Group on the right. For each Snapshot, the following information is available:
- Snapshot name
- Created timestamp
- SCN number at the time of the creation
- Leader indicator, i.e. which Snapshot will all new connections to the DB connect to
- The state of the database inside the Snapshot
- Snapshot total allocated size, plus how much is being used right now [1 ]. The space allocated 665MB/2147MB. The 665M indicated will be the initial size of the snapshot which is nothing but the space occupied by redolog groups and the controlfile which gets created for the activated read-write and read-only snapshots which should be taken into consideration when creating snapshots.
- The number of active connections, if any
- Information on whether or not the Snapshot is mounted
This detailed view provides read-only information only, no user actions are possible. If the Snapshot Group in question is active, i.e. the daemon is running, this screen will continually update to display near to real-time information.
You may control the Snapshot Group using the buttons on the right-hand side of the table, as follows:
- (1) Yellow Pause - Pause Snapshot generation. No new Snapshots will be created, however, all existing Snapshots will remain mounted.
- (2) Yellow Stop - Stop Snapshot generation, shut down database instances but does not umount the snapshots.
- (3) Red Remove - Stop Snapshot generation, and unmount and REMOVE all Snapshots.
Once the red remove action is used, a 4th option appears in place of the option (3) above:
- Red Delete - Remove the Snapshot Group configuration. This will remove the Snapshot Group definition/configuration from the system, returning it to the state it was in prior to any Snapshot Group actions.
Test/Dev Snapshots
The settings for a Single Snapshot are largely the same as those used for Snapshot Groups (discussed above), with the exception of the Open Database Read/Write (Activate) parameter. Setting this to Yes allows you to activate the database inside the Snapshot, allowing you to use it as a primary database - please see the information in the tooltip.
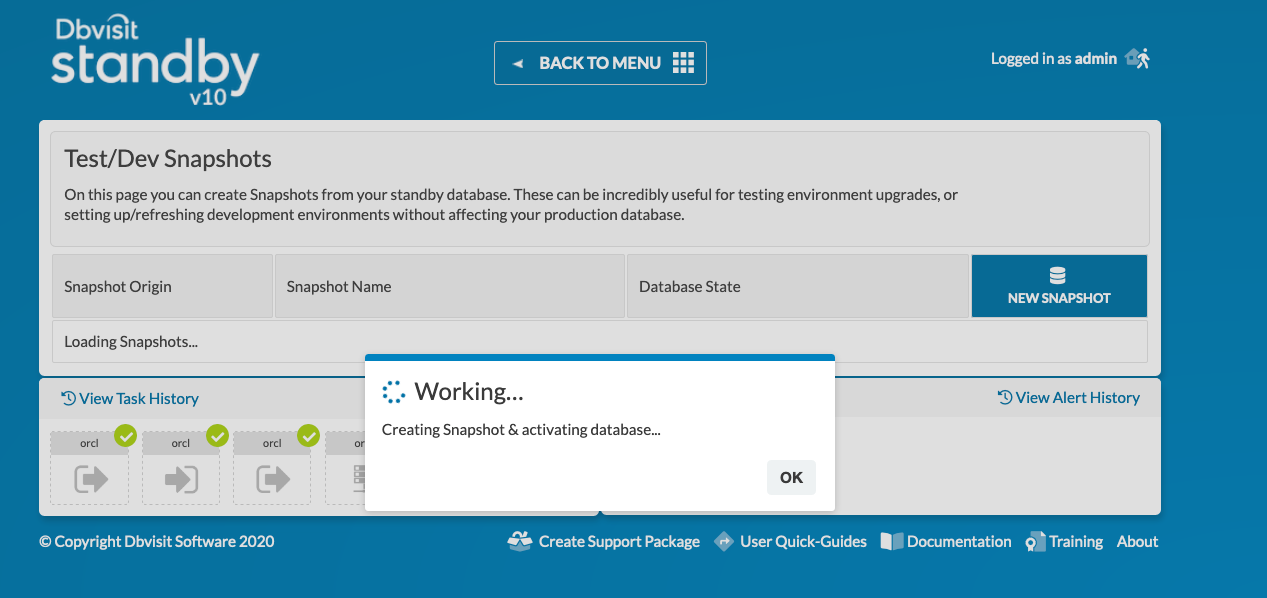
Creating a Snapshot does take some time (30 - 180+ seconds). While the Single Snapshot is being created, a working indicator popup is displayed to the user. Once the Snapshot is ready, it is visible in the appropriate table (note the TEST Snapshot below):
Just as with Snapshot Groups, it is possible to see detailed information for the Snapshot by clicking on View Details. Single Snapshots have only one available user action, which is to delete the Snapshot using the Red Delete button.
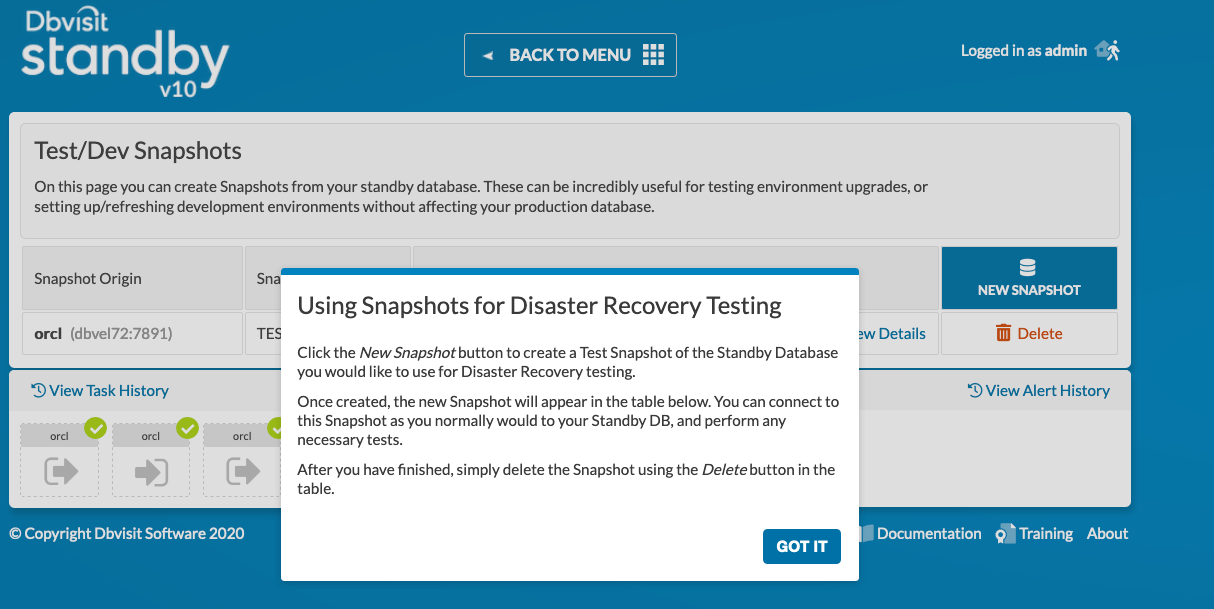
Using a Single Snapshot for DR Testing
One of the use-cases for Single Snapshots is using them for DR testing, instead of backing up the standby DB, performing the tests, and then re-instantiating. This use-case is built-in to the Snapshots Utility.
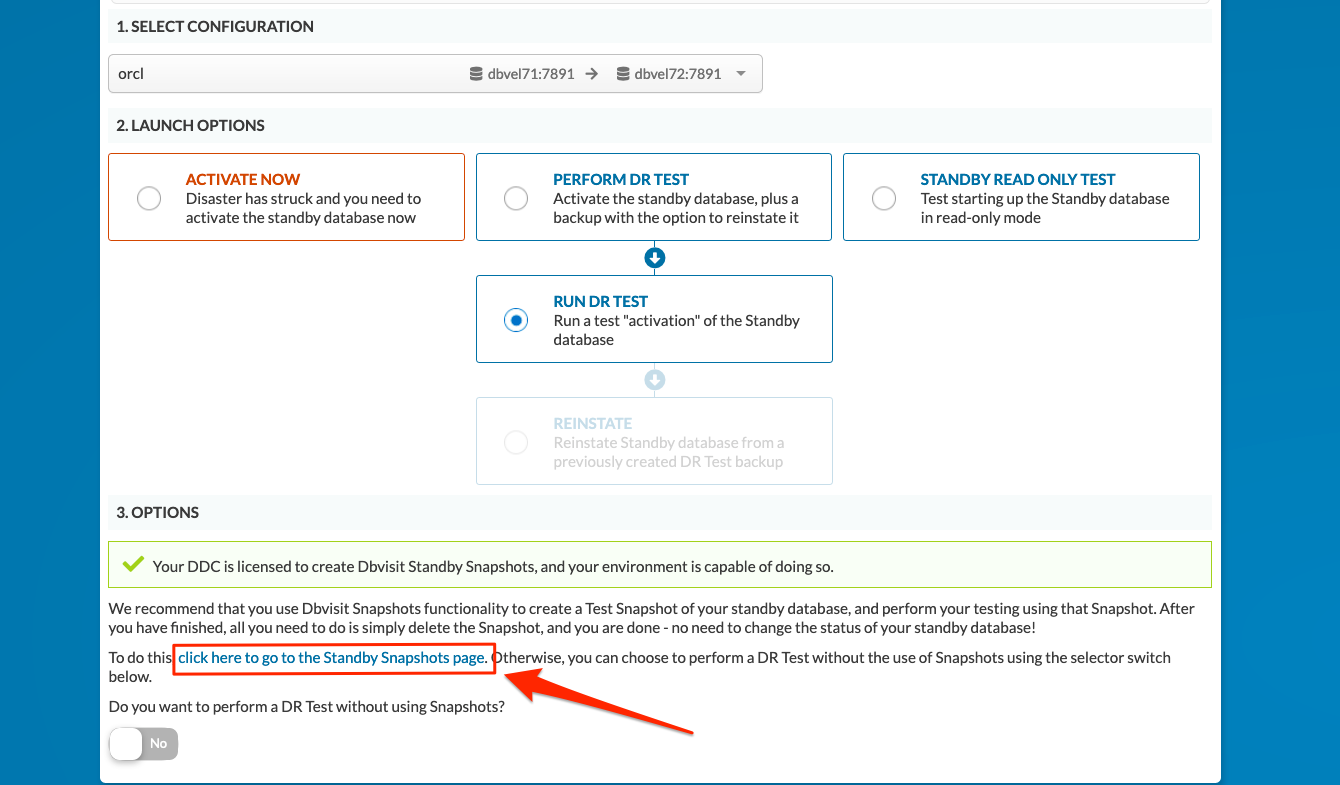
To begin, go to the Disaster Recovery Actions page as normal, select your DDC (note the new selector component) and "Perform DR Test" → "Run DR Test".
On environments which are Snapshot-capable (as defined by the requirements at the beginning of these docs), AND licensed to use the Snapshot utility, you should see a new option appear, as above.
This option essentially advises the user of their ability to do DR testing via Snapshot creation, and offers a link to proceed directly to the Snapshots page. The user can still select not to do this, and to instead proceed with a normal, backup→reinstantiate DR test by using the available switch toggle.
Click the link to go to the Standby Snapshots page.
If accessing this page from the Disaster Recovery Actions link, the user will be presented with a helper popup describing the process of using a Single Snapshot for DR test purposes.
Command Line Interface (CLI) - dbvsnap
The Dbvisit Standby Snapshot utility should be used via the Central Console (GUI) only. However, experienced users can, if necessary, also use the CLI option using the new "dbvsnap" utility introduced in v9.0.06.
Please note that all the pre-requisites required for using Snapshots through the GUI must also be met before you can use this CLI option.
The "dbvsnap" utility is located in DBVISIT_BASE/standby folder and when executed with the -h flag a quick help option will be displayed, example:
| No Format |
|---|
[oracle@dbvel72 standby]$ ./dbvsnap -h DBVSNAP USAGE: dbvsnap -V dbvsnap -h dbvsnap -d DDC -D start|pause|stop|delete|status [-debug_status] dbvsnap -d DDC -csnap [-sname <name>] -j <json> dbvsnap -d DDC -dsnap -sname <name> dbvsnap -d DDC -fsnap -sname <name> dbvsnap -d DDC -info dbvsnap -d DDC -setup dbvsnap -d DDC -enabled dbvsnap -d DDC -start_db -sname <name> dbvsnap -d DDC -stop_db -sname <name> dbvsnap -d DDC -support_package -pid <pid> dbvsnap -d DDC -support_package -trace <trace> ============================================================= DBVSNAP ended on : Fri Dec 11 16:58:29 2020 ============================================================= |
Snapshot Groups
Creating a Snapshot Group Configuration
To create a new snapshot group configuration, you can use the dbvsnap utility and supply the DDC for which you want to create the snapshot group, use the -setup flag to start the interactive process.
Below is an example:
| No Format |
|---|
[oracle@dbvel72 standby]$ ./dbvsnap -d orcl -setup
==============================================
        DBVSNAP Configuration Setup
==============================================

Standby Database orcl
Logical Volume u01
Volume Group   oravg
Mount Point    /u01

1 - Create DBVSNAP configuration file
Press any other key to exit

Enter your choice: 1

Enter Activate snapshot database: [N]: Y

Enter Snapshot interval in min: [10]: 10

Enter Optional option string to be used with mount command::

Enter Optional full path for pre- post- processing script if used: [/usr/dbvisit/standby/snap_pre_post_proc.sh]:

Enter Time in sec to wait if another snapshot in progress: [60]:

Enter Oracle service name for snapshots: [ROSH]: DEV

Enter Snapshots name pattern: [DBV]: DEV

Enter Snapshot size data usage percent threshold, dafaults to 90% if not set: [90]:

Enter Number of snapshots to maintain: [2]: 2

Enter Snapshot size: [2048M]: 1024M

Enter SGA_TARGET value for a snapshot database: [650M]:
{
  'pfile' => {
               'sga_target' => '650M'
             },
  'main' => {
              'retry_sec' => 60,
              'activate' => 'Y',
              'snap_size_threshold' => 90,
              'service' => 'DEV',
              'pre_post_proc' => '/usr/dbvisit/standby/snap_pre_post_proc.sh',
              'interval' => 10,
              'version' => '10.0.0RC_24_g94ba1d85',
              'ssize' => '1024M',
              'sname' => 'DEV',
              'mount_option' => '',
              'snum' => 2
            }
}
File /usr/dbvisit/standby/conf/dbvsnapd_orcl.conf created.

PID:26052
TRACE:dbvsnap_install.log |
As you can see a JSON summary output will be provided based on your values provided.
A new configuration file will now be available under the DBVISIT_BASE/standby/conf folder:
| No Format |
|---|
[oracle@dbvel72 standby]$ cd conf/
[oracle@dbvel72 conf]$ ls -lrt dbvsnapd*
-rw-r--r--. 1 oracle oinstall 407 Dec 11 17:00 dbvsnapd_orcl.conf
[oracle@dbvel72 conf]$ cat dbvsnapd_orcl.conf
{
   "pfile" : {
      "sga_target" : "650M"
   },
   "main" : {
      "retry_sec" : 60,
      "activate" : "Y",
      "snap_size_threshold" : 90,
      "service" : "DEV",
      "pre_post_proc" : "/usr/dbvisit/standby/snap_pre_post_proc.sh",
      "interval" : 10,
      "version" : "10.0.0RC_24_g94ba1d85",
      "ssize" : "1024M",
      "sname" : "DEV",
      "mount_option" : "",
      "snum" : 2
   }
}
[oracle@dbvel72 conf]$ |
Now that you have a configuration, you can start the background (Daemon) process that will use this configuration as input and then start the creation of snapshots based on the configuration. This is discussed more in the next section.
Start The Snapshot Group Creation
| No Format |
|---|
[oracle@dbvel72 standby]$ ./dbvsnap -d orcl -D start Starting DBVSNAP Daemon... Started successfully. [oracle@dbvel72 standby]$ |
Once you run the above the snapshot creation will start instantly. To view what is happening you can use the following commands to track the status:
Check the mount points (filesystem)
No Format [oracle@dbvel72 standby]$ df -h Filesystem Size Used Avail Use% Mounted on devtmpfs 2.3G 0 2.3G 0% /dev tmpfs 12G 0 12G 0% /dev/shm tmpfs 2.3G 8.5M 2.3G 1% /run tmpfs 2.3G 0 2.3G 0% /sys/fs/cgroup /dev/mapper/ol-root 26G 17G 9.0G 66% / /dev/sda1 1014M 177M 838M 18% /boot /dev/mapper/backup-u03 2.0G 40M 1.8G 3% /u03 /dev/mapper/oravg-u01 15G 9.2G 4.5G 68% /u01 tmpfs 469M 0 469M 0% /run/user/54321 /dev/mapper/oravg-DEV001 15G 9.8G 3.9G 72% /usr/dbvisit/standby/snap/orcl/DEV001. -------> Snapshot volumegroup mounted [oracle@dbvel72 standby]$
Next look at the Database Instances running
No Format [oracle@dbvel72 standby]$ ps -ef |grep pmon|grep -v grep oracle 4278 1 0 12:40 ? 00:00:00 ora_pmon_orcl oracle 26465 1 0 17:02 ? 00:00:00 ora_pmon_DEV001
- Next review the Listener status, we have specified in the configuration that the service ROSH should be registered with the listener
In the example below you can see that the ROSH service is attached (pointing) to the DBV001 Instance (our first snapshot)
No Format [oracle@dbvel72 standby]$ lsnrctl status LSNRCTL for Linux: Version 18.0.0.0.0 - Production on 11-DEC-2020 17:04:35 Copyright (c) 1991, 2018, Oracle. All rights reserved. Connecting to (DESCRIPTION=(ADDRESS=(PROTOCOL=TCP)(HOST=dbvel72.oraclekiwi.co.nz)(PORT=1521))) STATUS of the LISTENER ------------------------ Alias LISTENER Version TNSLSNR for Linux: Version 18.0.0.0.0 - Production Start Date 11-DEC-2020 16:22:53 Uptime 0 days 0 hr. 41 min. 41 sec Trace Level off Security ON: Local OS Authentication SNMP OFF Listener Parameter File /opt/oracle/product/18c/dbhome_1/network/admin/listener.ora Listener Log File /opt/oracle/diag/tnslsnr/dbvel72/listener/alert/log.xml Listening Endpoints Summary... (DESCRIPTION=(ADDRESS=(PROTOCOL=tcp)(HOST=dbvel72.oraclekiwi.co.nz)(PORT=1521))) (DESCRIPTION=(ADDRESS=(PROTOCOL=ipc)(KEY=EXTPROC1521))) Services Summary... Service "DEV.oraclekiwi.co.nz" has 1 instance(s). Instance "DEV001", status READY, has 1 handler(s) for this service... Service "DEV001.oraclekiwi.co.nz" has 1 instance(s). Instance "DEV001", status READY, has 1 handler(s) for this service... Service "orcl.oraclekiwi.co.nz" has 1 instance(s). Instance "orcl", status READY, has 1 handler(s) for this service... Service "orclXDB.oraclekiwi.co.nz" has 2 instance(s). Instance "DEV001", status READY, has 1 handler(s) for this service... Instance "orcl", status READY, has 1 handler(s) for this service... Service "pdb1.oraclekiwi.co.nz" has 1 instance(s). Instance "orcl", status READY, has 1 handler(s) for this service... Service "pdb2.oraclekiwi.co.nz" has 1 instance(s). Instance "orcl", status READY, has 1 handler(s) for this service... Service "pdb3.oraclekiwi.co.nz" has 1 instance(s). Instance "orcl", status READY, has 1 handler(s) for this service... The command completed successfully [oracle@dbvel72 standby]$
Next you can also review the log/dbvsnapd_DEV.log file to review the status
No Format [oracle@dbvel72 log]$ pwd /usr/dbvisit/standby/log [oracle@dbvel72 log]$ tail -100 dbvsnapd_orcl.log 'blocksize' => '512', 'bytes' => '209715200', 'members' => [ '/u01/oracle/oradata/ORCL/onlinelog/o1_mf_2_hvg0y6q7_.log', '/u01/oracle/fast_recovery_area/ORCL/onlinelog/o1_mf_2_hvg0y761_.log' ] }, '3' => { 'members' => [ '/u01/oracle/oradata/ORCL/onlinelog/o1_mf_3_hvg0y83o_.log', '/u01/oracle/fast_recovery_area/ORCL/onlinelog/o1_mf_3_hvg0y8d4_.log' ], 'bytes' => '209715200', 'blocksize' => '512' } }, 'tempfile' => [ '/u01/oracle/oradata/ORCL/datafile/o1_mf_temp_hvg0zcd7_.tmp', '/u01/oracle/oradata/ORCL/A4025919CCF0180DE0530902000A0032/datafile/o1_mf_temp_hvg0zcjy_.tmp' ], 'datafile' => [ '/u01/oracle/oradata/ORCL/datafile/o1_mf_system_hvc37x35_.dbf', '/u01/oracle/oradata/ORCL/datafile/o1_mf_sysaux_hvc39qsj_.dbf', '/u01/oracle/oradata/ORCL/datafile/o1_mf_undotbs1_hvc3byn6_.dbf', '/u01/oracle/oradata/ORCL/A4025919CCF0180DE0530902000A0032/datafile/o1_mf_system_hvc3c867_.dbf', '/u01/oracle/oradata/ORCL/A4025919CCF0180DE0530902000A0032/datafile/o1_mf_sysaux_hvc3d1lj_.dbf', '/u01/oracle/oradata/ORCL/datafile/o1_mf_users_hvc3drxz_.dbf', '/u01/oracle/oradata/ORCL/A4025919CCF0180DE0530902000A0032/datafile/o1_mf_undotbs1_hvc3f21n_.dbf', '/u01/oracle/oradata/ORCL/A402734C7AAD1E07E0530902000A138E/datafile/o1_mf_system_hvc3ffd1_.dbf', '/u01/oracle/oradata/ORCL/A402734C7AAD1E07E0530902000A138E/datafile/o1_mf_sysaux_hvc3g5y9_.dbf', '/u01/oracle/oradata/ORCL/A402734C7AAD1E07E0530902000A138E/datafile/o1_mf_undotbs1_hvc3gx27_.dbf', '/u01/oracle/oradata/ORCL/A402734C7AAD1E07E0530902000A138E/datafile/o1_mf_users_hvc3h67n_.dbf', '/u01/oracle/oradata/ORCL/B5852673BCA53EB9E0530902000A460B/datafile/o1_mf_system_hwjc5t5y_.dbf', '/u01/oracle/oradata/ORCL/B5852673BCA53EB9E0530902000A460B/datafile/o1_mf_sysaux_hwjc697m_.dbf', '/u01/oracle/oradata/ORCL/B5852673BCA53EB9E0530902000A460B/datafile/o1_mf_undotbs1_hwjc6r8x_.dbf', '/u01/oracle/oradata/ORCL/B58534A614584161E0530902000A4426/datafile/o1_mf_system_hwjcfsgo_.dbf', '/u01/oracle/oradata/ORCL/B58534A614584161E0530902000A4426/datafile/o1_mf_sysaux_hwjcg8ht_.dbf', '/u01/oracle/oradata/ORCL/B58534A614584161E0530902000A4426/datafile/o1_mf_undotbs1_hwjcgqk1_.dbf' ] }, 'size_mb' => 5060, 'size_txt' => '4.94GB', 'oracle_sid' => 'orcl', 'max' => { 'maxdatafiles' => '1024', 'maxloghistory' => '292', 'maxinstances' => '1', 'maxlogfiles' => '16', 'maxlogmembers' => '3' } } 20201211 17:01:50 main::rosh_action: action=start 20201211 17:01:50 main::cmn_lockfile_running: lockfile=/usr/dbvisit/standby/pid/dbvsnapd_orcl.pid 20201211 17:01:50 main::cmn_lockfile_running: pid= 20201211 17:01:50 main::cmn_lockfile_running: return pid=0 20201211 17:01:50 Standby::Auxiliary::inform: Starting DBVSNAP Daemon... 20201211 17:01:50 main::rosh_notify: Starting DBVSNAP Daemon... 20201211 17:01:50 main::rosh_all_conf_files: start 20201211 17:01:50 main::cmn_read_json_file: start file_name=/usr/dbvisit/standby/conf/dbvsnapd_orcl.conf 20201211 17:01:50 main::cmn_read_json_file: end 20201211 17:01:50 main::rosh_all_conf_files: { 'orcl' => { 'pfile' => { 'sga_target' => '650M' }, 'main' => { 'activate' => 'Y', 'pre_post_proc' => '/usr/dbvisit/standby/snap_pre_post_proc.sh', 'ssize' => '1024M', 'service' => 'DEV', 'retry_sec' => 60, 'sname' => 'DEV', 'interval' => 10, 'mount_option' => '', 'snap_size_threshold' => 90, 'snum' => 2, 'version' => '10.0.0RC_24_g94ba1d85' } } } 20201211 17:01:50 main::rosh_ssize_mb: ssize=1024 MB 20201211 17:01:50 main::rosh_check_redo_size: start ssize=1024M 20201211 17:01:50 main::rosh_ssize_mb: ssize=1024 MB 20201211 17:01:50 main::rosh_check_redo_size: redo_mb=600 20201211 17:01:50 main::ora_db_disconnect: start connection= 20201211 17:01:50 main::_ora_sys: ORA_SYS desc not defined 20201211 17:01:50 main::_rman_close: RMAN desc not defined 20201211 17:01:50 main::_rman_close: desc= 20201211 17:01:50 main::_db: DBH_SYS disconnected 20201211 17:01:50 main::ora_db_disconnect: end 20201211 17:01:50 Standby::Auxiliary::inform: Started successfully. 20201211 17:01:50 main::rosh_notify: Started successfully. 20201211 17:01:50 main::cmn_exit: error_code= 20201211 17:01:50 main::cmn_lockfile_create: start lockfile=/usr/dbvisit/standby/pid/dbvsnapd_orcl.pid pid=26317 20201211 17:01:50 main::cmn_lockfile_create: lock obtained 20201211 17:01:50 main::rosh_start: Daemon running... 20201211 17:01:50 main::rosh_run: start 20201211 17:01:50 main::rosh_create_thread: worker thread 1 created 20201211 17:01:50 main::rosh_create_thread: timer thread 2 created 20201211 17:01:52 main::rosh_run: TRACEFILE 26317_1_1_dbvsnap_orcl_202012111701.trc
After running for a while you will see there are multiple snapshots being created, depending on your configuration, example:
| No Format |
|---|
[oracle@dbvel72 log]$ df -kh Filesystem Size Used Avail Use% Mounted on devtmpfs 2.3G 0 2.3G 0% /dev tmpfs 12G 0 12G 0% /dev/shm tmpfs 2.3G 8.6M 2.3G 1% /run tmpfs 2.3G 0 2.3G 0% /sys/fs/cgroup /dev/mapper/ol-root 26G 17G 9.1G 66% / /dev/sda1 1014M 177M 838M 18% /boot /dev/mapper/backup-u03 2.0G 40M 1.8G 3% /u03 /dev/mapper/oravg-u01 15G 9.2G 4.5G 68% /u01 tmpfs 469M 0 469M 0% /run/user/54321 /dev/mapper/oravg-DEV001 15G 9.8G 3.9G 72% /usr/dbvisit/standby/snap/orcl/DEV001 /dev/mapper/oravg-DEV002 15G 9.8G 3.9G 72% /usr/dbvisit/standby/snap/orcl/DEV002 [oracle@dbvel72 log]$ ps -ef |grep pmon|grep -v grep oracle 4278 1 0 12:40 ? 00:00:00 ora_pmon_orcl oracle 26465 1 0 17:02 ? 00:00:00 ora_pmon_DEV001 oracle 27728 1 0 17:12 ? 00:00:00 ora_pmon_DEV002 [oracle@dbvel72 log]$ |
From the above we can see that the two snapshots (DBV002 and DBV003) was created. Remember if you specify a limit of 2 snapshots, the process is to create two snapshots, then on next schedule to create a snapshot, we will first create the 3rd snapshot, make sure it works, then remove the oldest snapshot. This is why you will notice the snapshot number can be more then the value 2 as specified in this example.
If you also review the listener status you will notice that the ROSH service (the name specified in this configuration) is now pointing to the DBV003 snapshot which at this particular time was the latest snapshot:
| No Format |
|---|
[oracle@dbvel72 log]$ lsnrctl status LSNRCTL for Linux: Version 18.0.0.0.0 - Production on 11-DEC-2020 17:20:15 Copyright (c) 1991, 2018, Oracle. All rights reserved. Connecting to (DESCRIPTION=(ADDRESS=(PROTOCOL=TCP)(HOST=dbvel72.oraclekiwi.co.nz)(PORT=1521))) STATUS of the LISTENER ------------------------ Alias LISTENER Version TNSLSNR for Linux: Version 18.0.0.0.0 - Production Start Date 11-DEC-2020 16:22:53 Uptime 0 days 0 hr. 57 min. 22 sec Trace Level off Security ON: Local OS Authentication SNMP OFF Listener Parameter File /opt/oracle/product/18c/dbhome_1/network/admin/listener.ora Listener Log File /opt/oracle/diag/tnslsnr/dbvel72/listener/alert/log.xml Listening Endpoints Summary... (DESCRIPTION=(ADDRESS=(PROTOCOL=tcp)(HOST=dbvel72.oraclekiwi.co.nz)(PORT=1521))) (DESCRIPTION=(ADDRESS=(PROTOCOL=ipc)(KEY=EXTPROC1521))) Services Summary... Service "DEV.oraclekiwi.co.nz" has 2 instance(s). Instance "DEV001", status READY, has 1 handler(s) for this service... Instance "DEV002", status READY, has 1 handler(s) for this service... Service "DEV001.oraclekiwi.co.nz" has 1 instance(s). Instance "DEV001", status READY, has 1 handler(s) for this service... Service "DEV002.oraclekiwi.co.nz" has 1 instance(s). Instance "DEV002", status READY, has 1 handler(s) for this service... Service "orcl.oraclekiwi.co.nz" has 1 instance(s). Instance "orcl", status READY, has 1 handler(s) for this service... Service "orclXDB.oraclekiwi.co.nz" has 3 instance(s). Instance "DEV001", status READY, has 1 handler(s) for this service... Instance "DEV002", status READY, has 1 handler(s) for this service... Instance "orcl", status READY, has 1 handler(s) for this service... Service "pdb1.oraclekiwi.co.nz" has 1 instance(s). Instance "orcl", status READY, has 1 handler(s) for this service... Service "pdb2.oraclekiwi.co.nz" has 1 instance(s). Instance "orcl", status READY, has 1 handler(s) for this service... Service "pdb3.oraclekiwi.co.nz" has 1 instance(s). Instance "orcl", status READY, has 1 handler(s) for this service... The command completed successfully [oracle@dbvel72 log]$ |
Status Check
When you have the background (Daemon) process running creating and managing the snapshots, you can easily view the status with the dbvsnap -d <DDC> -D status command. Do note that the output of this command will be in JSON format.
Below is an example:
| No Format |
|---|
[oracle@dbvel72 standby]$ ./dbvsnap -d orcl -D status
{
  'pfile' => {
               'sga_target' => '650M'
             },
  'main' => {
              'activate' => 'Y',
              'mount_option' => '',
              'sname' => 'DEV',
              'retry_sec' => 60,
              'ssize' => '1024M',
              'snap_size_threshold' => 90,
              'service' => 'DEV',
              'pre_post_proc' => '/usr/dbvisit/standby/snap_pre_post_proc.sh',
              'snum' => 2,
              'interval' => 10,
              'version' => '10.0.0RC_24_g94ba1d85'
            },
  'rsnap' => {
               'DEV001' => {
                             'cr_date_epoch' => '1607659318',
                             'ddc' => 'orcl',
                             'data_percent' => '73.59',
                             'recovery' => {
                                             'scn' => '6567847',
                                             'time' => '2020-12-11',
                                             'tz' => '12'
                                           },
                             'permission' => 'w',
                             'cr_date' => '2020-12-11T04:01:58Z',
                             'lv' => 'DEV001',
                             'size' => '1073.74M',
                             'attr' => 'swi-aos---',
                             'db_mode' => 'rw',
                             'instance' => {
                                             'sessions' => 1,
                                             'db_state_rc' => 50,
                                             'db_state' => 'Regular database open in read write mode',
                                             'oracle_sid' => 'DEV001'
                                           },
                             'vg' => 'oravg',
                             'mp' => '/usr/dbvisit/standby/snap/orcl/DEV001',
                             'meta' => '/usr/dbvisit/standby/meta/orcl/DEV001',
                             'origin' => 'u01'
                           },
               'DEV002' => {
                             'data_percent' => '70.31',
                             'recovery' => {
                                             'scn' => '6567847',
                                             'time' => '2020-12-11',
                                             'tz' => '12'
                                           },
                             'cr_date_epoch' => '1607659917',
                             'ddc' => 'orcl',
                             'instance' => {
                                             'db_state_rc' => 50,
                                             'db_state' => 'Regular database open in read write mode',
                                             'oracle_sid' => 'DEV002',
                                             'sessions' => 0
                                           },
                             'vg' => 'oravg',
                             'mp' => '/usr/dbvisit/standby/snap/orcl/DEV002',
                             'meta' => '/usr/dbvisit/standby/meta/orcl/DEV002',
                             'origin' => 'u01',
                             'cr_date' => '2020-12-11T04:11:57Z',
                             'permission' => 'w',
                             'lv' => 'DEV002',
                             'size' => '1073.74M',
                             'attr' => 'swi-aos---',
                             'db_mode' => 'rw'
                           }
             },
  'daemon_pid' => 26317
} df |
Pause Snapshot Group
It might be that you do not require snapshots to run all the time and maybe you want to pause the creation for a period, this can be done by running the "dbvsnap -d <DDC> -D pause" command.
Example, below we can see if we run the command the snapshot creation process is stopped, but the snapshots are still running and mounted.
| No Format |
|---|
[oracle@dbvel72 standby]$ ./dbvsnap -d orcl -D pause Pausing DBVSNAP Daemon... Successfully paused. [oracle@dbvel72 standby]$ ps -ef |grep pmon|grep -v grep oracle 4278 1 0 12:40 ? 00:00:00 ora_pmon_orcl oracle 26465 1 0 17:02 ? 00:00:00 ora_pmon_DEV001 oracle 27728 1 0 17:12 ? 00:00:00 ora_pmon_DEV002 [oracle@dbvel72 standby]$ df -h |egrep -i 'filesystem|DEV0' Filesystem Size Used Avail Use% Mounted on /dev/mapper/oravg-DEV001 15G 9.8G 3.9G 72% /usr/dbvisit/standby/snap/orcl/DEV001 /dev/mapper/oravg-DEV002 15G 9.8G 3.9G 72% /usr/dbvisit/standby/snap/orcl/DEV002 [oracle@dbvel72 standby]$ |
Stop the Snapshot Group
If you want to stop the Snapshot Instances that was created in the group, you can run the "dbvsnap -d <DDC> -D stop" command.
Once this is executed the snapshot instances will be shutdown, but the snapshots will still be mounted
| No Format |
|---|
[oracle@dbvel72 standby]$ ./dbvsnap -d orcl -D stop DBVSNAP Daemon process not running, nothing to pause. Stopping Oracle instances... DEV001... DEV002... [oracle@dbvel72 standby]$ ps -ef |grep pmon|grep -v grep oracle 4278 1 0 12:40 ? 00:00:00 ora_pmon_orcl [oracle@dbvel72 standby]$ df -h |egrep -i 'filesystem|DEV0' Filesystem Size Used Avail Use% Mounted on /dev/mapper/oravg-DEV001 15G 9.8G 3.9G 72% /usr/dbvisit/standby/snap/orcl/DEV001 /dev/mapper/oravg-DEV002 15G 9.8G 3.9G 72% /usr/dbvisit/standby/snap/orcl/DEV002 [oracle@dbvel72 standby]$ |
Delete the Snapshot Group
If you want to delete the configuration you can use the command "dbvsnap -d <DDC> -D delete"
Once this is executed all snapshot instances in the group will be shutdown, and the snapshots unmounted and removed.
Below is an example of the output:
| No Format |
|---|
[oracle@dbvel72 standby]$ ./dbvsnap -d orcl -D delete DBVSNAP Daemon process not running, nothing to pause. Stopping Oracle instances... Deleting snaps... DEV001... DEV002... [oracle@dbvel72 standby]$ df -h |egrep -i 'filesystem|DEV0' Filesystem Size Used Avail Use% Mounted on [oracle@dbvel72 standby]$ ps -ef |grep pmon|grep -v grep oracle 4278 1 0 12:40 ? 00:00:00 ora_pmon_orcl [oracle@dbvel72 standby]$ |
Manual Snapshots
Create Snapshot
Use -csnap option to create a snapshot manually. This option requires a json file that contains information about a snapshot to be created. If a full path to the json file is not provided, dbvsnaps looks for the json file under "conf" directory. Note a snapshot name can be provided on command line using option -sname, or included in the json file as option "sname". Snapshot name is mandatory.
dbvsnap -d DDC -csnap [-sname <name>] -j <json>
The json file must contain the following parameters:
permission - access permission (r for read only, w for read write)
ssize - snapshot size (default in M)
retry_sec - time in sec to wait if another snapshot in progress
sga_target - SGA_TARGET value for a snapshot database
| No Format |
|---|
[oracle@dbvel72 conf]$ cat DEVCS.json
{
  "pfile" : {
    "sga_target" : "650M"
  },
  "permission" : "w",
  "ssize" : "200M",
  "retry_sec" : 60
}

[oracle@dbvel72 standby]$ ./dbvsnap -d orcl -sname DEV1 -j DEVCS.json -csnap
=============================================================
Dbvisit Standby Database Technology (10.0.0RC_24_g94ba1d85) (pid 29813)
Dbvisit Snapshot (pid 29813)
DBVSNAP started on dbvel72: Fri Dec 11 17:32:30 2020
=============================================================

Snapshot DEV1 created

=============================================================
DBVSNAP ended on dbvel72: Fri Dec 11 17:34:33 2020
=============================================================

[oracle@dbvel72 standby]$ df -kh
Filesystem              Size  Used Avail Use% Mounted on
devtmpfs                2.3G     0  2.3G   0% /dev
tmpfs                    12G     0   12G   0% /dev/shm
tmpfs                   2.3G  8.5M  2.3G   1% /run
tmpfs                   2.3G     0  2.3G   0% /sys/fs/cgroup
/dev/mapper/ol-root      26G   18G  9.0G  66% /
/dev/sda1              1014M  177M  838M  18% /boot
/dev/mapper/backup-u03  2.0G   40M  1.8G   3% /u03
/dev/mapper/oravg-u01    15G  9.2G  4.5G  68% /u01
tmpfs                   469M     0  469M   0% /run/user/54321
/dev/mapper/oravg-DEV1   15G  9.8G  3.9G  72% /usr/dbvisit/standby/snap/orcl/DEV1
[oracle@dbvel72 standby]$ ps -ef |grep pmon |grep -v grep
oracle    4278     1  0 12:40 ?        00:00:00 ora_pmon_orcl
oracle   30385     1  0 17:34 ?        00:00:00 ora_pmon_DEV1
[oracle@dbvel72 standby]$ sudo lvs
  LV   VG     Attr       LSize   Pool Origin Data%  Meta%  Move Log Cpy%Sync Convert
  u03  backup -wi-ao----   2.00g
  root ol     -wi-ao---- <26.00g
  swap ol     -wi-ao----   3.00g
  DEV1 oravg  swi-aos---   1.17g      u01    55.75
  u01  oravg  owi-aos--- <14.65g
[oracle@dbvel72 standby]$ |
Delete Snapshot
Use -dsnap option to delete a manual snapshot:
dbvsnap -d DDC -dsnap -sname <name>
| No Format |
|---|
[oracle@dbvel72 standby]$ ./dbvsnap -d orcl -dsnap -sname DEV1 ============================================================= Dbvisit Standby Database Technology (10.0.0RC_24_g94ba1d85) (pid 30631) Dbvisit Snapshot (pid 30631) DBVSNAP started on dbvel72: Fri Dec 11 17:36:11 2020 ============================================================= Snapshot DEV1 deleted. ============================================================= DBVSNAP ended on dbvel72: Fri Dec 11 17:36:16 2020 ============================================================= [oracle@dbvel72 standby]$ |
Find Snapshot
Use -fsnap option to display information about a snapshot. Note this option will find a snapshot with a given name if it exists on the server, regardless of its type (manual or part of read only group) or a DDC used by dbvsnap to create it. This makes this option useful to check if a snapshot with the same name already exists prior to creating one.
dbvsnap -d DDC -fsnap -sname <name>
| No Format |
|---|
[oracle@dbvel72 standby]$ ./dbvsnap -d orcl -fsnap -sname DEV1
=============================================================
Dbvisit Standby Database Technology (10.0.0RC_24_g94ba1d85) (pid 32137)
Dbvisit Snapshot (pid 32137)
DBVSNAP started on dbvel72: Fri Dec 11 17:48:23 2020
=============================================================

Snapshot DEV1
{
  'mp' => '/usr/dbvisit/standby/snap/orcl/DEV1',
  'origin' => 'u01',
  'vg' => 'oravg',
  'ddc' => 'orcl',
  'size' => '1258.29M',
  'db_mode' => 'ro',
  'cr_date' => '2020-12-11T04:37:03Z',
  'attr' => 'swi-aos---',
  'recovery' => {
                  'tz' => '12',
                  'scn' => '6567847',
                  'time' => '2020-12-11'
                },
  'cr_date_epoch' => '1607661423',
  'meta' => '/usr/dbvisit/standby/meta/orcl/DEV1',
  'lv' => 'DEV1',
  'instance' => {
                  'sessions' => 0,
                  'db_state' => 'Regular database BUT NOT open in read write mode',
                  'oracle_sid' => 'DEV1',
                  'db_state_rc' => 53
                },
  'data_percent' => '55.85'
}

=============================================================
DBVSNAP ended on dbvel72: Fri Dec 11 17:48:23 2020
=============================================================

[oracle@dbvel72 standby]$ ./dbvsnap -d orcl -fsnap -sname DEV2
=============================================================
Dbvisit Standby Database Technology (10.0.0RC_24_g94ba1d85) (pid 32189)
Dbvisit Snapshot (pid 32189)
DBVSNAP started on dbvel72: Fri Dec 11 17:48:49 2020
=============================================================

Snapshot DEV2 does not exists

=============================================================
DBVSNAP ended on dbvel72: Fri Dec 11 17:48:49 2020
============================================================= |
Snapshots Info
Use -info option to display information about read only snapshot groups and manual snapshots created using the DDC file on the system:
dbvsnap -d DDC -fsnap
Note the output of this command is json-like text. Section "msnap" contains information about manual snapshots:
permission: r for read only, w for read write
cr_date: timestamp of creation
size: size of snapshot
mp: mount point
lv: logical volume name
lvg: logical volume group
sid: ORACLE_SID name
recovery: next SCN required for recovery and recovery timestamp with time zone
sessions: number of connected sessions
Section "db" contains logical volume name, logical volume group and mount point of the standby database used to take snapshots.
| No Format |
|---|
[oracle@dbvel72 standby]$ ./dbvsnap -d orcl -info
=============================================================
Dbvisit Standby Database Technology (10.0.0RC_24_g94ba1d85) (pid 699)
Dbvisit Snapshot (pid 699)
DBVSNAP started on dbvel72: Fri Dec 11 17:52:36 2020
=============================================================

{
  'msnap' => {
               'DEV1' => {
                           'vg' => 'oravg',
                           'instance' => {
                                           'db_state' => 'Regular database BUT NOT open in read write mode',
                                           'db_state_rc' => 53,
                                           'oracle_sid' => 'DEV1',
                                           'sessions' => 0
                                         },
                           'data_percent' => '58.25',
                           'cr_date_epoch' => '1607662200',
                           'lv' => 'DEV1',
                           'recovery' => {
                                           'tz' => '12',
                                           'scn' => '6567847',
                                           'time' => '2020-12-11'
                                         },
                           'size' => '1258.29M',
                           'attr' => 'swi-aos---',
                           'permission' => 'w',
                           'meta' => '/usr/dbvisit/standby/meta/orcl/DEV1',
                           'db_mode' => 'ro',
                           'origin' => 'u01',
                           'ddc' => 'orcl',
                           'mp' => '/usr/dbvisit/standby/snap/orcl/DEV1',
                           'cr_date' => '2020-12-11T04:50:00Z'
                         }
             },
  'available_action' => {
                          'remove' => 1,
                          'edit' => 1
                        },
  'db' => {
            'db_name' => 'orcl',
            'size_mb' => 5060,
            'db_unique_name' => 'orcl',
            'lv' => 'u01',
            'db_state_desc' => 'Standby Database in recovery mode',
            'vg' => {
                      'attr' => 'wz--n-',
                      'lv_count' => '2',
                      'size' => '21470.64M',
                      'snap_count' => '1',
                      'name' => 'oravg',
                      'free' => '4483.71M',
                      'pv_count' => '1'
                    },
            'characterset' => 'AL32UTF8',
            'oracle_sid' => 'orcl',
            'cdb' => 'Y',
            'mp' => '/u01',
            'db_files' => {
                            'tempfile' => [
                                            '/u01/oracle/oradata/ORCL/datafile/o1_mf_temp_hvg0zcd7_.tmp',
                                            '/u01/oracle/oradata/ORCL/A4025919CCF0180DE0530902000A0032/datafile/o1_mf_temp_hvg0zcjy_.tmp'
                                          ],
                            'controlfile' => [
                                               '/u01/oracle/oradata/ORCL/controlfile/o1_mf_hvc368t1_.ctl',
                                               '/u01/oracle/fast_recovery_area/ORCL/controlfile/o1_mf_hvc368wd_.ctl'
                                             ],
                            'redo' => {
                                        '1' => {
                                                 'blocksize' => '512',
                                                 'bytes' => '209715200',
                                                 'members' => [
                                                                '/u01/oracle/oradata/ORCL/onlinelog/o1_mf_1_hvg0ydnv_.log',
                                                                '/u01/oracle/fast_recovery_area/ORCL/onlinelog/o1_mf_1_hvg0yfpb_.log'
                                                              ]
                                               },
                                        '2' => {
                                                 'bytes' => '209715200',
                                                 'blocksize' => '512',
                                                 'members' => [
                                                                '/u01/oracle/oradata/ORCL/onlinelog/o1_mf_2_hvg0y6q7_.log',
                                                                '/u01/oracle/fast_recovery_area/ORCL/onlinelog/o1_mf_2_hvg0y761_.log'
                                                              ]
                                               },
                                        '3' => {
                                                 'members' => [
                                                                '/u01/oracle/oradata/ORCL/onlinelog/o1_mf_3_hvg0y83o_.log',
                                                                '/u01/oracle/fast_recovery_area/ORCL/onlinelog/o1_mf_3_hvg0y8d4_.log'
                                                              ],
                                                 'bytes' => '209715200',
                                                 'blocksize' => '512'
                                               }
                                      },
                            'datafile' => [
                                            '/u01/oracle/oradata/ORCL/datafile/o1_mf_system_hvc37x35_.dbf',
                                            '/u01/oracle/oradata/ORCL/datafile/o1_mf_sysaux_hvc39qsj_.dbf',
                                            '/u01/oracle/oradata/ORCL/datafile/o1_mf_undotbs1_hvc3byn6_.dbf',
                                            '/u01/oracle/oradata/ORCL/A4025919CCF0180DE0530902000A0032/datafile/o1_mf_system_hvc3c867_.dbf',
                                            '/u01/oracle/oradata/ORCL/A4025919CCF0180DE0530902000A0032/datafile/o1_mf_sysaux_hvc3d1lj_.dbf',
                                            '/u01/oracle/oradata/ORCL/datafile/o1_mf_users_hvc3drxz_.dbf',
                                            '/u01/oracle/oradata/ORCL/A4025919CCF0180DE0530902000A0032/datafile/o1_mf_undotbs1_hvc3f21n_.dbf',
                                            '/u01/oracle/oradata/ORCL/A402734C7AAD1E07E0530902000A138E/datafile/o1_mf_system_hvc3ffd1_.dbf',
                                            '/u01/oracle/oradata/ORCL/A402734C7AAD1E07E0530902000A138E/datafile/o1_mf_sysaux_hvc3g5y9_.dbf',
                                            '/u01/oracle/oradata/ORCL/A402734C7AAD1E07E0530902000A138E/datafile/o1_mf_undotbs1_hvc3gx27_.dbf',
                                            '/u01/oracle/oradata/ORCL/A402734C7AAD1E07E0530902000A138E/datafile/o1_mf_users_hvc3h67n_.dbf',
                                            '/u01/oracle/oradata/ORCL/B5852673BCA53EB9E0530902000A460B/datafile/o1_mf_system_hwjc5t5y_.dbf',
                                            '/u01/oracle/oradata/ORCL/B5852673BCA53EB9E0530902000A460B/datafile/o1_mf_sysaux_hwjc697m_.dbf',
                                            '/u01/oracle/oradata/ORCL/B5852673BCA53EB9E0530902000A460B/datafile/o1_mf_undotbs1_hwjc6r8x_.dbf',
                                            '/u01/oracle/oradata/ORCL/B58534A614584161E0530902000A4426/datafile/o1_mf_system_hwjcfsgo_.dbf',
                                            '/u01/oracle/oradata/ORCL/B58534A614584161E0530902000A4426/datafile/o1_mf_sysaux_hwjcg8ht_.dbf',
                                            '/u01/oracle/oradata/ORCL/B58534A614584161E0530902000A4426/datafile/o1_mf_undotbs1_hwjcgqk1_.dbf'
                                          ]
                          },
            'db_state' => 60,
            'max' => {
                       'maxinstances' => '1',
                       'maxloghistory' => '292',
                       'maxlogmembers' => '3',
                       'maxlogfiles' => '16',
                       'maxdatafiles' => '1024'
                     },
            'size_txt' => '4.94GB'
          },
  'Conf' => {
              'daemon_pid' => 0,
              'pfile' => {
                           'sga_target' => '650M'
                         },
              'rsnap' => {},
              'main' => {
                          'retry_sec' => 60,
                          'interval' => 10,
                          'snap_size_threshold' => 90,
                          'activate' => 'Y',
                          'version' => '10.0.0RC_24_g94ba1d85',
                          'mount_option' => '',
                          'service' => 'DEV',
                          'pre_post_proc' => '/usr/dbvisit/standby/snap_pre_post_proc.sh',
                          'sname' => 'DEV',
                          'snum' => 2,
                          'ssize' => '1024M'
                        }
            }
}

=============================================================
DBVSNAP ended on dbvel72: Fri Dec 11 17:52:37 2020
============================================================= |
Troubleshooting
Permissions
It is possible that you might not have configured your "sudoers" correct to allow your "oracle" Unix account to be able to execute the LVM commands required.
Below is an example where the permissions (entries) in the sudoers file was not specified correct:
| No Format |
|---|
oracle@dbvrosh02 /usr/dbvisit/standby : ./dbvsnap -d DEV -info ============================================================= Dbvisit Standby Database Technology (9.0.02) (pid 16326) Dbvisit Snapshot (pid 16326) DBVSNAP started on dbvrosh02: Wed Oct 9 10:03:40 2019 ============================================================= [sudo] password for oracle: <<<< DBVROSH terminated >>>> PID:16326 TRACEFILE:16326_dbvsnap_info_DEV_201910091003.trc SERVER:dbvrosh02 ERROR_CODE:1 Error returned from running command: sudo lvs -o lv_name,vg_name,lv_attr,lv_size,origin,lv_tags Sorry, user oracle is not allowed to execute '/sbin/lvs -o lv_name,vg_name,lv_attr,lv_size,origin,lv_tags' as root on dbvrosh02. >>>> DBVROSH terminated <<<< oracle@dbvrosh02 /usr/dbvisit/standby : |
To enable the correct permission to allow the "oracle" user to run these commands as the root user you can update the /etc/sudoers file.
Example:
| No Format |
|---|
/etc/sudoers ... oracle ALL = (root) NOPASSWD: /usr/sbin/lvs oracle ALL = (root) NOPASSWD: /usr/sbin/vgs oracle ALL = (root) NOPASSWD: /usr/sbin/lvcreate oracle ALL = (root) NOPASSWD: /usr/sbin/lvremove oracle ALL = (root) NOPASSWD: /usr/bin/mount oracle ALL = (root) NOPASSWD: /usr/bin/umount |
To make sure you can execute the commands, you can test using the following option to list all the Logical Volumes and Volume Groups.
Example:
| No Format |
|---|
oracle@dbvrosh02 /usr/dbvisit/standby : sudo vgs VG #PV #LV #SN Attr VSize VFree oradatavg 1 1 0 wz--n- <30.00g 9.00g orahomevg 1 1 0 wz--n- <20.00g 4.00g oracle@dbvrosh02 /usr/dbvisit/standby : sudo lvs LV VG Attr LSize Pool Origin Data% Meta% Move Log Cpy%Sync Convert u02 oradatavg -wi-ao---- <21.00g u01 orahomevg -wi-ao---- <16.00g |
License Key
It is important to make sure the correct license key is enable for the specific DDC to allow the use of the new Dbvisit Standby Snapshot option to work.
If you do not have the correct license key you could get messages such as the following:
| No Format |
|---|
oracle@dbvrosh02 /usr/dbvisit/standby : ./dbvsnap -d DEV -setup <<<< DBVROSH terminated >>>> PID:18995 TRACEFILE:dbvsnap_install.log SERVER:dbvrosh02 ERROR_CODE:1014 DBVSNAP is not licensed by the LICENSE KEY >>>> DBVROSH terminated <<<< oracle@dbvrosh02 /usr/dbvisit/standby : |
In this example, you need to make sure that you have the updated License Key for the Dbvisit Standby Snapshot Option which can then be applied as follow using the "dbvctl" command on the Primary server:
| No Format |
|---|
oracle@dbvrosh01 /usr/dbvisit/standby : ./dbvctl -d DEV -l 4jo70-qwp4l-7gqmu-ye8k7-52m3e-28vga-id5nu ============================================================= Dbvisit Standby Database Technology (9.0.02_585_gf3ed41f_DS_295) (pid 9635) dbvctl started on dbvrosh01: Wed Oct 9 10:53:58 2019 ============================================================= =>Update with license key: 4jo70-qwp4l-7gqmu-ye8k7-52m3e-28vga-id5nu? <Yes/No> [Yes]: >>> Dbvisit Standby License License Key : 4jo70-qwp4l-7gqmu-ye8k7-52m3e-28vga-id5nu customer_number : 0 dbname : DEV expiry_date : 2019-10-25 os : linux sequence : 1 software_features : 10000000 status : VALID updated : YES version : 9 ============================================================= dbvctl ended on dbvrosh01: Wed Oct 9 10:54:01 2019 ============================================================= oracle@dbvrosh01 /usr/dbvisit/standby : |
Once you have applied the license key you can run the "dbvctl -d <DDC> -c" to copy the configuration to the standby to make sure the Standby Database is up to date and have the latest configuration which includes the license key
| No Format |
|---|
oracle@dbvrosh01 /usr/dbvisit/standby : ./dbvctl -d DEV -c ============================================================= Dbvisit Standby Database Technology (9.0.02_585_gf3ed41f_DS_295) (pid 9892) dbvctl started on dbvrosh01: Wed Oct 9 10:58:37 2019 ============================================================= >>> Dbvisit Standby configuration copied to dbvrosh02... ============================================================= dbvctl ended on dbvrosh01: Wed Oct 9 10:58:38 2019 ============================================================= oracle@dbvrosh01 /usr/dbvisit/standby : |
Mount / Unmount Permission
It is possible that you have not configured the "sudoers" file to allow the user running the "dbvsnap" utility to mount and unmount the snapshots.
You might get the following error in the snapshot log file located in DBVISIT_BASE/standby/log folder.
| No Format |
|---|
.... 20191009 11:11:07 main::rosh_run: TRACEFILE 20161_1_1_dbvsnap_DEV_201910091111.trc 20191009 11:11:13 main::rosh_worker: Status=FAIL 20191009 11:11:13 main::rosh_worker: ERROR 1 201910091111 - Creation of snap DBV001 failed: 201910091111 - Error returned from running command: sudo mount /dev/oradatavg/DBV001 /usr/dbvisit/standby/snap/DEV/DBV001 ... |
To resolve this make sure that the Unix user "oracle" which in this example run the Oracle database, as well as Dbvisit Standby software, is allowed the correct permissions in the /etc/sudoers file.
Example, make sure the mount and umount commands are allowed.
| No Format |
|---|
/etc/sudoers ... oracle ALL = (root) NOPASSWD: /usr/sbin/lvs oracle ALL = (root) NOPASSWD: /usr/sbin/vgs oracle ALL = (root) NOPASSWD: /usr/sbin/lvcreate oracle ALL = (root) NOPASSWD: /usr/sbin/lvremove oracle ALL = (root) NOPASSWD: /usr/bin/mount oracle ALL = (root) NOPASSWD: /usr/bin/umount |
Check if Snapshot Creation Enabled
Use option -enabled to check if snapshots can be created on the system using dbvsnap. This command returns true or false in CLI mode and json output in GUI mode. Look for the "enabled" attribute in the json output.
The command runs the following checks:
- If the license key recorded in the DDC file is valid for Dbvisit Standby Snapshot option to work
- If logical volume, volume group and a single mount point for the standby database set in the DDC file can be obtained
| No Format |
|---|
[oracle@dbvrosh03 /usr/local/dbvisit_git/standby9/standby (ticket/DS-295/dbvsnap)]$ ./dbvsnap.pl -d DEVCS -enabled
=============================================================
Dbvisit Standby Database Technology (9.0.02) (pid 13035)
Dbvisit Snapshot (pid 13035)
DBVSNAP started on dbvrosh03: Fri Oct 11 16:17:05 2019
=============================================================

1

=============================================================
DBVSNAP ended on dbvrosh03: Fri Oct 11 16:17:05 2019
=============================================================

[oracle@dbvrosh03 /usr/local/dbvisit_git/standby9/standby (ticket/DS-295/dbvsnap)]$ ./dbvsnap.pl -d DEVCS -enabled -mode GUI
=============================================================
Dbvisit Standby Database Technology (9.0.02) (pid 13063)
Dbvisit Snapshot (pid 13063)
DBVSNAP started on dbvrosh03: Fri Oct 11 16:17:27 2019
=============================================================


---GUI_TAG_START_JSON---
{
   "trace_file_basename" : "13063_dbvsnap_enabled_DEVCS_201910111617.trc",
   "license" : {
      "os" : "",
      "license_key" : "4jo70-qwp4l-7gplh-g1clx-h7241-11ro2-m6r9v",
      "status" : "VALID",
      "dbname" : "",
      "expiry_date" : "2019-10-30",
      "customer_number" : "0",
      "sequence" : 1,
      "software_features" : "10000000",
      "version" : 9
   },
   "enabled" : 1,
   "done" : 1,
   "trace_file" : "/usr/local/dbvisit_git/standby9/standby/trace/13063_dbvsnap_enabled_DEVCS_201910111617.trc",
   "pid" : 13063
}

---GUI_TAG_END_JSON---

=============================================================
DBVSNAP ended on dbvrosh03: Fri Oct 11 16:17:27 2019
============================================================= |
Videos
Introduction to Dbvisit Standby Snapshot Option
| Widget Connector | ||
|---|---|---|
|
