...
It is creating a standby database, from a standby database. The concept is not difficult, and to configure it using Dbvisit Standby Version 8 9 is really easy. There are a number of use cases for this type of configuration. A second standby database may be needed to be used for reporting and only update it once or twice a day, where the original standby database is kept up to date with the primary in case of disaster strikes. Instead of sending logs from the primary to a second standby database, just send it from the first standby database. Using it this way you can also reduce the load on your primary and not double up on shipping archived redo multiple times to standby sites – but just ship it once, and then from the first standby ship the logs to the second or third standby.
...
1.) You cannot perform a Graceful Switchover (GS) between the primary and the secondary (cascading) standby databases. You will only be able to perform a GS between the primary and the first (primary) standby database.
2.) The second standby database can still be used for activation, reporting (if opened read-only), backups or even DR testing.
3.) To configure the cascading standby database option in Dbvisit Standby Version 89, you must create a second DDC file. To create the DDC file you must select the primary (first) standby as your source or “Primary” database. Dbvisit Standby Version 8 9 will set a new parameter CASCADE=Y in this DDC file which indicates that the source – or primary as seen in this case, is actually a standby database.
4.) Once the DDC file is created, the Create Standby Database (CSD) process for the secondary standby is exactly the same as what you would be familiar with when creating the first standby database.
5.) The location used for the ARCHDEST and ARCSOURCE is crucial when using cascading standby databases. The ARCHDEST
location used for your first standby database MUST be the same location used for the ARCSOURCE for the cascading standby configuration. This is important as Dbvisit Standby will detect and pick up the archive logs that are located in the Dbvisit ARCHDEST location to be shipped to the second standby database.
6.) COMPRESS and UNCOMPRESS should be set to ’N’ (none) in the primary DDC file. The archive logs that are stored on the standby server must be in an uncompressed format. Note that by default compression is enabled in Dbvnet during network transfer and using COMPRESS option in Dbvisit Standby Version 8 is not recommended. The option is still provided – but the default option for a new configuration compression in the DDC file will be disabled and default Dbvnet compression will be used.
...
4 servers running Oracle Linux 6:
- dbv1 kiwi701 – Primary Database Server
- dbv2 kiwi702 – Standby Database Server (first standby)
- dbv3 kiwi703 – Cascading Standby Database Server (second standby)
- dbv4 kiwi704 – Dbvisit Standby Version 8 Central Console
- Oracle Database 12.2 installed and configured on dbv1kiwi701, dbv2kiwi702, dbv3kiwi703
- Oracle 12c Database DEVCDB DEV running on dbv1kiwi701
- Standby Database DEVCDB DEV running on dbv2 kiwi702 (with dbv1 with kiwi701 as primary)
- Dbvisit Standby DDC file for Primary (dbv1kiwi701) to Standby (dbv2kiwi702) called DEVCDBDEV
- Dbvisit Standby Version 8.0.12 9 installed on all systems into /usr/dbvisit. This includes Dbvnet, Dbvagent and Standby Core on dbv1kiwi701, dbv2 kiwi702 and dbv3kiwi703. The Central Console (dbvserver) is installed on dbv4kiwi704.
- In this example, the secondary standby server dbv3 server kiwi703 is using the exact same directory structure as the first standby – which is also the same directory structure that is used on the primary. This is the recommended approach – a primary and standby database environment should match.
...
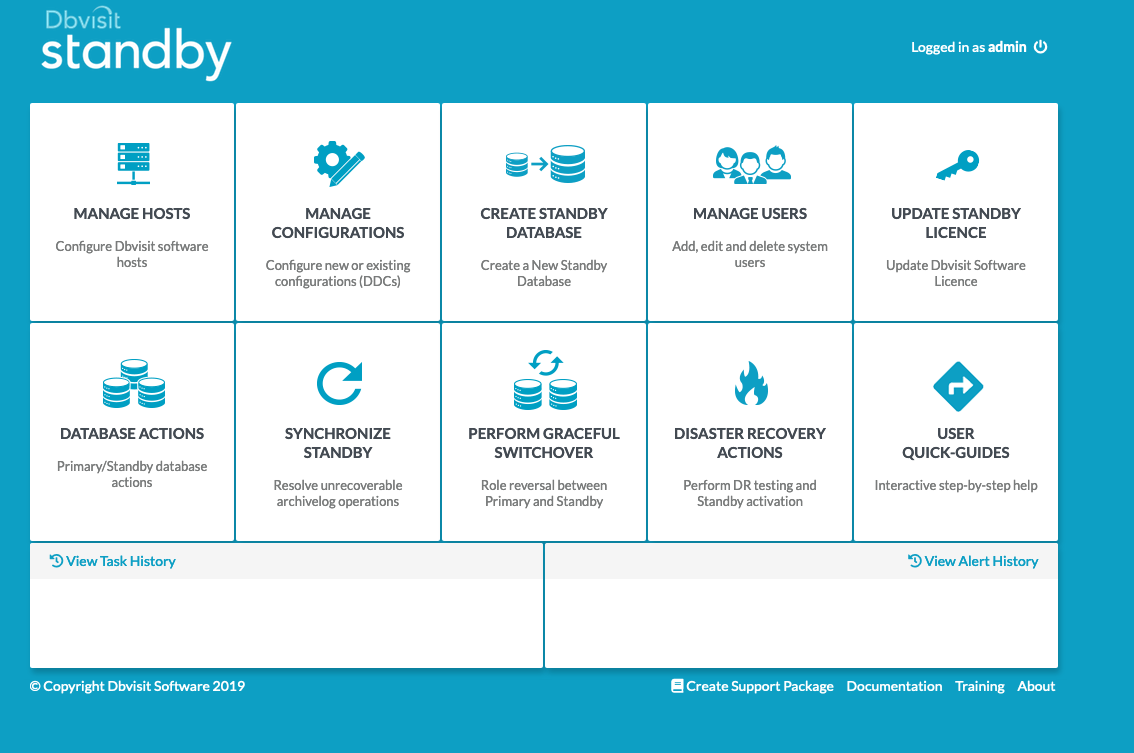
In the screen below we can see the main Dbvisit Standby Version 8 9 Central Console.
From the main screen, we navigate to Manage Hosts to see the Primary Host – DBV1kiwi701, as well as DBV2kiwi702, configured.
They are both accessible and we can see that communication with the agents (dbvagent) running on these hosts are successful.
...
If we move “BACK TO MENU” and select “MANAGE CONFIGURATIONS” from the main console, we can see the Dbvisit Standby Configuration (DDC) being listed – DEVCDB DEV in this example.
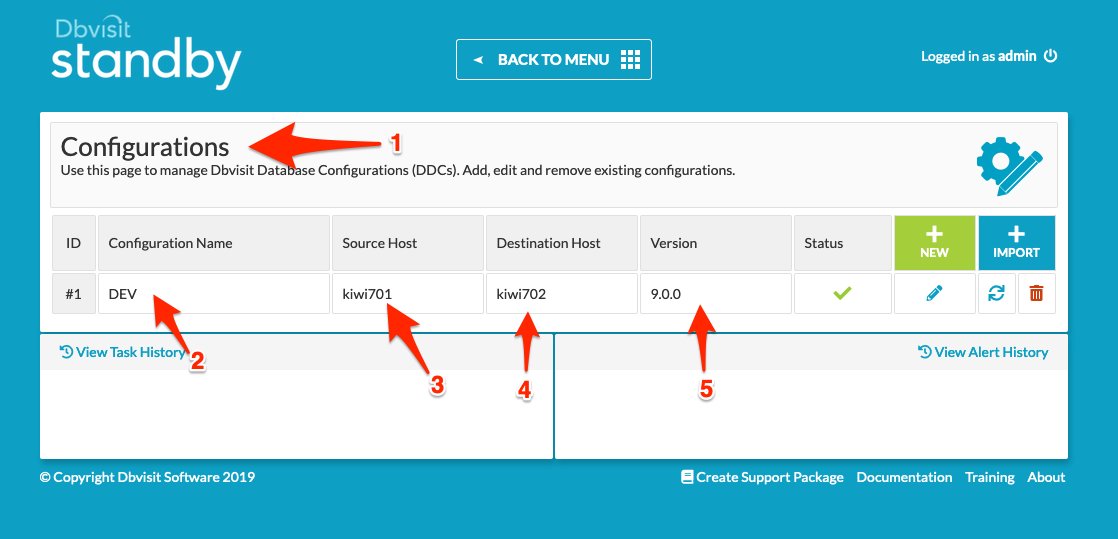
From the above we can see the following:
1. We are now on the Configurations page where you can create, edit or remove the Dbvisit Standby Configuration (DDC)
2. In this example, we have a DDC called DEVCDBDEV
3. The primary or “Source” host in this example is dbv1is kiwi701
4. The standby or “Destination” host in this example is dbv2is kiwi702
5. The Version in this example shows that we are using update 8version 9.0.12 with minor version 189220
In this example, we have already created the first standby database called DEVCDB DEV which is running on the dbv2 the kiwi702 server.
The “Active Task List” shows this completed task and if we click on it, we can see the details as shown below:
...
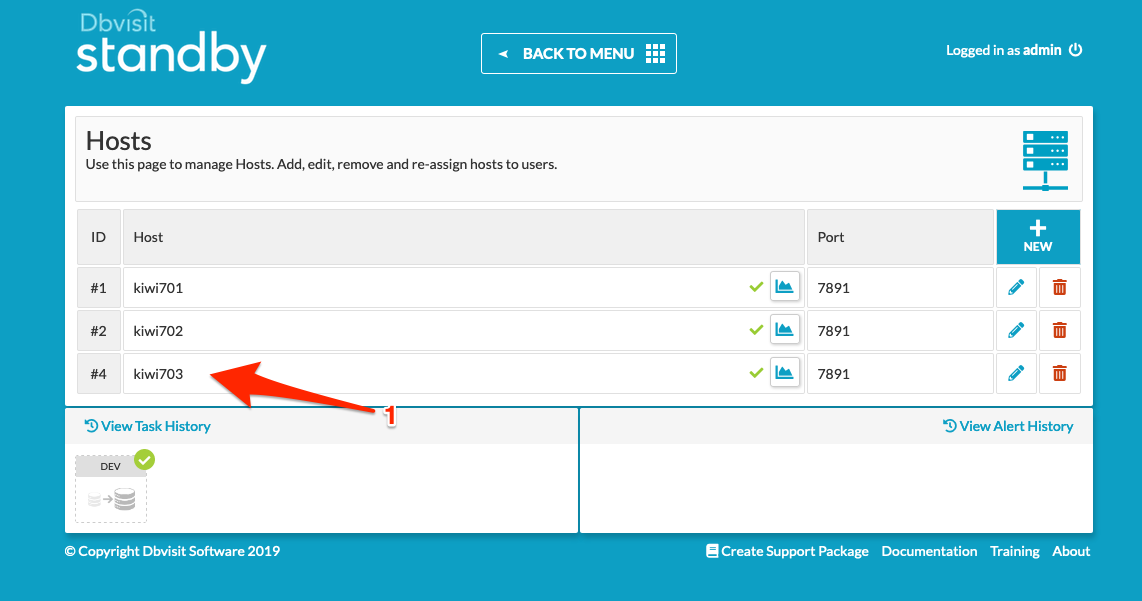
The next step is to add the second standby host. Now it is important that the Dbvisit Standby Version 8 9 software core components (Dbvnet, Dbvagent and Standby Core) are already installed on this host and that Dbvnet and Dbvagent are running.
We navigate from the main screen to “MANAGE HOSTS”. From here the following screen will be displayed.
...
We now have three hosts known to the Central Console – dbv1, dbv2 and dbv3kiwi701, kiwi702 and kiwi703
Creating the Cascading Standby DDC.
...
In summary, the values below are supplied:
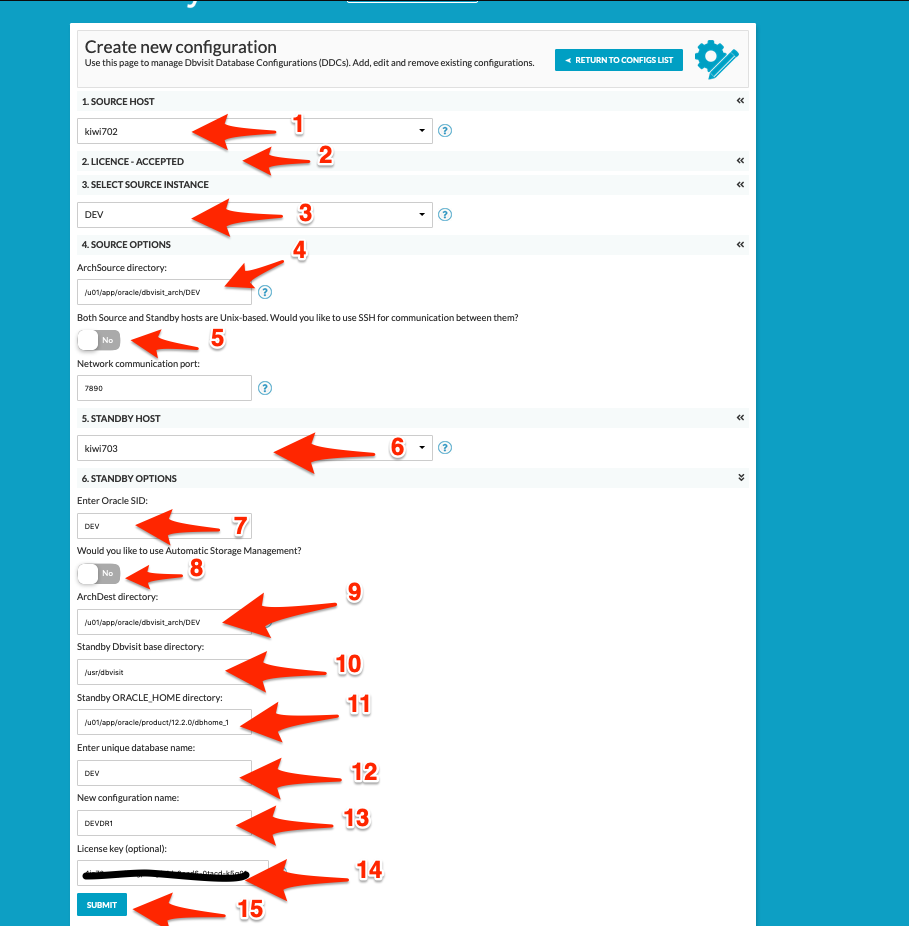
1. We select “dbv2” “kiwi702” – which is the first standby database server, as our “Source Host”. Remember we want to create a standby from a standby, so we specifically pick the source host that runs our first standby here.
2. Review and accept the license
3. The databases known on this system will be listed. In this example, we pick the standby database DEVCDB DEV that is running on dbv2 on kiwi702 as our “source database instance”
4. This option is crucial. You must specify the ARCHSOURCE location and it must be the same as the DEVCDB DEV ARCHDEST location
5. By default, we use DBVNET and leave port at 7891
6. Specify the standby host – “dbv3” “kiwi703” which is going to run our secondary standby database.
7. Specify the Oracle SID that will be used for the secondary standby database – you can adjust this if required, but using default provided value (which is the same as the primary Oracle SID) is recommended.
8. In the example used here, we are not using ASM, and the slider is left at “No” to indicate the standby server will not be using ASM.
9. The ARCHDEST location is the location used by Dbvisit Standby for copying archive logs onto the standby server. This location is not the same as the Oracle Archive Log destinations and should never be the same or located in the database recovery area.
10. The Dbvisit Base install location is specified which is the default /usr/dbvisit
11. The Oracle Home path is confirmed.
12. The Database Unique Name is specified. You can adjust this and if you are creating two standby databases on the same standby server for the same primary database, the Unique Name must be different. Otherwise, the default value is recommended, which is the same as the primary database Unique Name.
13. Here we need to specify the Dbvisit Standby Configuration (DDC) file name. This should be adjusted so that it does not match the DDC name we already used for our first Primary/Standby configuration. In this example I we used DEVCDBDRDEVDR1
14. provide Provide the license key, this is optional and can be provided later in the update license key option by selecting the DDC (DEVDR1), but must be provided before CSD.
...
We can see that the DDC name DEVCDBDR DEVDR1 (1) was created and that the source host is dbv2 is kiwi702 (2) and the destination host is dbv3 is kiwi703 (3).
If you click on the pencil (edit option) you can see the detail of the DDC as shown below.

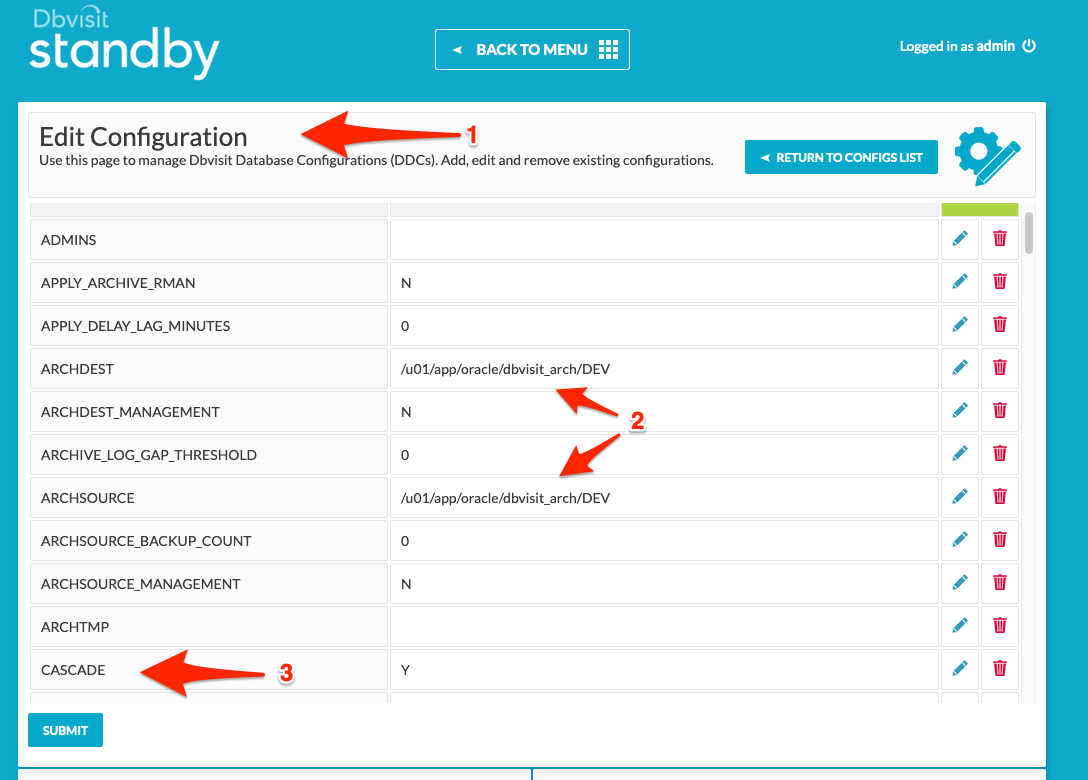
The key value I would like to highlight here is the new DDC parameter called CASCADE which is now set to a default value of “Y”. This is the key parameter that is set to indicate that we are dealing with Cascading Standby Databases here. Also, note the ARCHDEST and ARCHSOURCE values. As mentioned earlier, it is important that the ARCSOURCE value of this configuration match the ARCHDEST location of the 1st standby database configuration.
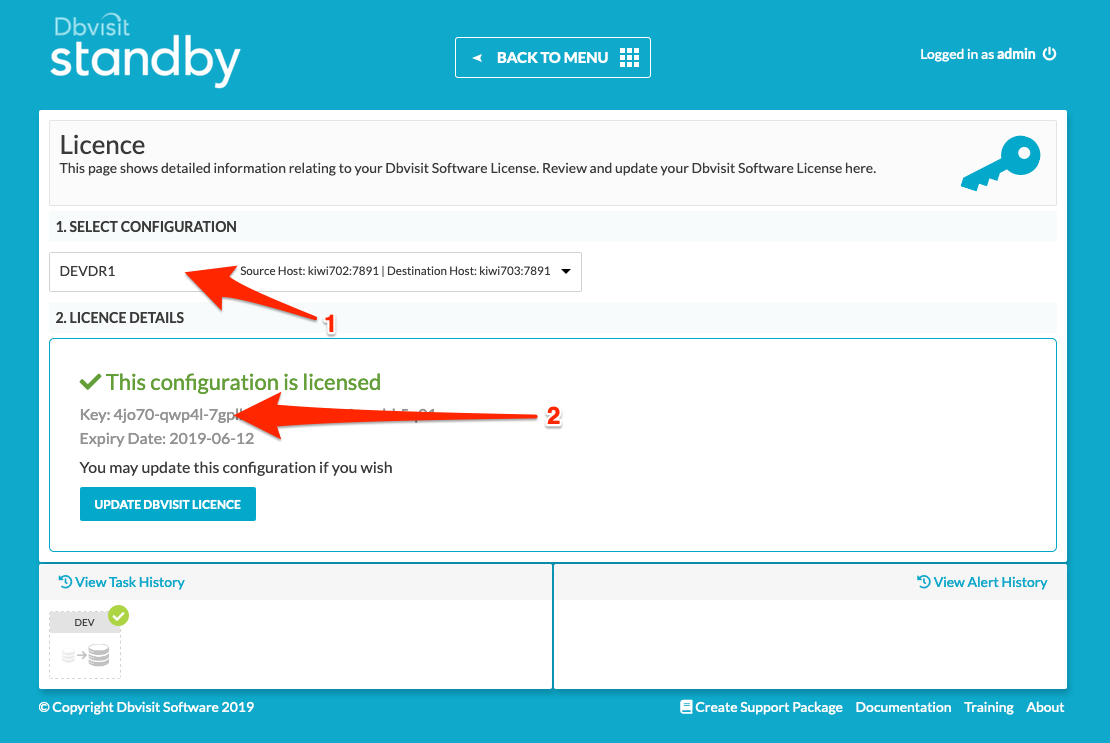
The next important step is to apply the license key for this configuration. The license configuration is easy. You need to use the license key provided to you on the purchase of your license – in this example a trial license key is used. You need to navigate to the License main menu option and then select the DDC DEVCDBDR DEVDR1 (shown in the image below as pointed out by number 1). Then once you filled in the license key and submitted it, you can review and will see the license key is valid and in this case have an expiry date – due to the trial license key used.
...
This is done if you have not already entered the license key when creating the DDC for DEVDR1.
Creating the Cascading Standby Database (the second standby from the 1st standby)
We now navigate to the Create Standby Database (CSD) main menu option. The screen below is displayed.

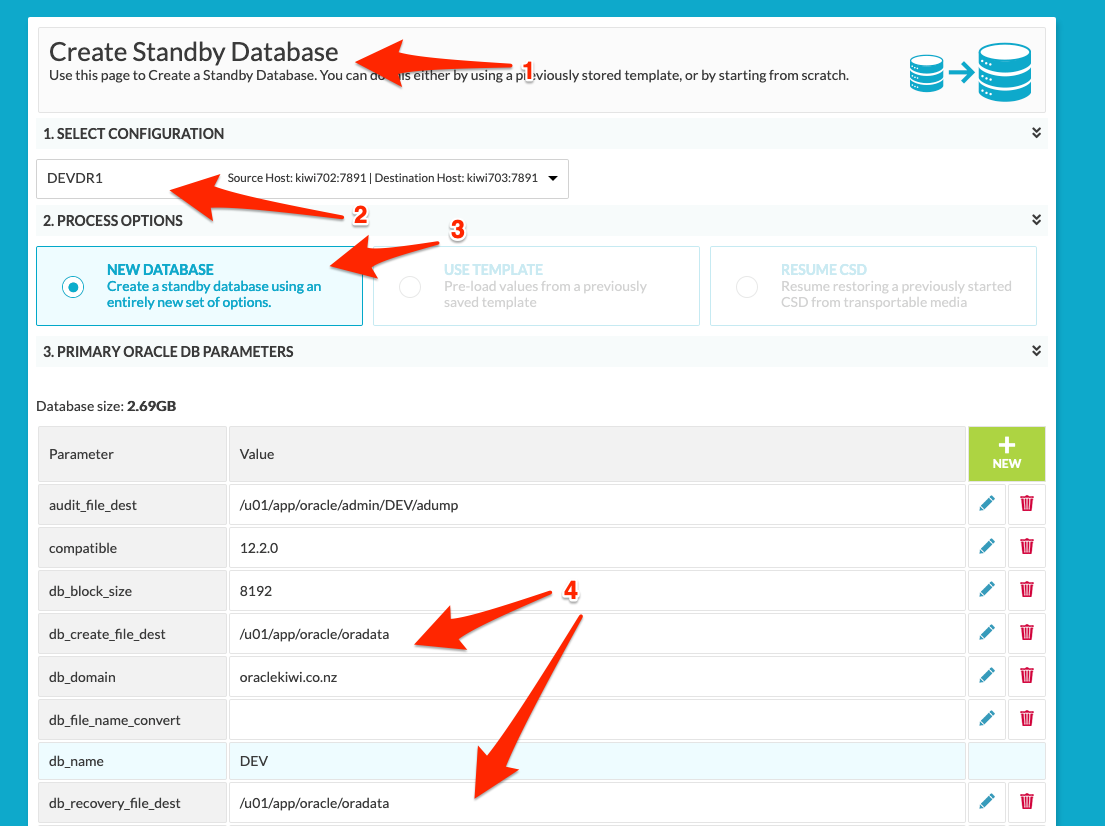
From here we select our DDC (2) and then select the option to create a “NEW DATABASE” (3). The default settings for the new standby database is displayed.
Note that in this case, the secondary standby database server has the exact same layout as the original standby server (dbv2kiwi702) and the primary server (dbv1kiwi701).
This page is split over two images to show all parameters.

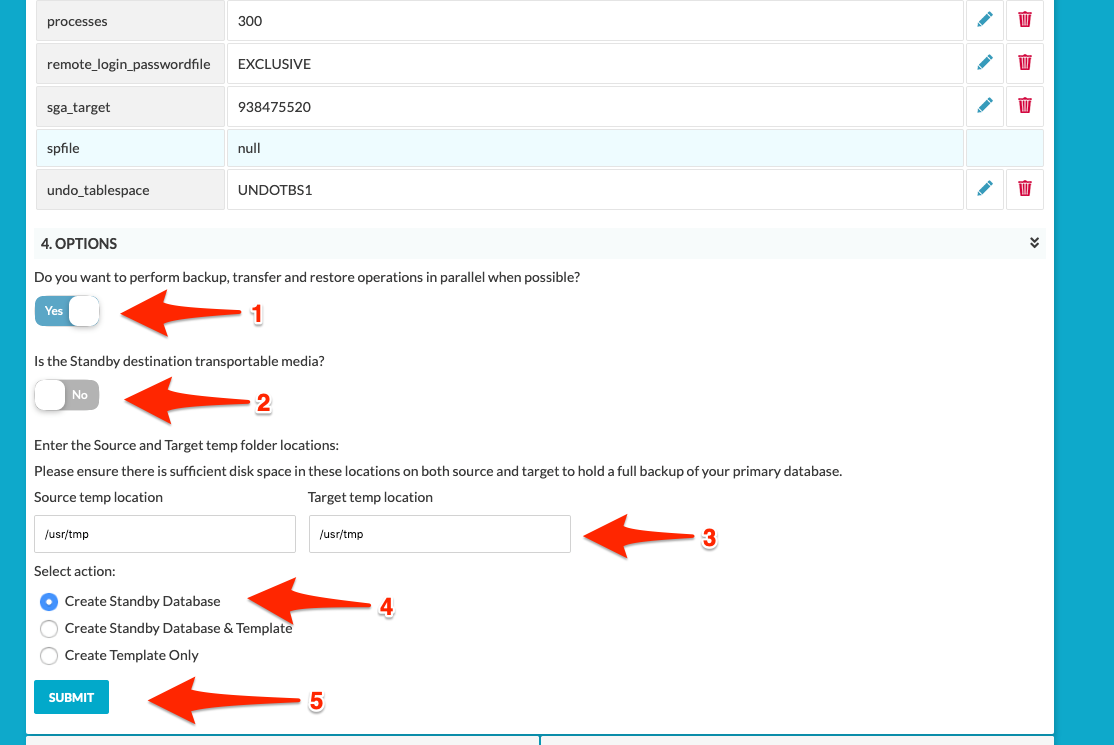
In the example as seen above, we do not select the use of transportable media (12). This is a useful option if you have a large database with low network bandwidth and you would like to use external media to transfer the backup to the second standby server. In this example, we will backup local to /usr/tmp from where the backup will be copied to the standby server /usr/tmp. You could use the parallel option (1) when creating the CSD as this would save time.
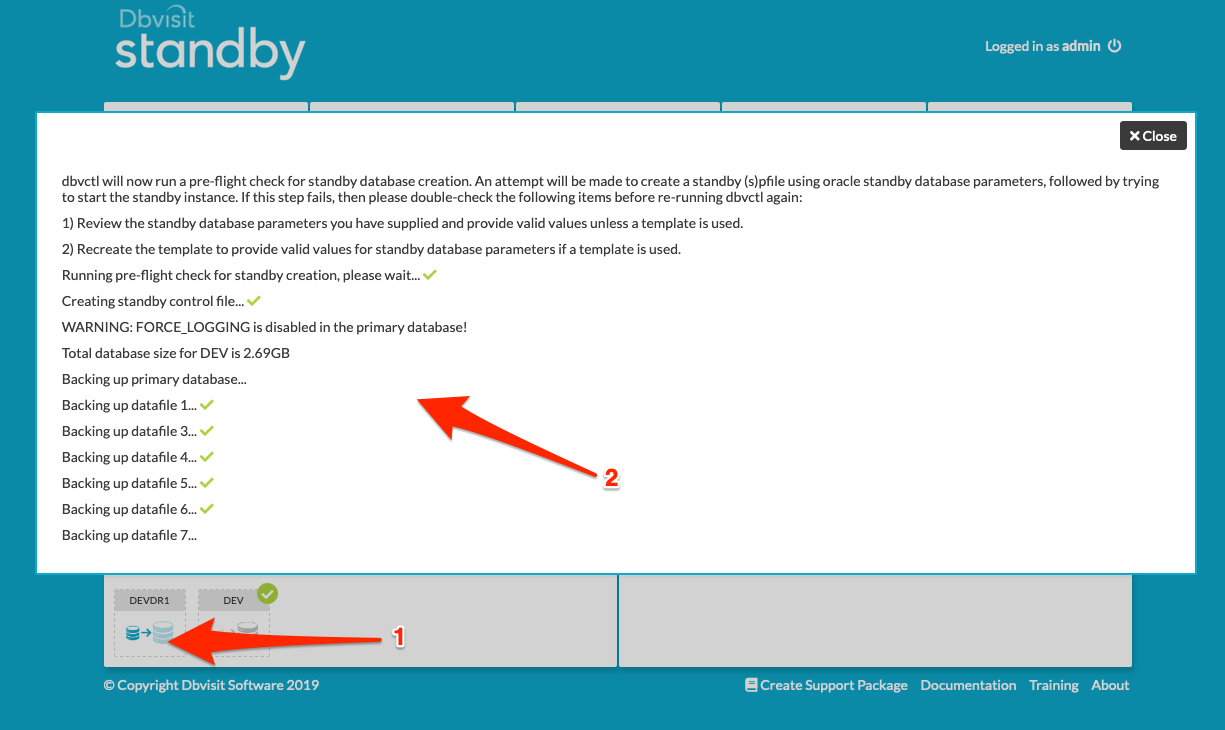
We now select the option to “Create Standby Database” (34) – which will now start the process. A new task will appear on the “Active Tasks” list and if selected, the details of the standby creation process are displayed – see image below:

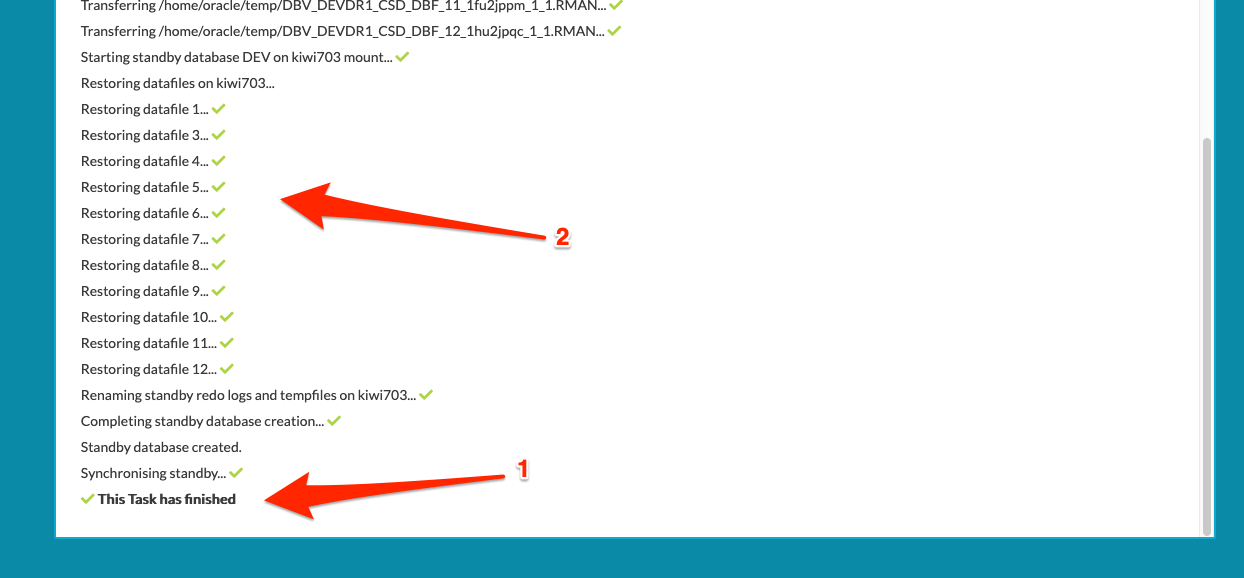
Once the creation is complete, we will see the task has a green checkmark. We can review the task as shown below when we click on the task (see image below).

Updating the new secondary standby database
Once the new secondary standby database is created, we can start the process of shipping logs to the standby database. But at this stage, it is important to note that the secondary standby database now running on dbv3kiwi703, is reliant on the archive logs that is are available on the first standby database running on dbv2kiwi702. To ensure we have logs available on the first standby database, we first run the process to ship and apply logs from primary (dbv1kiwi701) to the first standby (dbv2kiwi702). Then once we have successfully sent and applied logs between these, we can now send logs from the first standby database running on dbv2 on kiwi702 to the secondary standby on dbv3kiwi703. The arrows and numbers in the image below show the order of the steps to be performed.

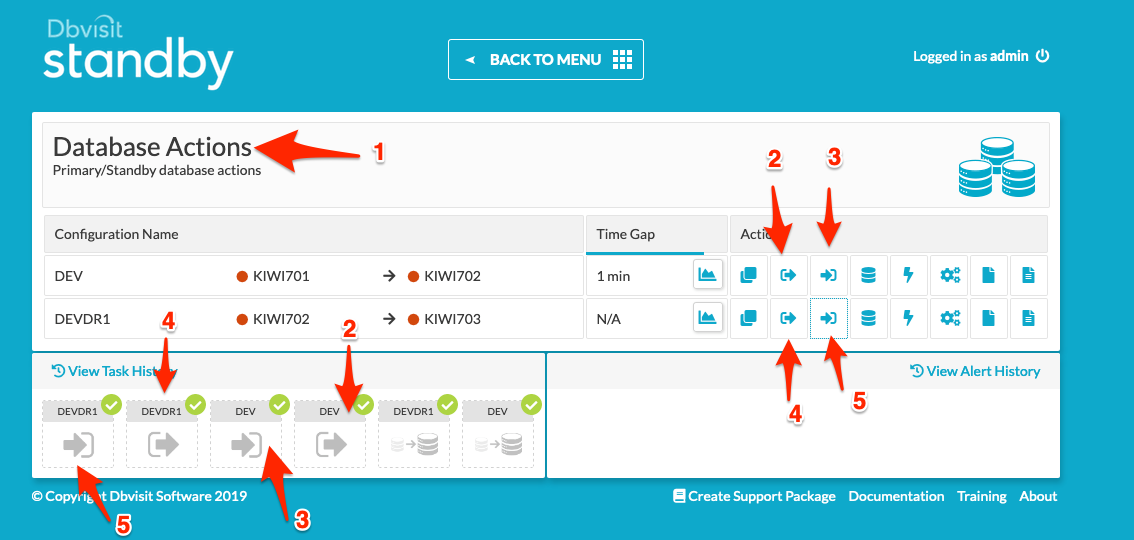
You should now have two standby databases, with the second standby receiving its log files from the first standby.
The next step would be to either schedule a CRON to send and apply logs to the secondary standby.
...