| Table of Contents |
|---|
1. Introduction
The purpose of this Deployment guide is to demonstrate the way in which Dbvisit Standby 8.0 software can be used within the Oracle Database As A Service (DBaaS) space. In this guide, we focus on the Primary being 'on-premise' and the Standby database hosted on DBaaS. In another document, we focus on both Primary and Standby Databases hosted on 'DBaaS'. This document can be found here
...
| Info |
|---|
| The setup will be from Single Instance Primary Databases to Single Instance Standby Databases with Datafiles stored on standard filesystems. However the options for configuring Dbvisit Standby in the Oracle Cloud are in no way limited to this, is it has simply been chosen for demonstration purposes. |
2. Initial Setup and Configuration
2.1 Provisioning the Servers
Connect to Oracle Cloud Dashboard and provision an 11.2.0.4 Database Service.
...
| Info |
|---|
We opted for "Oracle Database Cloud Service" for Service level and have a pre-created database on the host. It was deemed faster to drop the database on the host host rather than choose the "Oracle Database Cloud Service - Virtual Image" as this does not come with binaries installed as indicated. |
...
I generated a private and public set of key files using ssh-keygen from my local linux Linux machine.
| Code Block |
|---|
oracle@dbvlab01[/home/oracle]: ssh-keygen -b 2048 -t rsa -f oraclecloud Generating public/private rsa key pair. Enter passphrase (empty for no passphrase): Enter same passphrase again: Your identification has been saved in oraclecloud. Your public key has been saved in oraclecloud.pub. The key fingerprint is: 35:6b:e6:39:cd:06:c0:04:d9:7e:73:4d:85:80:33:ab oracle@dbvlab01.dbvisit.co.nz oracle@dbvlab01[/home/oracle]: |
...
In order for Dbvisit Standby to communicate between the 2 hosts, and to enable access to the GUI frontend, 3 ports need to be made available. These are 7890 (Dbvnet), 7891 (Dbvagent) and 4433 (dbvserver: GUI). To do this, navigate to the summary page and choose Access Rules from the menu. From here, click the "create rule" button and fill in the details. The example below shows 1 rule per a port range named dbvisit_ports. It is also possible to create 1 rule per port and name them accordingly.
...
| Primary Server (On-Premise) Details | Standby Server (Cloud) Details |
|---|---|
Name: dbvlab01 OCPUs: 1 OS: OEL6 Memory: 3G Storage: 20G Version: 11.2.0.4 Edition: Enterprise Edition Database: SAM Dbvisit Base: /usr/dbvisit Standby Version: 8.0.12.19052 | Name: dbvcloud03 OCPUs: 1 OS: OEL6 Memory: 7.5G Storage: 144G Version: 11.2.0.4 Edition: Enterprise Edition Database: SAM Dbvisit Base: /usr/dbvisit Standby Version: 8.0.12.19052 |
2.2 Preparing the Servers
Copy the Dbvisit Standby v8 software to dbvcloud03 and the local machine
...
| Note | ||||||
|---|---|---|---|---|---|---|
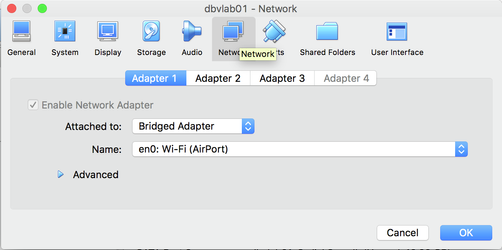
Configure the VirtualBox VM to be 'available' externally. To do this, update the relevant network controller enabling it to gain it's IP address from the Router and then shutdown shut down the machine.
Update the VM network settings to have a "Bridged Adapter" rather than "NAT Network" and then restart the machine
Once the machine is available, check that it can access external IP addresses and add the IP of dbvcloud03 to the /etc/hosts file.
The IP to enter into the Hosts file on dbvcloud03 is that of our office router. The actual entry is not displayed here for obvious reasons.
|
At this stage, these servers are ready for the next stage of installing the software.
3. Install, Configure and Run the Standby software
3.1 Installing and Configuring the Software
Unzip, Untar and the run the dbvisit installer following the instructions in the dbvisit installation guide as the user oracle.
...
On the cloud node dbvcloud03, the dbvserver (option 5) was also installed. Alternatively, a 3rd host could be configured for hosting the dbvserver. Careful to ensure during the dbvnet configuration on each node that the correct hosts are specified for source and destination. The output from the installation on the cloud host is shown below for reference.
...
| Code Block |
|---|
-----------------------------------------------------------
    Welcome to the Dbvisit software installer.
-----------------------------------------------------------

    It is recommended to make a backup of our current Dbvisit software
    location (Dbvisit Base location) for rollback purposes.

    Installer Directory /home/oracle/dbvisit

>>> Please specify the Dbvisit installation directory (Dbvisit Base).

    The various Dbvisit products and components - such as Dbvisit Standby,
    Dbvisit Dbvnet will be installed in the appropriate subdirectories of
    this path.

    Enter a custom value or press ENTER to accept default [/usr/dbvisit]:
     > /usr/dbvisit
    DBVISIT_BASE = /usr/dbvisit

    -----------------------------------------------------------
    Component      Installer Version   Installed Version
    -----------------------------------------------------------
    standby        8.0.12.19052        not installed
    dbvnet         2.0.12.19052        not installed
    dbvagent       2.0.12.19052        not installed
    dbvserver      2.0.12.19052        not installed

    -----------------------------------------------------------

    What action would you like to perform?
       1 - Install component(s)
       2 - Uninstall component(s)
       3 - Terminate

    Your choice: 1

    Which component do you want to install?
       1 - Core Components (Dbvisit Standby Cli, Dbvnet, Dbvagent)
       2 - Dbvisit Standby Core (Command Line Interface)
       3 - Dbvnet (Dbvisit Network Communication)
       4 - Dbvagent (Dbvisit Agent)
       5 - Dbvserver (Dbvisit Central Console)
       6 - Exit Installer

    Your choice: 1

-----------------------------------------------------------
    Summary of the Dbvisit STANDBY configuration
-----------------------------------------------------------
    DBVISIT_BASE /usr/dbvisit

    Press ENTER to continue

-----------------------------------------------------------
    About to configure DBVISIT DBVNET
-----------------------------------------------------------

>>> Please specify the Local host name to be used by Dbvnet on this server.

    Dbvnet will be listening on the local IP Address on this server which
    resolve to the host name specified here.
    If using a cluster or virtual IP make sure the host name or alias
    specified here resolve to the IP address local to where dbvnet is
    installed.

    Enter a custom value or press ENTER to accept default [dbvcloud03]:
     >

>>> Please specify the Local Dbvnet PORT to be used.

    Dbvnet will be listening on the specified port for incoming connections
    from remote dbvnet connections.  Please make sure that this port is not
    already in use or blocked by any firewall.  You may choose any value
    between 1024 and 65535, however the default of 7890 is recommended.

    Enter a custom value or press ENTER to accept default [7890]:
     >


>>> Please specify the Remote host name to be used by Dbvnet.

    By default Dbvnet will use this remote hostname for any remote
    connections.  Dbvnet must be installed and configured on the specified
    remote host. If using a cluster or virtual IP make sure the host name
    or alias specified here resolve to the IP address local to where dbvnet
    is installed.
    If you are unsure about the remote host name during installation, use
    the default value which will be the current local hostname.

    Enter a custom value or press ENTER to accept default [dbvlab01]:
     > dbvcloud01


>>> Please specify the Remote Dbvnet PORT to be used.

    Dbvnet will connect to the remote server on this specified port.
    On the remote host Dbvnet will be listening on the specified port for
    incoming connections. Please make sure that this port is not already in
    use or blocked by any firewall.  You may choose any value between 1024
    and 65535, however the default of 7890 is recommended.

    Enter a custom value or press ENTER to accept default [7890]:
     >


>>> Please specify the Dbvnet Passphrase to be used for secure connections.

    The passphrase provided must be the same in both the local and remote
    Dbvnet installations.  It is used to establish a secure (encrypted)
    Dbvnet connections

    Enter a custom value:
     > kiwi123

-----------------------------------------------------------
    Summary of the Dbvisit DBVNET configuration
-----------------------------------------------------------
    DBVISIT_BASE /usr/dbvisit
    DBVNET_LOCAL_HOST dbvcloud03
    DBVNET_LOCAL_PORT 7890
    DBVNET_REMOTE_HOST dbvlab01
    DBVNET_REMOTE_PORT 7890
    DBVNET_PASSPHRASE kiwi123

    Press ENTER to continue

-----------------------------------------------------------
    About to configure DBVISIT DBVAGENT
-----------------------------------------------------------


>>> Please specify the host name to be used for the Dbvisit Agent.

    The Dbvisit Agent (Dbvagent) will be listening on this local address.
    If you are using the Dbvserver (GUI) - connections from the GUI will be
    established to the Dbvisit Agent. The Dbvisit Agent address must be
    visible from the Dbvserver (GUI) installation.
    If using a cluster or virtual IP make sure the host name or alias
    specified here resolve to the IP address local to where dbvnet is
    installed.

    Enter a custom value or press ENTER to accept default [dbvcloud03]:
     >


>>> Please specify the listening PORT number for Dbvagent.

    The Dbvisit Agent (Dbvagent) will listening on the specified port for
    incoming requests from the GUI (Dbvserver).  Please make sure that this
    port is not already in use or blocked by any firewall.  You may choose
    any value between 1024 and 65535, however the default of 7891 is
    recommended.

    Enter a custom value or press ENTER to accept default [7891]:
     >


>>> Please specify passphrase for Dbvagent

    Each Dbvisit Agent must have a passpharse specified.  This passphrase
    does not have to match between all the servers.  It will be used to
    establish a secure connection between the GUI (Dbvserver) and the
    Dbvisit Agent.

    Enter a custom value:
     > kiwi123

-----------------------------------------------------------
    Summary of the Dbvisit DBVAGENT configuration
-----------------------------------------------------------
    DBVISIT_BASE /usr/dbvisit
    DBVAGENT_LOCAL_HOST dbvcloud03
    DBVAGENT_LOCAL_PORT 7891
    DBVAGENT_PASSPHRASE kiwi123

    Press ENTER to continue

-----------------------------------------------------------
    About to install Dbvisit STANDBY
-----------------------------------------------------------
    Component standby installed.

    Press ENTER to continue

-----------------------------------------------------------
    About to install Dbvisit DBVNET
-----------------------------------------------------------
    Component dbvnet installed.

    Press ENTER to continue

-----------------------------------------------------------
    About to install Dbvisit DBVAGENT
-----------------------------------------------------------
    Component dbvagent installed.

    Press ENTER to continue

    -----------------------------------------------------------
    Component      Installer Version   Installed Version
    -----------------------------------------------------------
    standby        8.0.12.19052        8.0.12.19052
    dbvnet         2.0.12.19052        2.0.12.19052
    dbvagent       2.0.12.19052        2.0.12.19052
    dbvserver      2.0.12.19052        not installed

    -----------------------------------------------------------

    What action would you like to perform?
       1 - Install component(s)
       2 - Uninstall component(s)
       3 - Terminate

    Your choice: 1

    Which component do you want to install?
       1 - Core Components (Dbvisit Standby Cli, Dbvnet, Dbvagent)
       2 - Dbvisit Standby Core (Command Line Interface)
       3 - Dbvnet (Dbvisit Network Communication)
       4 - Dbvagent (Dbvisit Agent)
       5 - Dbvserver (Dbvisit Central Console)
       6 - Exit Installer

    Your choice: 5

-----------------------------------------------------------
    About to configure DBVISIT DBVSERVER
-----------------------------------------------------------


>>> Please specify the host name to be used for Dbvserver


    The Dbvisit Web Server (Dbvserver) will be listening on this local
    address. If using a cluster or virtual IP make sure the host name or
    alias specified here resolve to the IP address local to where Dbvserver
    is installed.
    If you are unsure about the remote host name during installation, use
    the default value which will be the current local hostname.

    Enter a custom value or press ENTER to accept default [dbvcloud02]:
     >


>>> Please specify the listening port number for Dbvserver on the local server

    You may choose any value between 1024 and 65535.  The default recommended
    value is 4433.

    Note: if you can not access this port after the installation has
    finished, then please double-check your server firewall settings
    to ensure the selected port is open.
    Enter a custom value or press ENTER to accept default [4433]:
     >

-----------------------------------------------------------
    Summary of the Dbvisit DBVSERVER configuration
-----------------------------------------------------------
    DBVISIT_BASE /usr/dbvisit
    DBVSERVER_LOCAL_HOST dbvcloud03
    DBVSERVER_LOCAL_PORT 4433

    Press ENTER to continue

-----------------------------------------------------------
    About to install Dbvisit DBVSERVER
-----------------------------------------------------------
    Component dbvserver installed.

    Press ENTER to continue

    -----------------------------------------------------------
    Component      Installer Version   Installed Version
    -----------------------------------------------------------
    standby        8.0.12.19052        8.0.12.19052
    dbvnet         2.0.12.19052        2.0.12.19052
    dbvagent       2.0.12.19052        2.0.12.19052
    dbvserver      2.0.12.19052        2.0.12.19052

    -----------------------------------------------------------

    What action would you like to perform?
       1 - Install component(s)
       2 - Uninstall component(s)
       3 - Terminate

    Your choice: 3

>>> Installation completed
Install log /tmp/dbvisit_install.log.201706200938. |
| Note |
|---|
Version 8.0.20 has a new parameter, that of DBVSERVER_PUBLIC_HOST (parameter public_address in dbvserver.conf) Rather than accepting the default hostname prompt here, the public-facing IPv4 address of the Cloud Host should be used. Public-facing IPv4 address that will be supplied to the Agents (Dbvagent) to be used for pushing information back to the Central Console. This is the externally resolvable address supplied to dbvagent, not an additional listener address on dbvserver itself. |
Once the software has been installed on both nodes. Start the processes.
| Code Block |
|---|
[oracle@dbvlab01 installer]$ cd /usr/dbvisit/dbvnet [oracle@dbvlab01 dbvnet]$ ./dbvnet -d start [oracle@dbvlab01 dbvnet]$ cd ../dbvagent/ [oracle@dbvlab01 dbvagent]$ ./dbvagent -d start [oracle@dbvlab01 dbvagent]$ ps -ef|grep -i dbv oracle 9372 1 0 20:34 ? 00:00:00 ./dbvnet -d start oracle 9379 1 0 20:34 ? 00:00:00 ./dbvagent -d start |
Additionally, on the standby node, start the dbvserver process
| Code Block |
|---|
[oracle@dbvcloud03 dbvagent]$ cd ../dbvserver/ [oracle@dbvcloud03 dbvserver]$ ./dbvserver -d start [oracle@dbvcloud03 dbvserver]$ ps -ef|grep -i dbv oracle 30354 1 0 09:44 ? 00:00:00 ./dbvnet -d start oracle 30374 1 0 09:44 ? 00:00:00 ./dbvserver -d start oracle 30549 1 0 09:45 ? 00:00:00 ./dbvagent -d start |
3.2 Start the GUI and Create the DDC
Start a web browser and navigate to the https://<dbvserver_host>:4433. In this case, the standby node.
...
Firstly Create a directory for ARCHSOURCE and ARCHDEST parameters. The former is only required in the event of a Graceful switchover , when the Primary becomes a Standby database. In this example, the same location is created on each server.
...
Create a New Configuration. Fill out the relevant entries (as shown in the example below) the click 'Submit'

3.3 Create the Standby Database
| Info | ||||
|---|---|---|---|---|
Before Creating the Standby Database you must apply the v8 license. This can be done either via the GUI, by pasting the key into the boxes and choosing 'license dbvisit'  Or on the command line
E.g.
|
3.3.1 Creating the Standby with the GUI
Choose the Create Standby Database Tab from the Home Screen.
...
Select your configuration, New Database, edit the spfile SPFILE parameters if required and then check there is enough space in the Source and Dest temp locations.
...
Click Submit. The progress can be monitored from the resulting icon in the status bar.
3.3.2 Creating the Standby with the CLI
To Create the Standby database with the command line is shown below
...
| Code Block |
|---|
[oracle@dbvcloud03 ~]$ cat /etc/oratab # Next line added by Dbvisit Standby at Tue Jun 20 23:06:43 2017 SAM:/u01/app/oracle/product/11.2.0/dbhome_1:N |
3.4 Performing Basic Tasks
Some examples of basic tasks are outlined below. Please refer to the online documentation for more details on each command.
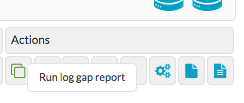
3.4.1 Log Gap Report
Run a log gap report from the Primary Site
| Code Block |
|---|
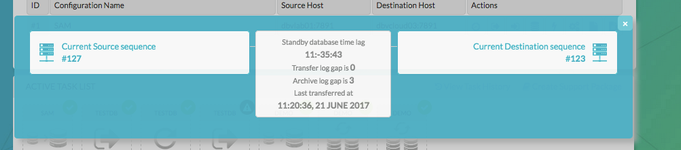
oracle@dbvlab01[/home/oracle]: cd /usr/dbvisit/standby/ oracle@dbvlab01[/usr/dbvisit/standby]: ./dbvctl -d SAM -i ============================================================= Dbvisit Standby Database Technology (8.0.12.19052) (pid 6516) dbvctl started on dbvlab01: Wed Jun 21 11:29:38 2017 ============================================================= Dbvisit Standby log gap report for SAM thread 1 at 201706211129: ------------------------------------------------------------- Destination database on dbvcloud03 is at sequence: 123. Source database on dbvlab01 is at log sequence: 127. Source database on dbvlab01 is at archived log sequence: 126. Dbvisit Standby last transfer log sequence: 126. Dbvisit Standby last transfer at: 2017-06-21 11:20:36. Archive log gap for SAM: 3. Transfer log gap for SAM: 0. Standby database time lag (DAYS-HH:MI:SS): -11:-27:45. ============================================================= dbvctl ended on dbvlab01: Wed Jun 21 11:29:52 2017 ============================================================= oracle@dbvlab01[/usr/dbvisit/standby]: |
Also from the GUI

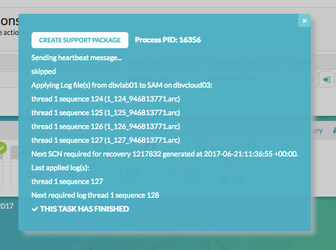
3.4.2 Log Transfer
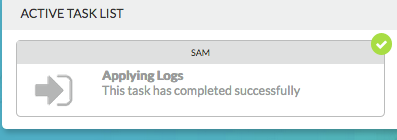
For the purposes of the Documentation, we will use the CLI to Send logs to the Standby Site and then Apply them on the Standby site using the GUI
...
Applying Logs with the GUI
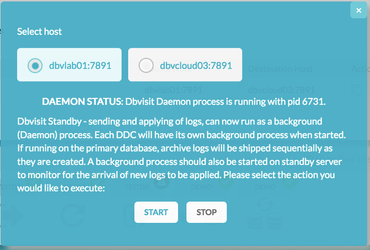
3.4.3 Daemon Status
Start the Daemons for automatic send/apply from the GUI Database Actions Tab.

The lightening "lightning bolt" icon manages the daemon processes as shown below.
...
https://dbvisit.atlassian.net/wiki/display/DS8QSG/Dbvisit+Standby+Scheduling
3.4.4 Starting Standby Database in Readonly Mode
From the Database Actions Tab choose the Database Icon. This allows the user to perform database actions on each node.
...
Select the Standby Host, review the current status and Select Start READ ONLY.
...
Now the Standby is back in recovery mode and the logs can be applied as normal.
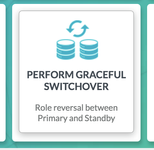
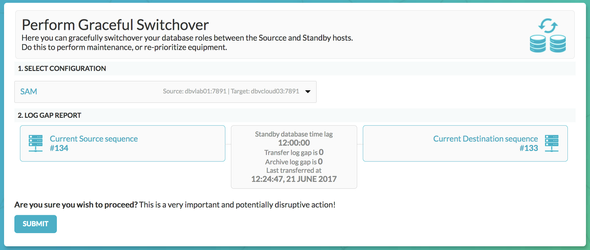
3.5 Performing Graceful Switchover
The following screenshots show a Graceful Switchover from one Cloud Standby to the other using the GUI.
A first pre-requisite is to ensure that the daemons started earlier are not running whilst the switchover is in progress.
3.5.1 Check the Status of the Daemons
From the lightening "lightning bolt" icon stop the running Daemons for each site.
3.5.2 Graceful Switchover Icon
Performing a graceful switchover reverses the roles of the Primary and Standby databases and in this instance, the cloud server will host the primary database. This can be a temporary test or for a long as required by your business needs.
This task can be performed from either the GUI or the command line, here we demonstrate a Graceful Switchover from the GUI.
3.5.3 Check Log Gap is Zero and Click Submit
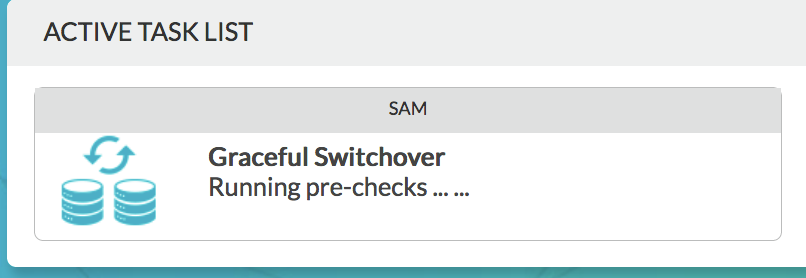
3.5.4 Locate the Task on the Task Bar and Monitor the Activity
3.5.5 Verify the New Roles within each of the Databases
Verify the new database roles within the database
| Code Block |
|---|
oracle@dbvlab01[/usr/dbvisit/standby/trace]: sqlplus / as sysdba SQL*Plus: Release 11.2.0.4.0 Production on Wed Jun 21 12:34:53 2017 Copyright (c) 1982, 2013, Oracle. All rights reserved. Connected to: Oracle Database 11g Enterprise Edition Release 11.2.0.4.0 - 64bit Production With the Partitioning, OLAP, Data Mining and Real Application Testing options SQL> select name, database_role from v$database; NAME DATABASE_ROLE --------- ---------------- SAM PHYSICAL STANDBY oracle@dbvcloud03 standby]$ sqlplus / as sysdba SQL*Plus: Release 11.2.0.4.0 Production on Wed Jun 21 00:42:30 2017 Copyright (c) 1982, 2013, Oracle. All rights reserved. Connected to: Oracle Database 11g Enterprise Edition Release 11.2.0.4.0 - 64bit Production With the Partitioning and Real Application Testing options SQL> select name, database_role from v$database; NAME DATABASE_ROLE --------- ---------------- SAM PRIMARY SQL> |
Also, note that the primary and standby hosts are reversed in the Configuration Tab:
...
| Code Block |
|---|
[oracle@dbvcloud03 standby]$ ./dbvctl -d SAM -o switchover
=============================================================
Dbvisit Standby Database Technology (8.0.12.19052) (pid 11238)
dbvctl started on dbvcloud03: Wed Jun 21 00:51:20 2017
=============================================================

>>> Starting Switchover between dbvcloud03 and dbvlab01

Running pre-checks       ... done
Pre processing           ... done
Processing primary       ... done
Processing standby       ... done
Converting standby       ... done
Converting primary       ... done
Completing               ... done
Synchronizing            ... done
Post processing          ... done

>>> Graceful switchover completed.
    Primary Database Server: dbvlab01
    Standby Database Server: dbvcloud03

>>> Dbvisit Standby can be run as per normal:
    dbvctl -d SAM


PID:11238
TRACE:11238_dbvctl_switchover_SAM_201706210051.trc

=============================================================
dbvctl ended on dbvcloud03: Wed Jun 21 00:55:25 2017
=============================================================

[oracle@dbvcloud03 standby]$
|
3.6 Activate the Standby Database
It is possible to activate the Standby Database and make it become the new Primary. This is also called failover to the standby database.
The assumption is that the original Primary site has been lost and needs to be rebuilt.
3.6.1 Activate Standby Database from the Central Console/GUI
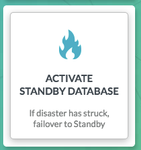
Select the Configuration and then click submit.
...
Locate the Task and monitor it from the Task Bar.
3.6.2 Activate From the Command Line
| Code Block |
|---|
[oracle@dbvcloud03 standby]$ ./dbvctl -d SAM -o activate
=============================================================
Dbvisit Standby Database Technology (8.0.12.19052) (pid 14588)
dbvctl started on dbvcloud03: Wed Jun 21 00:59:57 2017
=============================================================

Activating means this database will become a Primary Database.
It will no longer be a Standby Database for SAM on dbvlab01.
Activation cannot be reversed.
=>Activate Standby Database on dbvcloud03? <Yes/No> [No]: Yes
Are you sure? <Yes/No> [No]: Yes
>>> Activating now...

File /usr/dbvisit/standby/conf/dbv_SAM.env copied to /usr/dbvisit/standby/conf/dbv_SAM.env.201706210059.

>>> Activation complete. Please ensure a backup of this Database is made
>>> Old archives from before the activation should be removed to avoid mix-up between new
    and old archive logs


>>> Process complete

=============================================================
dbvctl ended on dbvcloud03: Wed Jun 21 01:02:09 2017
=============================================================

[oracle@dbvcloud03 standby]$
|
3.6.3 Verify the Status within the Database
| Code Block |
|---|
[oracle@dbvcloud03 standby]$ sqlplus / as sysdba SQL*Plus: Release 11.2.0.4.0 Production on Wed Jun 21 01:08:09 2017 Copyright (c) 1982, 2013, Oracle. All rights reserved. Connected to: Oracle Database 11g Enterprise Edition Release 11.2.0.4.0 - 64bit Production With the Partitioning and Real Application Testing options SQL> select name, database_role from v$database; NAME DATABASE_ROLE --------- ---------------- SAM PRIMARY SQL> |
3.6.4 Manage Configurations Tab Implications
Now the Manage Configurations Tab has the option to choose the hosts. This allows you to either accept the current configuration with the new Primary (old Standby site) or start again with the original Primary site and depends on the circumstances of the Activation.
...