Install Dbvisit Standby - Linux/Unix
Dbvisit Standby version 7 is making use of a new directory structure in comparison to the previous version 5 and 6. The default location on Linux for version 5 and 6 was /usr/local/dbvisit but in version 7 the default location changed to /usr/dbvisit. You can however still install version 7 into any other custom location, example /opt/dbvisit. It is recommended not to install Dbvisit Standby in the home directory of the oracle Unix account (/home/oracle).
On Linux it is possible to have both version 6 and 7 installed side by side, but only one should be run at a time. Dbvisit Standby version 7 repository owner during installation defaults to "dbvisit7" and will not affect the default version 6 standby repository user which is called "dbvisit". This option can be used to first configure and test version 7 in the environment and once up and running you can remove the version 6 software and only use version 7. More on this option in the section "Installing version 7 side by side to version 6" located under the "Upgrading Dbvisit Standby - Linux/Unix" section.
The following section will provide you with the detail steps required to perform a new installation of Dbvisit Standby version 7.
Installation Steps
You can follow 7 basic steps to install Dbvisit Standby version 7. This section cover the installation of Dbvisit Standby on a Non-RAC environment.
The Dbvisit Standby version 7 installation use approximately 70MB of disk space, but as trace files and log files will be stored in this location, 200MB free space is the recommended minimum.
In version 7 the default installation location is /usr/dbvisit. We do recommend you use the default or /usr/local/dbvisit. This directory will be known as the Dbvisit Base directory from version 7.
Step 1: Create "Dbvisit Base" Directory
The first step is to create the Dbvisit Base directory. This is the directory into which Dbvisit Standby will be installed into. The default location is /usr/dbvisit
This directory should be owned by the Oracle Database software owner.
The following steps can be executed as the "root" user to create the directory and set correct permission:
[root@dbvlin101 ~]# cd /usr
[root@dbvlin101 usr]# mkdir dbvisit
[root@dbvlin101 usr]# chown -R oracle:oinstall dbvisit
[root@dbvlin101 usr]# ls -ld dbvisit
drwxr-xr-x 2 oracle oinstall 4096 Aug 21 11:13 dbvisit
Step 2: Download Latest Software
The first step is to download the latest available version from the Dbvisit web site http://www.dbvisit.com
Once the software is downloaded, you can copy it to a temporary location on your server.
The Dbvisit Standby software is available for different Operating Systems and versions as noted on the download web page.
In summary:
- Files with -el4- in the name can be used for Oracle Linux and Red Had Enterprise Linux 4 (example - dbvisit-standby7.0.04-el4.zip)
- Files with -el5- in the name can be used for Oracle Linux and Red Had Enterprise Linux 5 (example - dbvisit-standby7.0.04-el5.zip)
- Files with -el6- in the name can be used for Oracle Linux and Red Had Enterprise Linux 6 (example - dbvisit-standby7.0.04-el6.zip)
- IF the name also include -x86_64 then it indicates it is for 64bit installations, and if -i686 is part of the name, then it is for 32bit installations (example dbvisit-standby7.0.04-el6-x86_64.zip indicates a download file for Oracle Linux 6 (as well as RHEL6) 64bit installation). If there is no -i686 or -x86_64- then the installation is for both 32bit and 64bit environments.
In this example, we create a temporary directory called 7.0 in /home/oracle and copy the software download into this directory.
We now have the following structure:
oracle@dbvlin101[/home/oracle/7.0]: ls -l
total 44084
-rw-r--r-- 1 oracle oinstall 45089534 Aug 21 10:40 dbvisit-standby7.0.01_linux.zip
Step 3: Extract Software
The next step is to extract the software downloaded in the previous step as well as updating the install-dbvisit file permission to allow the execution option.
First use "unzip" to uncompress the downloaded software package, followed by using the "tar -xf" command to extract the archive. The steps are shown below:
oracle@dbvlin101[/home/oracle/7.0]: unzip dbvisit-standby7.0.01_linux.zip
Archive:  dbvisit-standby7.0.01_linux.zip
  inflating: dbvisit-standby7.0.01.tar
  inflating: README.txt
  inflating: online_user_guide_reference.txt
oracle@dbvlin101[/home/oracle/7.0]: ls -l
total 109844
-rw-r--r-- 1 oracle oinstall 45089534 Aug 21 10:40 dbvisit-standby7.0.01_linux.zip
-rw-rw-rw- 1 oracle oinstall 67165696 Aug 19 18:10 dbvisit-standby7.0.01.tar
-rw-rw-rw- 1 oracle oinstall      393 Jul 10 23:21 online_user_guide_reference.txt
-rw-rw-rw- 1 oracle oinstall    87875 Aug 19 14:17 README.txt
oracle@dbvlin101[/home/oracle/7.0]: tar -xf dbvisit-standby7.0.01.tar
oracle@dbvlin101[/home/oracle/7.0]: ls -l
total 109848
drwxr-xr-x 6 oracle oinstall     4096 Aug 21 10:50 dbvisit
-rw-r--r-- 1 oracle oinstall 45089534 Aug 21 10:40 dbvisit-standby7.0.01_linux.zip
-rw-rw-rw- 1 oracle oinstall 67165696 Aug 19 18:10 dbvisit-standby7.0.01.tar
-rw-rw-rw- 1 oracle oinstall      393 Jul 10 23:21 online_user_guide_reference.txt
-rw-rw-rw- 1 oracle oinstall    87875 Aug 19 14:17 README.txt
Step 4: Running the Dbvisit Installer
The next step in the process is to start the Dbvisit Standby installer. Once you have extracted the tar archive, you will notice a new "dbvisit" directory.
In this directory you will find an "installer" directory which contains the installation script to be executed. Before executing this script you need to make it "executable". This can be done as follow:
oracle@dbvlin101[/home/oracle/7.0]: ls -l
total 109848
drwxr-xr-x 6 oracle oinstall     4096 Aug 21 10:50 dbvisit
-rw-r--r-- 1 oracle oinstall 45089534 Aug 21 10:40 dbvisit-standby7.0.01_linux.zip
-rw-rw-rw- 1 oracle oinstall 67165696 Aug 19 18:10 dbvisit-standby7.0.01.tar
-rw-rw-rw- 1 oracle oinstall      393 Jul 10 23:21 online_user_guide_reference.txt
-rw-rw-rw- 1 oracle oinstall    87875 Aug 19 14:17 README.txt
oracle@dbvlin101[/home/oracle/7.0]: cd dbvisit
oracle@dbvlin101[/home/oracle/7.0/dbvisit]: ls
dbvnet	dbvserver  installer  standby
oracle@dbvlin101[/home/oracle/7.0/dbvisit]: cd installer
oracle@dbvlin101[/home/oracle/7.0/dbvisit/installer]: ls  -l
total 2648
-rw-r--r-- 1 oracle oinstall 2707057 Aug 19 18:10 install-dbvisit

oracle@dbvlin101[/home/oracle/7.0/dbvisit/installer]: chmod u+x install-dbvisit
oracle@dbvlin101[/home/oracle/7.0/dbvisit/installer]: ls -l
total 2648
-rwxr--r-- 1 oracle oinstall 2707057 Aug 19 18:10 install-dbvisit
Now that the install-dbvisit script has the correct permissions, you may execute this script to start the installer.
Below is the detail output of the installation process. In summary the following are performed
(note that in most cases just accepting the default values are recommended)
- Start the installer using - ./install-dbvisit command
- Provide the DBVISIT_BASE directory - /usr/dbvisit (default)
- Confirm the Oracle Database software owner name - oracle (default)
- Specify the dbvnet port number - 7890 (default)
- Specify the dbvnet password used for secure communication between nodes - admin (default)
- Confirm if you want to auto start dbvnet after installation - yes (default)
- Specify the Dbvserver (GUI) protocol (http or https) - https (default)
- Confirm the default port number for Dbvserver (GUI) - 8443 (default for https)
- Specify the Dbvserver administrator user name - admin (default)
- Specify the Dbvserver administrator user password - admin (default)
- Confirm if you want to auto start Dbvserver after installation - yes (default)
- Do you want to allow error notification (bug tracking Dbvserver) - yes (default)
- Confirm bug tracking email address (bug tracking Dbvserver) - bugtrack700@dbvisit.com (default)
Below is an example installation process. At the end of this process the Dbvnet and Dbvserver background processes will be started automatically.
oracle@dbvlin101[/home/oracle/7.0/dbvisit/installer]: ./install-dbvisit
-------------------------------------------------------------------------------
 Welcome. Your Dbvisit product is going to be installed in a moment.
 It will be required by you to enter some configuration parameters
 during installation.
-------------------------------------------------------------------------------
 It is recommended to make a backup of our current Dbvisit software
 location for rollback purposes.
>>> INSTALLATION DIRECTORY
 Please specify the Dbvisit main installation directory.
 The default directory is "/usr/dbvisit".
 Note: the various Dbvisit products and components - such as Standby,
 Replicate, Dbvnet, and Dbvserver - will be installed in the appropriate
 subdirectories of this path.
 Enter a custom value or press ENTER to accept default [/usr/dbvisit]:
 > /usr/dbvisit
-------------------------------------------------------------------------------
 ABOUT TO CONFIGURE: DBVISIT STANDBY
-------------------------------------------------------------------------------
 Dbvisit Standby is Dbvisit's disaster recovery software for your
 Oracle database.
>>> ORACLE USER NAME
 Please specify the Oracle user name on this server.
 The default user name is "oracle".
 Note: you must be logged in as the Oracle user to run Dbvisit installer.
 Custom value or ENTER for default [oracle]:
 > oracle
-------------------------------------------------------------------------------
 ABOUT TO CONFIGURE: DBVISIT DBVNET
-------------------------------------------------------------------------------
 Dbvisit Dbvnet is Dbvisit's network transportation software which
 provides network connectivity for all Dbvisit products. Dbvnet is a
 persistent daemon software that must be running on both the primary
 and standby servers at all times.
>>> DBVNET PORT NUMBER
 Please specify the listening port number for Dbvnet on this server.
 The default port number used by Dbvnet is 7890. You may choose any
 value between 1024 and 65535.
 Note: if you can not access this port after the installation has
 finished, then please double-check your server's firewall settings
 to ensure the selected port is open.
 Custom value or ENTER for default [7890]:
 > 7890
>>> DBVNET PASSWORD
 Please specify a password to encrypt all network data transmissions
 between servers in your network on which Dbvisit software is running.
 The default password is "admin".
 Custom value or ENTER for default [admin]:
 > admin
>>> DBVNET START AFTER INSTALLATION
 Please specify whether or not Dbvnet should be started when the
 installer has finished.
 The default setting is "yes".
 Custom value or ENTER for default [yes]:
 > yes
-------------------------------------------------------------------------------
 ABOUT TO CONFIGURE: DBVISIT DBVSERVER
-------------------------------------------------------------------------------
 Dbvisit Dbvserver is Dbvisit's web server software that provides a web
 interface for all Dbvisit products. Dbverver is a also a daemon that
 must be running on both servers if you wish to use its built-in
 command scheduler or control Dbvisit software through your web
 browser.
>>> DBVSERVER WEB PROTOCOL
 Please specify the web protocol to be used by Dbvserver on this server.
 Dbvserver supports both the HTTP and HTTPS web protocols. HTTP sends
 plain text messages across the network and should therefore be used
 on local networks only.
 The default web protocol is "https".
 If unsure, select HTTPS which safely encrypts all network transmissions.
 Custom value or ENTER for default [https]:
 > https
>>> DBVSERVER PORT NUMBER
 Please specify the listening port number for Dbvserver on this server.
 The default port number used by Dbvserver is 8081 for HTTP and 8443
 for HTTPS. You may choose any value between 1024 and 65535.
 Note: if you can not access this port after the installation has
 finished, then please double-check your server's firewall settings
 to ensure the selected port is open.
 Custom value or ENTER for default [8443]:
 > 8443
>>> DBVSERVER USER
 Please specify a user name to be used to access Dbvserver through
 your web browser later on.
 Note: this is a virtual user name, i.e. there is no corresponding
 system user account required.
 The default user name is "admin".
 Custom value or ENTER for default [admin]:
 > admin
>>> DBVSERVER PASSWORD
 Please specify a login password for the user name you just entered.
 The default password is "admin".
 Custom value or ENTER for default [admin]:
 > admin
>>> DBVSERVER START AFTER INSTALLATION
 Please specify whether or not Dbvserver should be started when the
 installer has finished.
 The default setting is "yes".
 Custom value or ENTER for default [yes]:
 > yes
>>> AUTOMATIC ERROR NOTIFICATION
 In order to improve both the Dbvisit web interface and the network
 transport layer, an automatic email can be sent to Dbvisit support
 when a run-time issue is detected by Dbvserver or Dbvnet.
 Note: information pertaining to Dbvserver and Dbvnet is sent only,
 and the information is solely used to improve our software.
 The default setting is "yes".
 Custom value or ENTER for default [yes]:
 > yes
>>> AUTOMATIC ERROR EMAIL ADDRESS
 What email address should be used to send automatic error notifications
 to? Usually, they are sent to a special Dbvisit error collection address.
 However, you may use your own support email address to receive error
 notifications first, and then forward them to Dbvisit support later in
 case there is a serious issue.
 Note: the Dbvisit notification address below can not be used for support
 enquiries. Manual email sent to this address will be ignored. Please open
 a support ticket on the support desk (http://www.dbvisit.com/servicedesk)
 if you are facing any difficulties.
 The default email address is "bugtrack700@dbvisit.com".
 Custom value or ENTER for default [bugtrack700@dbvisit.com]:
 >
-------------------------------------------------------------------------------
 Thank you. Configuration is complete. Installation will commence now.
-------------------------------------------------------------------------------
>>> Installing Standby - the Dbvisit disaster recovery software...
 Installing product files...
 Updating and migrating existing DDC files in /usr/dbvisit...
 > Removing old DDC files with appended timestamps
 Updating and migrating existing DDC files in /usr/dbvisit/standby...
 > Removing old DDC files with appended timestamps
 Removing old product files...
 Dbvisit Standby installation complete.
>>> Installing Dbvnet - the Dbvisit network layer...
>>> Adjusting init script templates for product dbvnet...
 Please find some init script templates in the following directory:
 /usr/dbvisit/dbvnet/conf/init.d
 These templates will allow your Systems Administrator to automatically
 start Dbvserver after a database server reboot.
 Templates are available for Sun Solaris, IBM AIX, and the Linux flavours
 OpenSuSE, RedHat/Centos/Fedora & Debian/Ubuntu.
>>> Starting Dbvnet daemon, please wait...
 Dbvnet is up and running on the following ip address and port:
 niop://172.16.1.111:7890
>>> Installing Dbvserver - the Dbvisit web interface...
>>> Adjusting init script templates for product dbvserver...
 Please find some init script templates in the following directory:
 /usr/dbvisit/dbvserver/conf/init.d
 These templates will allow your Systems Administrator to automatically
 start Dbvserver after a database server reboot.
 Templates are available for Sun Solaris, IBM AIX, and the Linux flavours
 OpenSuSE, RedHat/Centos/Fedora & Debian/Ubuntu.
>>> Starting Dbvserver daemon, please wait...
 Dbvserver is up and running. Please point your browser to the
 following URL to log in to the Dbvisit web interface:
 https://172.16.1.111:8443
 Login user name is 'admin' (password 'admin')
>>> Dbvisit product and component installation is now complete.
>>> NEXT STEPS: CONFIGURE DBVISIT STANDBY VIA COMMAND LINE INTERFACE (CLI):
 cd /usr/dbvisit/standby
 ./dbvisit_setup
 Note: Dbvisit can also be configured and run through a (GUI) web browser.
 Dbvserver (dbvserverd) must be installed and started for this.
>>> IMPORTANT - PLEASE NOTE THE FOLLOWING REQUIREMENTS BEFORE CONTINUING:
 > The Dbvisit Standby, Dbvnet, and Dbvserver software must be installed
 on both the primary and standby servers.
 > For network communication between the primary and standby server
 via Dbvnet port number 7890 must not be blocked by your firewalls.
 > Dbvnet must be up and running on both the primary and standby servers
 at all times.
 > If you wish to use Dbvserver, the Dbvisit web interface, then please
 ensure port 8443 is open on your servers' firewalls, as well.
>>> Thank you for using Dbvisit software!
At this stage you should now have the Dbvisit Standby software installed and if you selected to auto start Dbvnet (Dbvisit Networking) and Dbvserver (GUI) you will have a number of Background processes running. Below is example output listing these processes:
oracle@dbvlin101[/home/oracle]: ps -ef|grep dbv
oracle    6410     1  0 Aug21 ?        00:00:01 ./dbvnetd start
oracle    6411  6410  0 Aug21 ?        00:00:00 ./dbvnetd start
oracle    6414  6410  0 Aug21 ?        00:00:00 ./dbvnetd start
oracle    6415  6410  0 Aug21 ?        00:00:00 ./dbvnetd start
oracle    6416  6410  0 Aug21 ?        00:00:00 ./dbvnetd start
oracle    6431     1  0 Aug21 ?        00:00:01 ./dbvserverd start
oracle    6432  6431  0 Aug21 ?        00:00:00 ./dbvserverd start
oracle    6434  6431  0 Aug21 ?        00:00:01 ./dbvserverd start
oracle    6436  6431  0 Aug21 ?        00:00:00 ./dbvserverd start
Step 5: Repeat Installation on Standby Server
Dbvisit Standby needs to be installed on the Primary server as well as on the Standby server.
Before you continue with the next step you need to make sure you follow Step 1 to 5 above on all the servers in the standby configuration. When doing this, it is important to make sure the Dbvnet password provided during installation is the same on all the servers where you are installing Dbvnet. This password is used for secure communication and if different passwords are used between the primary and standby servers, you will not be able to establish a connection between these servers using Dbvnet.
Step 6: Testing Dbvnet Communication
Once you have Dbvisit Standby installed on all the servers, it is important to make sure that the communication between the Primary and Standby servers are working. This can be done by making use of the Dbvnet Test utility provided with the Dbvisit Standby installation - dbvnet-test, which is located under the dbvnet sub directory. When using the default path this utility will be in /usr/dbvisit/dbvnet/dbvnet-test
To test communication between the primary and standby servers you can run the following recommended test commands:
- To perform a basic status check which confirms that the primary and standby server can communicate using Dbvnet:
- dbvnet-test [-s|--status] SERVER[:PORT]
- To perform a more detail check, testing network connectivity, you can run the following:
- dbvnet-test [-f|--fulltest] SERVER:PORT
In the example below, dbvlin101 is the primary server and dbvlin102 is the standby server. Dbvisit Standby was installed using default values and no additional configuration has been performed at this stage. Dbvnet and Dbvserver is running on both nodes, but only Dbvnet is required and used for these tests:
Test 1: Basic Status Check
oracle@dbvlin101[/usr/dbvisit/dbvnet]: ./dbvnet-test -s dbvlin102:7890

>>> Determining Dbvnet status on server dbvlin102:7890...


    Dbvnet on server dbvlin102:7890 is running.
Test 2: Full Test - 10MB file is copied (and verified) between primary and standby
From 7.0.10, please make sure you specify the temp directory, example /tmp in this case. It must exist on both systems.
oracle@dbvlin101[/usr/dbvisit/dbvnet]: ./dbvnet-test -f /tmp dbvlin102:7890

>>> Determining Dbvnet status on server dbvlin102:7890...
    Dbvnet on server dbvlin102:7890 is running.

>>> Running file transfer round trip on server dbvlin102:7890...
    Creating file '/tmp/dbvnet-test.tmp' containing 10 MB of data... - done.

  > Transferring 'dbvnet-test.tmp' to server dbvlin102:7890
    Progress: 0%...20%...40%...60%...80%...100% [11046 KB/s] - done.

  > Retrieving file "dbvnet-test.tmp" from server dbvlin102:7890
    Progress: 0%...20%...40%...60%...80%...100% [11209 KB/s] - done.
    Comparing checksums: all three checksums (local/remote/local) are
    identical. File transfer round trip finished successfully.
Stop and Start Dbvnet
Dbvnet can be stopped and started using the dbvnetd executable located in the dbvnet sub directory (example - /usr/dbvisit/dbvnet). Below is an example of stopping and starting the Dbvnet background processes:
oracle@dbvlin101[/usr/dbvisit/dbvnet]: ./dbvnetd stop
oracle@dbvlin101[/usr/dbvisit/dbvnet]: ps -ef|grep dbvnet
oracle   12641 12446  0 09:20 pts/1    00:00:00 grep dbvnet
oracle@dbvlin101[/usr/dbvisit/dbvnet]: ./dbvnetd start
oracle@dbvlin101[/usr/dbvisit/dbvnet]: ps -ef|grep dbvnet
oracle   12643     1  0 09:20 pts/1    00:00:00 ./dbvnetd start
oracle   12644 12643  0 09:20 pts/1    00:00:00 ./dbvnetd start
oracle   12645 12643  0 09:20 pts/1    00:00:00 ./dbvnetd start
oracle   12646 12643  0 09:20 pts/1    00:00:00 ./dbvnetd start
oracle   12647 12643  0 09:20 pts/1    00:00:00 ./dbvnetd start
oracle   12649 12446  0 09:20 pts/1    00:00:00 grep dbvnet
You should run the above tests from both the primary and standby servers to ensure communication between primary and standby servers can be established. Once this is done you can continue to the next step which is the creation of a Dbvisit Standby Database Configuration (DDC) file.
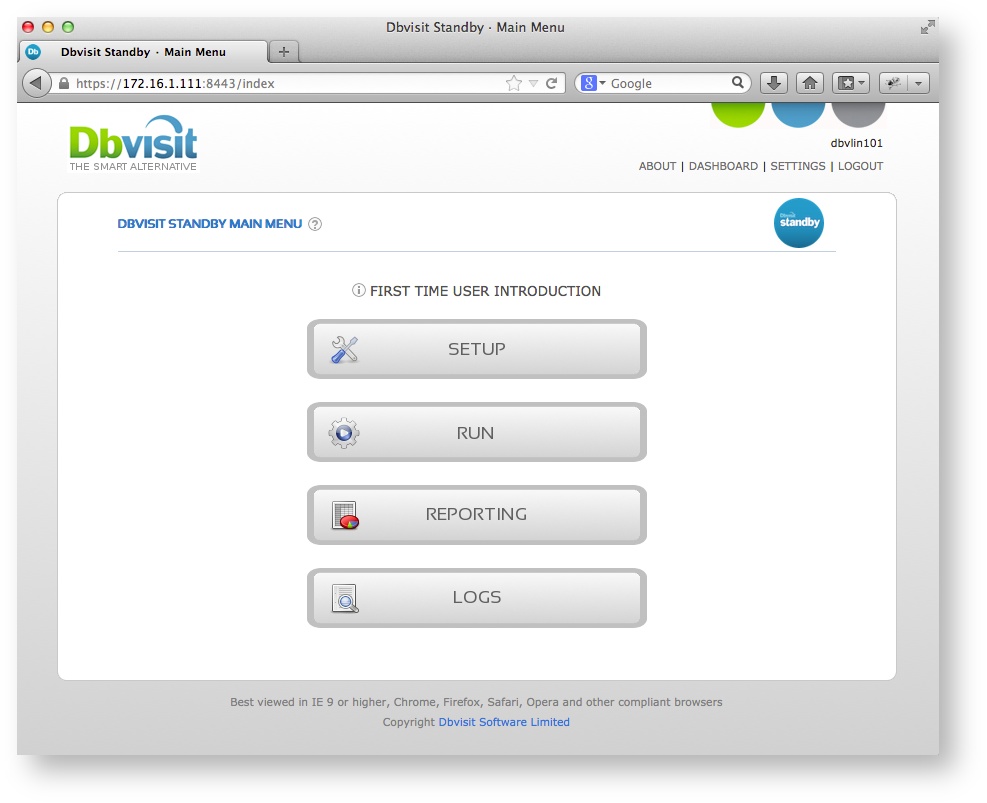
Step 7: Accessing the GUI (Dbvserver)
If you selected to install the Dbvserver (GUI) and allowed the auto start option during the installation process you should now be able to connect to the web based GUI interface.
To access this interface you can use http or https and the specified port you specified during installation. The default is https with port 8443 and you should be able to connect to the web based frontend using the following url: https://yourservername:8443
Example below is connecting to the GUI on dbvlin101 (172.16.1.111) using https and port 8443.
When asked for a username and password you need to provide the username and password specified during installation.
Summary
If you followed the above steps you should now have Dbvisit Standby installed on both your primary and standby servers.
You are now ready to move on to the next step which is to configure Dbvisit Standby.