Upgrade Dbvisit Standby
1. Introduction
The Dbvisit Standby upgrade process in Version 10 will be similar to the process in earlier versions. There are a number of pre-requisites before upgrading:
- Dbvisit Standby version to be upgraded MUST be at least version 9 or Version 8 (latest update recommended).
- The Operating System and Database Version requirements are met.
- Dbvisit Standby version 10 will not work with Oracle versions lower than 10.2.0.5
Prior to performing any upgrades, it is recommended to make sure you have sufficient backups. This is good practice for any software upgrade.
This can easily be done by just backing up the DBVISIT_BASE folder prior to installing the new version.
Before starting the upgrade process, please make sure all Dbvisit Standby schedules are stopped.
Central Console (dbvserver) must be the same version as all the other components. We can not run dbvserver on a lower or higher version than dbvnet, dbvagent, and core.
When upgrading from 9.0.08 to 9.0.10 we've made some changes to how Dbvisit Software obtains certificates.
These parameters are removed from the conf files - dbvnet, dbvagent & dbvserver
cert=conf/cert.pem
prikey=conf/prikey.pem
ca=conf/ca.pem
The software now looks for certificates in the default conf locations. If, however, a client wants to use their own certificates (different names & locations), they can still manually add these setting lines to the conf files. Existing customers with custom values in those lines should NOT have them cleared on upgrade.
The rest of this section will take you through the upgrade process from Dbvisit Standby version 8.0.x, 9.0.x to 10.0.x
On this page:
Important Notes:
- If you are using Dbvisit Standby version 5 or 6, you can either first install version 7 and then upgrade to version 8 then version 10, or install a new version 10 (in a separate location) and re-create your DDC configurations. You will not be required to recreate standby databases.
- IMPORTANT: Before performing the upgrade process it is important to make sure that all pre-requisite checks were performed and met. Ignoring these can lead to Dbvisit Standby version 9 installation failure as well as Dbvisit Standby not behaving as expected. For more detail please see Installation Prerequisites
- If you are upgrading from version 7.0.x in an Oracle RAC configuration, please note the following:
- Dbvisit Standby version 8, 9 and 10 handles Oracle RAC configurations different.
- You MUST create a new DDC file from scratch - you cannot perform an upgrade as when using version 8 or 9 or 10 in an Oracle RAC configuration, the RAC settings in the DDC file is totally different. The upgrade process will not upgrade these old DDC files to the correct format - you must run the NEW DDC file creation.
- In Version 8 and above, Dbvisit Standby is more Oracle RAC aware and it is recommended to run Dbvisit Standby from only one node in the RAC cluster instead of running it on each of the nodes.
- There is no more RAC_TAKEOVER or RAC_TAKEOVER_FORCE settings in the DDC File and if set they will be ignored.
- Dbvisit Standby version 8 and above, will detect all Threads in the cluster and ship all archive logs, no need to set the takeover settings or have Dbvisit Standby run on both RAC nodes.
- We recommend the use of shared storage for the Dbvisit Standby installation - example the use of ACFS, which is then shared between the RAC nodes. This will allow Dbvisit Standby components such as Dbvnet, Dbvserver and Dbvagent to be added as cluster resources.
- If you do not have the option to create shared storage, you will have to use local storage. This does have some challenges, as if the node you are running on fail, you do not have shared storage that can fail over. To accommodate this, you can use a tool such as "rsync" to sync this folder between the RAC nodes. Then in the case of failure on the one node, you have the other node where you can then start Dbvisit Standby - note that we still recommend the use of a Virtual IP to be used.
For more detail on Oracle RAC configurations, please see the advance Oracle RAC configuration section in the documentation
For creating a new Oracle RAC DDC files see the examples here
- Oracle RAC primary to Single Instance standby - Creating the DDC File#2.5.CreateaDDCFile-OracleRACprimarytoSingleInstanceStandby
- Oracle RAC primary to Oracle RAC standby - Creating the DDC File#2.4.CreatingaDDC-OracleRACprimarytoOracleRACstandby
2. Linux - Upgrade from Dbvisit Standby version 7.0.x
If you are using Dbvisit Standby 7.0.x you must first upgrade to Dbvisit Standby version 8 before you can upgrade to version 10.0.x. You can directly move to Version 10.0.x by doing a fresh install and creating a fresh DDC file. Remember you don't have to re-create your standby database for moving Version 7.0.x to Version 10.0 if your standby already exists and is in sync.
For more details on upgrading from version 7.0.x to version 8.0.x please see the Dbvisit Standby version 8 documentation.
3. Linux - Upgrade from Dbvisit Standby version 8.0.x or 9.0.x to 10.0.x
It is recommended to be on the latest update of Dbvisit Standby version 8 or 9 prior to upgrading to version 10.
The upgrade process consists of two key steps:
- Upgrade (install) the new version 10 software.
- Upgrade the DDC files and repository to reflect the latest release.
When upgrading from version 8.0.x or 9.0.x, the process is easy and should only take a few minutes.
The high level recommended steps are:
- Stop your Dbvisit Schedules if you have any running.
- Stop or wait for any Dbvisit processes that might still be executing.
- Backup the Dbvisit Base location where your software is installed.
- Download the latest version from www.dbvisit.com
- Extract the install files into a temporary folder, example /home/oracle/10.0
- Start the Installer and select to install the required components.
- Once the update is complete, you can remove the temporary install folder where the installer was extracted.
- Apply the new version 10 license key.
- It is recommended to run a manual send/apply of logs once an upgrade is complete.
- Re-enable any schedules
The section below will show you a detailed example of the upgrade process.
3.1. Example 1 - Upgrading Dbvisit Standby Core Components
The first example shows the upgrade process for the Dbvisit Standby version 8 core components which include - Dbvnet, Dbvagent and the Standby Core CLI.
The steps followed below are:
3.1.1. Prerequisite Steps
- Stop all schedules if used - on Unix systems if schedules are used it would be via the UNIX "CRON" schedule. You can use the "crontab -l" command to list any schedules and if you want to edit them use "crontab -e"
Stop the Dbvisit components. Check the processes running and by running ps -ef |grep dbv which would list out processes that are running and you can stop them. Below is the example for stopping the Dbvisit components from both primary and standby. We have our dbvserver installed in the standby server in this example.
Primary: dbvel71 Standby: dbvel72

Stopping the components in Primary:
[oracle@dbvel71 standby]$ pwd
/usr/dbvisit/standby
[oracle@dbvel71 standby]$ ps -ef |grep dbv
oracle    6028     1  0 11:18 ?        00:00:00 ./dbvnet -d start
oracle    6032     1  0 11:18 ?        00:00:00 ./dbvagent -d start
oracle    7987     1  1 11:31 ?        00:00:00 ./dbvctl -d orcl -D start
oracle    8034  4659  0 11:31 pts/0    00:00:00 grep --color=auto dbv
[oracle@dbvel71 standby]$ ./dbvctl -d orcl -D stop
Stopping Dbvisit Daemon...
Successfully stopped.
[oracle@dbvel71 standby]$ cd ../dbvnet/
[oracle@dbvel71 dbvnet]$ ./dbvnet -d stop
Stop signal has been sent to pid: 6028
[oracle@dbvel71 dbvnet]$ cd ../dbvagent/
[oracle@dbvel71 dbvagent]$ ./dbvagent -d stop
Stop signal has been sent to pid: 6032
[oracle@dbvel71 dbvagent]$ ps -ef |grep dbv
oracle    8084  4659  0 11:32 pts/0    00:00:00 grep --color=auto dbv
[oracle@dbvel71 dbvagent]$

Stopping the components in the Standby:

[oracle@dbvel72 standby]$ pwd
/usr/dbvisit/standby
[oracle@dbvel72 standby]$ ./dbvctl -d orcl -D stop
Stopping Dbvisit Daemon...
Successfully stopped.
[oracle@dbvel72 standby]$ cd ../dbvnet/
[oracle@dbvel72 dbvnet]$ ./dbvnet -d stop
Stop signal has been sent to pid: 6257
[oracle@dbvel72 dbvnet]$ cd ../dbvagent/
[oracle@dbvel72 dbvagent]$ ./dbvagent -d stop
Stop signal has been sent to pid: 6261
[oracle@dbvel72 dbvagent]$ cd ../dbvserver/
[oracle@dbvel72 dbvserver]$ ./dbvserver -d stop
Stop signal has been sent to pid: 6266
[oracle@dbvel72 dbvserver]$ ps -ef |grep dbv
oracle    8174  4724  0 11:33 pts/0    00:00:00 grep --color=auto dbv
[oracle@dbvel72 dbvserver]$
Backup the Dbvisit Standby installation directory (optional - but recommended)
In this example, we will backup the /usr/dbvisit directory using the "tar" command to create a backup in a backup folder called /home/oracle/backup. You can use the "du -sh" command to confirm the /usr/dbvisit directory size prior to backup. The "tar" command used in this case will use the -z option to enable compression.[oracle@dbvel72 dbvisit]$ pwd /usr/dbvisit [oracle@dbvel72 dbvisit]$ du -sh . 453M . [oracle@dbvel72 dbvisit]$ tar czf /home/oracle/backup/dbvisit_backup_03Dec2020.tar.gz . [oracle@dbvel72 dbvisit]$ ls -lrt /home/oracle/backup/dbvisit_backup_03Dec2020.tar.gz -rw-r--r--. 1 oracle oinstall 83521643 Dec 3 11:36 /home/oracle/backup/dbvisit_backup_03Dec2020.tar.gz [oracle@dbvel72 dbvisit]$
If you have a regular backup schedule the above backup process might not be required.
Backing up the full directory is not strictly required, the most important files are located in /usr/dbvist/standby/conf/ which is the DDC files and their respective repositories. It is recommended to have at minimum at least a backup of this folder.
Now that the required process is stopped and a backup is created, you can continue with the upgrade process.
3.1.2. Start The Upgrade Process
- Download the latest installation package and placed it in /home/oracle/10.0 folder - which was empty
- A listing of the install file is shown
- The install package is then extracted using the "unzip <package-name>.zip" command followed by the extracting of the archive file with the command "tar -xf <package-name>.tar"
- You will now have a subfolder called dbvisit with the install files located inside.
- Navigate to the dbvisit/installer subdirectory with cd dbvisit/installer
- The installer is then started with the command: ./install-dbvisit
- The first question that will be asked is the destination installation path also known as the Dbvisit Base directory, in the example, the default is used "/usr/dbvisit" as this is where the previous version was installed, that we want to upgrade.
- The next screen will display a summary of the options installed as well as the new installer version. (The major or minor version numbers may be different)
- You will be asked to confirm if you want to Install, Uninstall components or Terminate the installer. In this case, we want to select "Install" which is option "1"
- The following menu option will display the 6 possible options. In this case, we have the Core components installed - dbvnet, dbvagent and standby (CLI) and we would like to upgrade them. We select option "1" to continue upgrading these 3 components.
- The installer will now start updating the Standby Core (CLI) first, followed by Dbvnet and then the Dbvisit Agent (dbvagent).
- Once the update is complete, you will be presented with a menu showing you the installed components and their versions.
- Select the option "3" to Terminate the installer as we are not complete with this step.
The example below shows you the steps as discussed above:
[oracle@dbvel71 10.0]$ ls -lrt
total 163132
-rw-r--r--. 1 oracle oinstall 167043374 Dec  3 11:38 dbvisit-standby-10.0.0RC_24_g94ba1d85-el6.zip
[oracle@dbvel71 10.0]$ unzip dbvisit-standby-10.0.0RC_24_g94ba1d85-el6.zip
Archive:  dbvisit-standby-10.0.0RC_24_g94ba1d85-el6.zip
  inflating: dbvisit-standby-10.0.0RC_24_g94ba1d85-el6.tar
[oracle@dbvel71 10.0]$ tar xf dbvisit-standby-10.0.0RC_24_g94ba1d85-el6.tar
[oracle@dbvel71 10.0]$ ls
dbvisit  dbvisit-standby-10.0.0RC_24_g94ba1d85-el6.tar  dbvisit-standby-10.0.0RC_24_g94ba1d85-el6.zip  INSTALL.txt  README.txt
[oracle@dbvel71 10.0]$ cd dbvisit
[oracle@dbvel71 dbvisit]$ cd installer/
[oracle@dbvel71 installer]$ ./install-dbvisit

-----------------------------------------------------------
    Welcome to the Dbvisit software installer.
-----------------------------------------------------------

    It is recommended to make a backup of our current Dbvisit software
    location (Dbvisit Base location) for rollback purposes.

    Installer Directory /home/oracle/10.0/dbvisit

>>> Please specify the Dbvisit installation directory (Dbvisit Base).

    The various Dbvisit products and components - such as Dbvisit Standby,
    Dbvisit Dbvnet will be installed in the appropriate subdirectories of
    this path.

    Enter a custom value or press ENTER to accept default [/usr/dbvisit]:
     >
    DBVISIT_BASE = /usr/dbvisit

    -----------------------------------------------------------
    Component      Installer Version   Installed Version
    -----------------------------------------------------------
    standby        10.0.0RC_24_g94ba1d85                             8.0.30_0_g81a31d32
    dbvnet         10.0.0RC_24_g94ba1d85 (dbvnet v1.5.0-301-g3896e54)8.0.30_0_g81a31d32
    dbvagent       10.0.0RC_24_g94ba1d85                             8.0.30_0_g81a31d32
    dbvserver      10.0.0RC_24_g94ba1d85                             not installed
    observer       10.0.0RC_24_g94ba1d85                             not installed

    -----------------------------------------------------------

    What action would you like to perform?
       1 - Install component(s)
       2 - Uninstall component(s)
       3 - Exit

    Your choice: 1

    Choose component(s):
       1 - Core Components (Dbvisit Standby Cli, Dbvnet, Dbvagent)
       2 - Dbvisit Standby Core (Command Line Interface)
       3 - Dbvnet (Dbvisit Network Communication)
       4 - Dbvagent (Dbvisit Agent)
       5 - Dbvserver (Dbvisit Central Console) - Not available on Solaris/AIX
       6 - Dbvisit Observer (Automatic Failover Option) - Not available on Solaris/AIX
    Press ENTER to exit Installer

    Your choice: 1

>>> Please specify the Oracle Instant Client version.

    The Oracle Instant Client is a required library for Dbvisit products.
    You may choose 12.1 or 12.2, however the default version is 12.2.

    Enter a custom value or press ENTER to accept default [12.2]:
     >

-----------------------------------------------------------
    Summary of the Dbvisit STANDBY configuration
-----------------------------------------------------------
    DBVISIT_BASE /usr/dbvisit
    INSTANT_CLIENT_VERSION 12.2

    Press ENTER to continue

-----------------------------------------------------------
    About to install Dbvisit STANDBY
-----------------------------------------------------------
    NTF repo installed.
    Component standby installed.

-----------------------------------------------------------
    About to install Dbvisit DBVNET
-----------------------------------------------------------
    Default cert.pem is found, replace certificates with new files
Copied file /home/oracle/10.0/dbvisit/dbvnet/conf/prikey.pem to /usr/dbvisit/dbvnet/conf/prikey.pem
Copied file /home/oracle/10.0/dbvisit/dbvnet/conf/ca.pem to /usr/dbvisit/dbvnet/conf/ca.pem
Copied file /home/oracle/10.0/dbvisit/dbvnet/conf/cert.pem to /usr/dbvisit/dbvnet/conf/cert.pem
Copied file /home/oracle/10.0/dbvisit/dbvnet/dbvnet to /usr/dbvisit/dbvnet/dbvnet
Copied file /usr/dbvisit/dbvnet/conf/dbvnetd.conf to /usr/dbvisit/dbvnet/conf/dbvnetd.conf.202012031140
    DBVNET config file updated

-----------------------------------------------------------
    About to install Dbvisit DBVAGENT
-----------------------------------------------------------
    Default cert.pem is found, replace certificates with new files
Copied file /home/oracle/10.0/dbvisit/dbvagent/dbvagent to /usr/dbvisit/dbvagent/dbvagent
Copied file /home/oracle/10.0/dbvisit/dbvagent/conf/cert.pem to /usr/dbvisit/dbvagent/conf/cert.pem
Copied file /home/oracle/10.0/dbvisit/dbvagent/conf/prikey.pem to /usr/dbvisit/dbvagent/conf/prikey.pem
Copied file /home/oracle/10.0/dbvisit/dbvagent/conf/ca.pem to /usr/dbvisit/dbvagent/conf/ca.pem
Copied file /usr/dbvisit/dbvagent/conf/dbvagent.conf to /usr/dbvisit/dbvagent/conf/dbvagent.conf.202012031140
    DBVAGENT config file updated

    -----------------------------------------------------------
    Component      Installer Version   Installed Version
    -----------------------------------------------------------
    standby        10.0.0RC_24_g94ba1d85                             10.0.0RC_24_g94ba1d85
    dbvnet         10.0.0RC_24_g94ba1d85 (dbvnet v1.5.0-301-g3896e54)10.0.0RC_24_g94ba1d85 (dbvnet v1.5.0-301-g3896e54)
    dbvagent       10.0.0RC_24_g94ba1d85                             10.0.0RC_24_g94ba1d85
    dbvserver      10.0.0RC_24_g94ba1d85                             not installed
    observer       10.0.0RC_24_g94ba1d85                             not installed

    -----------------------------------------------------------

    What action would you like to perform?
       1 - Install component(s)
       2 - Uninstall component(s)
       3 - Exit

    Your choice: 3

>>> Installation completed
    Install log /tmp/dbvisit_install.log.202012031140.
Next steps is to upgrade Dbvisit Standby Core components (Standby Cli , Dbvnet and dbvagent) in the Standby Server.
[oracle@dbvel72 10.0]$ ls -lrt
total 163132
-rw-r--r--. 1 oracle oinstall 167043374 Dec  3 11:38 dbvisit-standby-10.0.0RC_24_g94ba1d85-el6.zip
[oracle@dbvel71 10.0]$ unzip dbvisit-standby-10.0.0RC_24_g94ba1d85-el6.zip
Archive:  dbvisit-standby-10.0.0RC_24_g94ba1d85-el6.zip
  inflating: dbvisit-standby-10.0.0RC_24_g94ba1d85-el6.tar
[oracle@dbvel72 10.0]$ tar xf dbvisit-standby-10.0.0RC_24_g94ba1d85-el6.tar
[oracle@dbvel72 10.0]$ ls
dbvisit  dbvisit-standby-10.0.0RC_24_g94ba1d85-el6.tar  dbvisit-standby-10.0.0RC_24_g94ba1d85-el6.zip  INSTALL.txt  README.txt
[oracle@dbvel72 10.0]$ cd dbvisit
[oracle@dbvel72 dbvisit]$ cd installer/
[oracle@dbvel72 installer]$ ./install-dbvisit

-----------------------------------------------------------
    Welcome to the Dbvisit software installer.
-----------------------------------------------------------

    It is recommended to make a backup of our current Dbvisit software
    location (Dbvisit Base location) for rollback purposes.

    Installer Directory /home/oracle/10.0/dbvisit

>>> Please specify the Dbvisit installation directory (Dbvisit Base).

    The various Dbvisit products and components - such as Dbvisit Standby,
    Dbvisit Dbvnet will be installed in the appropriate subdirectories of
    this path.

    Enter a custom value or press ENTER to accept default [/usr/dbvisit]:
     >
    DBVISIT_BASE = /usr/dbvisit

    -----------------------------------------------------------
    Component      Installer Version   Installed Version
    -----------------------------------------------------------
    standby        10.0.0RC_24_g94ba1d85                             8.0.30_0_g81a31d32
    dbvnet         10.0.0RC_24_g94ba1d85 (dbvnet v1.5.0-301-g3896e54)8.0.30_0_g81a31d32
    dbvagent       10.0.0RC_24_g94ba1d85                             8.0.30_0_g81a31d32
    dbvserver      10.0.0RC_24_g94ba1d85                             not installed
    observer       10.0.0RC_24_g94ba1d85                             not installed

    -----------------------------------------------------------

    What action would you like to perform?
       1 - Install component(s)
       2 - Uninstall component(s)
       3 - Exit

    Your choice: 1

    Choose component(s):
       1 - Core Components (Dbvisit Standby Cli, Dbvnet, Dbvagent)
       2 - Dbvisit Standby Core (Command Line Interface)
       3 - Dbvnet (Dbvisit Network Communication)
       4 - Dbvagent (Dbvisit Agent)
       5 - Dbvserver (Dbvisit Central Console) - Not available on Solaris/AIX
       6 - Dbvisit Observer (Automatic Failover Option) - Not available on Solaris/AIX
    Press ENTER to exit Installer

    Your choice: 1

>>> Please specify the Oracle Instant Client version.

    The Oracle Instant Client is a required library for Dbvisit products.
    You may choose 12.1 or 12.2, however the default version is 12.2.

    Enter a custom value or press ENTER to accept default [12.2]:
     >

-----------------------------------------------------------
    Summary of the Dbvisit STANDBY configuration
-----------------------------------------------------------
    DBVISIT_BASE /usr/dbvisit
    INSTANT_CLIENT_VERSION 12.2

    Press ENTER to continue

-----------------------------------------------------------
    About to install Dbvisit STANDBY
-----------------------------------------------------------
    NTF repo installed.
    Component standby installed.

-----------------------------------------------------------
    About to install Dbvisit DBVNET
-----------------------------------------------------------
    Default cert.pem is found, replace certificates with new files
Copied file /home/oracle/10.0/dbvisit/dbvnet/conf/prikey.pem to /usr/dbvisit/dbvnet/conf/prikey.pem
Copied file /home/oracle/10.0/dbvisit/dbvnet/conf/ca.pem to /usr/dbvisit/dbvnet/conf/ca.pem
Copied file /home/oracle/10.0/dbvisit/dbvnet/conf/cert.pem to /usr/dbvisit/dbvnet/conf/cert.pem
Copied file /home/oracle/10.0/dbvisit/dbvnet/dbvnet to /usr/dbvisit/dbvnet/dbvnet
Copied file /usr/dbvisit/dbvnet/conf/dbvnetd.conf to /usr/dbvisit/dbvnet/conf/dbvnetd.conf.202012031140
    DBVNET config file updated

-----------------------------------------------------------
    About to install Dbvisit DBVAGENT
-----------------------------------------------------------
    Default cert.pem is found, replace certificates with new files
Copied file /home/oracle/10.0/dbvisit/dbvagent/dbvagent to /usr/dbvisit/dbvagent/dbvagent
Copied file /home/oracle/10.0/dbvisit/dbvagent/conf/cert.pem to /usr/dbvisit/dbvagent/conf/cert.pem
Copied file /home/oracle/10.0/dbvisit/dbvagent/conf/prikey.pem to /usr/dbvisit/dbvagent/conf/prikey.pem
Copied file /home/oracle/10.0/dbvisit/dbvagent/conf/ca.pem to /usr/dbvisit/dbvagent/conf/ca.pem
Copied file /usr/dbvisit/dbvagent/conf/dbvagent.conf to /usr/dbvisit/dbvagent/conf/dbvagent.conf.202012031140
    DBVAGENT config file updated

    -----------------------------------------------------------
    Component      Installer Version   Installed Version
    -----------------------------------------------------------
    standby        10.0.0RC_24_g94ba1d85                             10.0.0RC_24_g94ba1d85
    dbvnet         10.0.0RC_24_g94ba1d85 (dbvnet v1.5.0-301-g3896e54)10.0.0RC_24_g94ba1d85 (dbvnet v1.5.0-301-g3896e54)
    dbvagent       10.0.0RC_24_g94ba1d85                             10.0.0RC_24_g94ba1d85
    dbvserver      10.0.0RC_24_g94ba1d85                             not installed
    observer       10.0.0RC_24_g94ba1d85                             not installed

    -----------------------------------------------------------

    What action would you like to perform?
       1 - Install component(s)
       2 - Uninstall component(s)
       3 - Exit

    Your choice: 3

>>> Installation completed
    Install log /tmp/dbvisit_install.log.202012031140.
3.1.3. Upgrade The DDC File
IMPORTANT
The next step is to update the Dbvisit Standby Configuration (DDC) files which are located in DBVISIT_BASE/standby/conf directory. Before doing the below step please start all components from both primary and standby.
From Primary:
[oracle@dbvel71 installer]$ cd /usr/dbvisit/
[oracle@dbvel71 dbvisit]$ cd dbvnet/
[oracle@dbvel71 dbvnet]$ ./dbvnet -d start
Dbvnet daemon started with pid 8749.
[oracle@dbvel71 dbvnet]$ cd ../dbvagent/
[oracle@dbvel71 dbvagent]$ ./dbvagent -d start
Dbvagent daemon started.
[oracle@dbvel71 dbvagent]$

From Standby:
[oracle@dbvel72 dbvisit]$ pwd
/usr/dbvisit
[oracle@dbvel72 dbvisit]$ cd dbvnet/
[oracle@dbvel72 dbvnet]$ ./dbvnet -d start
Dbvnet daemon started with pid 8871.
[oracle@dbvel72 dbvnet]$ cd ../dbvagent/
[oracle@dbvel72 dbvagent]$ ./dbvagent -d start
Dbvagent daemon started.
[oracle@dbvel72 dbvagent]$ cd ../dbvserver/
[oracle@dbvel72 dbvserver]$ ./dbvserver -d start
Dbvserver daemon started.
[oracle@dbvel72 dbvserver]$
During this upgrade process, the original DDC file will automatically be backed up with a date-timestamp suffix.
The command to upgrade the DDC files is: ./dbvctl -d <DDC> -o upgrade
The Below command must be run from the Primary Database Server
[oracle@dbvel71 standby]$ ./dbvctl -d orcl -o upgrade
=============================================================
Dbvisit Standby Database Technology (10.0.0RC_24_g94ba1d85) (pid 8881)
dbvctl started on dbvel71: Thu Dec  3 11:44:37 2020
=============================================================


=========================================================

     Dbvisit Standby Database Technology (10.0.0RC_24_g94ba1d85)
           http://www.dbvisit.com

=========================================================

=>dbvctl only needs to be run on the primary server.

Is this the primary server? <Yes/No> [Yes]: yes

>>> DDC file orcl version: 8.0.30

>>> DDC file orcl upgraded to version 10.0.0RC.

>>> Dbvisit Database repository (DDR) orcl upgraded.

=============================================================
dbvctl ended on dbvel71: Thu Dec  3 11:44:40 2020
=============================================================

[oracle@dbvel71 standby]$
[oracle@dbvel71 standby]$ cd conf/
[oracle@dbvel71 conf]$ ls -lrt
total 172
-rw-rw-rw-. 1 oracle oinstall 23112 Dec  3 11:25 dbv_orcl.env.202012031125
-rw-rw-rw-. 1 oracle oinstall 23112 Dec  3 11:25 dbv_orcl.env.202012031144
-rw-r--r--. 1 oracle oinstall  8872 Dec  3 11:40 dbv_error.html
-rw-r--r--. 1 oracle oinstall  8861 Dec  3 11:40 dbv_message.html
-rw-r--r--. 1 oracle oinstall 26063 Dec  3 11:44 dbv_orcl.env
-rw-rw-rw-. 1 oracle oinstall 44032 Dec  3 11:44 orcl.db
-rw-r--r--. 1 oracle oinstall 28672 Dec  3 11:44 dbv_notify.db
[oracle@dbvel71 conf]$
After the upgrade is completed you have to apply the version 10.0 license from the Primary before we can start sending and applying logs.
[oracle@dbvel71 standby]$ ./dbvctl -d orcl -l 4jo70-qwp4l-7gplh-g1cg5-lx3kf-2dcd9-1o43m
=============================================================
Dbvisit Standby Database Technology (10.0.0RC_24_g94ba1d85) (pid 8942)
dbvctl started on dbvel71: Thu Dec  3 11:45:32 2020
=============================================================

=>Update with license key: 4jo70-qwp4l-7gplh-g1cg5-lx3kf-2dcd9-1o43m? <Yes/No>
[Yes]: yes
>>> Dbvisit Standby License
License Key     : 4jo70-qwp4l-7gplh-g1cg5-lx3kf-2dcd9-1o43m
customer_number : 0
dbname          :
expiry_date     : 2020-12-08
os              :
sequence        : 1
software_features : 00000000
status          : VALID
updated         : YES
version         : 10
warning         : Dbvisit Standby license will expire in 4 days.
*** Dbvisit Standby license will expire in 4 days. Please contact Dbvisit Standby
    (www.dbvisit.com) to obtain license.

=============================================================
dbvctl ended on dbvel71: Thu Dec  3 11:45:40 2020
=============================================================
3.2. Example 2 - Upgrade Central Console (Dbvserver)
This section will show you the upgrade process for the Dbvisit Standby version 10 Central Console (Dbvserver).
The process is similar to the upgrading of the core components, but in this case, the Dbvserver component will be selected for installation (upgrade).
Prior to upgrading the Dbvserver component, it is required to first stop Dbvserver if it is already running followed by a backup of the installation destination (Dbvisit Base).
3.2.1. Prerequisite Steps
The steps are similar to what we have used earlier for Dbvnet and Dbvagent, the steps for Dbvserver is shown below:
Stop Dbvserver:
First, we confirm if the process is running, if it is we stop it using the "./dbvserver -d stop", followed by confirming no dbvserver processes are running.[oracle@dbv103 dbvisit]$ pwd /usr/dbvisit [oracle@dbv103 dbvisit]$ ps -ef|grep dbvserver|grep -v grep oracle 26664 0 0 22:25 ? 00:00:00 ./dbvserver -d start [oracle@dbv103 dbvisit]$ [oracle@dbv103 dbvisit]$ cd dbvserver [oracle@dbv103 dbvserver]$ ./dbvserver -d stop dbvserver attempt to stop pid: 26664 [oracle@dbv103 dbvserver]$ [oracle@dbv103 dbvserver]$ ps -ef|grep dbvserver|grep -v grep [oracle@dbv103 dbvserver]$
Backup the Dbvisit Standby installation directory (optional - but recommended)
In this example, we will backup the /usr/dbvisit directory using the "tar" command to create a backup in a backup folder called /backup. You can use the "du -sh" command to confirm the /usr/dbvisit directory size prior to backup. The "tar" command used in this case will use the -z option to enable compression.[oracle@dbv103 dbvisit]$ pwd /usr/dbvisit [oracle@dbv103 dbvisit]$ tar czf /backups/usr_dbvisit.tar.gz . [oracle@dbv103 dbvisit]$ ls -al /backups/usr_dbvisit* -rw-r--r-- 1 oracle oinstall 3755257 Sep 5 22:27 /backups/usr_dbvisit.tar.gz [oracle@dbv103 dbvisit]$
3.2.2. Upgrade Dbvserver
We are now ready to perform the upgrade of the Central Console (Dbvserver).
Below are the example steps followed to upgrade the Dbvserver component:
[oracle@dbvel72 installer]$ ./install-dbvisit

-----------------------------------------------------------
    Welcome to the Dbvisit software installer.
-----------------------------------------------------------

    It is recommended to make a backup of our current Dbvisit software
    location (Dbvisit Base location) for rollback purposes.

    Installer Directory /home/oracle/10.0/dbvisit

>>> Please specify the Dbvisit installation directory (Dbvisit Base).

    The various Dbvisit products and components - such as Dbvisit Standby,
    Dbvisit Dbvnet will be installed in the appropriate subdirectories of
    this path.

    Enter a custom value or press ENTER to accept default [/usr/dbvisit]:
     >
    DBVISIT_BASE = /usr/dbvisit

    -----------------------------------------------------------
    Component      Installer Version   Installed Version
    -----------------------------------------------------------
    standby        10.0.0RC_24_g94ba1d85                             10.0.0RC_24_g94ba1d85
    dbvnet         10.0.0RC_24_g94ba1d85 (dbvnet v1.5.0-301-g3896e54)10.0.0RC_24_g94ba1d85 (dbvnet v1.5.0-301-g3896e54)
    dbvagent       10.0.0RC_24_g94ba1d85                             10.0.0RC_24_g94ba1d85
    dbvserver      10.0.0RC_24_g94ba1d85                             8.0.30_0_g81a31d32
    observer       10.0.0RC_24_g94ba1d85                             10.0.0RC_15_g81628a5f

    -----------------------------------------------------------

    What action would you like to perform?
       1 - Install component(s)
       2 - Uninstall component(s)
       3 - Exit

    Your choice: 1

    Choose component(s):
       1 - Core Components (Dbvisit Standby Cli, Dbvnet, Dbvagent)
       2 - Dbvisit Standby Core (Command Line Interface)
       3 - Dbvnet (Dbvisit Network Communication)
       4 - Dbvagent (Dbvisit Agent)
       5 - Dbvserver (Dbvisit Central Console) - Not available on Solaris/AIX
       6 - Dbvisit Observer (Automatic Failover Option) - Not available on Solaris/AIX
    Press ENTER to exit Installer

    Your choice: 5

-----------------------------------------------------------
    About to install Dbvisit DBVSERVER
-----------------------------------------------------------
    Default cert.pem is found, replace certificates with new files
Copied file /home/oracle/10.0/dbvisit/dbvserver/conf/prikey.pem to /usr/dbvisit/dbvserver/conf/prikey.pem
Copied file /home/oracle/10.0/dbvisit/dbvserver/conf/cert.pem to /usr/dbvisit/dbvserver/conf/cert.pem
Copied file /home/oracle/10.0/dbvisit/dbvserver/conf/ca.pem to /usr/dbvisit/dbvserver/conf/ca.pem
Copied file /home/oracle/10.0/dbvisit/dbvserver/dbvserver to /usr/dbvisit/dbvserver/dbvserver
Copied file /usr/dbvisit/dbvserver/conf/dbvserver.conf to /usr/dbvisit/dbvserver/conf/dbvserver.conf.202012031149
    DBVSERVER config file updated

    -----------------------------------------------------------
    Component      Installer Version   Installed Version
    -----------------------------------------------------------
    standby        10.0.0RC_24_g94ba1d85                             10.0.0RC_24_g94ba1d85
    dbvnet         10.0.0RC_24_g94ba1d85 (dbvnet v1.5.0-301-g3896e54)10.0.0RC_24_g94ba1d85 (dbvnet v1.5.0-301-g3896e54)
    dbvagent       10.0.0RC_24_g94ba1d85                             10.0.0RC_24_g94ba1d85
    dbvserver      10.0.0RC_24_g94ba1d85                             10.0.0RC_24_g94ba1d85
    observer       10.0.0RC_24_g94ba1d85                             10.0.0RC_15_g81628a5f

    -----------------------------------------------------------

    What action would you like to perform?
       1 - Install component(s)
       2 - Uninstall component(s)
       3 - Exit

    Your choice: 3

>>> Installation completed
    Install log /tmp/dbvisit_install.log.202012031149.
4.0. Windows - Upgrading from Dbvisit Standby version 9.0.x to 10.0.x
Important: Prior to installing Dbvisit Standby version 10 on Windows, please make sure you have performed the pre-requisite steps prior to starting the installer - Installing Dbvisit Standby#2.5.WindowsEnvironmentPre-requisites
In this section, we will review the process to upgrade an existing Dbvisit Standby version 9 installation to the latest version 10. It is recommended that before you perform the upgrade process that you have the Dbvisit Standby version 9 already at the latest version 9 update.
When upgrading a Windows-based installation, there are only a few key steps to follow. In summary, the installer will ask for the Dbvisit Base location to install the Dbvisit Software. If you already have an installation, please make sure you select the existing installation folder as the destination. The installer will detect that a version is already installed and will perform the upgrade - replacing the version 8 executable files with the new version 10.
4.1. Prerequisites
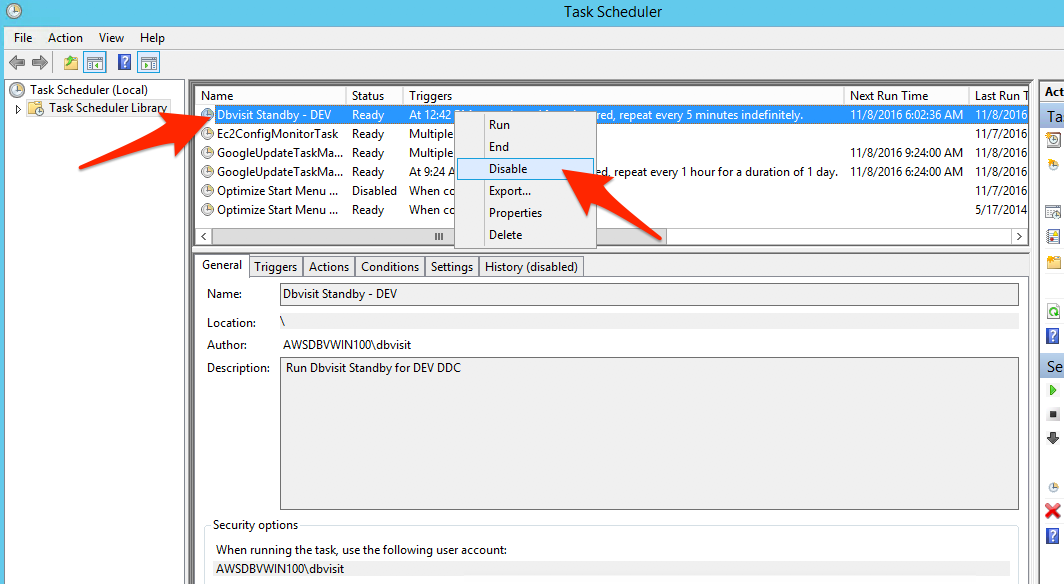
The first step to stop any schedules if you have any configured.
The example below shows the disabling of a Windows scheduled task. Select the task, right click and select disable.
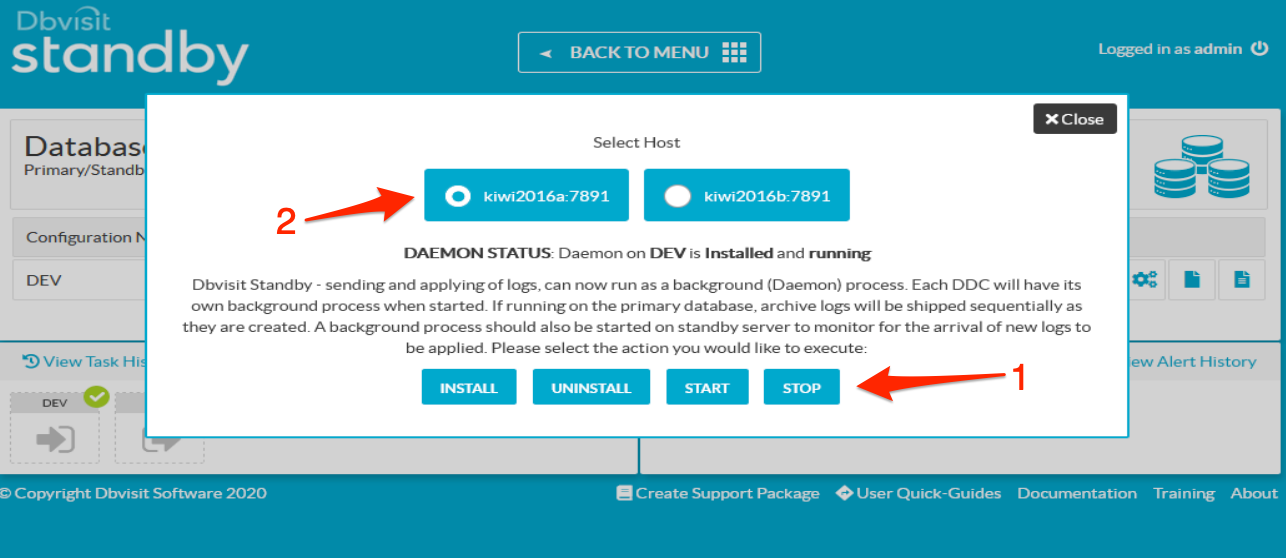
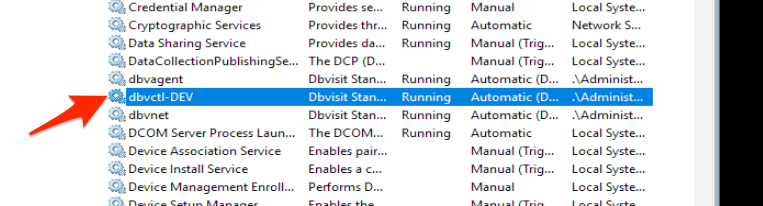
If you are using Daemon service, Please stop the daemon process in both Primary and Standby
- Click on Daemon Actions
- Select the host for which you want to stop the daemon service
- Click stop to completely stop the daemon service.
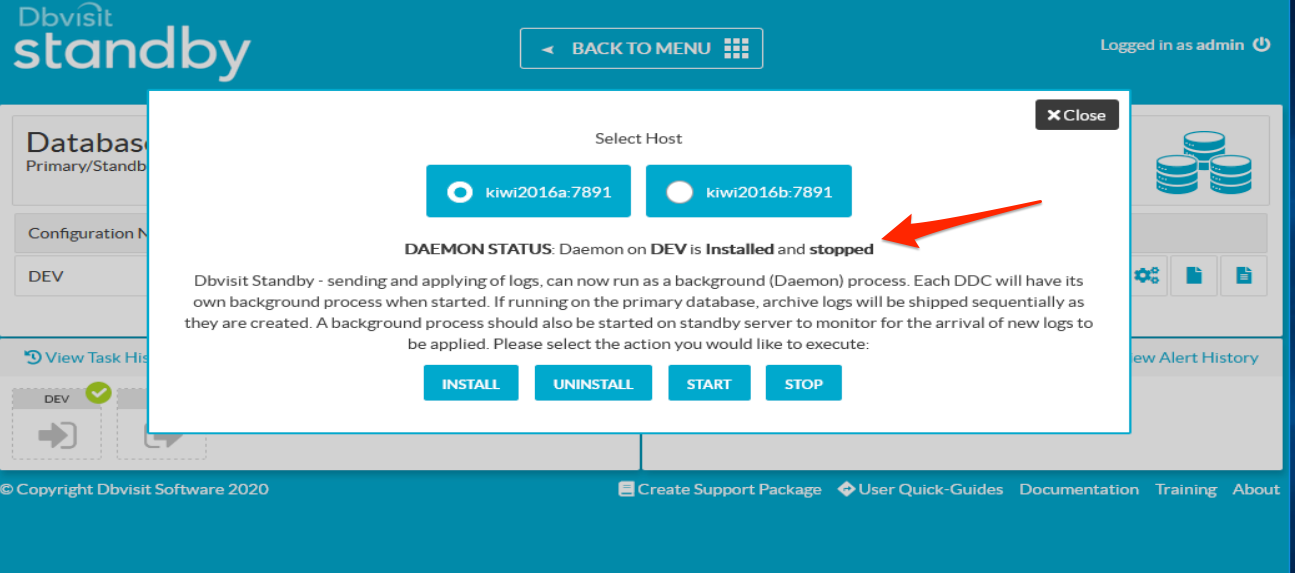
Below screenshot will provide the status of the daemon service.
4.2. Step 2: Installing the latest version 10.0.x software
- Download the latest Dbvisit Standby version 10 software, the install file will be a compressed zip file, example: dbvisit-standby10.0.0-win64.zip
- Extract the downloaded install file into a temporary folder, example D:\Software\dbvisit-standby10.0.0-win64.exe
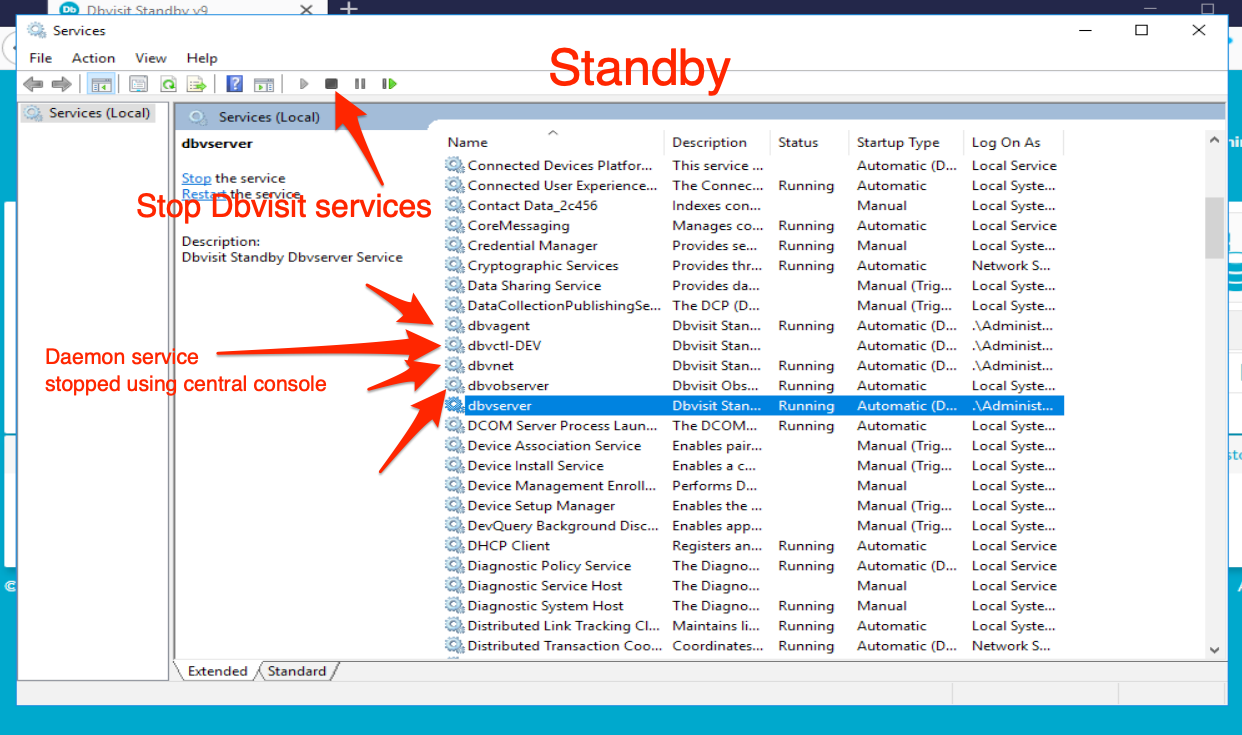
- Make sure that you have stopped the Dbvisit Standby schedules and that you are not running any Dbvisit processes during the upgrade process. Stop the dbvagent and dbvnet services in both Primary and Standby. Also, stop the dbvserver service before proceeding with the installation. In this example the Primary server has dbvagent and dbvnet service and the standby has dbvagent,dbvnet and dbvserver services running. We also have the daemon service running which was stopped in the previous step.
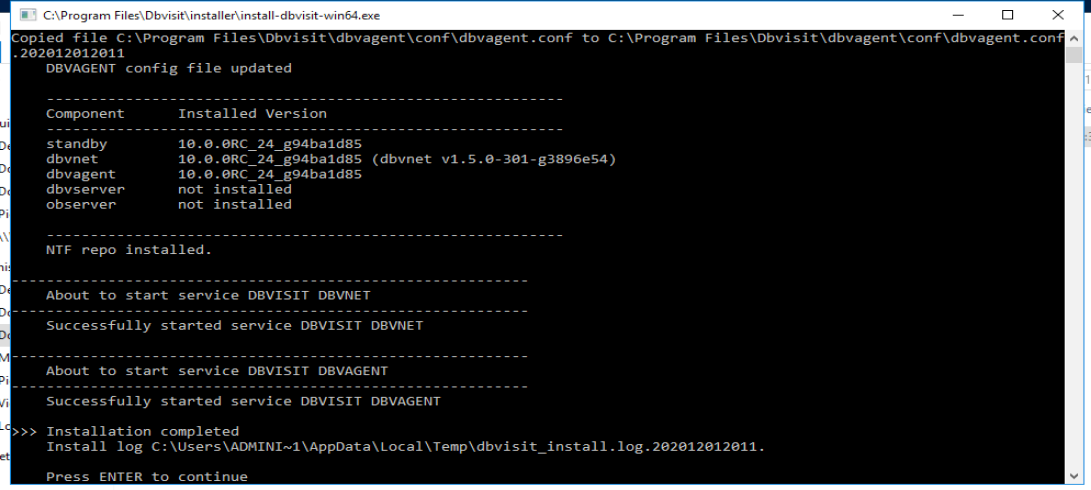
4. Start the Installer by running (double click) the dbvisit-standby10.0.0-win64.exe file
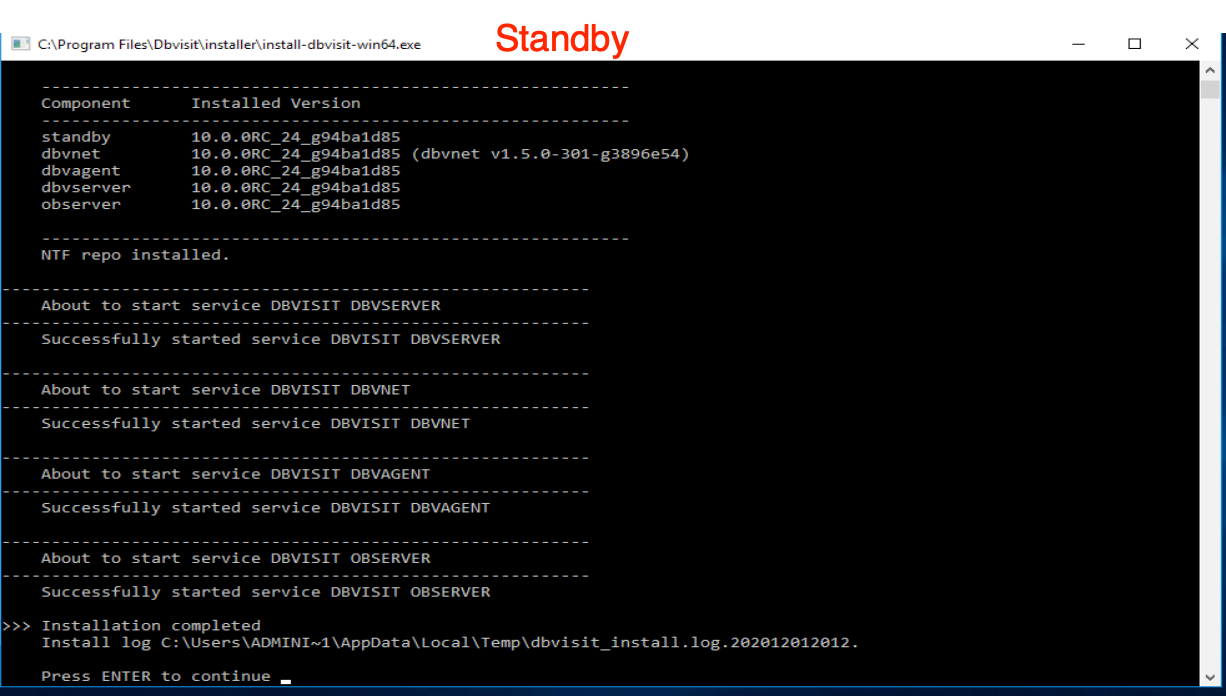
The installer will start shortly. By default the installer will have the Dbvagent, Dbvnet and Standby CLI selected. Note that the Dbvserver (Central Console) is not selected. This is intentional as it is recommended to have the Dbvserver component installed on its own system. However, if required you can install the central console as part of the installation, but be advised that this is not recommended(We need to select it for this example as we have installed the dbvserver in standby). If the primary or standby system running the Central Console is down due to a disaster, you will not be able to access the Dbvisit Standby version 10 GUI. The installation process is similar to the Dbvisit Version 9.0.x installation process. The Dbvnet, Dbvagent and the Dbvserver configurations are updated and the services are started.
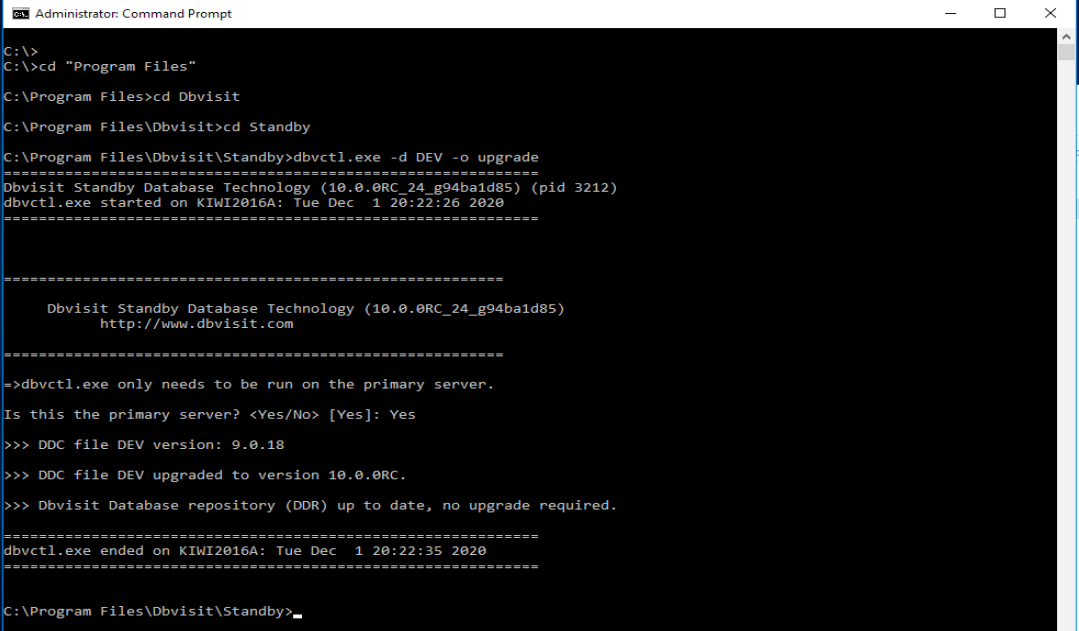
5. Once the above step is completed. Run the upgrade command from the Primary dbvctl.exe -d <DDC> -o upgrade . This has to be done before starting the daemon process in both primary and standby.
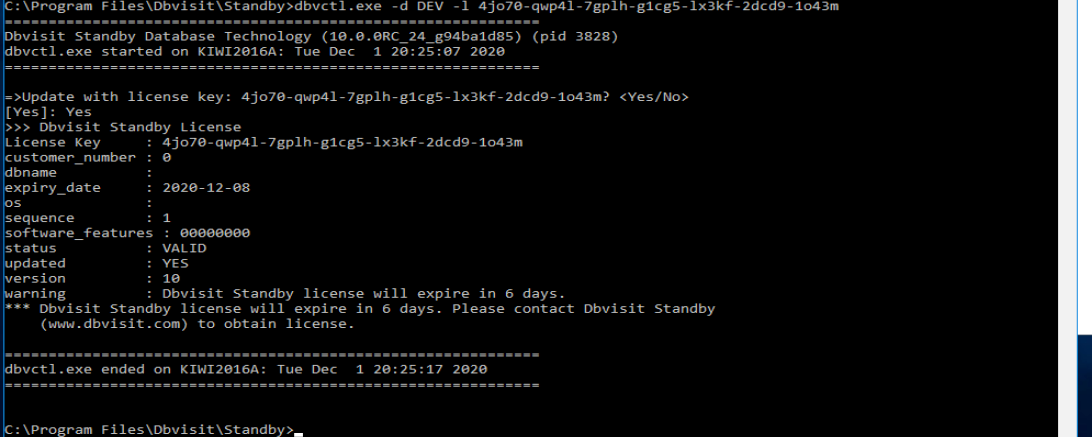
6. Apply the version 10 license key before starting the daemon service from Primary.
7. Now run the Archivelog send/apply manually and then start the daemon process for the automatic process to take over.
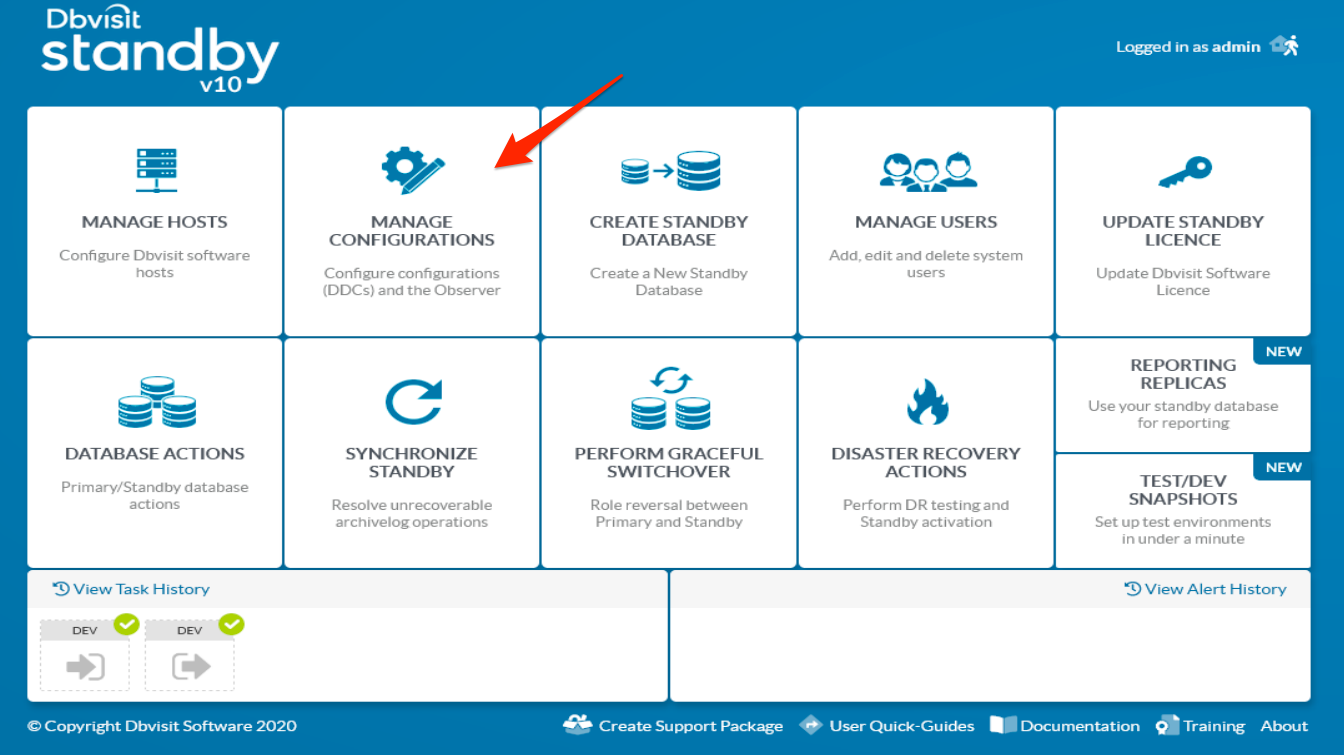
5. Steps performed post upgrade in the central console.
The steps performed are common for both Linux and Windows, After the CLI upgrade the GUI repository needs to updated with the latest DDC information.
1. Open the browser and type in the console address to view the version 10.0 GUI interface and to check the DDC file go to Manage Configurations page.
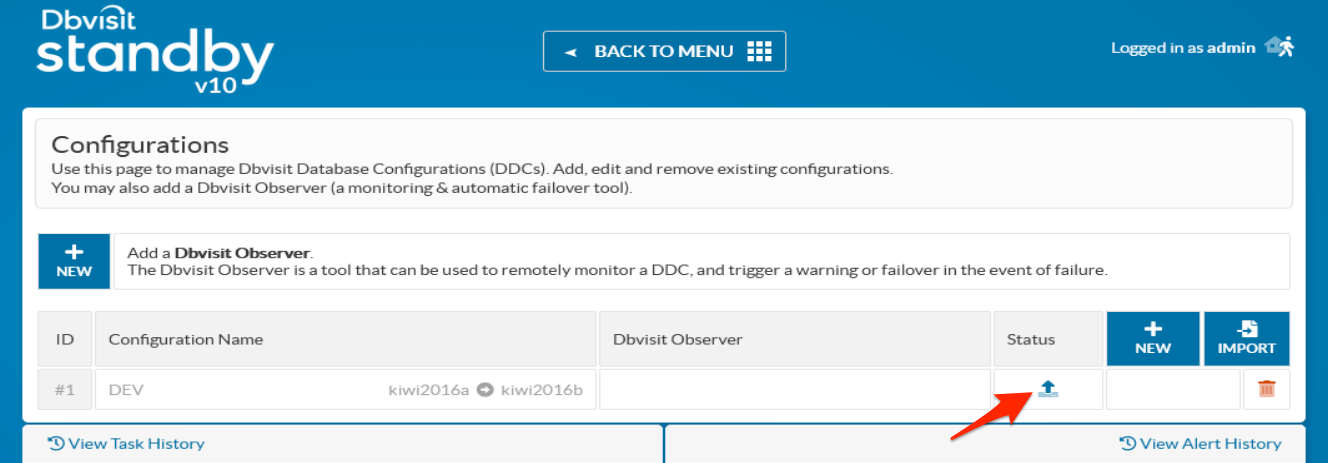
2. The DDC should still show the old version and allow you to click on the status to upgrade to the Version 10.0 release.
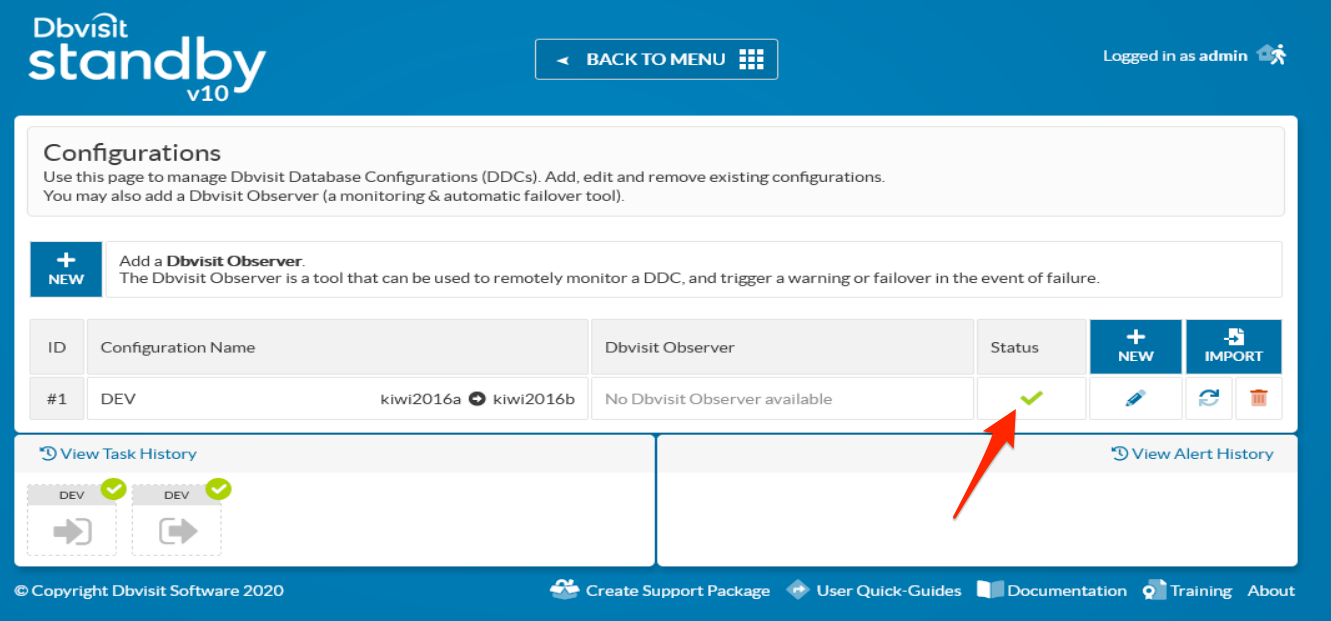
3. After the above step, you should see the current version of Dbvisit Standby and also the status showing a tick mark.
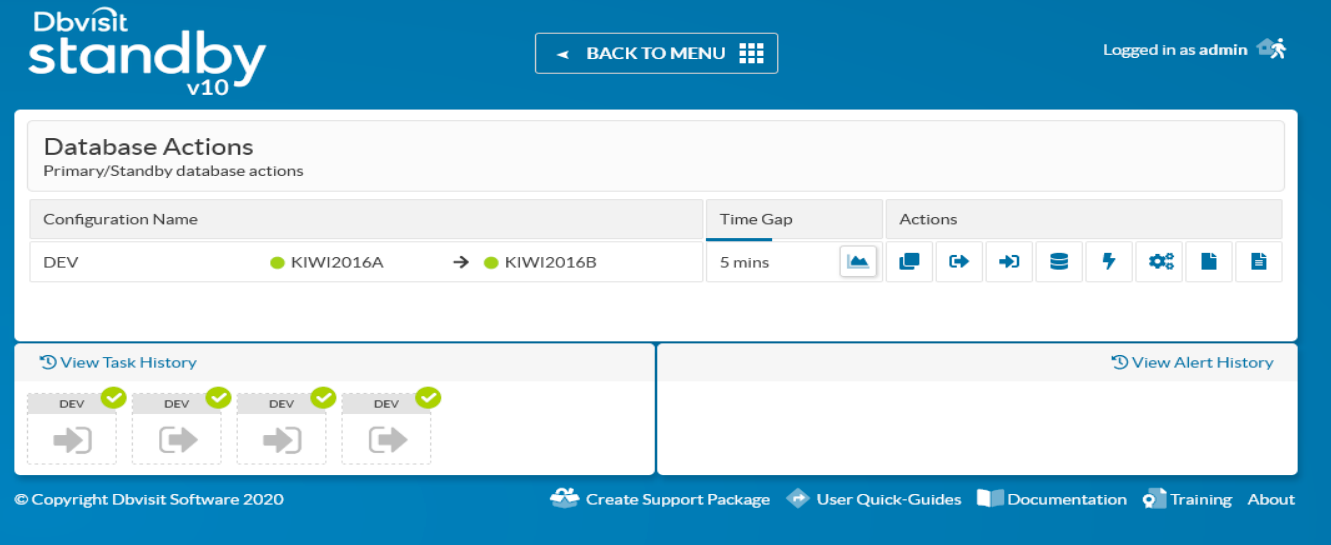
4. Post upgrade the Database Actions screen with Time Gap displayed between Primary and Standby (This will be displayed only after the first send and apply of archivelogs).
IMPORTANT: Please make sure that you have upgraded both primary and standby Dbvisit Standby software prior to upgrading the DDC files. This includes making sure Dbvnet is running on both systems.
For more detail on network communication please see - Dbvisit Standby Networking - Dbvnet#Dbvnet-5.TestingDbvnetCommunication
In Windows, you may have to delete the old daemon service, install it and start it, please see Dbvisit Standby Scheduling
6. Blogs & Videos
6.1 Upgrade from Dbvisit Standby v8 to v9 on Linux
https://dbvisit.com/blog/upgrade-dbvisit-standby-v8-v9-linux
6.2 Upgrade Dbvisit Standby v8 to v9 on Windows
https://dbvisit.com/blog/upgrade-dbvisit-standby-v8-v9-windows