2. Linux - Upgrade from Dbvisit Standby version 9.0.x or 10.0.x to Multiplatform
It is recommended to be on the latest update of Dbvisit Standby version 9 or 10 prior to upgrading to Multiplatform.
The upgrade process consists of two key steps:
Upgrade (install) the new version 11 software.
Upgrade the DDC files and repository to reflect the latest release.
When upgrading from version 9.0.x or 10.0.x, the process is easy and should only take a few minutes.
The high level recommended steps are:
Stop your Dbvisit Schedules if you have any running.
Stop or wait for any Dbvisit processes that might still be executing.
Backup the Dbvisit Base location where your software is installed.
Download the latest version from www.dbvisit.com
Extract the install files into a temporary folder, example /home/oracle/MP
Start the Installer and select to install the required components.
Once the update is complete, you can remove the temporary install folder where the installer was extracted.
Apply the new version 11 license key.
It is recommended to run a manual send/apply of logs once an upgrade is complete.
Enable the automatic standby update for scheduling the send and apply.
The section below will show you a detailed example of the upgrade process.
3. Example of the Upgrade process
3.1. Prerequisite Steps
Stop all schedules if used - on Unix systems if schedules are used it would be via the UNIX "CRON" schedule. You can use the "crontab -l" command to list any schedules and if you want to edit them use "crontab -e"
Stop the Dbvisit components. Check the processes by running “ps -ef |grep dbv” which would list out processes that are running . Below is the example for stopping the Dbvisit components from both primary and standby. We have our dbvserver installed in the standby server in this example.
Primary: dbvel71. Standby: dbvel72

Stopping Components in Primary
[oracle@dbvel71 standby]$ ps -ef |grep dbv
oracle    2682     1  2 12:00 ?        00:00:02 ./dbvctl                                                                    -d orcl21c -D start
oracle    2829  3974  0 12:02 pts/0    00:00:00 grep --color=auto dbv
oracle   30150     1  0 11:03 ?        00:00:23 ./dbvnet -d start
oracle   30158     1  0 11:03 ?        00:00:03 ./dbvagent -d start
[oracle@dbvel71 standby]$ ./dbvctl -d orcl21c -D stop
Stopping Dbvisit Daemon...
Successfully stopped.
[oracle@dbvel71 standby]$ cd ../dbvnet/
[oracle@dbvel71 dbvnet]$ ./dbvnet -d stop
Stop signal has been sent to pid: 30150
[oracle@dbvel71 dbvnet]$ cd ../dbvagent/
[oracle@dbvel71 dbvagent]$ ./dbvagent -d stop
Stop signal has been sent to pid: 30158
[oracle@dbvel71 dbvagent]$ ps -ef |grep dbv
oracle    2886  3974  0 12:03 pts/0    00:00:00 grep --color=auto dbv
[oracle@dbvel71 dbvagent]$

Stopping Components in Standby
[oracle@dbvel72 standby]$ ps -ef |grep dbv
oracle     405     1  0 11:04 ?        00:00:01 ./dbvnet -d start
oracle     413     1  0 11:04 ?        00:00:05 ./dbvagent -d start
oracle     420     1  0 11:04 ?        00:00:16 ./dbvserver -d start
oracle    5841     1  1 12:00 ?        00:00:02 ./dbvctl                                                                    -d orcl21c -D start
oracle    6066  4048  0 12:03 pts/0    00:00:00 grep --color=auto dbv
[oracle@dbvel72 standby]$ ./dbvctl -d orcl21c -D stop
Stopping Dbvisit Daemon...
Successfully stopped.
[oracle@dbvel72 standby]$ cd ../dbvnet/
[oracle@dbvel72 dbvnet]$ ./dbvnet -d stop
Stop signal has been sent to pid: 405
[oracle@dbvel72 dbvnet]$ cd ../dbvagent/
[oracle@dbvel72 dbvagent]$ ./dbvagent -d stop
Stop signal has been sent to pid: 413
[oracle@dbvel72 dbvagent]$ cd ../dbvserver/
[oracle@dbvel72 dbvserver]$ ./dbvserver -d stop
Stop signal has been sent to pid: 420
[oracle@dbvel72 dbvserver]$ ps -ef |grep dbv
oracle    6110  4048  0 12:04 pts/0    00:00:00 grep --color=auto dbv
[oracle@dbvel72 dbvserver]$
Backup the Dbvisit Standby installation directory (optional - but recommended)
In this example, we will backup the /usr/dbvisit directory using the "tar" command to create a backup in a backup folder called /home/oracle/backup. You can use the "du -sh" command to confirm the /usr/dbvisit directory size prior to backup. The "tar" command used in this case will use the -z option to enable compression.
[oracle@dbvel72 dbvisit]$ pwd
/usr/dbvisit
[oracle@dbvel72 dbvisit]$ du -sh .
453M    .
[oracle@dbvel72 dbvisit]$ tar czf /home/oracle/backup/dbvisit_backup_31Dec2021.tar.gz .
[oracle@dbvel72 dbvisit]$ ls -lrt /home/oracle/backup/dbvisit_backup_31Dec2021.tar.gz
-rw-r--r--. 1 oracle oinstall 83521643 Dec  31 11:36 /home/oracle/backup/dbvisit_backup_31Dec2021.tar.gz
[oracle@dbvel72 dbvisit]$
If you have a regular backup schedule the above backup process might not be required.
Backing up the full directory is not strictly required, the most important files are located in /usr/dbvist/standby/conf/ which is the DDC files and their respective repositories. It is recommended to have at minimum at least a backup of this folder.
Agentmanager installation
[oracle@dbvel71 ~]$ cd MP/
[oracle@dbvel71 MP]$ ls -lrt
total 303208
-rwxr-xr-x. 1 oracle oinstall  28322375 Dec 28 12:54 install-control-v11.0.0RC3-1-g2c6a9646
-rwxr-xr-x. 1 oracle oinstall 126913353 Dec 28 12:55 install-agent-v11.0.0RC3-1-g2c6a9646
-rw-------. 1 oracle oinstall      5767 Dec 28 17:15 setup.log
[oracle@dbvel71 MP]$ ./install-agent-v11.0.0RC3-1-g2c6a9646
+----------------------------------------------------------------------+
|          ____  _                  _ _           __  __ ____          |
|         / ___|| |_ __ _ _ __   __| | |__  _   _|  \/  |  _ \         |
|         \___ \| __/ _' | '_ \ / _' | '_ \| | | | |\/| | |_) |        |
|          ___) | || (_| | | | | (_| | |_) | |_| | |  | |  __/         |
|         |____/ \__\__,_|_| |_|\__,_|_.__/ \__, |_|  |_|_|            |
|          Copyright 2021                   |___/   By Dbvisit         |
+----------------------------------------------------------------------+

Welcome to Dbvisit StandbyMP setup version v11.0.0RC3-1-g2c6a9646.

? Which directory should the software be installed into? /usr/dbvisit
? Upgrade Dbvisit Standby from: 10.1.0_0_gba3a9e08 to v11.0.0RC3-1-g2c6a9646? Yes

- - - You are now configuring the Dbvisit StandbyMP Agent - - -

The Agent will listen on the following discovered addresses:
 -  127.0.0.1
 -  10.0.2.9
 -  192.168.56.9
? Agent File Transfer Port: 7890
? Fully Qualified Domain Name for this host: dbvel71
? Fully Qualified Domain Name for the Control Center: 192.168.56.10
? Agent Communications Port: 5533
Each Dbvisit StandbyMP Agent and the Dbvisit StandbyMP Control Center must
be configured with the same passphrase. This is how we know that they are all
intended to be part of the same system. Please specify a strong passphrase - we
suggest at least 12 characters, containing at least 2 numbers and 2 symbols.
? Passphrase: *******
? Confirm Passphrase: *******

- - - Dbvisit StandbyMP Agent configuration finished - - -


- - - Ready to perform installation - - -

? Do you wish to proceed with the setup using the supplied configuration options? Proceed with setup

- - - Performing installation - - -

Copying software files to '/usr/dbvisit'...
Writing Agent configuration file '/usr/dbvisit/standbymp/conf/dbvagentmanager.ini'...

- - - Installation successful! - - -


To enable the installed Dbvisit StandbyMP components to run as system services, you will need to execute some commands as the "root" user in order to complete the setup.

To install the system service(s), you can run, substituting the name of the user to run as if it is different from the current user:
	sudo /usr/dbvisit/standbymp/bin/dbvagentmanager service install --user oracle
To start the system service(s), you can run:
	sudo /usr/dbvisit/standbymp/bin/dbvagentmanager service start

- - - Configuration Summary - - -

Install Directory:                                  /usr/dbvisit
Fully Qualified Domain Name for this host:          dbvel71
Fully Qualified Domain Name for the Control Center: 192.168.56.10
Agent Communications Port:                          5533
Agent File Transfer Port:                           7890

- - - Installation Summary - - -

The following actions have been performed:
 -  Backed up files for components being upgraded to: /usr/dbvisit/upgradeBackup
 -  Installed Dbvisit StandbyMP Agent software into: /usr/dbvisit/standbymp
 -  Agent settings are available in the configuration file: /usr/dbvisit/standbymp/conf/dbvagentmanager.ini
 -  Imported DDCs from previous version
 -  Generated new security certificates in: /usr/dbvisit/standbymp/certificates

- - - UPGRADE SUCCESSFUL - - -
Start the agent manager in primary
[root@dbvel71 ~]# /usr/dbvisit/standbymp/bin/dbvagentmanager service install --user oracle
[root@dbvel71 ~]# /usr/dbvisit/standbymp/bin/dbvagentmanager service start
[root@dbvel71 ~]# ps -ef |grep dbv
oracle    3601     1  3 12:13 ?        00:00:00 /usr/dbvisit/standbymp/bin/dbvagentmanager
root      3613  3489  0 12:13 pts/0    00:00:00 grep --color=auto dbv
[root@dbvel71 ~]#
Run the same process on the standby server to install the agent manager.
[oracle@dbvel72 MP]$ ./install-agent-v11.0.0RC3-1-g2c6a9646
+----------------------------------------------------------------------+
|          ____  _                  _ _           __  __ ____          |
|         / ___|| |_ __ _ _ __   __| | |__  _   _|  \/  |  _ \         |
|         \___ \| __/ _' | '_ \ / _' | '_ \| | | | |\/| | |_) |        |
|          ___) | || (_| | | | | (_| | |_) | |_| | |  | |  __/         |
|         |____/ \__\__,_|_| |_|\__,_|_.__/ \__, |_|  |_|_|            |
|          Copyright 2021                   |___/   By Dbvisit         |
+----------------------------------------------------------------------+

Welcome to Dbvisit StandbyMP setup version v11.0.0RC3-1-g2c6a9646.

? Which directory should the software be installed into? /usr/dbvisit
? Upgrade Dbvisit Standby from: 10.1.0_0_gba3a9e08 to v11.0.0RC3-1-g2c6a9646? Yes

- - - You are now configuring the Dbvisit StandbyMP Agent - - -

The Agent will listen on the following discovered addresses:
 -  127.0.0.1
 -  10.0.2.10
 -  192.168.56.10
? Agent File Transfer Port: 7890
? Fully Qualified Domain Name for this host: dbvel72
? Fully Qualified Domain Name for the Control Center: 192.168.56.10
? Agent Communications Port: 5533
Each Dbvisit StandbyMP Agent and the Dbvisit StandbyMP Control Center must
be configured with the same passphrase. This is how we know that they are all
intended to be part of the same system. Please specify a strong passphrase - we
suggest at least 12 characters, containing at least 2 numbers and 2 symbols.
? Passphrase: *******
? Confirm Passphrase: *******

- - - Dbvisit StandbyMP Agent configuration finished - - -


- - - Ready to perform installation - - -

? Do you wish to proceed with the setup using the supplied configuration options? Proceed with setup

- - - Performing installation - - -

Copying software files to '/usr/dbvisit'...
Writing Agent configuration file '/usr/dbvisit/standbymp/conf/dbvagentmanager.ini'...

- - - Installation successful! - - -


To enable the installed Dbvisit StandbyMP components to run as system services, you will need to execute some commands as the "root" user in order to complete the setup.

To install the system service(s), you can run, substituting the name of the user to run as if it is different from the current user:
	sudo /usr/dbvisit/standbymp/bin/dbvagentmanager service install --user oracle
To start the system service(s), you can run:
	sudo /usr/dbvisit/standbymp/bin/dbvagentmanager service start

- - - Configuration Summary - - -

Install Directory:                                  /usr/dbvisit
Fully Qualified Domain Name for this host:          dbvel72
Fully Qualified Domain Name for the Control Center: 192.168.56.10
Agent Communications Port:                          5533
Agent File Transfer Port:                           7890

- - - Installation Summary - - -

The following actions have been performed:
 -  Backed up files for components being upgraded to: /usr/dbvisit/upgradeBackup
 -  Installed Dbvisit StandbyMP Agent software into: /usr/dbvisit/standbymp
 -  Agent settings are available in the configuration file: /usr/dbvisit/standbymp/conf/dbvagentmanager.ini
 -  Imported DDCs from previous version
 -  Generated new security certificates in: /usr/dbvisit/standbymp/certificates

- - - UPGRADE SUCCESSFUL - - -
Start the components
[root@dbvel72 ~]# /usr/dbvisit/standbymp/bin/dbvagentmanager service install --user oracle
[root@dbvel72 ~]# /usr/dbvisit/standbymp/bin/dbvagentmanager service start
[root@dbvel72 ~]# ps -ef |grep dbv
oracle    6858     1  2 12:16 ?        00:00:00 /usr/dbvisit/standbymp/bin/dbvagentmanager
root      6871  6780  0 12:16 pts/0    00:00:00 grep --color=auto dbv
[root@dbvel72 ~]#
3.2 Install the Control Center
The control center must be installed only on one server. This must be either a separate server or on the standby server. In this example we are installing the control center in standby server.
[oracle@dbvel72 MP]$ ./install-control-v11.0.0RC3-1-g2c6a9646
+----------------------------------------------------------------------+
|          ____  _                  _ _           __  __ ____          |
|         / ___|| |_ __ _ _ __   __| | |__  _   _|  \/  |  _ \         |
|         \___ \| __/ _' | '_ \ / _' | '_ \| | | | |\/| | |_) |        |
|          ___) | || (_| | | | | (_| | |_) | |_| | |  | |  __/         |
|         |____/ \__\__,_|_| |_|\__,_|_.__/ \__, |_|  |_|_|            |
|          Copyright 2021                   |___/   By Dbvisit         |
+----------------------------------------------------------------------+

Welcome to Dbvisit StandbyMP setup version v11.0.0RC3-1-g2c6a9646.

? Which directory should the software be installed into? /usr/dbvisit
? Upgrade Dbvisit Standby Web Server from: 10.1.0_0_gba3a9e08 to v11.0.0RC3-1-g2c6a9646? Yes

- - - You are now configuring the Dbvisit StandbyMP Control Center - - -

The Control Center will listen on the following discovered addresses:
 -  127.0.0.1
 -  10.0.2.10
 -  192.168.56.10
? Control Center Web Server Port: 4433
? Agent Communications Port: 5533
Each Dbvisit StandbyMP Agent and the Dbvisit StandbyMP Control Center must
be configured with the same passphrase. This is how we know that they are all
intended to be part of the same system. Please specify a strong passphrase - we
suggest at least 12 characters, containing at least 2 numbers and 2 symbols.
? Passphrase: *******
? Confirm Passphrase: *******

- - - Dbvisit StandbyMP Control Center configuration finished - - -


- - - Ready to perform installation - - -

? Do you wish to proceed with the setup using the supplied configuration options? Proceed with setup

- - - Performing installation - - -

Copying software files to '/usr/dbvisit'...
Writing Control Center configuration file '/usr/dbvisit/standbymp/conf/dbvcontrol.ini'...

- - - Installation successful! - - -


To enable the installed Dbvisit StandbyMP components to run as system services, you will need to execute some commands as the "root" user in order to complete the setup.

To install the system service(s), you can run, substituting the name of the user to run as if it is different from the current user:
	sudo /usr/dbvisit/standbymp/bin/dbvcontrol service install --user oracle
To start the system service(s), you can run:
	sudo /usr/dbvisit/standbymp/bin/dbvcontrol service start

- - - Configuration Summary - - -

Install Directory:              /usr/dbvisit
Control Center Web Server Port: 4433
Agent Communications Port:      5533

- - - Installation Summary - - -

The following actions have been performed:
 -  Backed up files for components being upgraded to: /usr/dbvisit/upgradeBackup
 -  Installed Dbvisit StandbyMP Control Center software into: /usr/dbvisit/standbymp
 -  Control Center settings are available in the configuration file: /usr/dbvisit/standbymp/conf/dbvcontrol.ini
 -  Imported Web Server users from previous version
 -  Generated new security certificates in: /usr/dbvisit/standbymp/certificates

- - - UPGRADE SUCCESSFUL - - -
Start the control center
[root@dbvel72 ~]# /usr/dbvisit/standbymp/bin/dbvcontrol service install --user oracle
[root@dbvel72 ~]# /usr/dbvisit/standbymp/bin/dbvcontrol service start
[root@dbvel72 ~]# ps -ef |grep control
oracle    7358     1 32 12:23 ?        00:00:01 /usr/dbvisit/standbymp/bin/dbvcontrol
root      7382  7274  0 12:23 pts/0    00:00:00 grep --color=auto control
[root@dbvel72 ~]#
3. 3 Upgrade the DDC from the control center and License
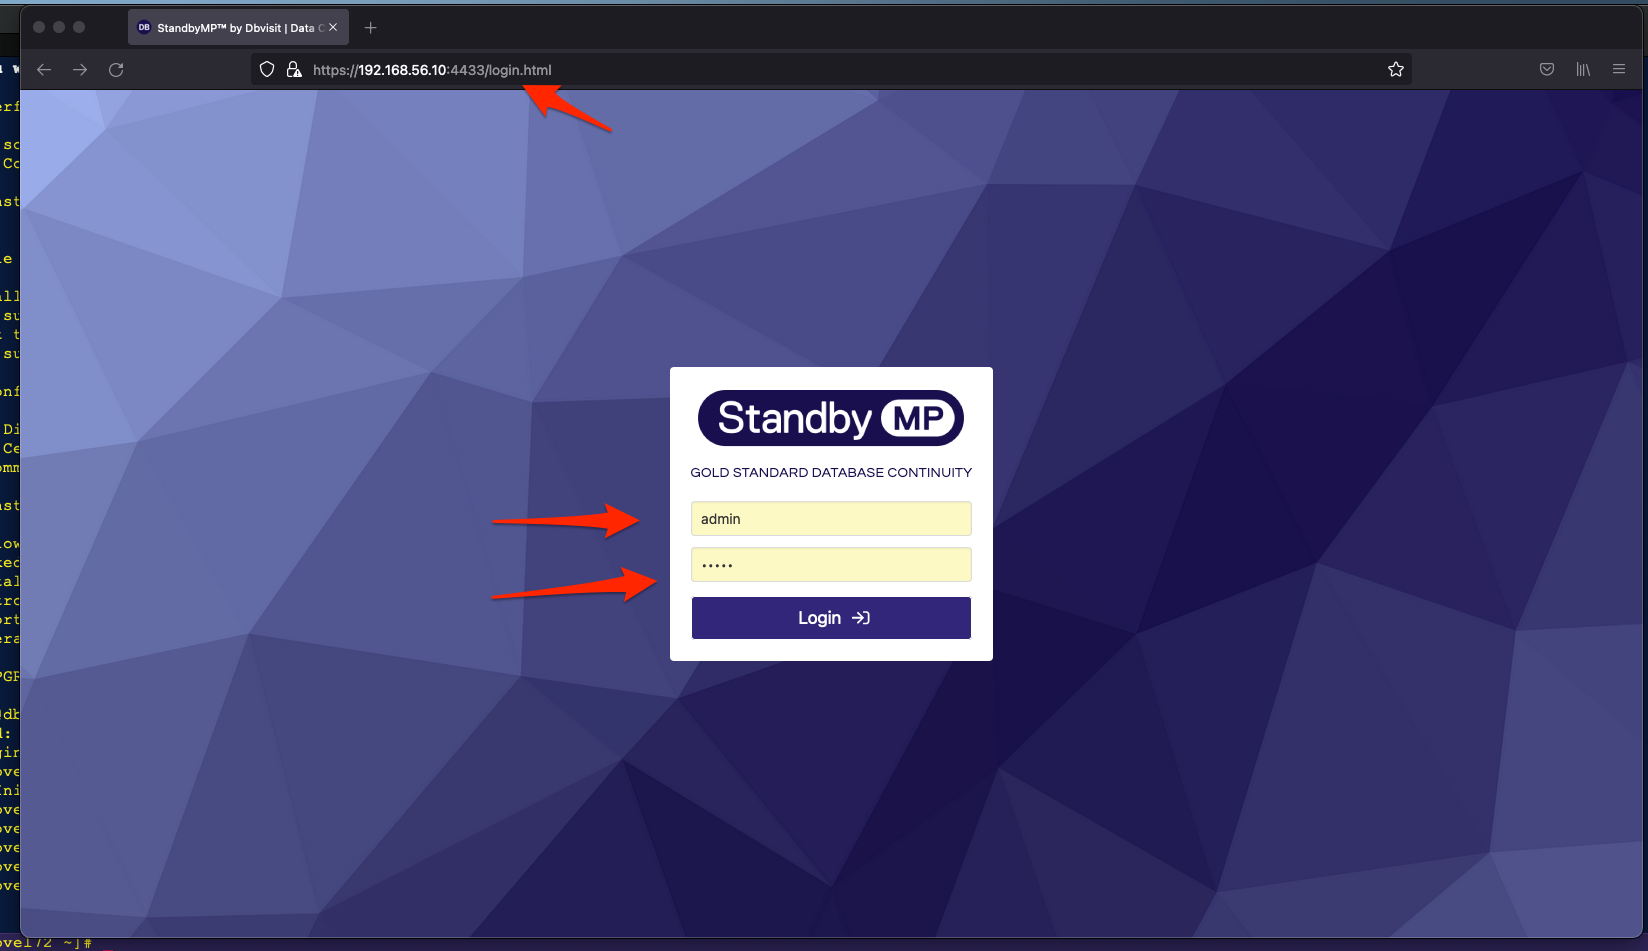
3.3.1. Login to control center
3.3.2 Import the DDC’s
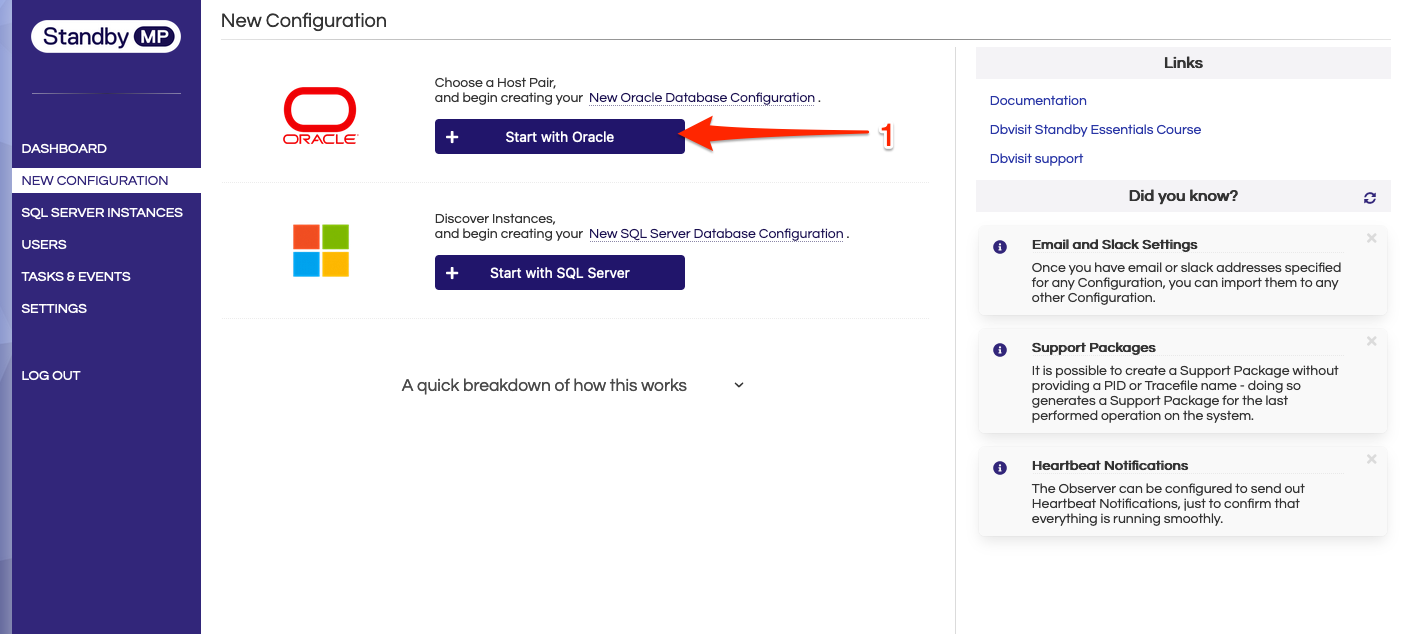
Unlike the earlier versions where the DDC’s appear in the Managed configurations page, for the Standby MultiPlatform, the primary host needs to be selected and then the DDC has to be imported. Go to New configurations and click on Start with Oracle ( 1 )
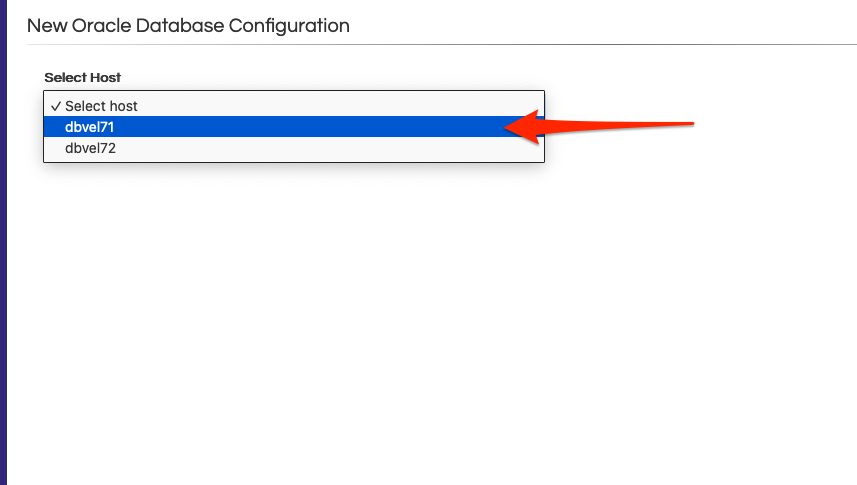
Select the Primary database server host. In the example the primary database host is dbvel71
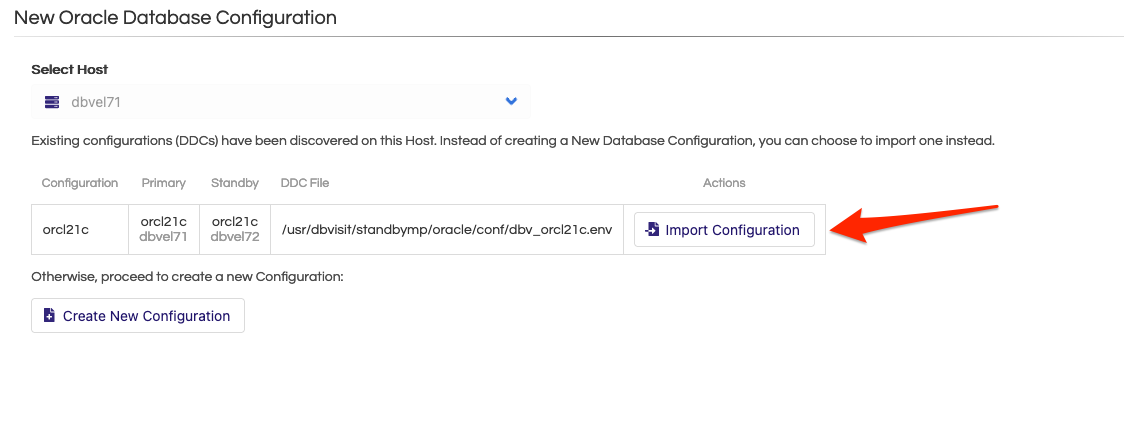
This will list the configuration that has been upgraded from the previous version and then click on Import Configuration ( 1 )
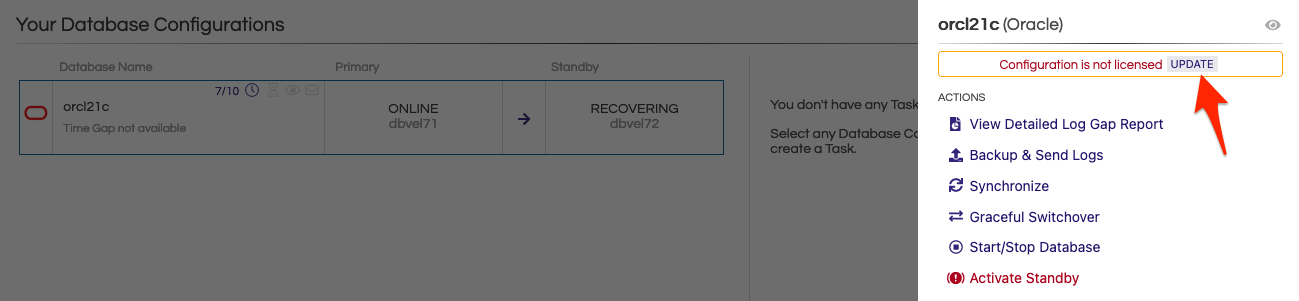
After the configuration is imported. Click on UPDATE to install the new license key for Dbvisit Standby MultiPlatform
Enter the new license key ( 1 ) and click on Update ( 2 ) to install the new key.

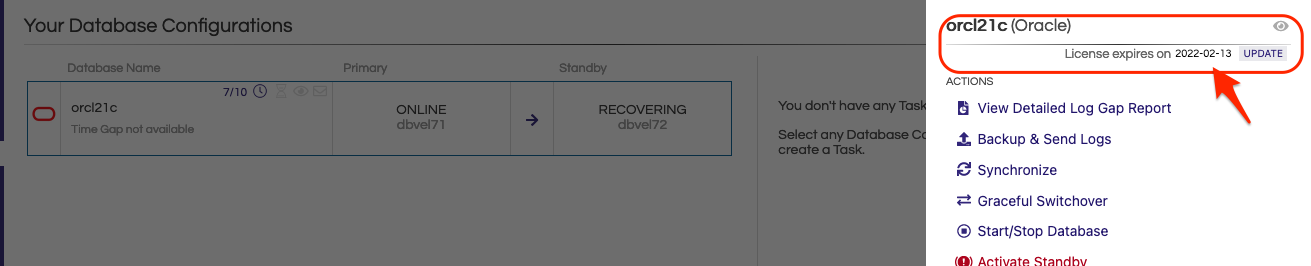
The New license key is updated and shows the expiration date for the license.
Important
Verify if all the notifications and Observers are configured according to your requirements. Please refer to the user guide for additional options available.