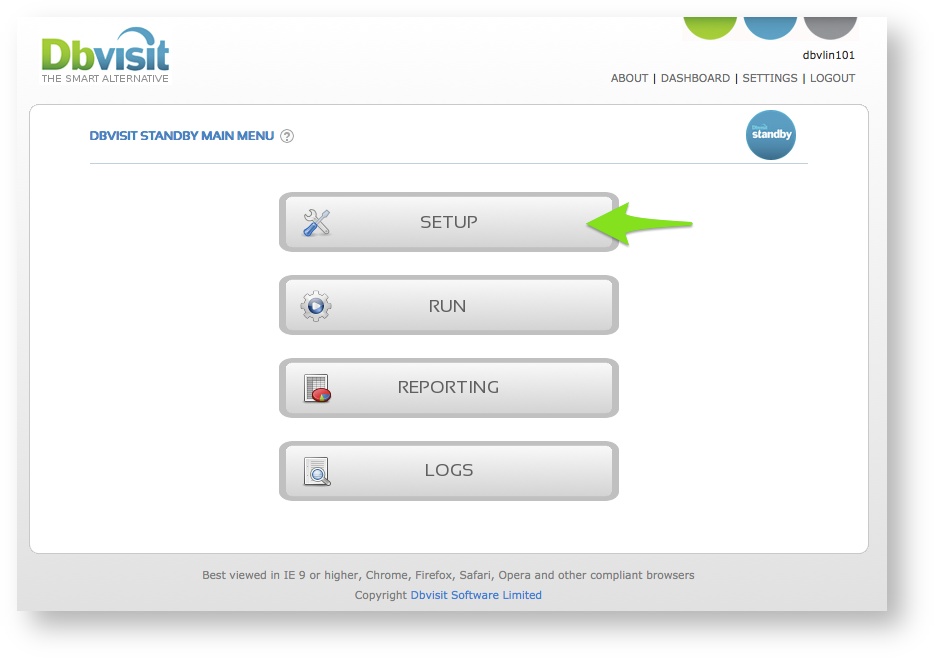
In this section we will cover the creation of a new Dbvisit Standby Configuration, also known as creating a Dbvisit Database Configuration (DDC) file.
Once you have done a clean installation of Dbvisit Standby, the first step is to create a configuration file or DDC, which will contain information about your environment as well as your Primary and Standby database settings.
For each Primary and Standby database pair there will be one DDC file. The file is created and maintained from the Primary server. The DDC file on the standby server is a mirrored copy of the one on the primary server and any changes to this file will be overwritten.
DDC files should be created on the primary nodes (One DDC file per RAC node if RAC is used) - this is where the master copy of the DDC files are located and maintained. A copy of the DDC file will be transferred and maintained on the standby server by Dbvisit Standby. You should not manually create or modify the DDC file on the standby server. All DDC creation and changes should be made from the primary servers. |
The default location of the DDC file is in the “conf” directory located under the “standby” sub directory.
If your Dbvisit Base directory is /usr/dbvisit, then you will find the DDC files in the /usr/dbvisit/standby/conf directory.
The DDC files have the following format: dbv_<DDC>.env, where DDC is in most cases the ORACLE_SID of your database, but this value can be different.
Example names:
The DDC file can be created from either the CLI or the GUI, but it should be done from the primary server. If you are using Oracle RAC you have to follow the same steps on all the Nodes in the Oracle RAC configuration.
This section will cover the creation of the DDC file via the Command Line and via the GUI below.
When installing Dbvisit Standby on Oracle RAC environments, please review this section, if you are using Single instance configurations please continue with the next section below.
For Oracle RAC installations please see - Configure Oracle RAC Primary with Oracle RAC Standby
Note: For Oracle RAC environments you will need to create a DDC file on all nodes. To do this you have to run the setup on all the RAC nodes. During the configuration you will be asked if it is the 1st node you are configuring, state yes, that will then ensure the Repository is created as part of the first node setup. When creating the second node's DDC file, you can specify No to this question as the repository would have been already created from node 1. If the standby is RAC, we can only create a single instance (multithread) db with our process. Once CSD (create standby database) successfully completes, you will have to convert the standby to RAC manually. |
When installing Dbvisit Standby on Oracle RAC on a UNIX based environment we recommend that you add an entry into each nodes /etc/oratab file for the corresponding instance.
Example if the Oracle RAC database is called DEV and you have instance DEV1 running on node 1 and instance DEV2 running on node 2 then you can add an entry for DEV1 into Node one /etc/oratab file and and entry for DEV2 into the /etc/oratab file of Node 2.
Example (the example below is showing for a RAC database called DEV using Oracle 11.2)
Node 1:
+ASM1:/u01/app/11.2.0/grid:N DEV:/u01/app/oracle/product/11.2.0/db_1:N DEV1:/u01/app/oracle/product/11.2.0/db_1:N |
Node 2:
+ASM2:/u01/app/11.2.0/grid:N DEV:/u01/app/oracle/product/11.2.0/db_1:N DEV2:/u01/app/oracle/product/11.2.0/db_1:N |
Standby Node, assuming it is single instance and you are calling the standby database DEV (same as primary), the standby /etc/oratab file might look like this:
+ASM:/u01/app/11.2.0/grid:N DEV:/u01/app/oracle/product/11.2.0/db_1:N |
Now when running the Dbvisit Setup you will get a question (if using command line) similar to the following, which will show you the Instance entry. Select 1 "DEV1" and continue with the setup. You should then end up with a DDC file named "dbv_DEV1.env".
....
=>ORATAB
Dbvisit can use the oratab file to find all the databases on this server.
If you would like Dbvisit to do this, please enter the location of the oratab file.
Specifying the oratab file is not mandatory.

Oratab file is [/etc/oratab]:
=>Oratab will be: /etc/oratab

Is this correct? <Yes/No> [Yes]:
The following Oracle instance(s) have been found on this server:

    SID      ORACLE_HOME
    ===      ===========
1)  DEV1     /u01/app/oracle/product/11.2.0/db_1
2)  DEV      /u01/app/oracle/product/11.2.0/db_1
3)  Enter own ORACLE_SID and ORACLE_HOME

Please enter choice : 1
.... |
The end result will be that you end up with two DDC files, on node 1 you will have a DDC file for instance 1 (dbv_DEV1.env) and for node 2 you will have a DDC file for instance 2 (dbv_DEV2.env). Both of them will have the standby database name as the same, in this case DEV (same as the primary).
To create a Dbvisit Database Configuration (DDC) file from the command line you need to run the “dbvisit_setup” command.
From the menu, select option 1 for Single Instance environments and if you are creating a DDC file for an Oracle RAC environment, you have to specify option 1a.
Once you have selected this option, follow the onscreen prompts and provide the information requested.
Note: If not using ASM for database storage, accept the default value of +ASM when asked for ASM details. Dbvisit Standby will automatically pick up ASM is not used and will ignore this value.
Below is an example of starting the DDC file creation:
oracle@dbvlin501[/usr/dbvisit/standby]: ./dbvisit_setup

=========================================================
     Dbvisit Standby Database Technology (7.0.01.11204)
           http://www.dbvisit.com
=========================================================

=>dbvisit_setup only needs to be run on the primary server.
Is this the primary server? <Yes/No> [Yes]: Yes

=========================================================
     Dbvisit Standby Database Technology (7.0.01.11204)
           http://www.dbvisit.com

     Dbvisit Database setup
       Default values will be shown in []

  Options:
       1) New Dbvisit Database setup (combines options 2,3,4)
       1a) New Dbvisit RAC Instance setup (combines options 2,3,4)


       2) New Dbvisit Database configuration (DDC) file setup
       3) New Dbvisit Archive Management Module (AMM) setup
       4) New Dbvisit Database repository (DDR) setup

       5) Manage Dbvisit Database repository (DDR)
       6) Update Dbvisit Database configuration (DDC) file

       7) Create Standby Database (and template)
       8) Synchronize Standby Database

       9) Uninstall Dbvisit Database repository (DDR)
       E) Exit
=========================================================
Please enter choice : 1 <--- Select option 1 to start creation of new DDC file |
Once you have specified option 1 follow the onscreen instructions, if using RAC, you must specify option 1a
The following questions will be asked (summary below)
Specify the Dbvisit ARCHDEST location
Please note that the Dbvisit Standby ARCHDEST location must exist on both primary (if using RAC - on all primary nodes) and standby server. It must be located on normal filesystem, not ASM. This location is not the same as the Oracle Database archive destinations, but is specific to Dbvisit Standby. The Dbvisit Standby ARCHDEST should not be located in the primary or standby database FRA (Fast/Flash Recovery Area). It is also important to make sure that you do not have the Dbvisit ARCHDEST set to the same as what you database archive log destination is. The ARCHDEST is specific to Dbvisit Standby and is not the same as the Oracle database archive log destinations. The Dbvisit Standby ARCHDEST can not be specified as an ASM location. |
The next step following the creation of the DDC file is to create a standby database, or if one already exists, run Dbvisit Standby as normal, first from the primary (which will then copy the DDC file to the standby location), followed by running it on the standby server.
Important: For Oracle RAC environments, repeat the above step on all the nodes, and make sure you select option 1a from the menu. The DDC file that will be created have the following format: dbv_<DDC>.env, where DDC is in most cases the ORACLE_SID of your database instance on the node where the DDC is configured (but this value can be different if you want to name it something else, but using the SID name is recommended) Examples: When configuring a RAC setup, you will run the setup and select option 1a follow the onscreen instructions. In an Oracle RAC setup where the database is named PROD with instance PROD1 and PROD2 on the two nodes, you should end up with a DDC file per node as follow:
|
To create the Dbvisit Database Configuration file from the GUI interface you need to login to the web-based interface as the admin (default) user.
Once logged in select the “SETUP” button from the main screen.

You will then enter the Dbvisit Setup menu as seen below:
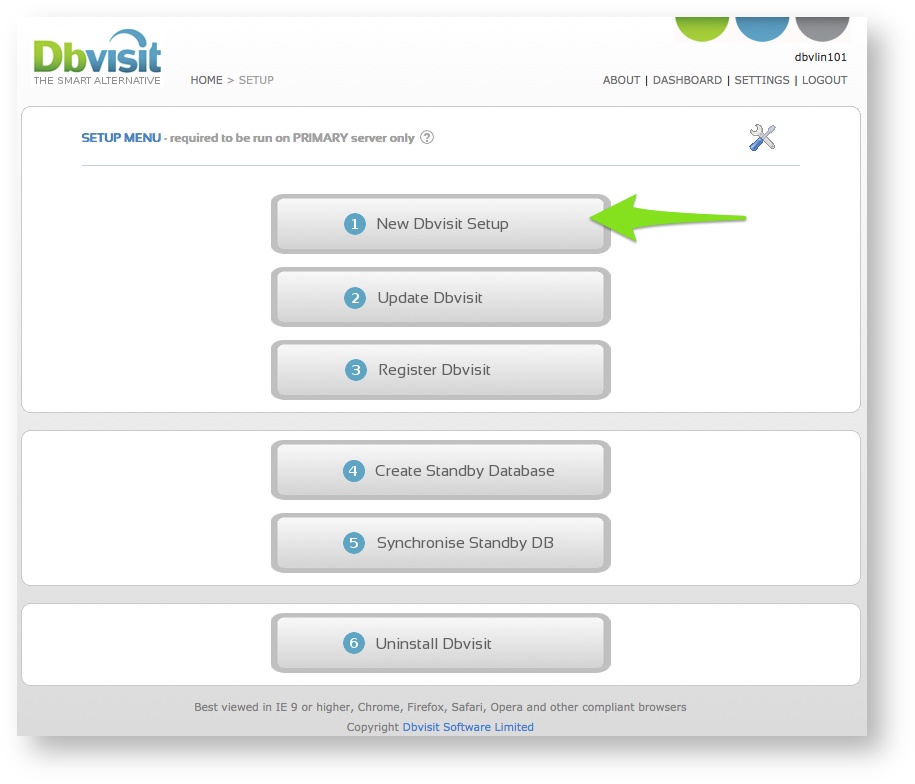
Once you have entered the "New Dbvisit Setup" section, you will be displayed with the screen blow. From this screen select the database you would like to configure Dbvisit Standby for (Create a DDC file for).
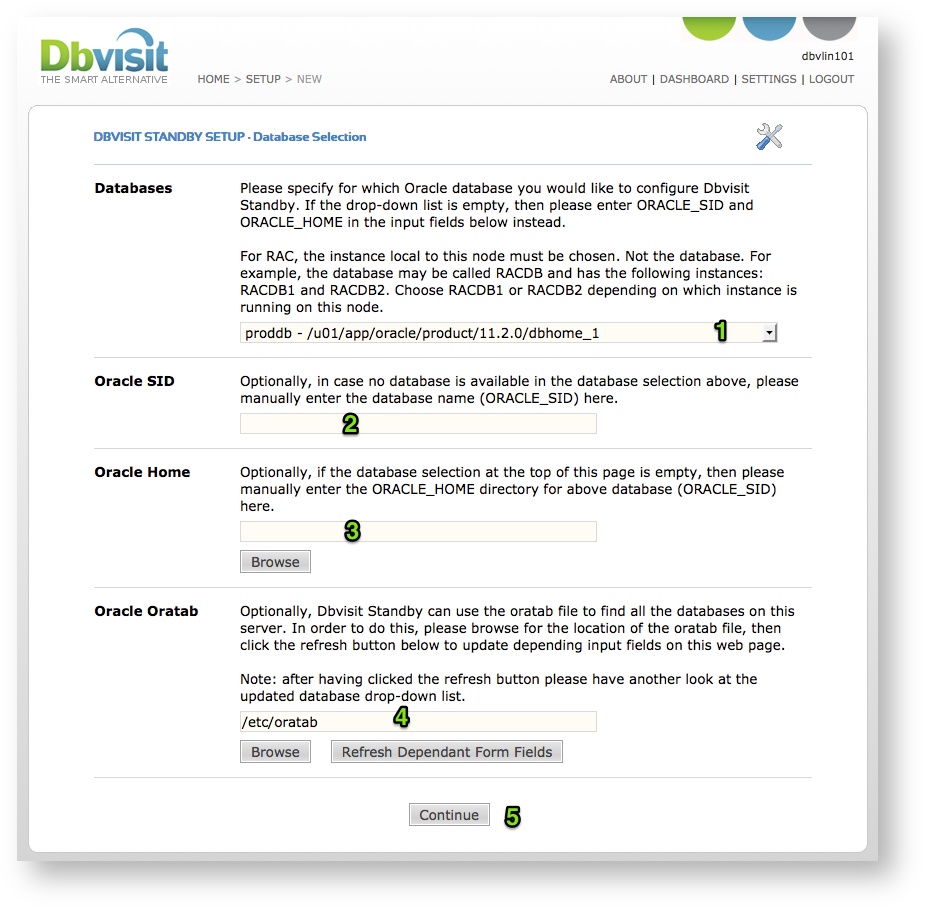
Dbvisit Standby will attempt to identify the databases running on the server. On Unix it will look for the Oracle "oratab" file, which should indicate all databases configured on the server and on Windows based systems, the information will be obtained from the Windows registry.
It is important that for Oracle RAC environments you have an entry in the "oratab" file for the instance running on this server. Example, if the primary RAC database is called PROD and instance PROD1 is running on this node that you have an entry for PROD1 in the "oratab" file. On the second node, you will then have PROD2 in the oratab file. Make sure in the Dbvisit Configuration, that you select the name for the instance running on that node, example on node 1 select PROD1 and node 2 select PROD2. |
Once you have selected the database in the step 1 above, a question will be asked confirming this is the primary server, confirm with Yes and then click continue.
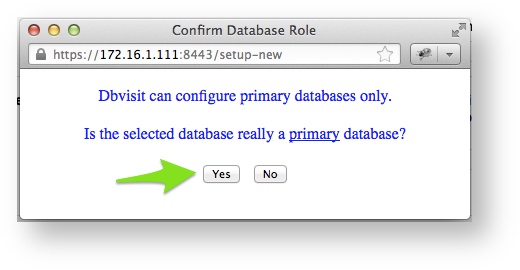
Click on Yes to confirm this is the primary.
You have to run the New Setup on the primary server only. (If you are using Oracle RAC, you need to run this configuration on ALL the RAC nodes) |
You will now be presented with the Main screen for a new Setup from where you will have to follow 7 steps (TABS) to complete the new configuration (creation of a DDC file)
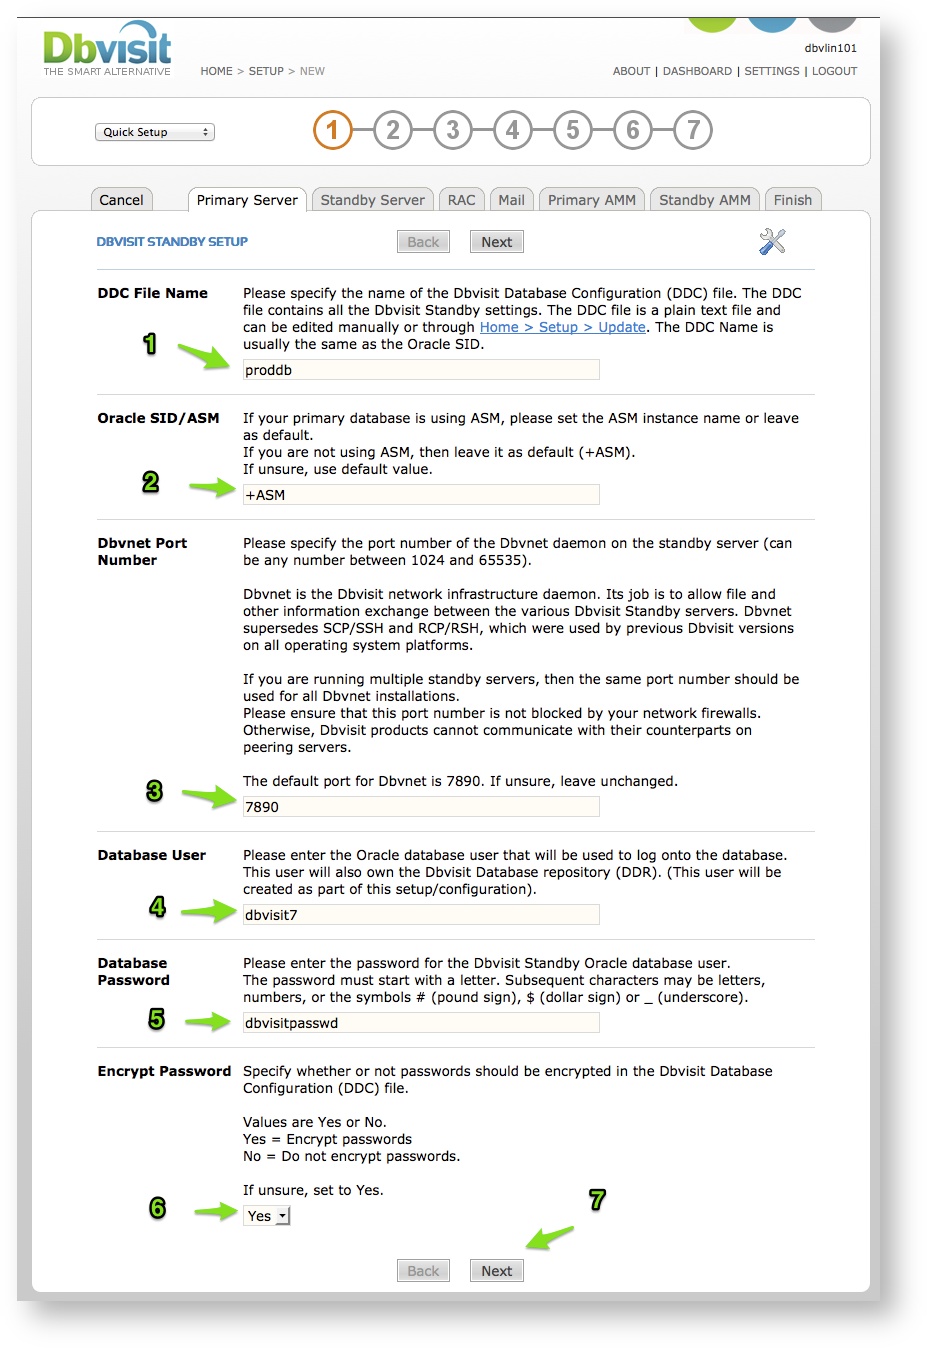
STEP 1: Primary Server
This screen will take you through 7 tabs to create the Dbvisit Standby Database Configuration file.
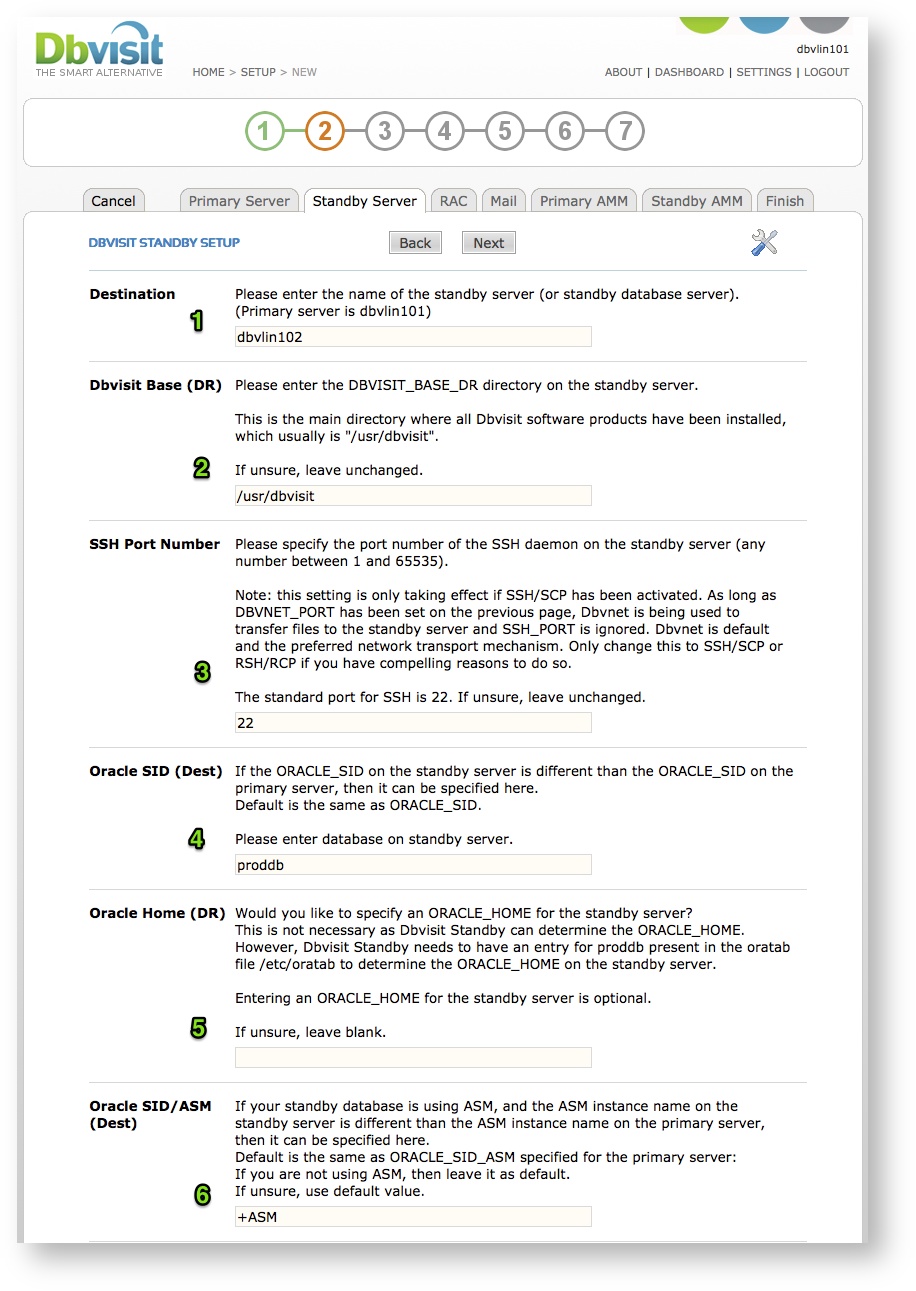
Similar questions as mentioned for the CLI, will be asked as you move through these “tabs”.
Once you have completed all the information required in these 7 tabs, the DDC file as well as Dbvisit Database Repository (DDR) will be created.
STEP 2: Standby Server
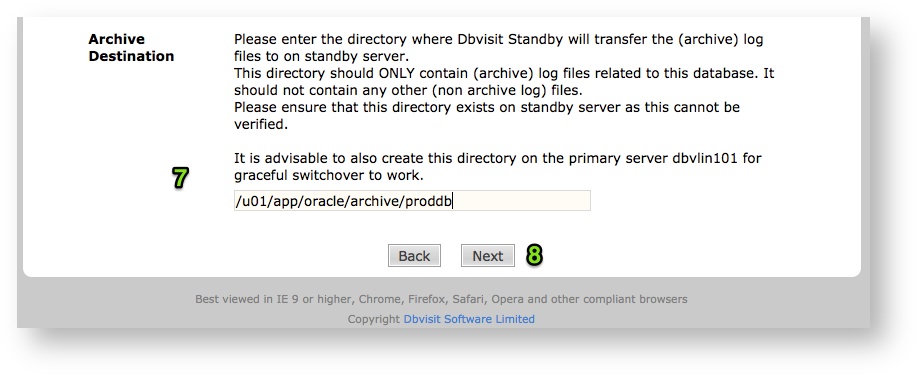
Please note that the Dbvisit Standby ARCHDEST location must exist on both primary and standby server. It must be located on normal filesystem, not ASM. This location is not the same as the Database archive destinations, but is specific to Dbvisit Standby. |
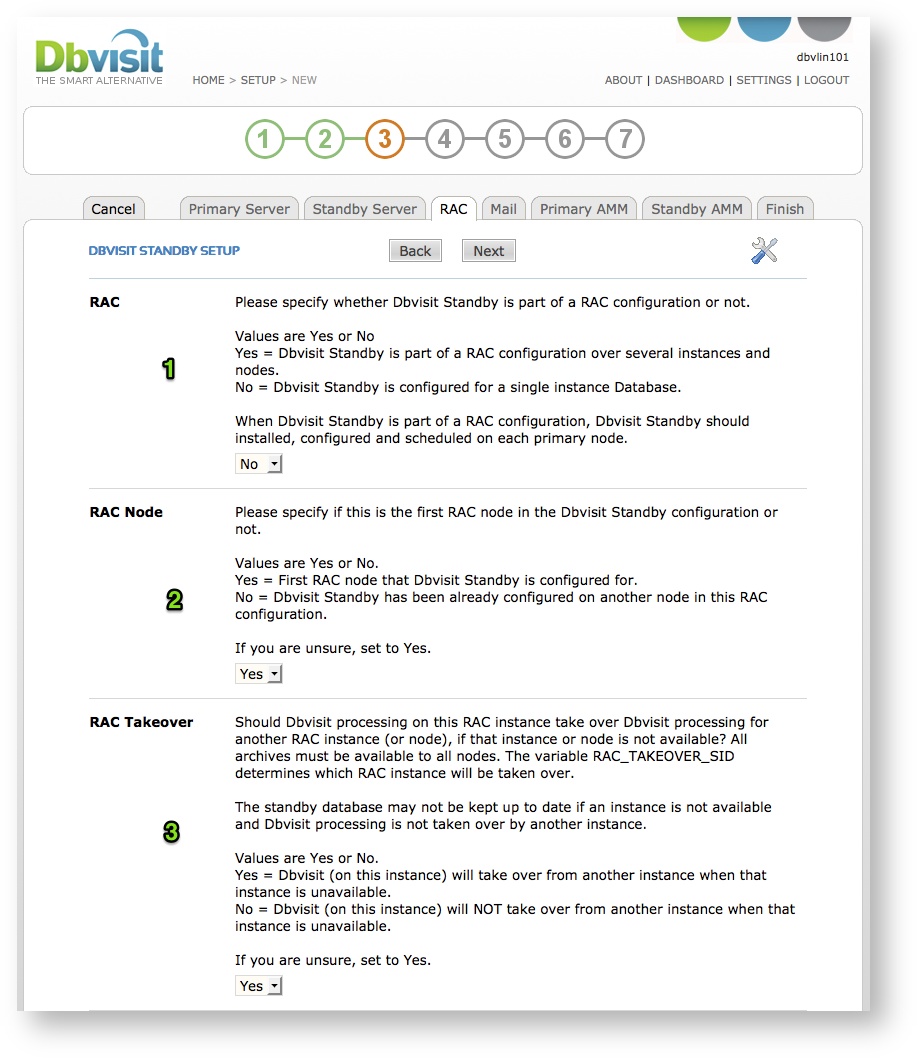
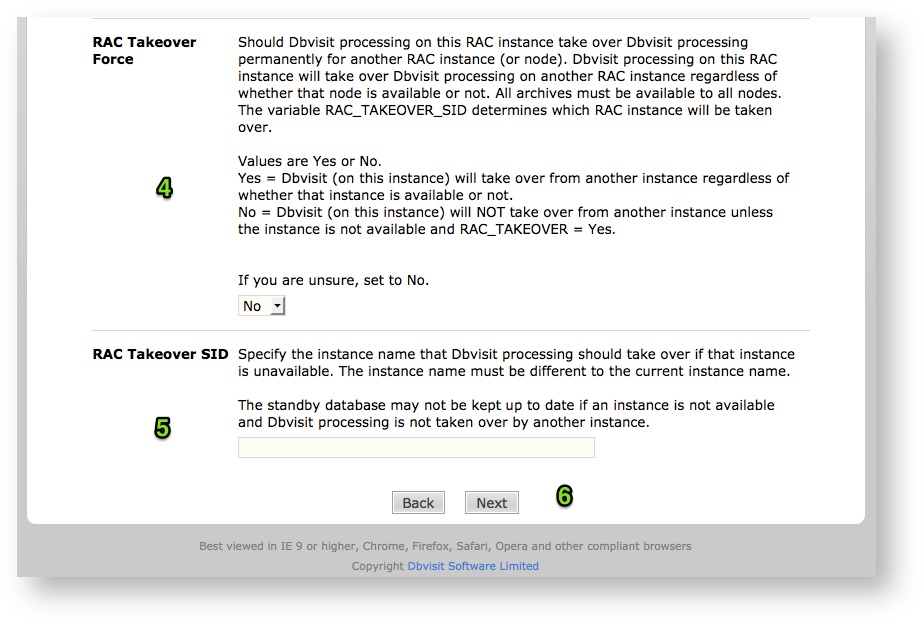
STEP 3: RAC
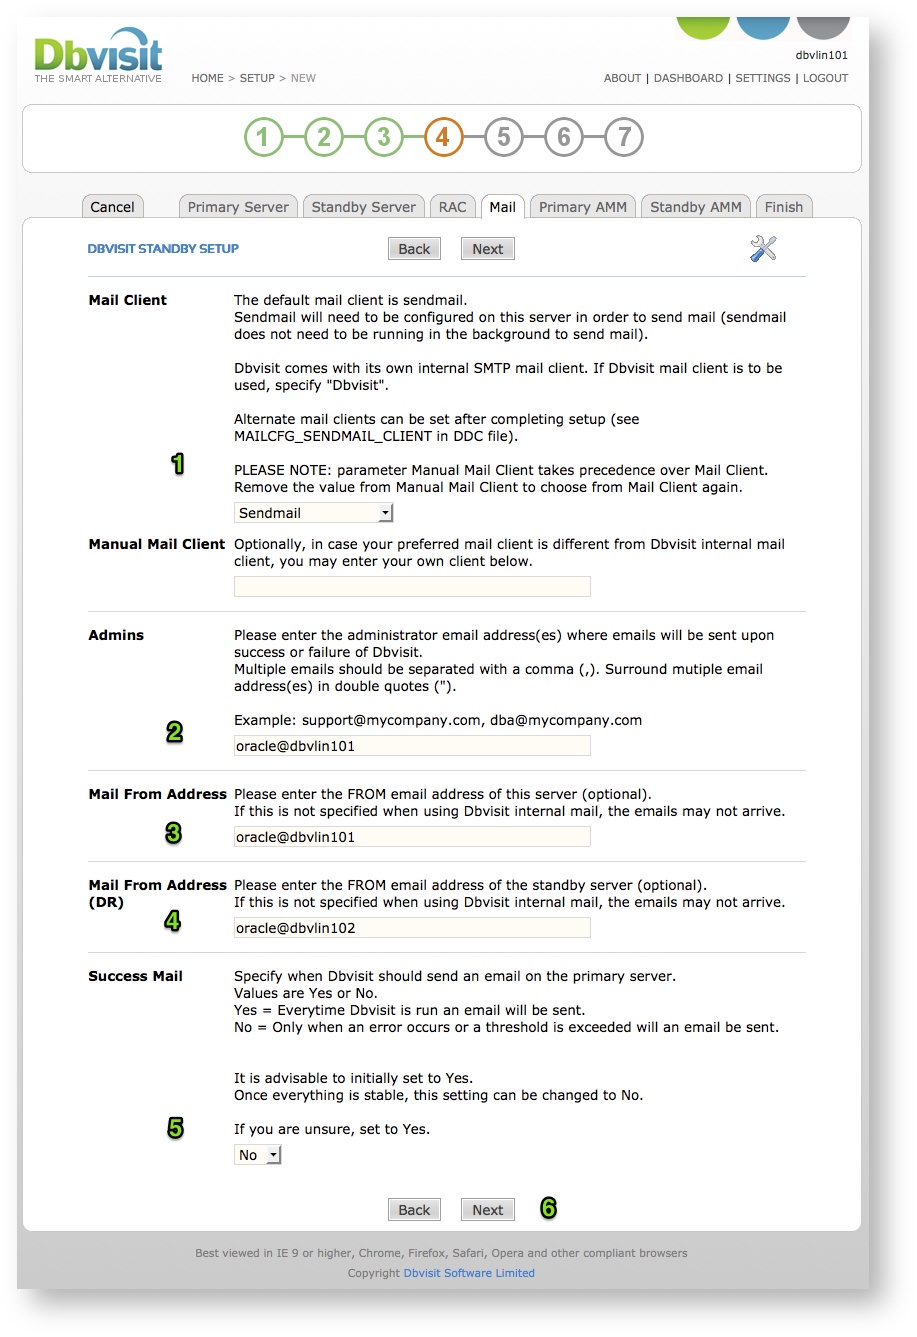
STEP 4: MAIL
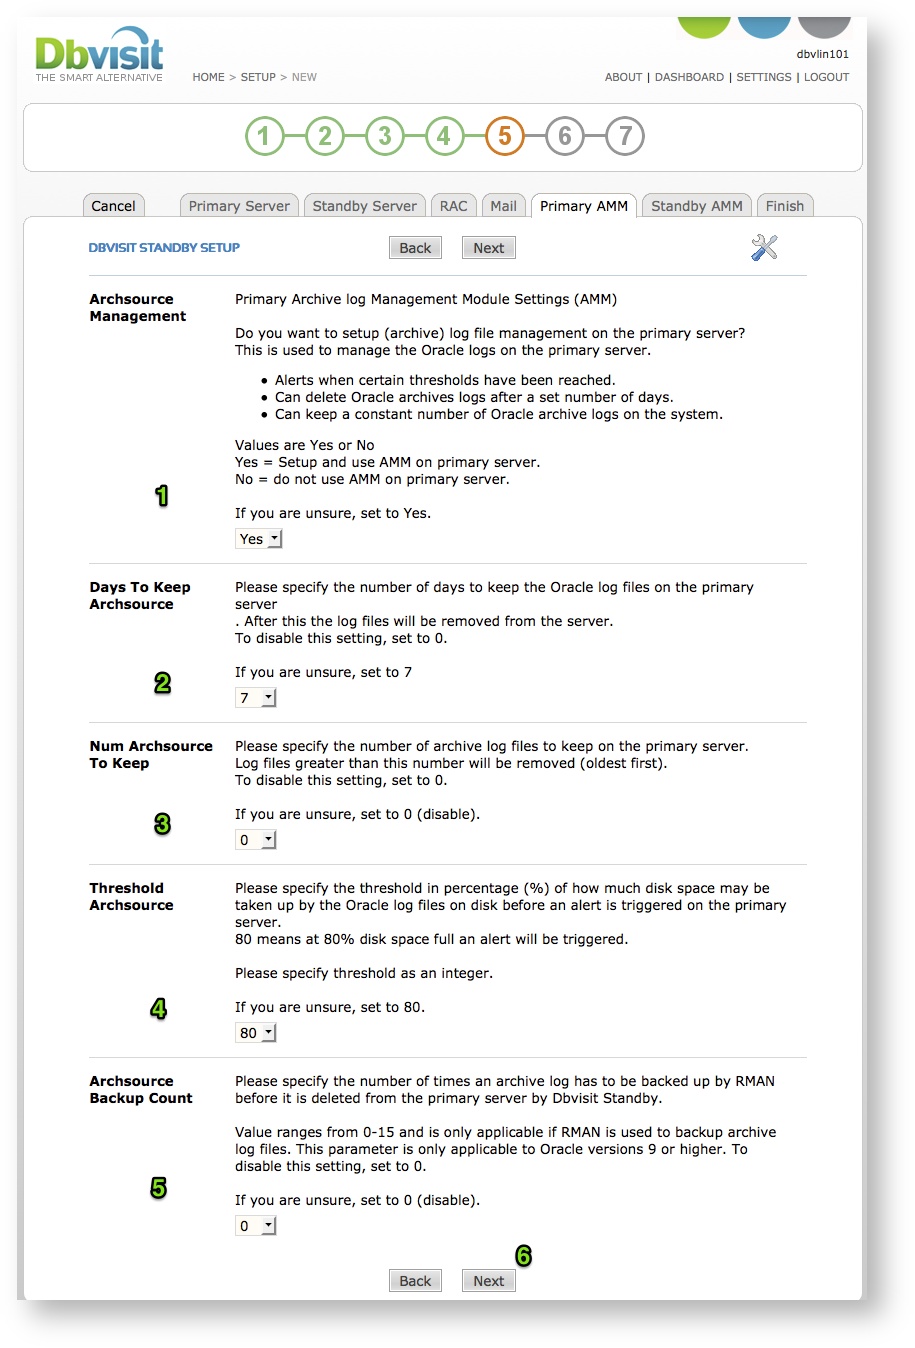
STEP 5: Primary AMM (Dbvisit Standby Archive Log Management Module)
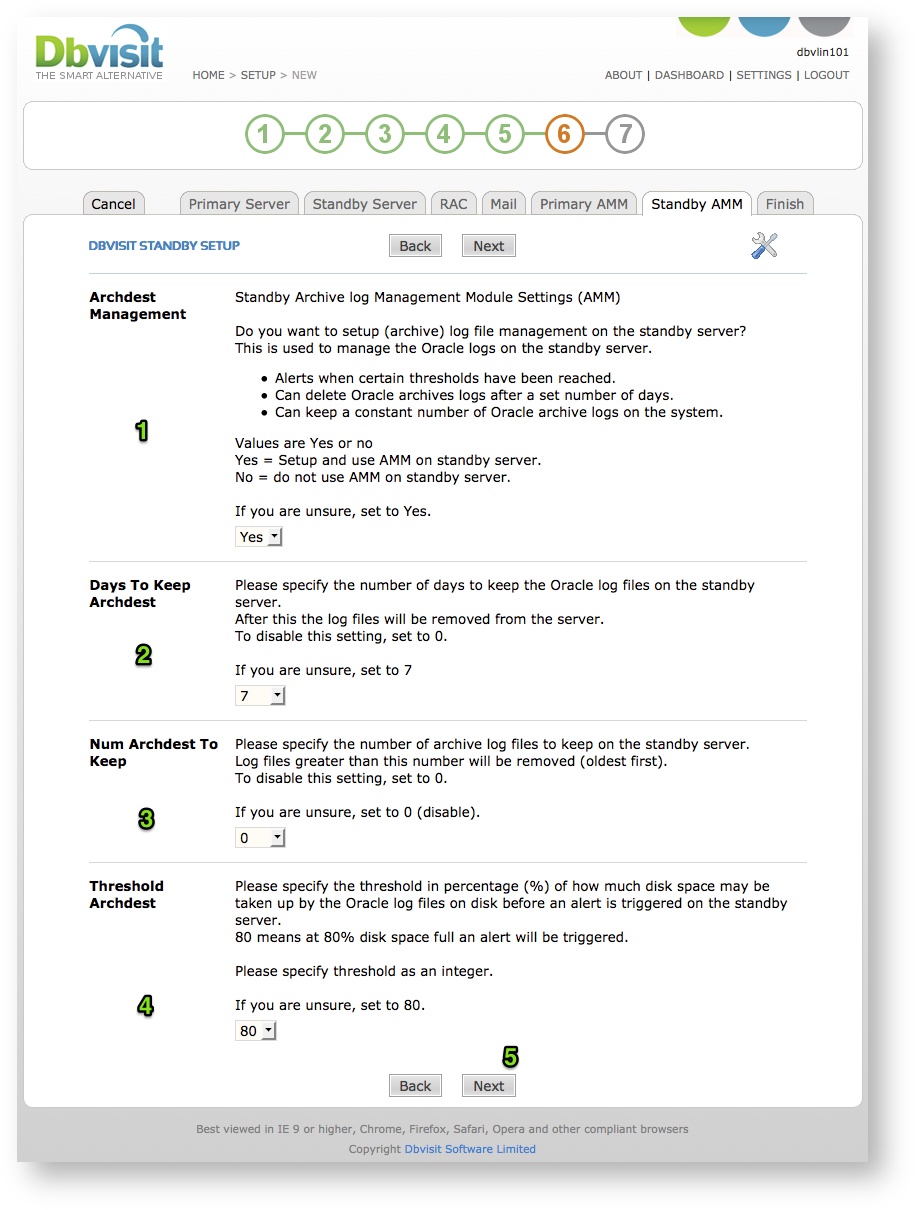
STEP 6: Standby AMM (Dbvisit Standby Archive Log Management Module)
STEP 7: Finish
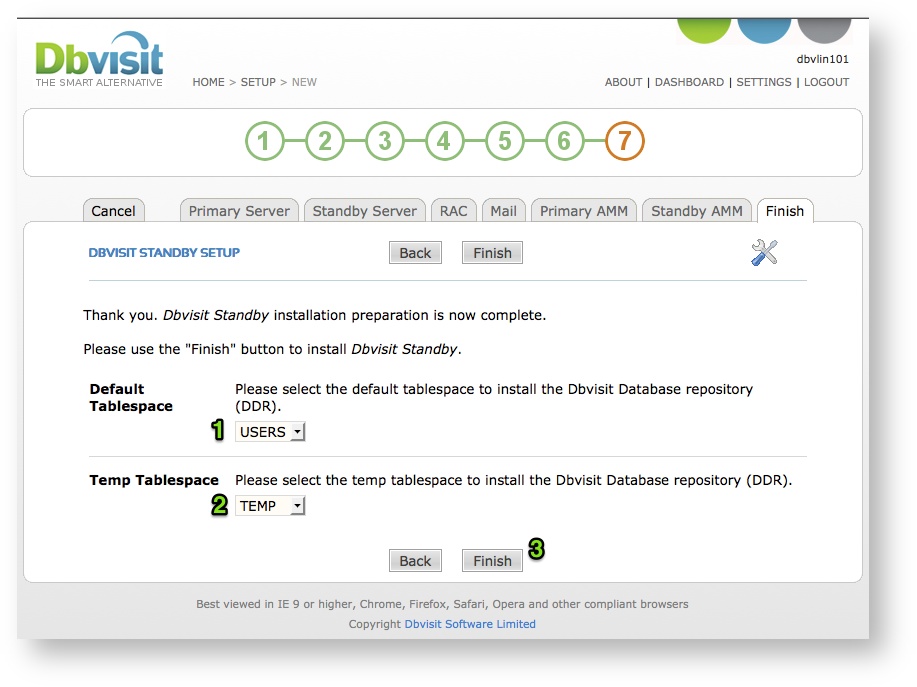
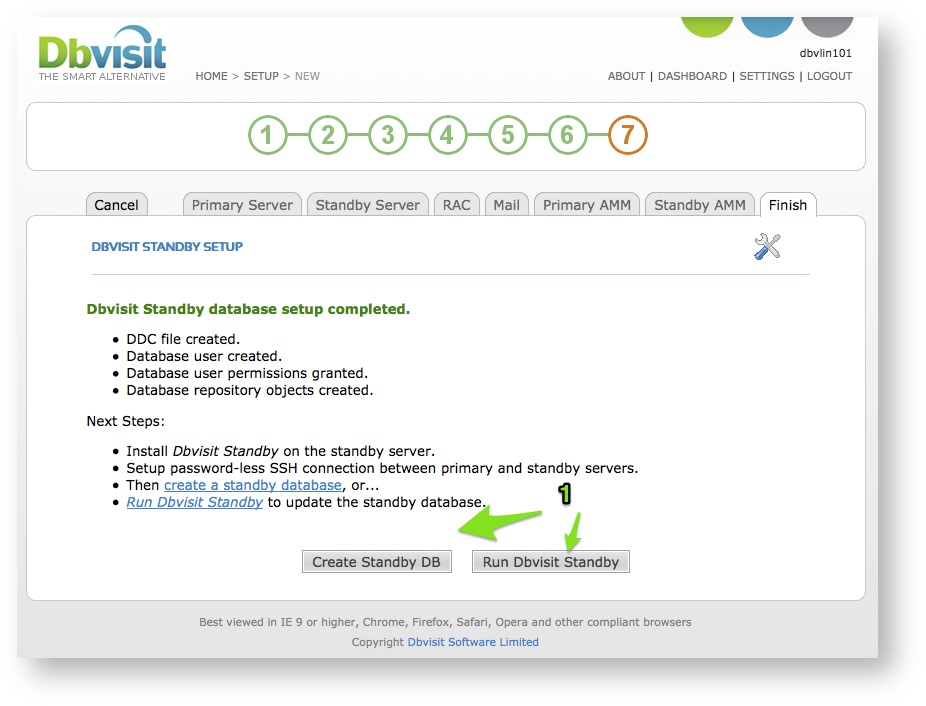
Note: For Oracle RAC environments you will need to perform this step on all nodes. Just make sure you create the repository only from one of the Nodes. Under the RAC Tab, make sure you only specify “yes” to the question “Please specify if this is the first RAC node in the Dbvisit Standby configuration or not.” On the first node where you run the configuration. On all other RAC nodes make sure this value is set to “No”. |