Oracle Cloud (DBS) -> Oracle Cloud (DBS)
1. Introduction
The purpose of this Deployment guide is to demonstrate the way in which Dbvisit Standby 9.0 software can be used within the Oracle Cloud Infrastructure's Database As A Service (DBaaS) or Database System (DBS) space. In this guide, we focus on both the Primary and Standby databases hosted on DBS environments. This guide will offer instructions for configuring both the OCI DBS machines as well as the installation and setup of Dbvisit Standby version 9.
2. Initial Setup and Configuration
Configuring a VCN is outwith the scope of the document as there are too many factors involved that are client specific requirements. For the purpose of this guide, a VCN and Security Group was created with default values and the details specific to configuring Dbvisit Standby will be covered later in the guide.
2.1 Provisioning the Severs
Connect to OCI Portal and navigate to the Database section from the menu on the left.
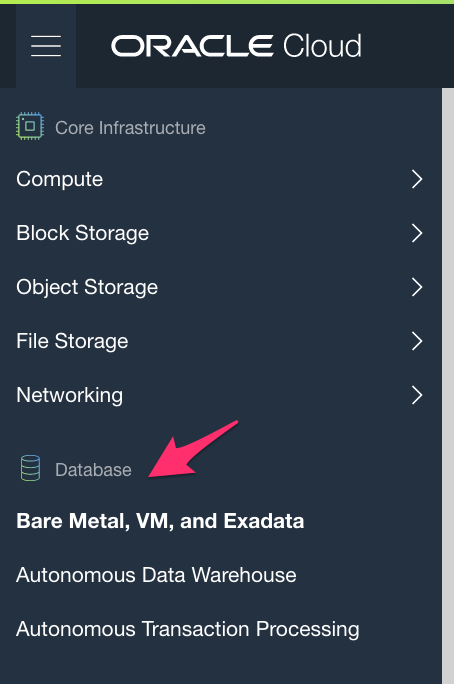
This option will direct you to the Bare Metal, VM and Exadata Page from which we can go ahead and create our first DB System.

The compartment (1) offered was the root of our Dbvisit account and the (2) DB system name of the primary is 'dbvlab01'. (3) is showing availability domain AD-1
We opted for the shape 'Virtual Machine' (4) and it comes with a pre-created database on each host. The Bare Metal option does not have any binaries or pre-installed Database and is in no way different from installing Dbvisit Version 9 in a local data center.
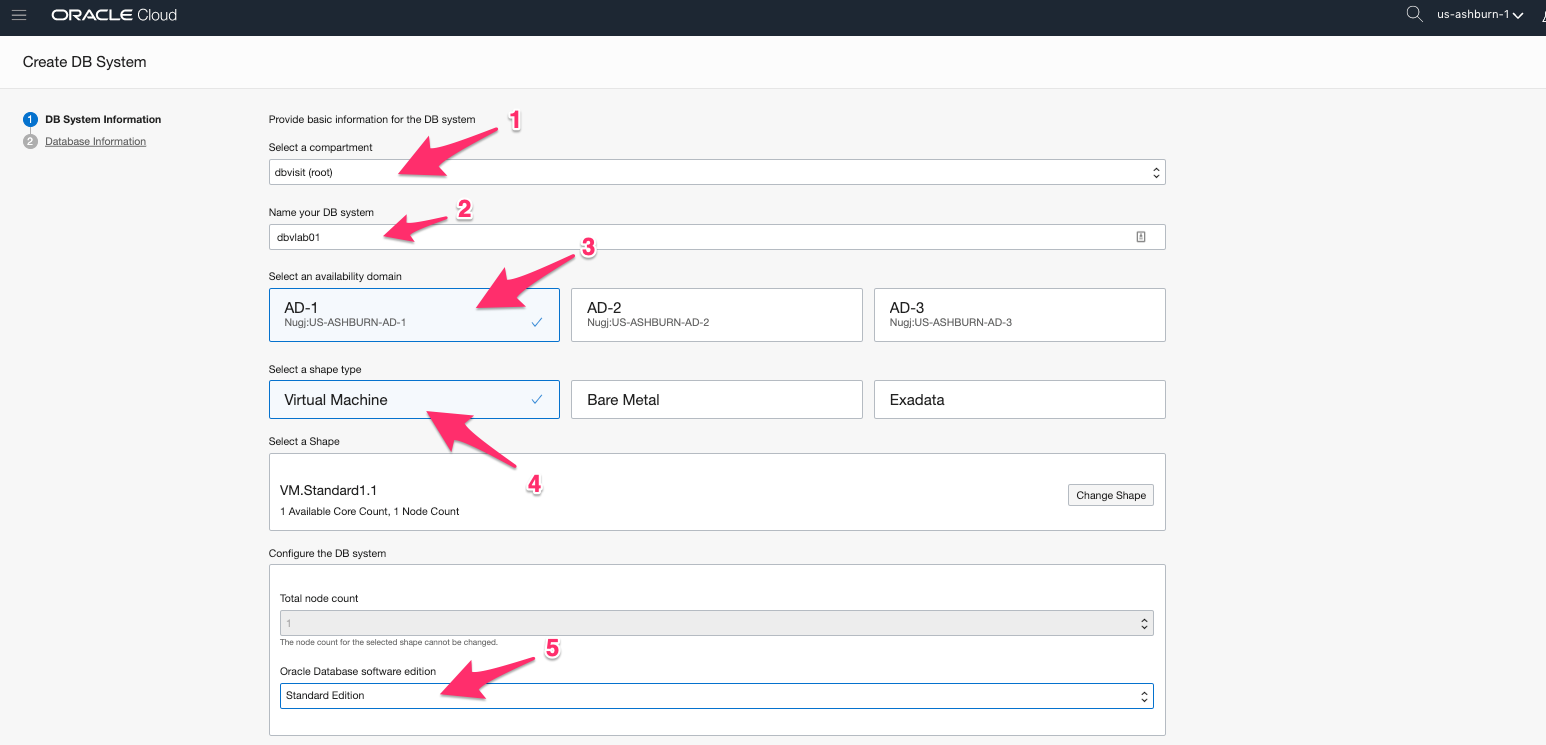
The basic configuration of 1 node and 1 core was chosen as well as Oracle Standard Edition (5)
I generated a private and public set of key files using ssh-keygen from my local Linux machine.
oracle@dbvlab01[/home/oracle]: ssh-keygen -b 2048 -t rsa -f oraclecloud
Generating public/private rsa key pair.
Enter passphrase (empty for no passphrase):
Enter same passphrase again:
Your identification has been saved in oraclecloud.
Your public key has been saved in oraclecloud.pub.
The key fingerprint is:
35:6b:e6:39:cd:06:c0:04:d9:7e:73:4d:85:80:33:ab oracle@dbvlab01.dbvisit.co.nz
oracle@dbvlab01[/home/oracle]:
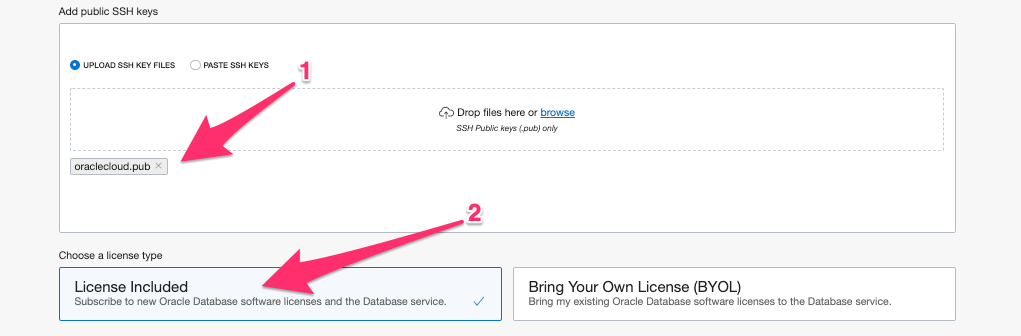
I could then import this file as shown by (1) in the image. (2) We also opted to have the License costs included in the billing rather than BYOL.
Move on to chosing the details for the VCN (1), Subnet (2), Security Groups (3) and interesting named 'Hostname prefix' (4)
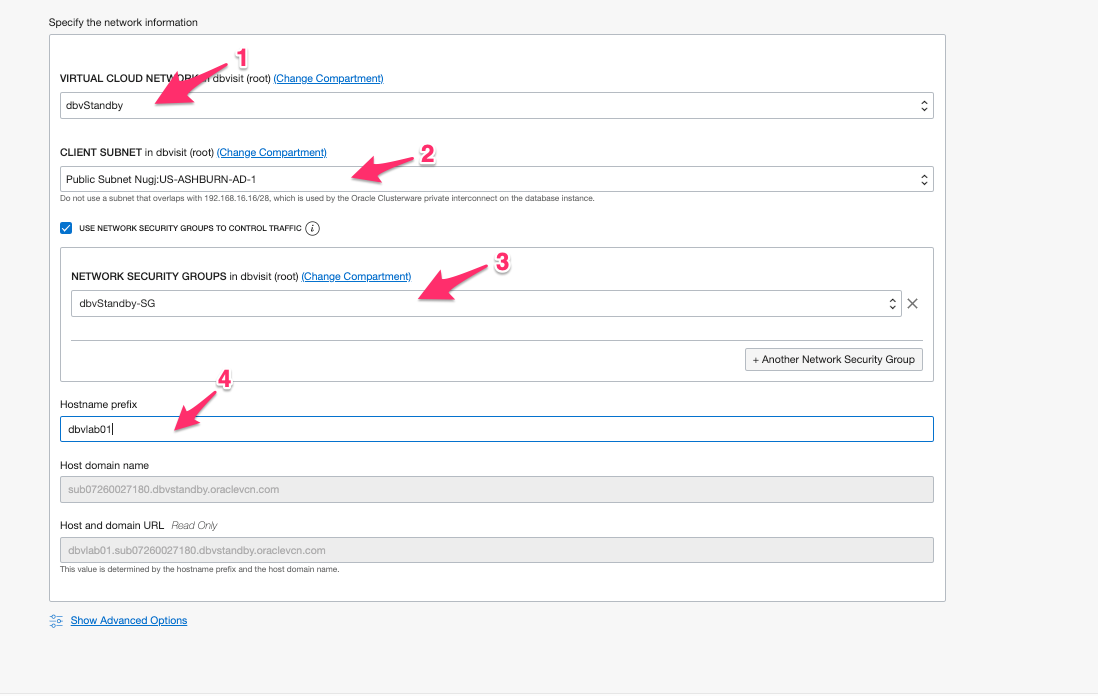
This hostname prefix is actually the hostname of your node or VM after the creation.
Once the network settings are in place we can move to the next page. Here we specify the Database Name (1), version (2)
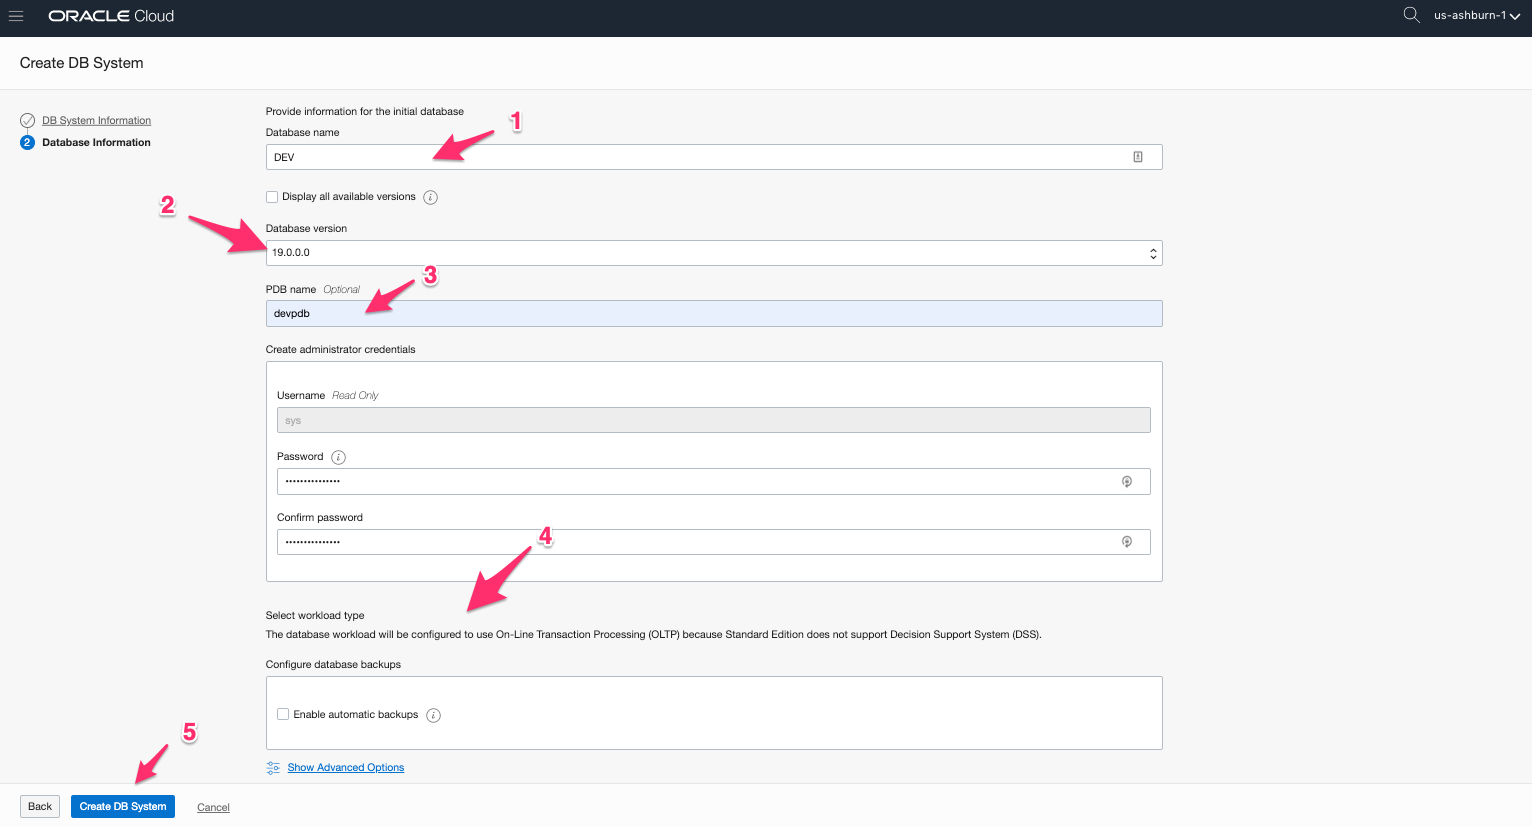
If the database will have a pluggable database and it's name (3). There is a note (4) to say workload type is fixed at OLTP as DSS is not supported with Standard Edition. In this example we have left the automatic backup un-checked and can proceed to Create the DB System. (5)
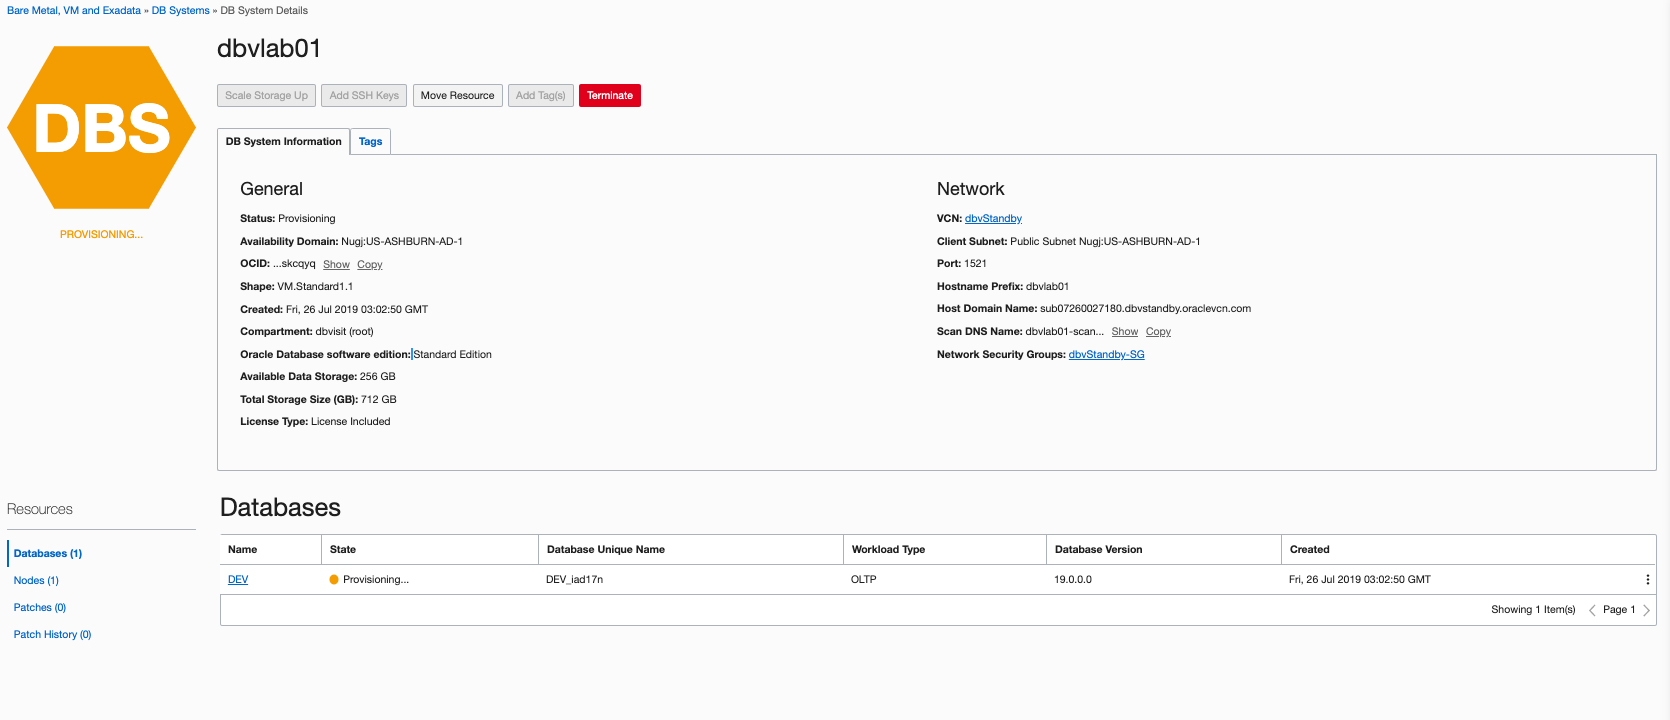
The screen changes to show info about your new system and it remains yellow whilst it is still provisioning.
Whilst this is provisioning, we can create a 2nd host that will be the standby server. The values are all the same except the name and 'Hostname prefix' has been set to 'dbvlab02'
As the Standby server is also of type DB system, it will come with a pre-installed Database. The shape chosen in this configuration is the default VM Standard1.1 that has only 1 core and 1 node. This config is unable to support a 2nd database so the pre-created database is dropped prior to creating the Standby. An OCI DB System assumes only 1 database so this standby effectively replaces the pre-created one. However, if the shape of your machine supports having more than one database then there might not be a requirement to drop the database prior to creation.
The DB systems home screen now shows the 2 systems in the Provisioning State

Provisioning these databases can take up to 1 hour, so it's worthwhile at this point to add the Dbvisit Port details to the default Security List provisioned with your Virtual Cloud Network (VCN)
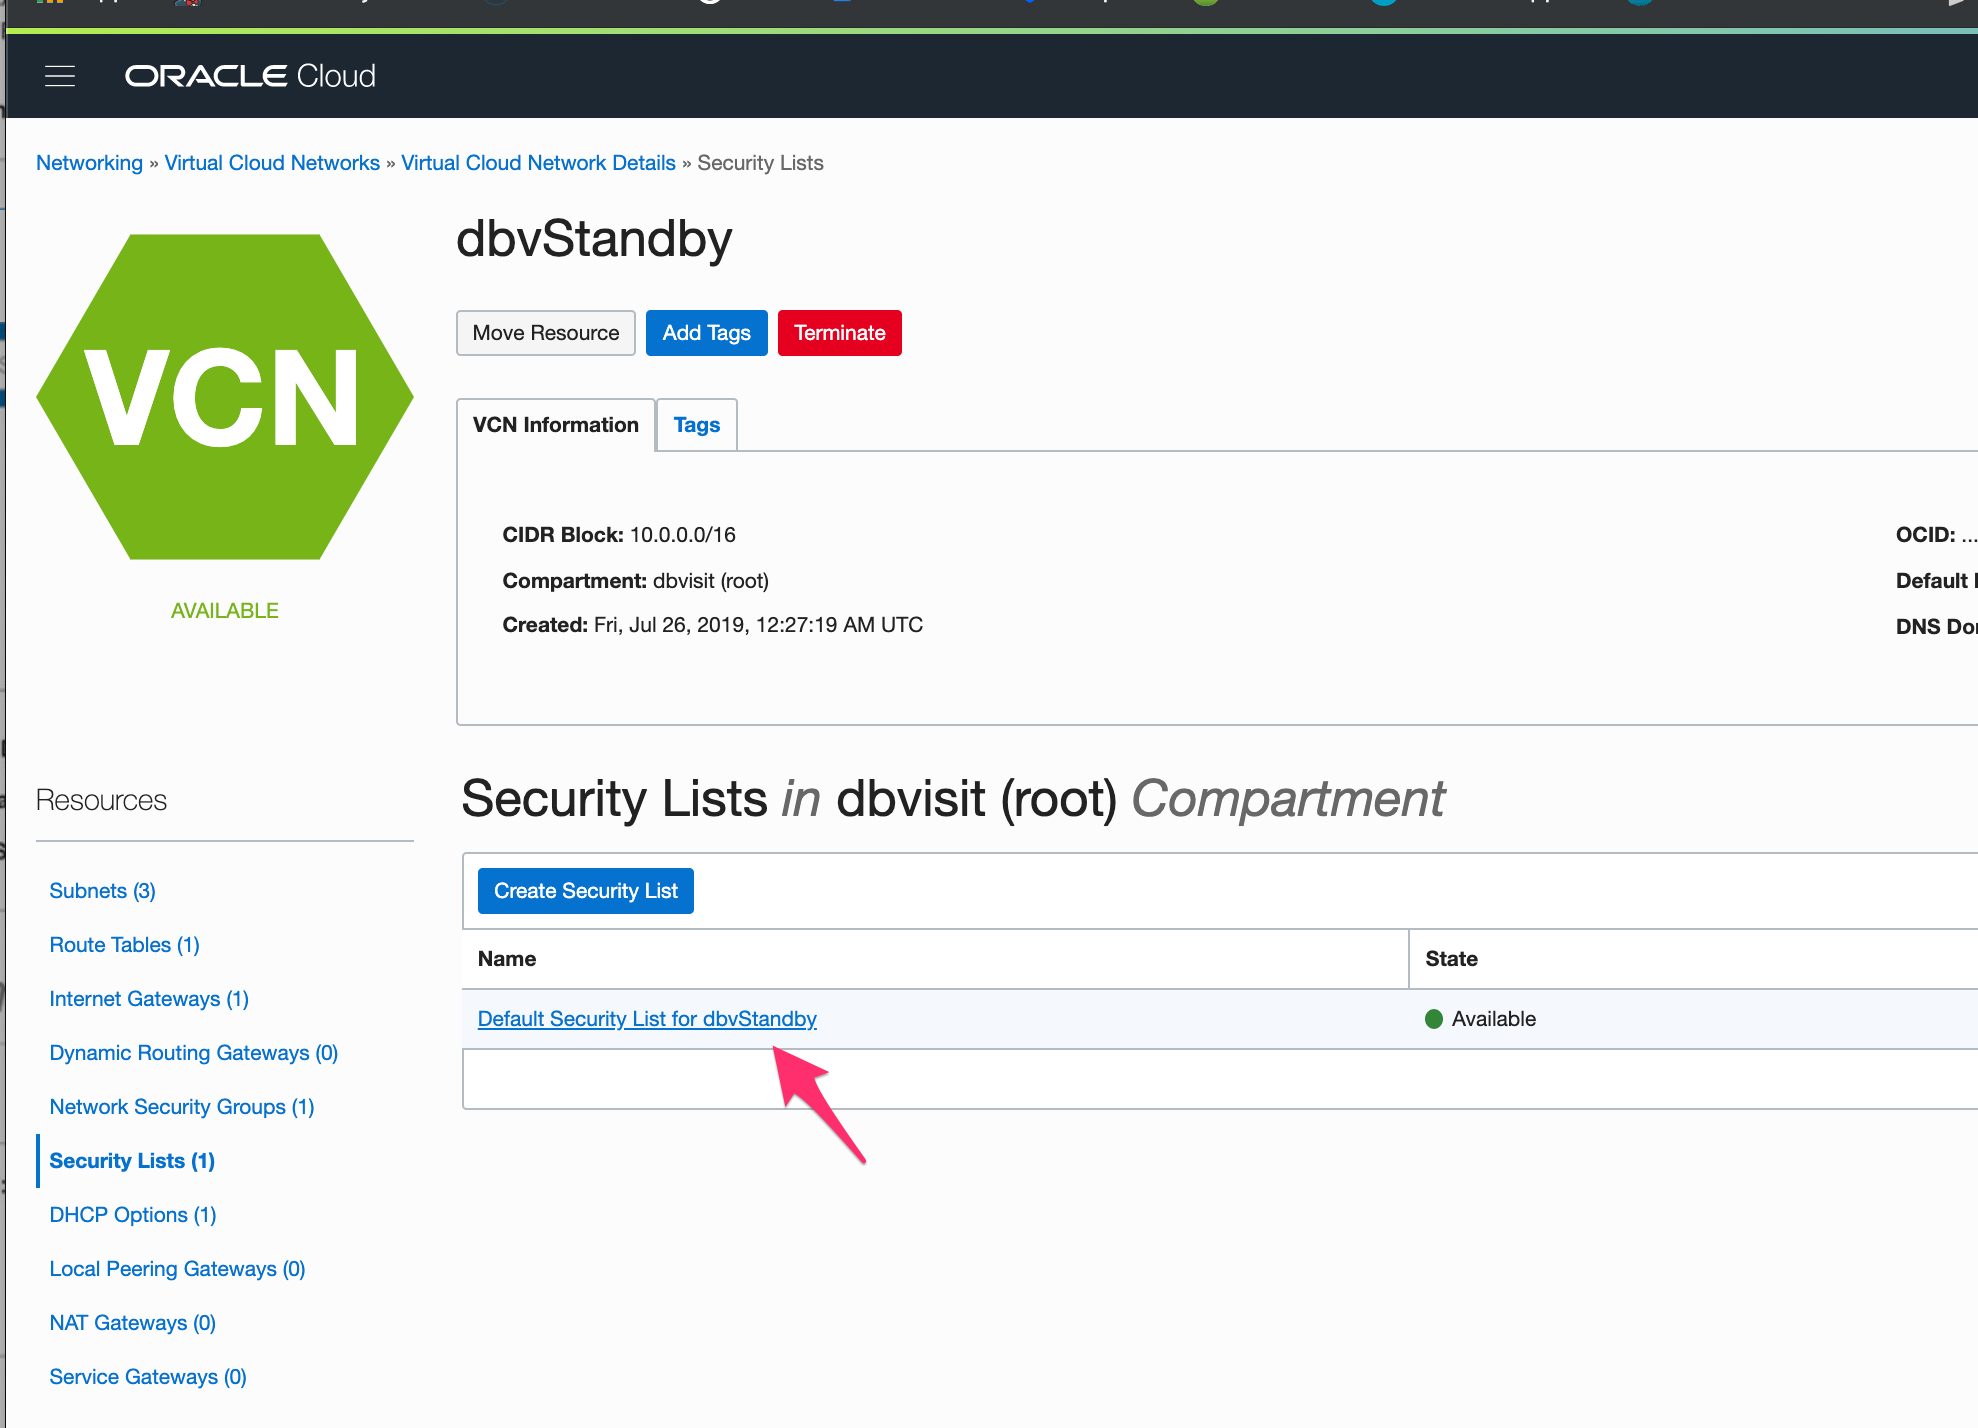
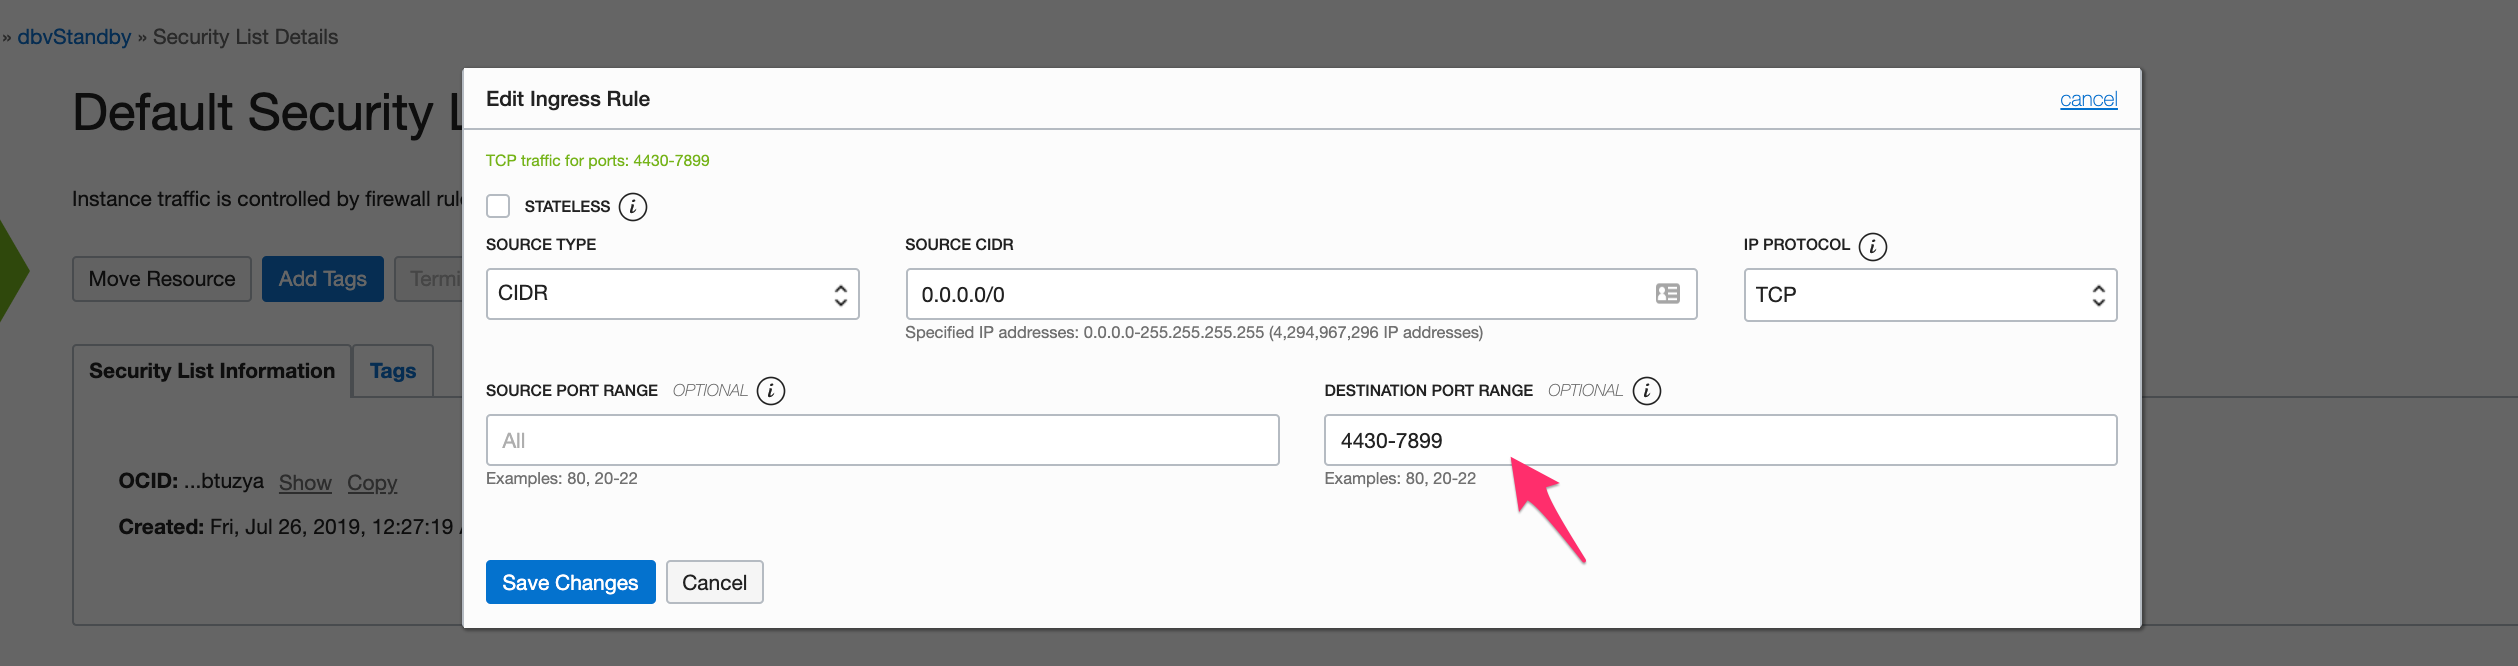
Within this Default List, add a rule that allows traffic via the Dbvisit communication Ports. These are 7890 (Dbvnet), 7891 (Dbvagent) and 4433 (dbvserver: GUI).
In this example we are allowing all traffic. Restricting access to specific IP ranges is also possible are probably recommended
Navigating back to the DB systems section we can see that they are now available and we are able to connect using the public key added during creation.

| Primary Server Details | Standby Server Details |
|---|---|
Name: dbvlab01 OCPUs: 1 OS: OEL7 Version: 19.3.0.0.0 Edition: Standard Edition Database: DEV Dbvisit Base: /usr/dbvisit Standby Version: 9.0.02 | Name: dbvlab02 OCPUs: 1 OS: OEL7 Version: 19.3.0.0.0 Edition: Standard Edition Database: DEV Dbvisit Base: /usr/dbvisit Standby Version: 9.0.02 |
2.2 Preparing the Servers
Connect to each of the cloud hosts with ssh, specifying the public key uploaded when creating the service, as user opc. I have added an entry locally with the public ip of each node.
$ ssh -i oraclecloud opc@dbvlab01
From here execute sudo -s to switch to the root user and create the dbvisit directory in /usr. Also vi the /etc/hosts file to reflect the internal IP address of the other node in each case. (dbvlab01 : 10.0.0.3 and dbvlab02 : 10.0.0.4)
[opc@dbvlab01 ~]$ sudo -s
[root@dbvlab01 opc]# mkdir /usr/dbvisit
[root@dbvlab01 opc]# chown oracle:oinstall /usr/dbvisit
[root@dbvlab01 opc]# vi /etc/hosts
Download the latest version of Dbvisit Standby 9.0 for OEL7 and SCP to each of the cloud hosts /tmp as the opc user.
$ scp -i oraclecloud dbvisit-standby9.0.02-el7.zip opc@dbvlab01:/tmp
dbvisit-standby9.0.02-el7.zip                                                           100%   80MB 462.5KB/s   02:56
$ scp -i oraclecloud dbvisit-standby9.0.02-el7.zip opc@dbvlab02:/tmp
dbvisit-standby9.0.02-el7.zip                                                           100%   80MB 462.5KB/s   02:56
From there chown to oracle:oinstall and move to the /home/oracle on each host.
$ scp -i oraclecloud opc@dbvlab01
[opc@dbvlab01 ~]$ sudo -s
[root@dbvlab01 opc]# cd /tmp
[root@dbvlab01 opc]# chown oracle:oinstall dbvisit-standby9.0.02-el7.zip
[root@dbvlab01 opc]# mv dbvisit-standby9.0.02-el7.zip /home/oracle
[root@dbvlab01 opc]# exit
[opc@dbvlab01 ~]$ exit
$ scp -i oraclecloud opc@dbvlab02
[opc@dbvlab02 ~]$ sudo -s
[root@dbvlab02 opc]# cd /tmp
[root@dbvlab02 opc]# chown oracle:oinstall dbvisit-standby9.0.02-el7.zip
[root@dbvlab02 opc]# mv dbvisit-standby9.0.02-el7.zip /home/oracle
For OEL7, in addition to the changes made in the security list, we must also add entries into the iptables of each node (dbvlab01 shown).
[root@dbvlab01 opc]# iptables -I INPUT -p tcp -m state --state NEW --dport 4433 -j ACCEPT
[root@dbvlab01 opc]# iptables -I INPUT -p tcp -m state --state NEW --dport 7891 -j ACCEPT
[root@dbvlab01 opc]# iptables -I INPUT -p tcp -m state --state NEW --dport 7890 -j ACCEPT
[root@dbvlab01 opc]# service iptables save
iptables: Saving firewall rules to /etc/sysconfig/iptables:[  OK  ]
At this stage, these servers are ready for the next stage of installing the software.
3. Install, Configure and Run the Standby software
3.1 Installing and Configuring the Software
Unzip, Untar and the run the dbvisit installer following the instructions in the dbvisit installation guide as the user oracle.
https://dbvisit.atlassian.net/wiki/spaces/DS9QSG/overview
[oracle@dbvlab02 ~]$ unzip dbvisit-standby9.0.02-el7.zip
Archive:  dbvisit-standby9.0.02-el7.zip
  inflating: dbvisit-standby9.0.02-el7.tar
[oracle@dbvlab02 ~]$ cd dbvisit/installer/
[oracle@dbvlab02 installer]$ ls -lrt
total 2768
-rwxr-x--- 1 oracle oinstall 2833364 May 11 02:16 install-dbvisit
[oracle@dbvlab02 installer]$ ./install-dbvisit
On the node dbvlab02, the dbvserver (option 5) and Automatic Failover (option 6) was also installed.
Automatic Failover (observer) is a new option bundled with version 9.0.02 and is currently only available to run on a linux OS.
A 3rd host could be configured for hosting the dbvserver or the observer. Careful to ensure during the dbvnet configuration on each node that the correct hosts are specified for source and destination. The output from the installation on node2 is shown below for reference.
[oracle@dbvlab02 installer]$ ./install-dbvisit

-----------------------------------------------------------
Welcome to the Dbvisit software installer.
-----------------------------------------------------------

It is recommended to make a backup of our current Dbvisit software
location (Dbvisit Base location) for rollback purposes.

Installer Directory /home/oracle/dbvisit

>>> Please specify the Dbvisit installation directory (Dbvisit Base).

The various Dbvisit products and components - such as Dbvisit Standby,
Dbvisit Dbvnet will be installed in the appropriate subdirectories of
this path.

Enter a custom value or press ENTER to accept default [/usr/dbvisit]:
>
DBVISIT_BASE = /usr/dbvisit

-----------------------------------------------------------
Component Installer Version Installed Version
-----------------------------------------------------------
standby 9.0.02_0_gbd40c486 not installed
dbvnet 9.0.02_0_gbd40c486 not installed
dbvagent 9.0.02_0_gbd40c486 not installed
dbvserver 9.0.02_0_gbd40c486 not installed
observer 1.02 not installed

-----------------------------------------------------------

What action would you like to perform?
1 - Install component(s)
2 - Uninstall component(s)
3 - Exit

Your choice: 1

Choose component(s):
1 - Core Components (Dbvisit Standby Cli, Dbvnet, Dbvagent)
2 - Dbvisit Standby Core (Command Line Interface)
3 - Dbvnet (Dbvisit Network Communication)
4 - Dbvagent (Dbvisit Agent)
5 - Dbvserver (Dbvisit Central Console) - Not available on Solaris/AIX
6 - Dbvisit Observer (Automatic Failover Option) - Not available on Solaris/AIX
Press ENTER to exit Installer

Your choice: 1

-----------------------------------------------------------
Summary of the Dbvisit STANDBY configuration
-----------------------------------------------------------
DBVISIT_BASE /usr/dbvisit

Press ENTER to continue

-----------------------------------------------------------
About to configure DBVISIT DBVNET
-----------------------------------------------------------

>>> Please specify the Local host name to be used by Dbvnet on this server.

Dbvnet will be listening on the local IP Address on this server which
resolve to the host name specified here.
If using a cluster or virtual IP make sure the host name or alias
specified here resolve to the IP address local to where dbvnet is
installed. The host name should resolve to IPv4 address, if not
you can use an IPv4 IP address instead of host name.

Enter a custom value or press ENTER to accept default [dbvlab02]:
>

>>> Please specify the Local Dbvnet PORT to be used.

Dbvnet will be listening on the specified port for incoming connections
from remote dbvnet connections. Please make sure that this port is not
already in use or blocked by any firewall. You may choose any value
between 1024 and 65535, however the default of 7890 is recommended.

Enter a custom value or press ENTER to accept default [7890]:
>


>>> Please specify the Remote host name to be used by Dbvnet.

By default Dbvnet will use this remote hostname for any remote
connections. Dbvnet must be installed and configured on the specified
remote host. If using a cluster or virtual IP make sure the host name
or alias specified here resolve to the IP address local to where dbvnet
is installed.
If you are unsure about the remote host name during installation, use
the default value which will be the current local hostname.
The host name should resolve to IPv4 address, if not
you can use an IPv4 IP address instead of host name.

Enter a custom value or press ENTER to accept default [dbvlab02]:
> dbvlab01


>>> Please specify the Remote Dbvnet PORT to be used.

Dbvnet will connect to the remote server on this specified port.
On the remote host Dbvnet will be listening on the specified port for
incoming connections. Please make sure that this port is not already in
use or blocked by any firewall. You may choose any value between 1024
and 65535, however the default of 7890 is recommended.

Enter a custom value or press ENTER to accept default [7890]:
>


>>> Please specify the Dbvnet Passphrase to be used for secure connections.

The passphrase provided must be the same in both the local and remote
Dbvnet installations. It is used to establish a secure (encrypted)
Dbvnet connections

Enter a custom value:
> kiwi123

-----------------------------------------------------------
Summary of the Dbvisit DBVNET configuration
-----------------------------------------------------------
DBVISIT_BASE /usr/dbvisit
DBVNET_LOCAL_HOST dbvlab02
DBVNET_LOCAL_PORT 7890
DBVNET_REMOTE_HOST dbvlab01
DBVNET_REMOTE_PORT 7890
DBVNET_PASSPHRASE kiwi123

Press ENTER to continue

-----------------------------------------------------------
About to configure DBVISIT DBVAGENT
-----------------------------------------------------------


>>> Please specify the host name to be used for the Dbvisit Agent.

The Dbvisit Agent (Dbvagent) will be listening on this local address.
If you are using the Dbvserver (GUI) - connections from the GUI will be
established to the Dbvisit Agent. The Dbvisit Agent address must be
visible from the Dbvserver (GUI) installation.
If using a cluster or virtual IP make sure the host name or alias
specified here resolve to the IP address local to where dbvnet is
installed.
The host name should resolve to IPv4 address, if not you can use
an IPv4 IP address instead of host name.

Enter a custom value or press ENTER to accept default [dbvlab02]:
>


>>> Please specify the listening PORT number for Dbvagent.

The Dbvisit Agent (Dbvagent) will be listening on the specified port for
incoming requests from the GUI (Dbvserver). Please make sure that this
port is not already in use or blocked by any firewall. You may choose
any value between 1024 and 65535, however the default of 7891 is
recommended.

Enter a custom value or press ENTER to accept default [7891]:
>


>>> Please specify passphrase for Dbvagent

Each Dbvisit Agent must have a passpharse specified. This passphrase
does not have to match between all the servers. It will be used to
establish a secure connection between the GUI (Dbvserver) and the
Dbvisit Agent.

Enter a custom value:
> kiwi123

-----------------------------------------------------------
Summary of the Dbvisit DBVAGENT configuration
-----------------------------------------------------------
DBVISIT_BASE /usr/dbvisit
DBVAGENT_LOCAL_HOST dbvlab02
DBVAGENT_LOCAL_PORT 7891
DBVAGENT_PASSPHRASE kiwi123

Press ENTER to continue

-----------------------------------------------------------
About to install Dbvisit STANDBY
-----------------------------------------------------------
NTF repo installed.
Component standby installed.

-----------------------------------------------------------
About to install Dbvisit DBVNET
-----------------------------------------------------------
Component dbvnet installed.

-----------------------------------------------------------
About to install Dbvisit DBVAGENT
-----------------------------------------------------------
Component dbvagent installed.

-----------------------------------------------------------
Component Installer Version Installed Version
-----------------------------------------------------------
standby 9.0.02_0_gbd40c486 9.0.02_0_gbd40c486
dbvnet 9.0.02_0_gbd40c486 9.0.02_0_gbd40c486
dbvagent 9.0.02_0_gbd40c486 9.0.02_0_gbd40c486
dbvserver 9.0.02_0_gbd40c486 not installed
observer 1.02 not installed

-----------------------------------------------------------

What action would you like to perform?
1 - Install component(s)
2 - Uninstall component(s)
3 - Exit

Your choice: 1

Choose component(s):
1 - Core Components (Dbvisit Standby Cli, Dbvnet, Dbvagent)
2 - Dbvisit Standby Core (Command Line Interface)
3 - Dbvnet (Dbvisit Network Communication)
4 - Dbvagent (Dbvisit Agent)
5 - Dbvserver (Dbvisit Central Console) - Not available on Solaris/AIX
6 - Dbvisit Observer (Automatic Failover Option) - Not available on Solaris/AIX
Press ENTER to exit Installer

Your choice: 5

-----------------------------------------------------------
About to configure DBVISIT DBVSERVER
-----------------------------------------------------------


>>> Please specify the host name to be used for Dbvserver


The Dbvisit Web Server (Dbvserver) will be listening on this local
address. If using a cluster or virtual IP make sure the host name or
alias specified here resolve to the IP address local to where Dbvserver
is installed.
If you are unsure about the remote host name during installation, use
the default value which will be the current local hostname.
The host name should resolve to IPv4 address, if not you can use
an IPv4 IP address instead of host name.

Enter a custom value or press ENTER to accept default [dbvlab02]:
>


>>> Please specify the listening port number for Dbvserver on the local server

You may choose any value between 1024 and 65535. The default recommended
value is 4433.

Note: if you can not access this port after the installation has
finished, then please double-check your server firewall settings
to ensure the selected port is open.
Enter a custom value or press ENTER to accept default [4433]:
>


>>> Please specify the host name (or IPv4 address) to be used for Dbvserver public interface


In most cases this will be the same as the listener address, if not sure
use the same value as the listener address.

The Dbvisit Web Server (Dbvserver) will be listening on the local
listener address. The public address can be set to an external IP
example a firewall address in case the Central Console (Dbvserver)
and agents (Primary and Standby Database servers) have a firewall
inbetween them. The public interface address will be passed to
the agents during communication for sending information back.
If you are unsure about the public host address, use
the default value which will be the current local hostname.
The host name should resolve to IPv4 address, if not you can use
an IPv4 IP address instead of host name.
Enter a custom value or press ENTER to accept default [dbvlab02]:
>

-----------------------------------------------------------
Summary of the Dbvisit DBVSERVER configuration
-----------------------------------------------------------
DBVISIT_BASE /usr/dbvisit
DBVSERVER_LOCAL_HOST dbvlab02
DBVSERVER_LOCAL_PORT 4433
DBVSERVER_PUBLIC_HOST dbvlab02

Press ENTER to continue

-----------------------------------------------------------
About to install Dbvisit DBVSERVER
-----------------------------------------------------------
Component dbvserver installed.

-----------------------------------------------------------
Component Installer Version Installed Version
-----------------------------------------------------------
standby 9.0.02_0_gbd40c486 9.0.02_0_gbd40c486
dbvnet 9.0.02_0_gbd40c486 9.0.02_0_gbd40c486
dbvagent 9.0.02_0_gbd40c486 9.0.02_0_gbd40c486
dbvserver 9.0.02_0_gbd40c486 9.0.02_0_gbd40c486
observer 1.02 not installed

-----------------------------------------------------------

What action would you like to perform?
1 - Install component(s)
2 - Uninstall component(s)
3 - Exit

Your choice: 1

Choose component(s):
1 - Core Components (Dbvisit Standby Cli, Dbvnet, Dbvagent)
2 - Dbvisit Standby Core (Command Line Interface)
3 - Dbvnet (Dbvisit Network Communication)
4 - Dbvagent (Dbvisit Agent)
5 - Dbvserver (Dbvisit Central Console) - Not available on Solaris/AIX
6 - Dbvisit Observer (Automatic Failover Option) - Not available on Solaris/AIX
Press ENTER to exit Installer

Your choice: 6

-----------------------------------------------------------
Summary of the Dbvisit OBSERVER configuration
-----------------------------------------------------------
127.0.0.1 localhost localhost.localdomain localhost4 localhost4.localdomain4
DBVISIT_BASE /usr/dbvisit

Press ENTER to continue

-----------------------------------------------------------
About to install Dbvisit OBSERVER
-----------------------------------------------------------
Component observer installed.

-----------------------------------------------------------
Component Installer Version Installed Version
-----------------------------------------------------------
standby 9.0.02_0_gbd40c486 9.0.02_0_gbd40c486
dbvnet 9.0.02_0_gbd40c486 9.0.02_0_gbd40c486
dbvagent 9.0.02_0_gbd40c486 9.0.02_0_gbd40c486
dbvserver 9.0.02_0_gbd40c486 9.0.02_0_gbd40c486
observer 1.02 1.02

-----------------------------------------------------------

[general]
What action would you like to perform?
1 - Install component(s)
2 - Uninstall component(s)
3 - Exit

Your choice: 3

>>> Installation completed
Install log /tmp/dbvisit_install.log.201907290000.
[oracle@dbvlab02 installer]$
Version 8.0.20 has a new parameter, that of DBVSERVER_PUBLIC_HOST (parameter public_address in dbvserver.conf)
Rather than accepting the default hostname prompt here, the public-facing IPv4 address of the Cloud Host should be used. Public-facing IPv4 address that will be supplied to the Agents (Dbvagent) to be used for pushing information back to the Central Console. This is the externally resolvable address supplied to dbvagent, not an additional listener address on dbvserver itself.
Repeat the installation on node 1 but install only the core components (Dbvisit Standby Cli, Dbvnet, Dbvagent)
Once the software has been installed on both nodes. Start the processes.
[oracle@dbvlab01 installer]$ cd /usr/dbvisit/dbvnet
[oracle@dbvlab01 dbvnet]$ ./dbvnet -d start
[oracle@dbvlab01 dbvnet]$ cd ../dbvagent/
[oracle@dbvlab01 dbvagent]$ ./dbvagent -d start
[oracle@dbvlab01 dbvagent]$ ps -ef|grep -i dbv
oracle    6250     1  0 02:23 ?        00:00:00 ./dbvnet -d start
oracle    6388     1  0 02:24 ?        00:00:00 ./dbvagent -d start
Additionally, on the standby node, start the dbvserver and observer processes
Presently the observer process (observersvc) needs to be started as a background process.
[oracle@dbvlab02 dbvagent]$ cd ../dbvserver/
[oracle@dbvlab02 dbvserver]$ ./dbvserver -d start
[oracle@dbvlab02 dbvserver]$ cd ../observer/
[oracle@dbvlab02 observer]$ nohup ./observersvc -d conf/observer.conf &
[oracle@dbvlab02 observer]$ ps -ef|grep -i dbv
oracle    6423     1  0 02:24 ?        00:00:00 ./dbvnet -d start
oracle    6466     1  0 02:25 ?        00:00:00 ./dbvagent -d start
oracle    6588     1  0 02:25 ?        00:00:00 ./dbvserver -d start
[oracle@dbvlab02 observer]$ ps -ef|grep -i observer
oracle   23086     1  0 02:26 ?        00:00:00 ./observersvc -f conf/observer.conf
Once the processes are started a test can be performed to check communication between the nodes and that all is correct with the security list entry and the iptable (firewall) configuration. The package telnet was installed on each node to perform the tests.
Firstly, test that we can communicate to dbvlab02 from dbvlab01 across the dbvserver port 4433.
[oracle@dbvlab01 ~]$ telnet dbvlab02 4433
Trying 10.0.0.4...
Connected to dbvlab02.
Escape character is '^]
Then repeat from dbvlab02 for one of the other ports (e.g. 7891).
[oracle@dbvlab02 ~]$ telnet dbvlab01 7891
Trying 10.0.0.3...
Connected to dbvlab01.
Escape character is '^]
Optionally uninstall telnet after this test has confirmed communication.
Before Creating the DDC, check if the oratab entries(/etc/oratab) have been added for the primary server's database and ASM instances if any. The Oratab entries for the standby will be added as a part of the CSD process.
3.2 Start the GUI and Create the DDC
Start a web browser and navigate to the https://<dbvserver_host>:4433 and accept the exception.
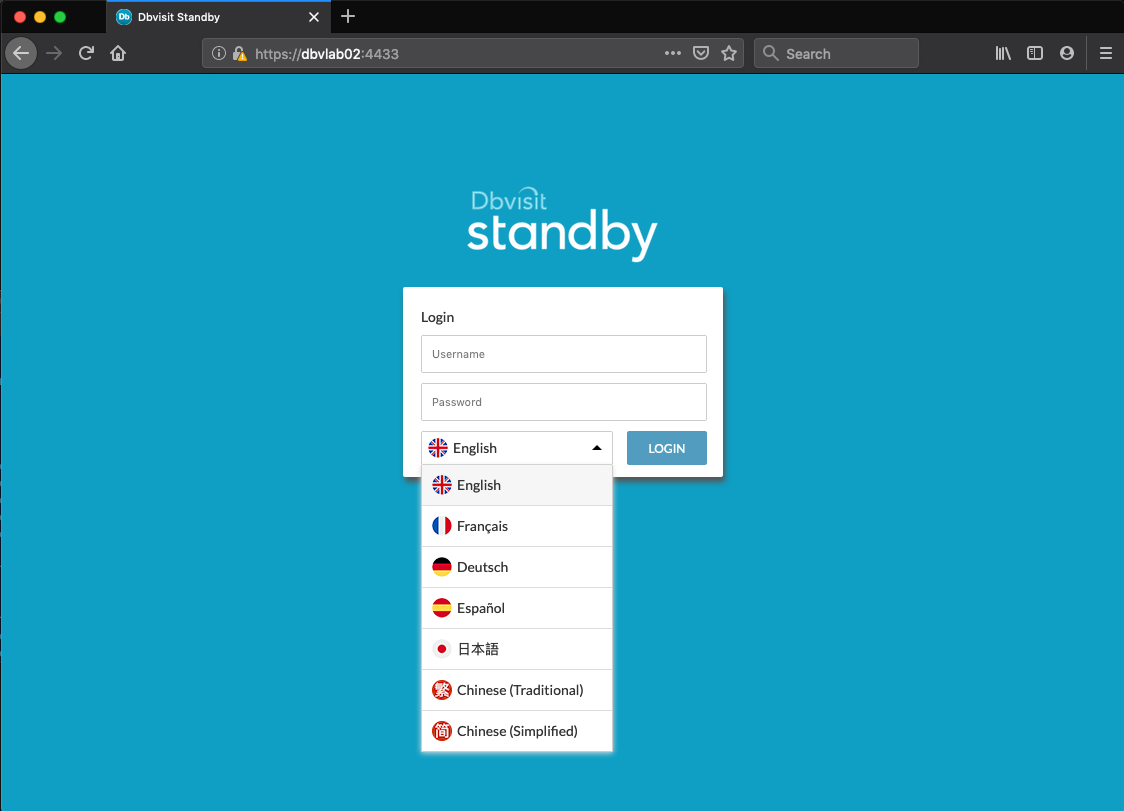
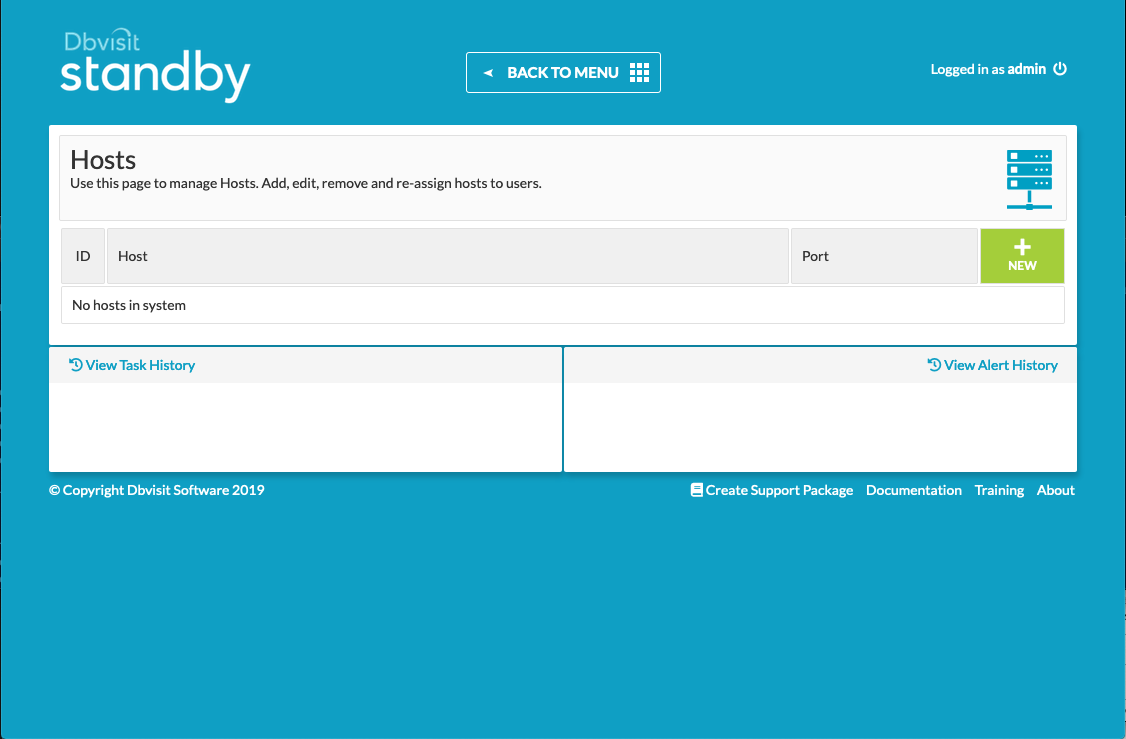
Enter the default username/password of admin/admin and proceed to the first screen, manage hosts.
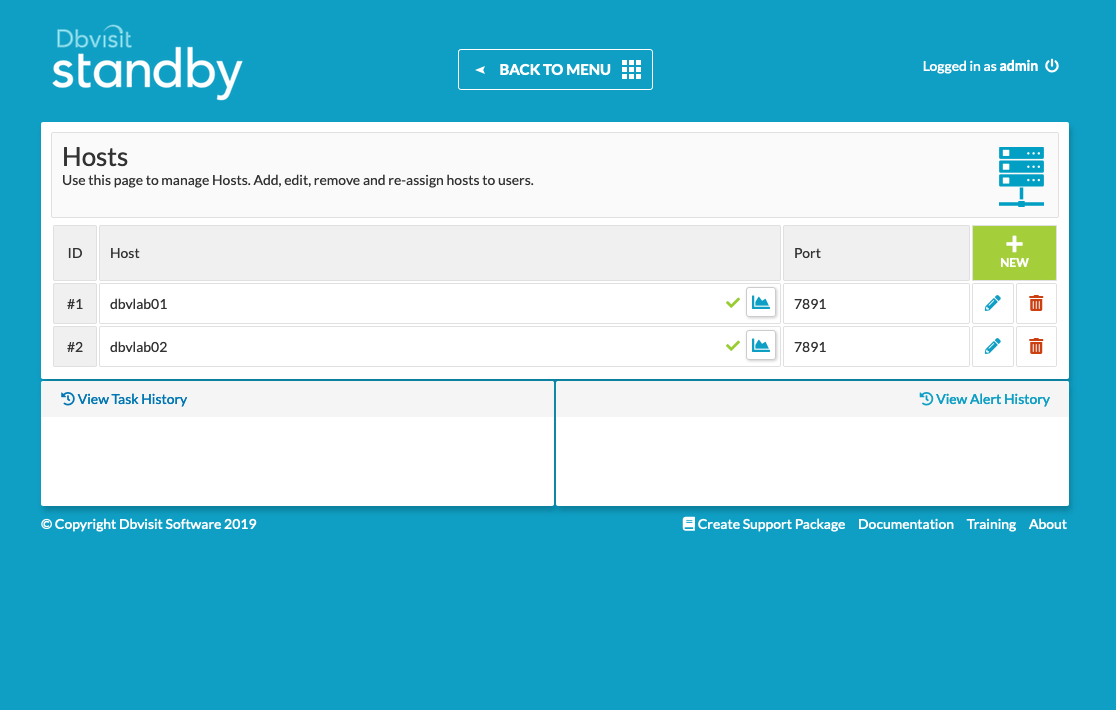
Click "New" and enter each of the hosts in turn, specifying the passphrase used at creation time (kiwi123 here).
Successfully adding hosts that can be contacted by the GUI will result in a green tick.
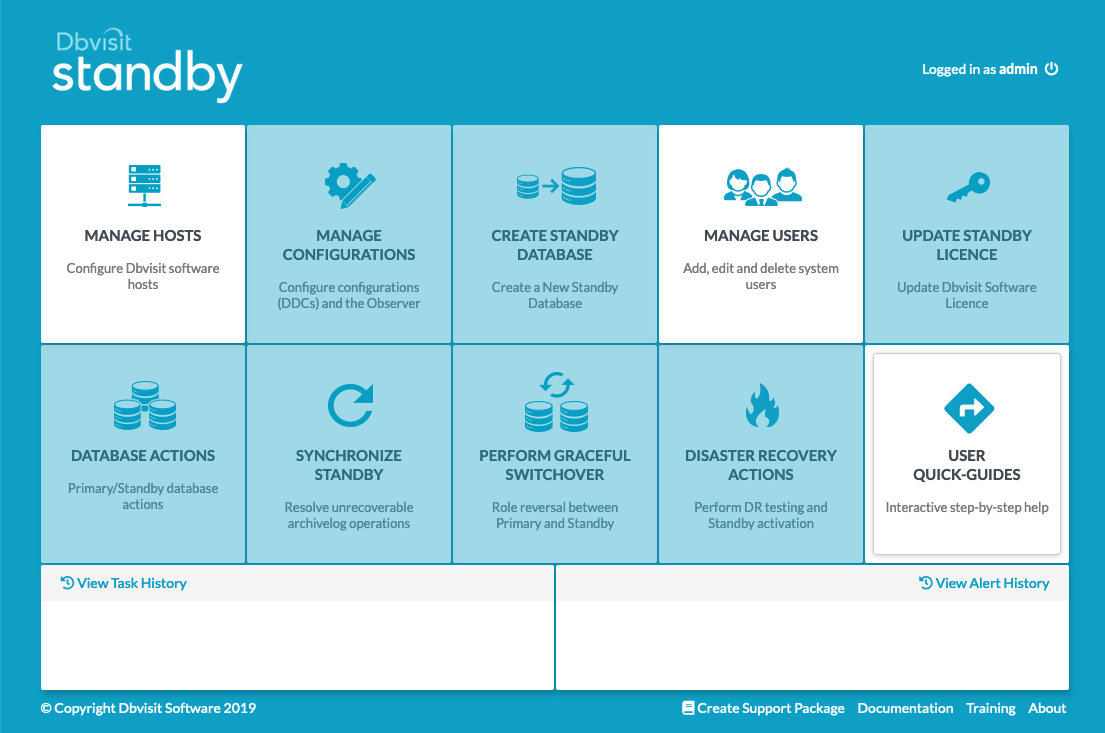
Return to the Main Menu and then proceed on to creating the DDC
In this Guide, the latest Oracle version 19.3.0.0 has been used and the init.ora parameter "encrypt_new_tablespaces" set to CLOUD_ONLY. This means that any new tablespaces created will be encrypted and it is essential to copy the relevant wallet files from the primary server to the standby server.
Failure to do so will result in a failed CSD (Standby Creation) with rman errors
ORA-19870: error while restoring backup piece /usr/tmp/DBV_DEV_CSD_DBF_11_1eu7tt2o_1_1.RMAN
ORA-19913: unable to decrypt backup
The new default location for the wallet is : (Primary Server Shown) and this is different from the old 12.1.0.2 location of /u01/app/oracle/admin/$ORACLE_SID/tde_wallet
SQL> select WRL_TYPE, WRL_PARAMETER, STATUS, WALLET_TYPE from v$encryption_wallet;

WRL_TYPE	     	 WRL_PARAMETER						  				 STATUS			 WALLET_TYPE
-------------------- --------------------------------------------------  ---------------- ----------------
FILE		     	 /opt/oracle/dcs/commonstore/wallets/tde/DEV_iad17n/ OPEN			 AUTOLOGIN
This location is specified in the $ORACLE_HOME/network/admin/sqlnet.ora as
[oracle@dbvlab01 admin]$ cat sqlnet.ora |grep -i encryption_wallet
ENCRYPTION_WALLET_LOCATION=(SOURCE=(METHOD=FILE)(METHOD_DATA=(DIRECTORY=/opt/oracle/dcs/commonstore/wallets/tde/$ORACLE_UNQNAME)))
However.... Currently this environment variable is not set by Dbvisit Standby and needs to be altered on the Standby Server to be $ORACLE_SID which is an environment variable that is known.
[oracle@dbvlab02 admin]$ cat sqlnet.ora |grep -i encryption_wallet
ENCRYPTION_WALLET_LOCATION=(SOURCE=(METHOD=FILE)(METHOD_DATA=(DIRECTORY=/opt/oracle/dcs/commonstore/wallets/tde/$ORACLE_SID)))
Copy the wallet files to the standby server and verify the location with $ORACLE_SID
[oracle@dbvlab02 tde]$ ls -l /opt/oracle/dcs/commonstore/wallets/tde/$ORACLE_SID
total 20
-rw------- 1 oracle asmadmin 5864 Jul 30 03:48 cwallet.sso
-rw------- 1 oracle asmadmin 5819 Jul 30 03:48 ewallet.p12
-rw------- 1 oracle asmadmin 2555 Jul 30 03:48 ewallet_2019072604164815_defaultTag.p12
As the location is controlfile based and instance specific the primary server will have a location of the $ORACLE_UNQNAME whereas the standby server on instance start will read the sqlnet.ora file and set a location with $ORACLE_SID
SQL> select WRL_TYPE, WRL_PARAMETER, STATUS, WALLET_TYPE from v$encryption_wallet;

WRL_TYPE	     	 WRL_PARAMETER						  				 STATUS			 WALLET_TYPE
-------------------- --------------------------------------------------  ---------------- ----------------
FILE		     	 /opt/oracle/dcs/commonstore/wallets/tde/DEV_iad17n/ OPEN			 AUTOLOGIN

SQL> select WRL_TYPE, WRL_PARAMETER, STATUS, WALLET_TYPE from v$encryption_wallet;

WRL_TYPE	     	 WRL_PARAMETER						  				 STATUS			 WALLET_TYPE
-------------------- --------------------------------------------------  --------------- ----------------
FILE		     	 /opt/oracle/dcs/commonstore/wallets/tde/DEV/        OPEN			 AUTOLOGIN
Now that hosts have been added the Manage Configurations Tab is available, click on it to create the DDC file. For the time being we will leave the observer.
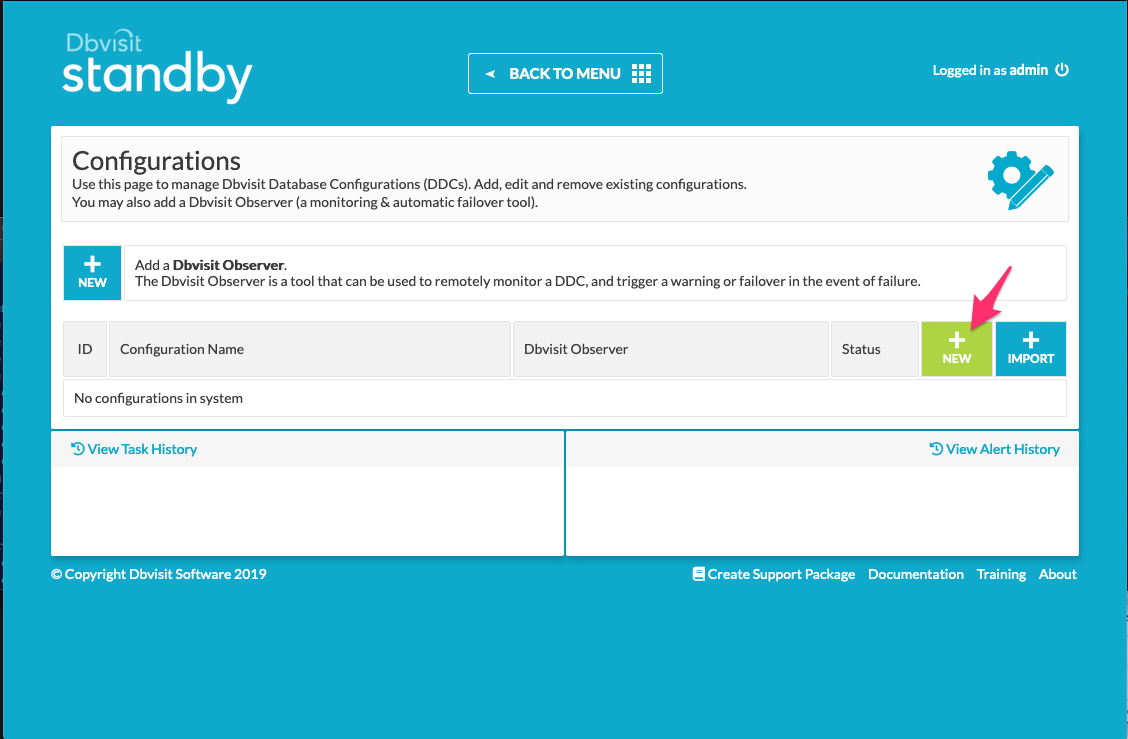
Click on 'New' to create a New Configuration. The source host (1) is dbvlab01, the standby host (2) is dbvlab02 and click the slider to use ASM (3) and add +ASM1 for the instance.
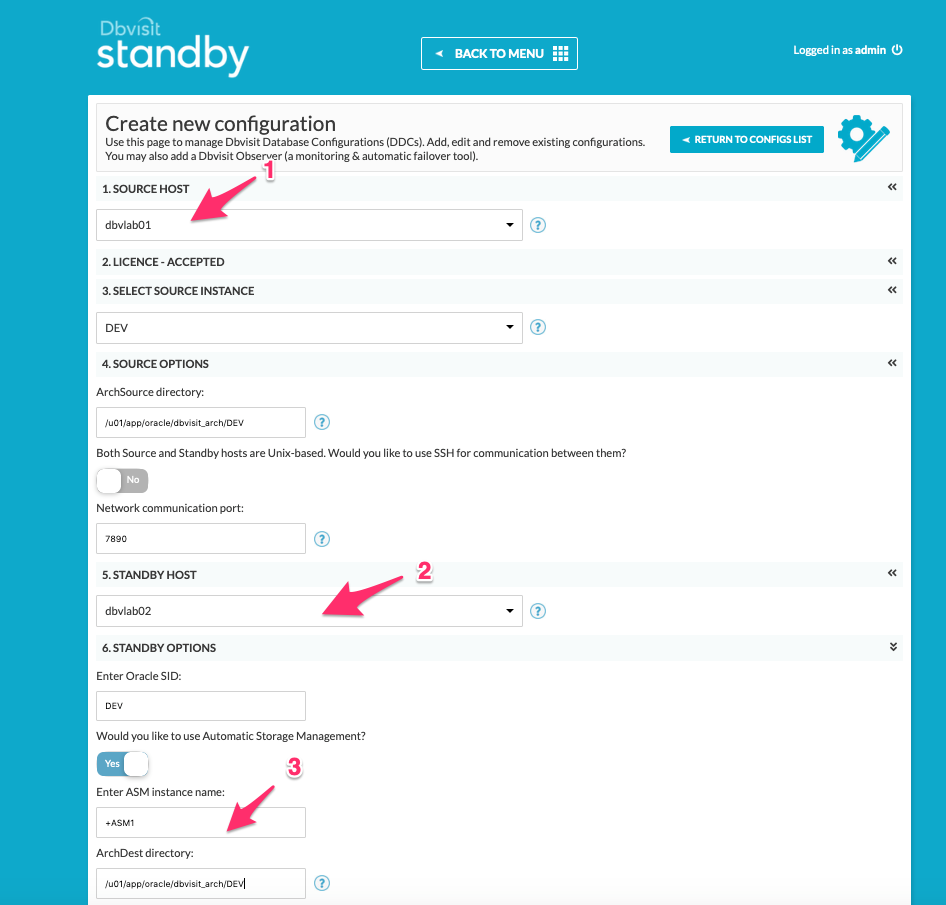
For the rest of the configuration, accept the pre-filled entries, add a your license key at this stage if it is to hand and click submit. The DDC will be added and displayed similar to the image below.
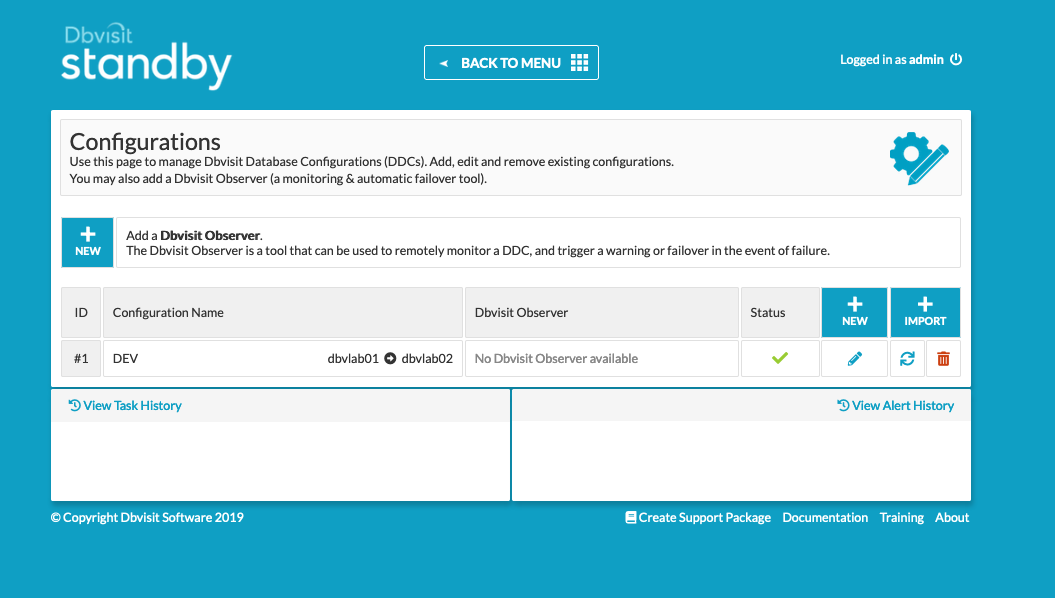
Now we can proceed with the CSD (Standby creation)
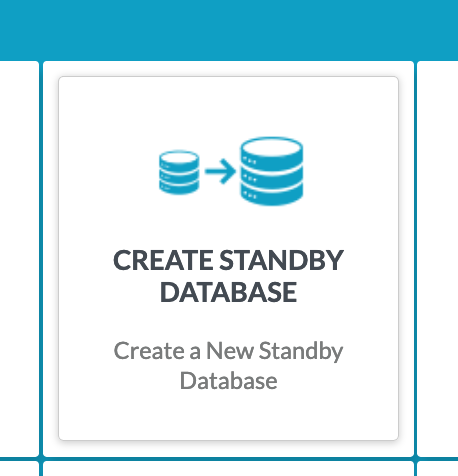
3.3 Create the Standby Database
Select the Create Standby Database option from the main menu.
Once a series of pre-requisite checks have been performed the New Database radio button is selected.
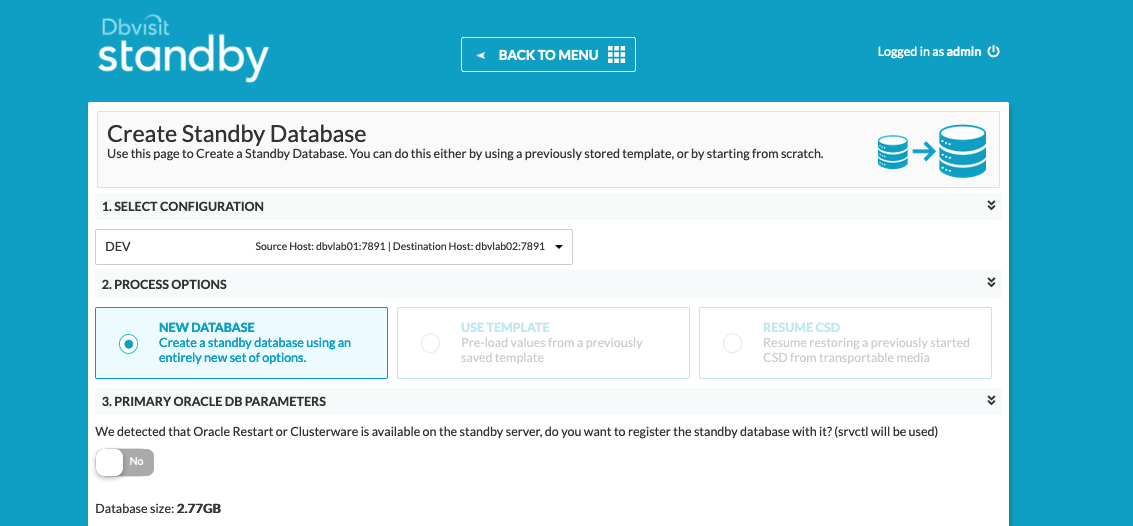
Accept the defaults and check that the /usr/tmp location is a suitable location for the rman backup. Alternatively the creation could be handled either in parallel or with transportable media and details of each of the options can be found in the main Version 9 documentation. However this is a small database of 2.77GB a default creation is adequate.
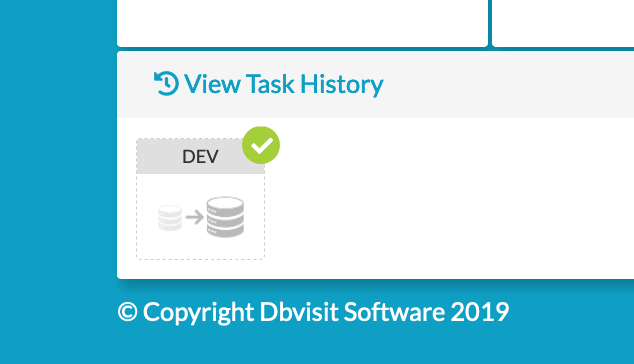
Click Submit. The progress can be monitored from the resulting icon in the status bar.
3.4 Performing Basic Tasks
Some examples of basic tasks are outlined below. Please refer to the online documentation for more details on each command.
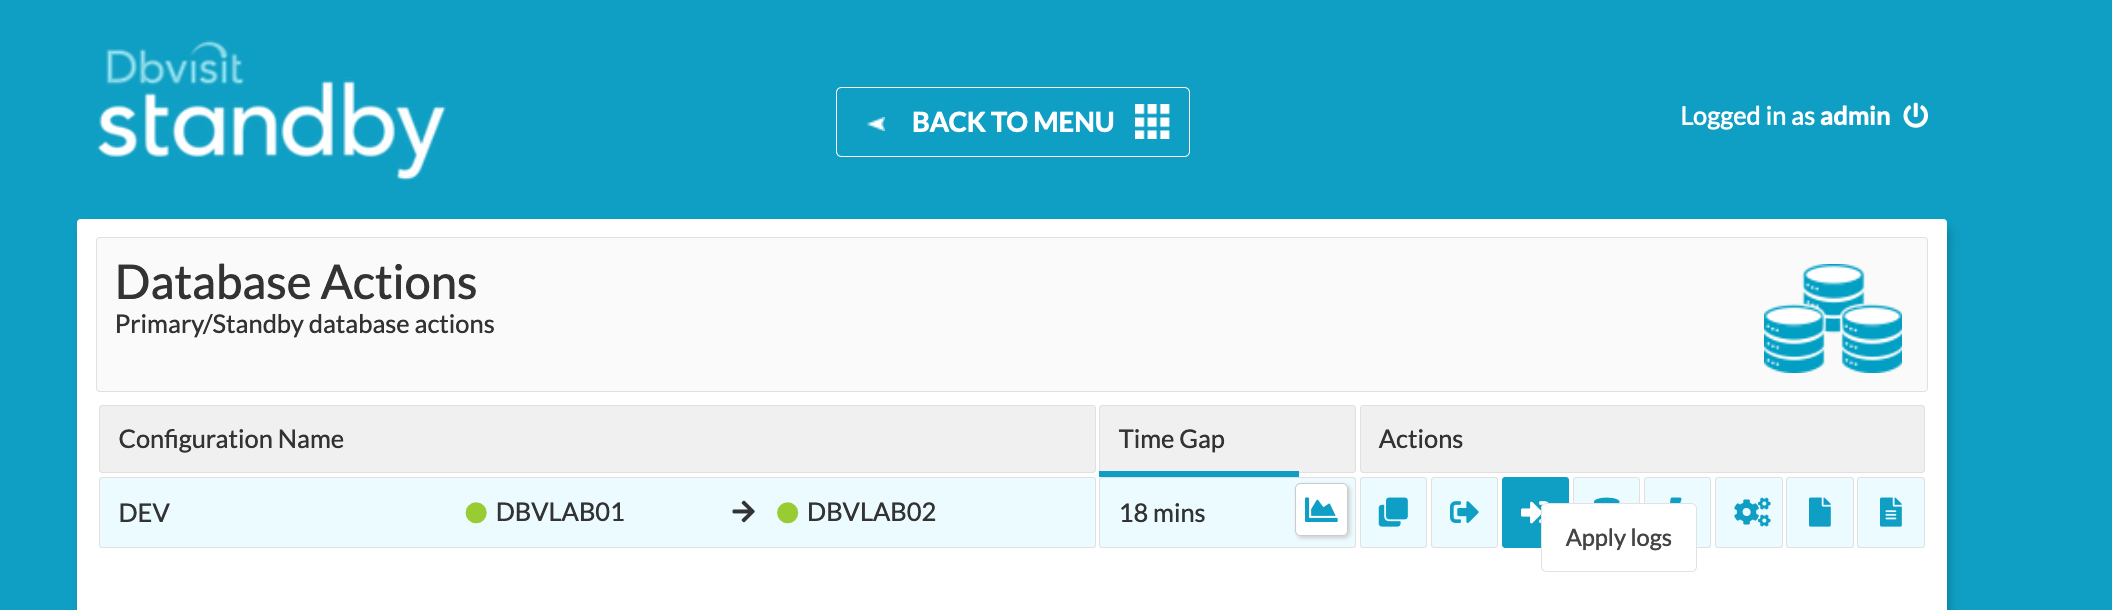
3.4.1 Log Transfer
First send the logs to the standby site
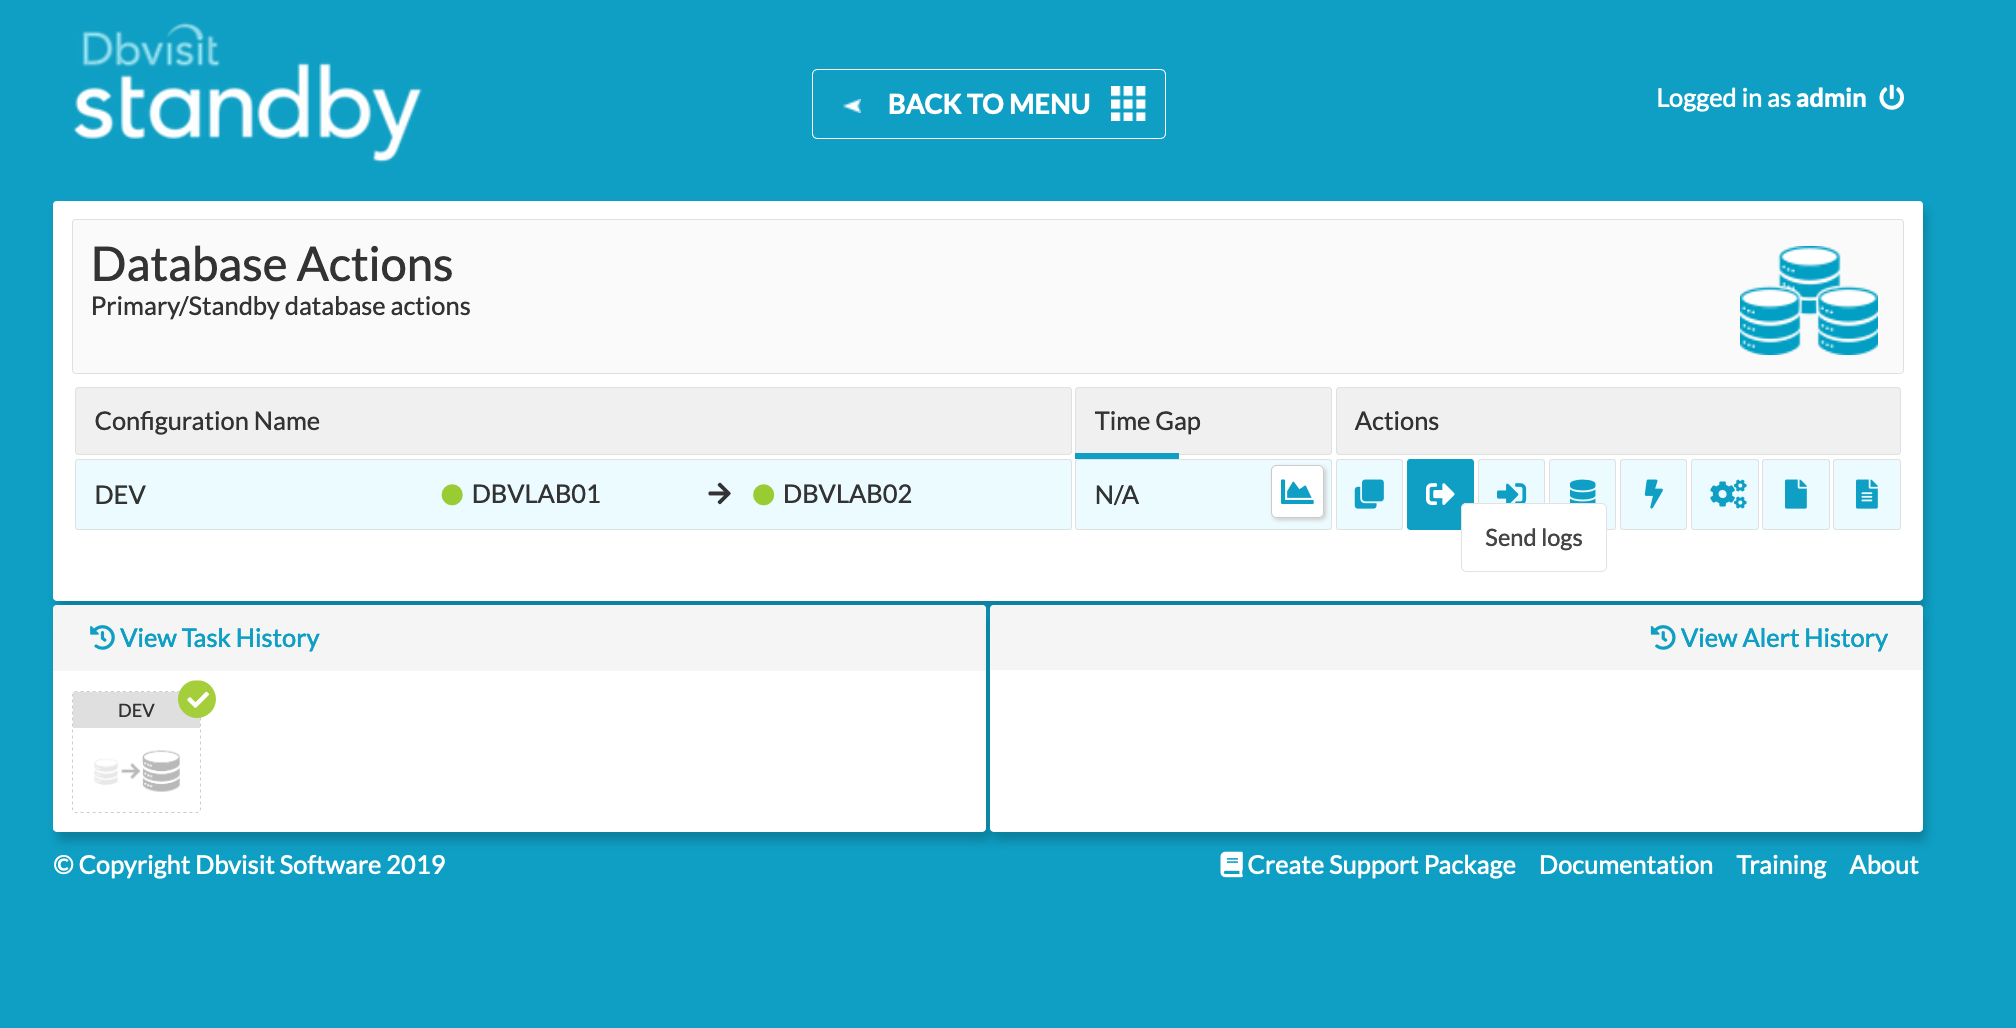
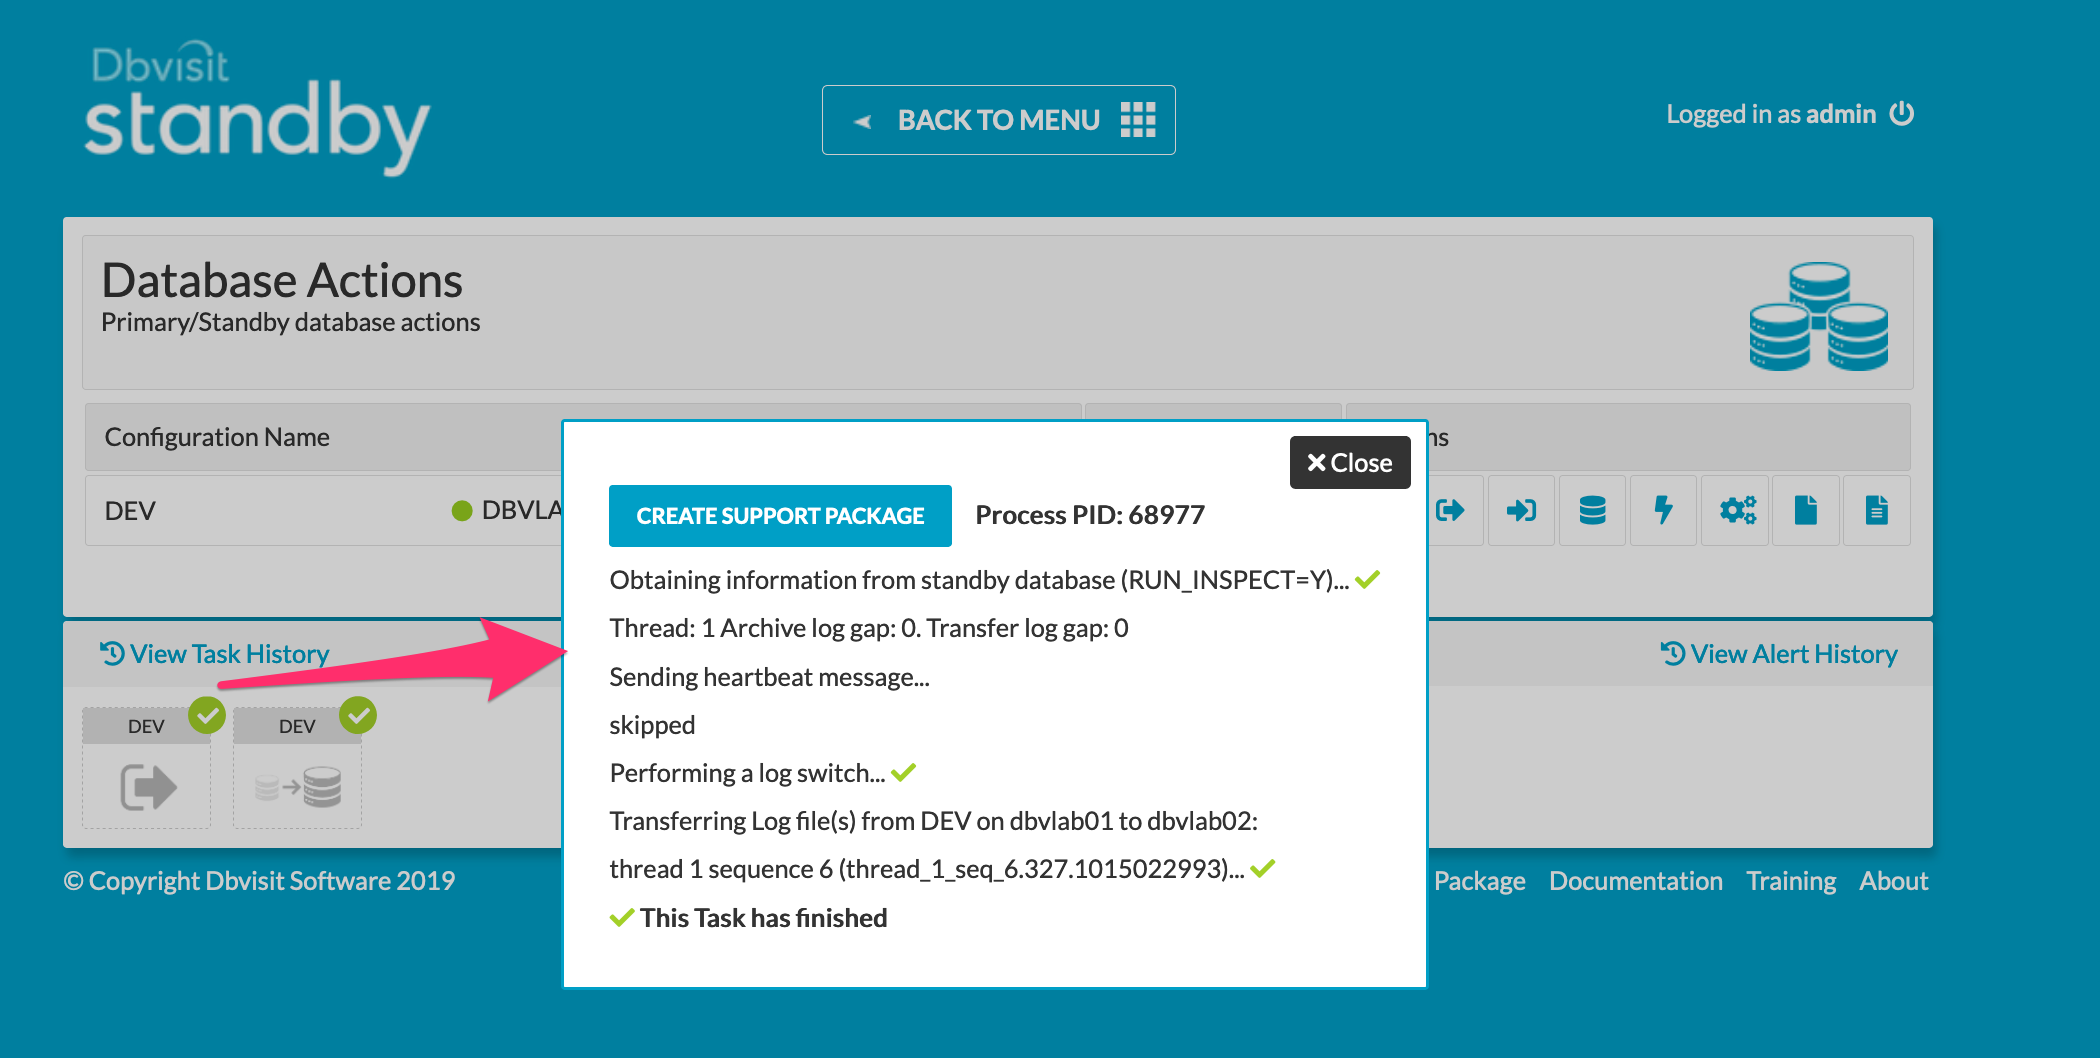
Progress can be monitored by clicking on the Icon in the Task Bar
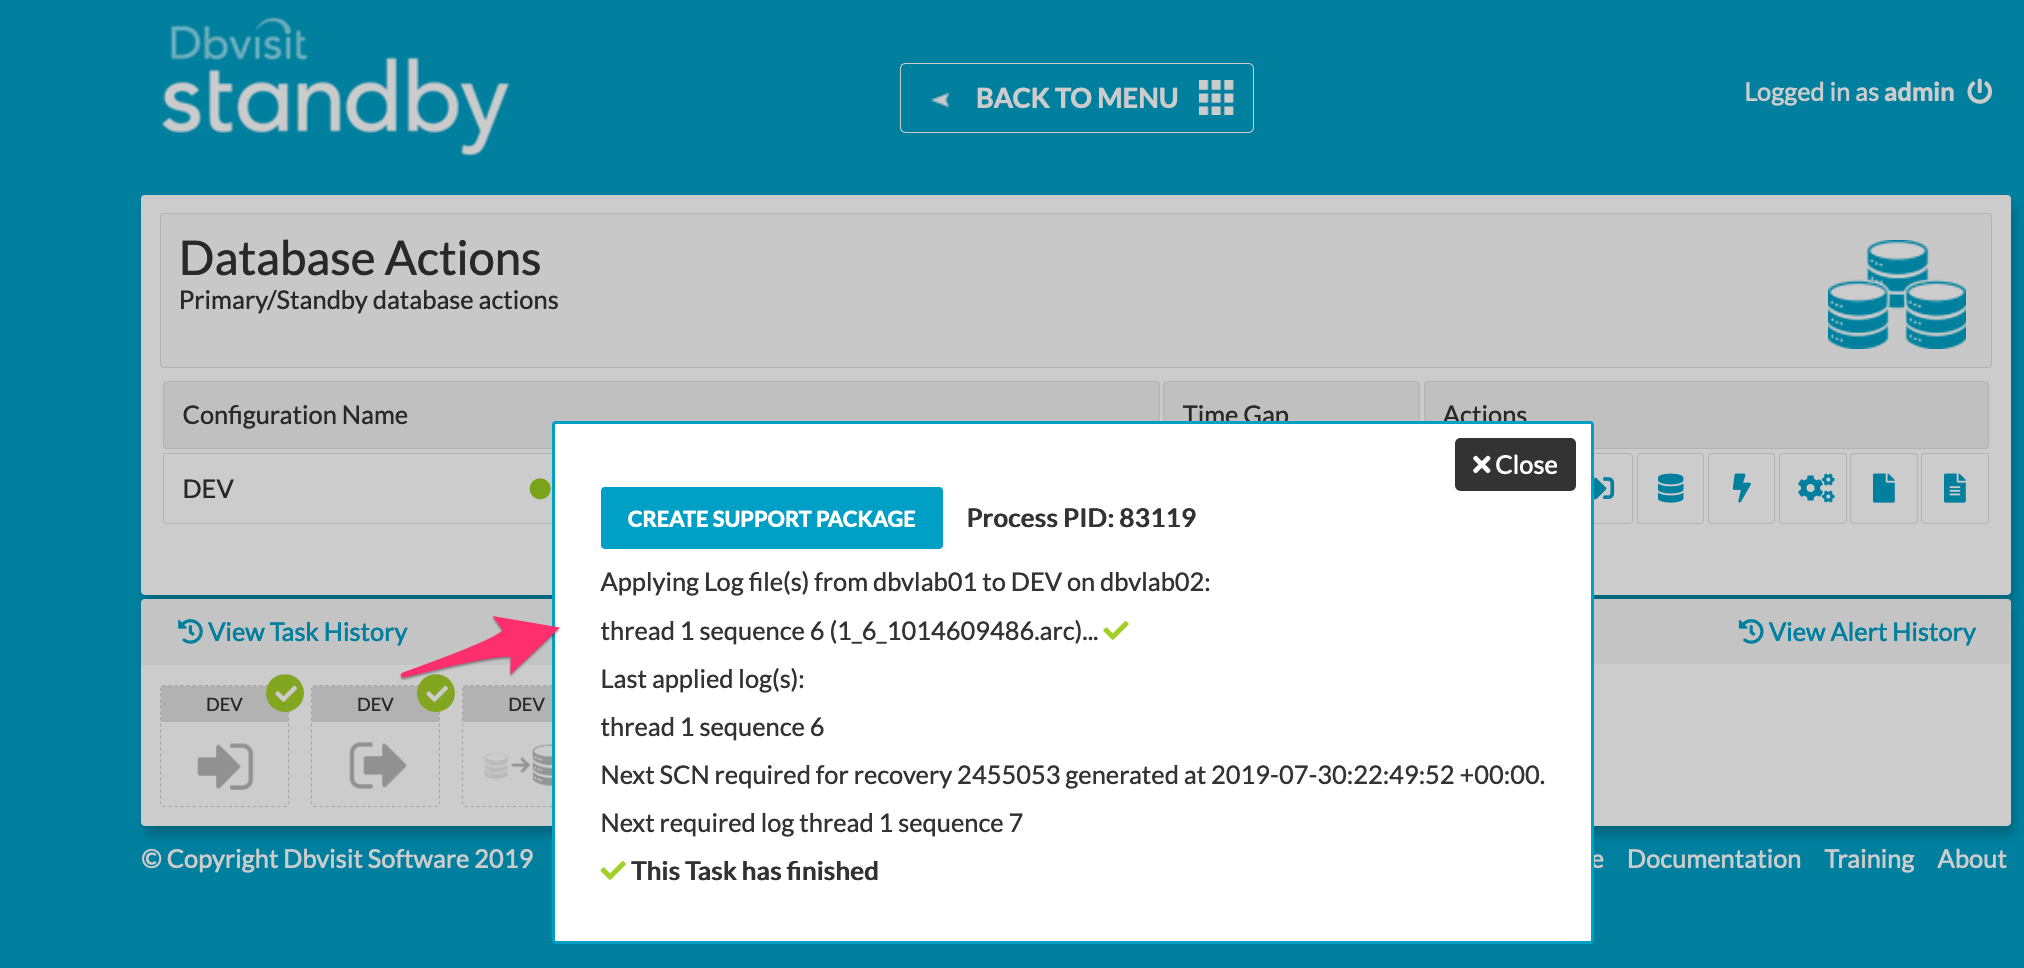
Once the icon is green we can then apply them.
And similarly monitor this task from the taskbar.
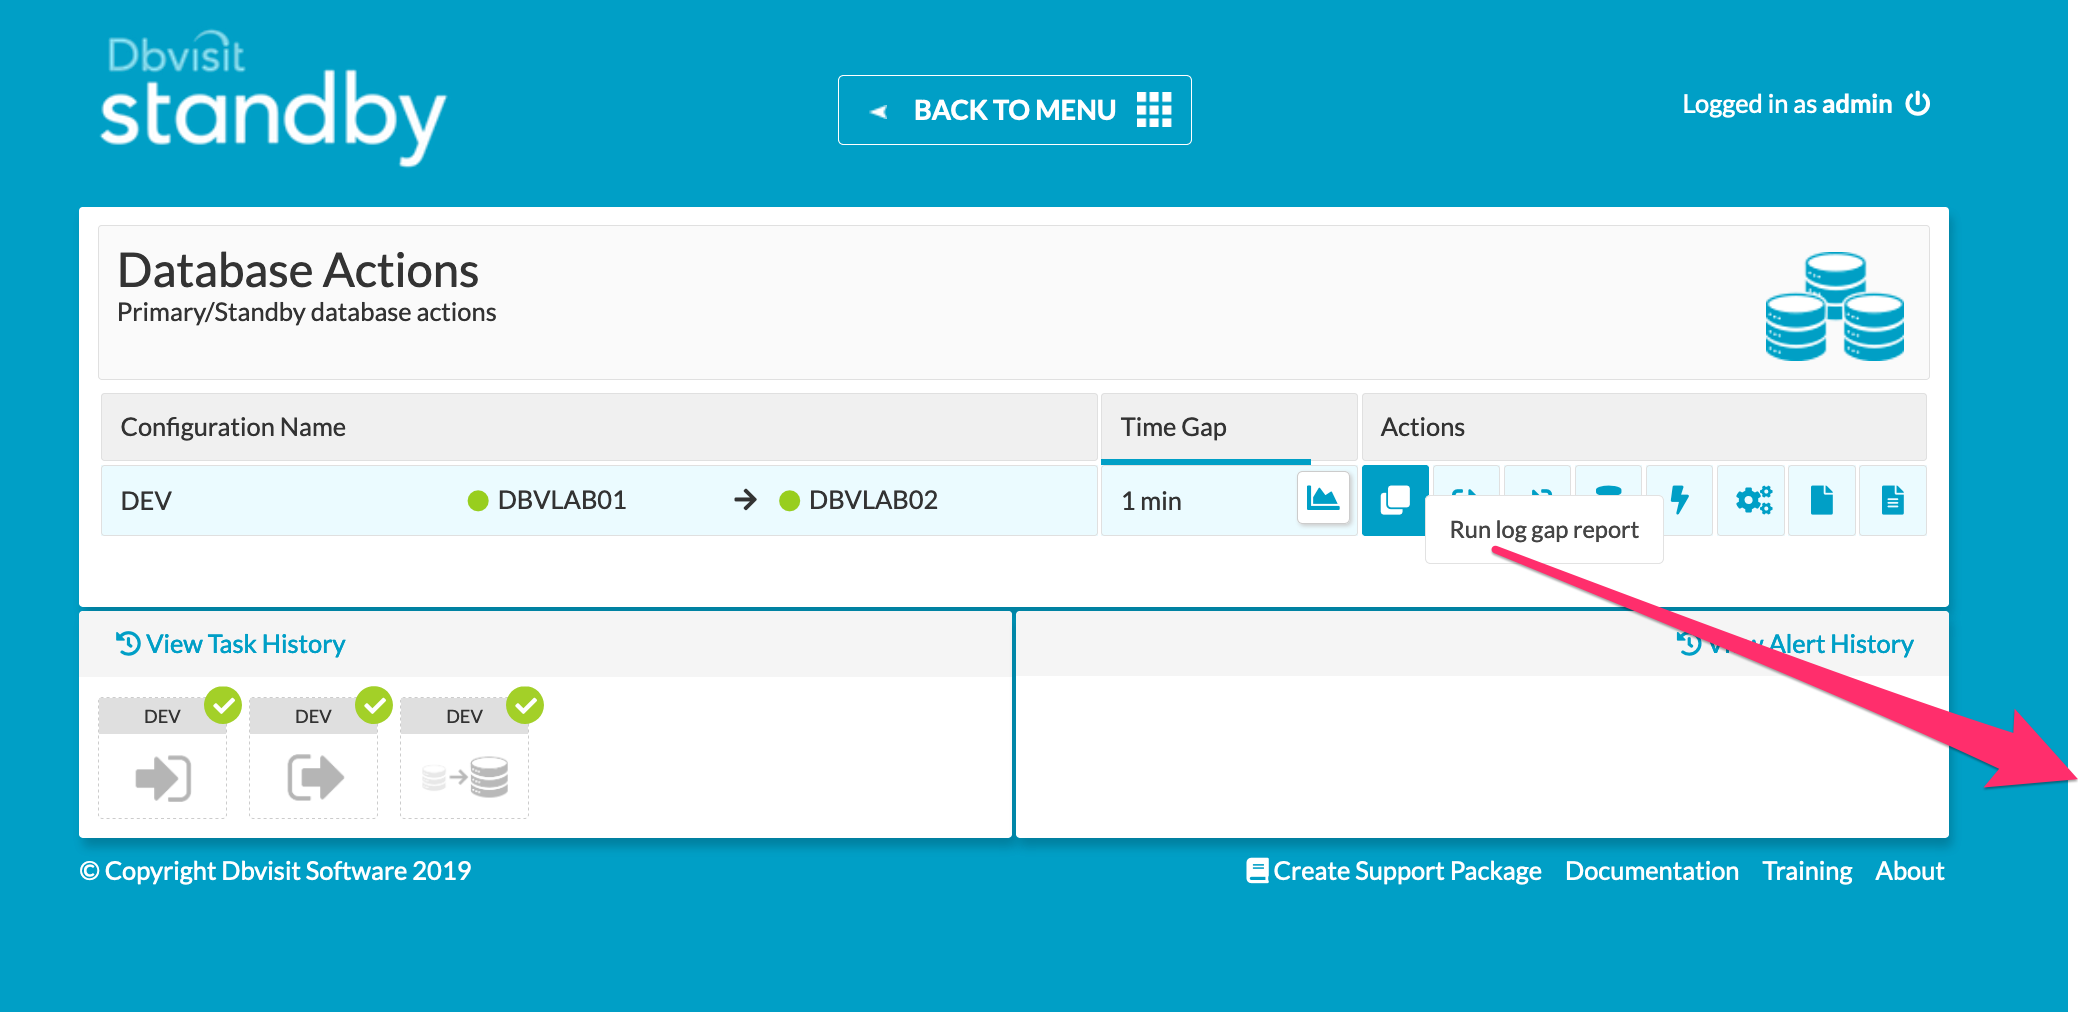
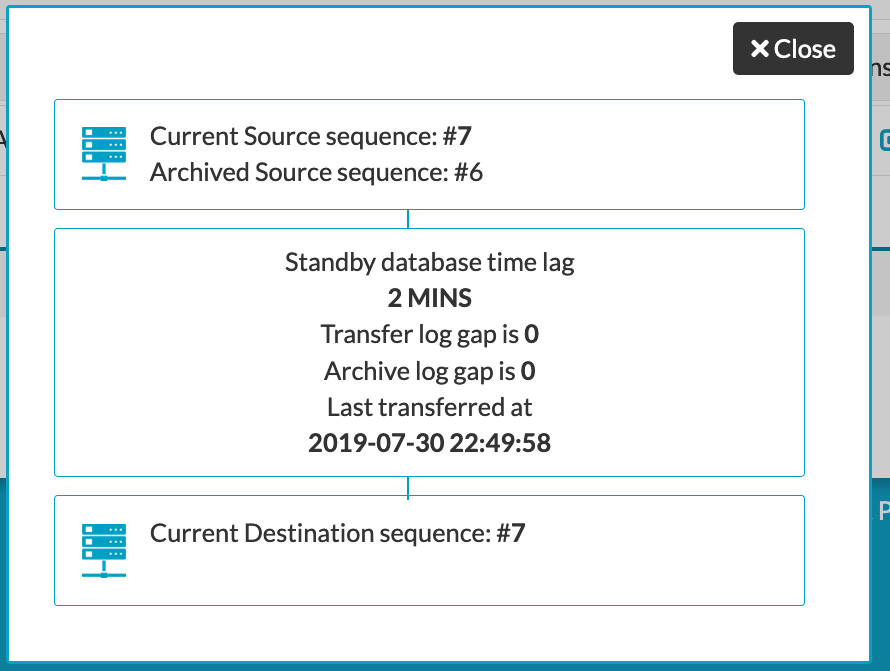
3.4.2 Log Gap Report
Run a log gap report from the Primary Site from the GUI
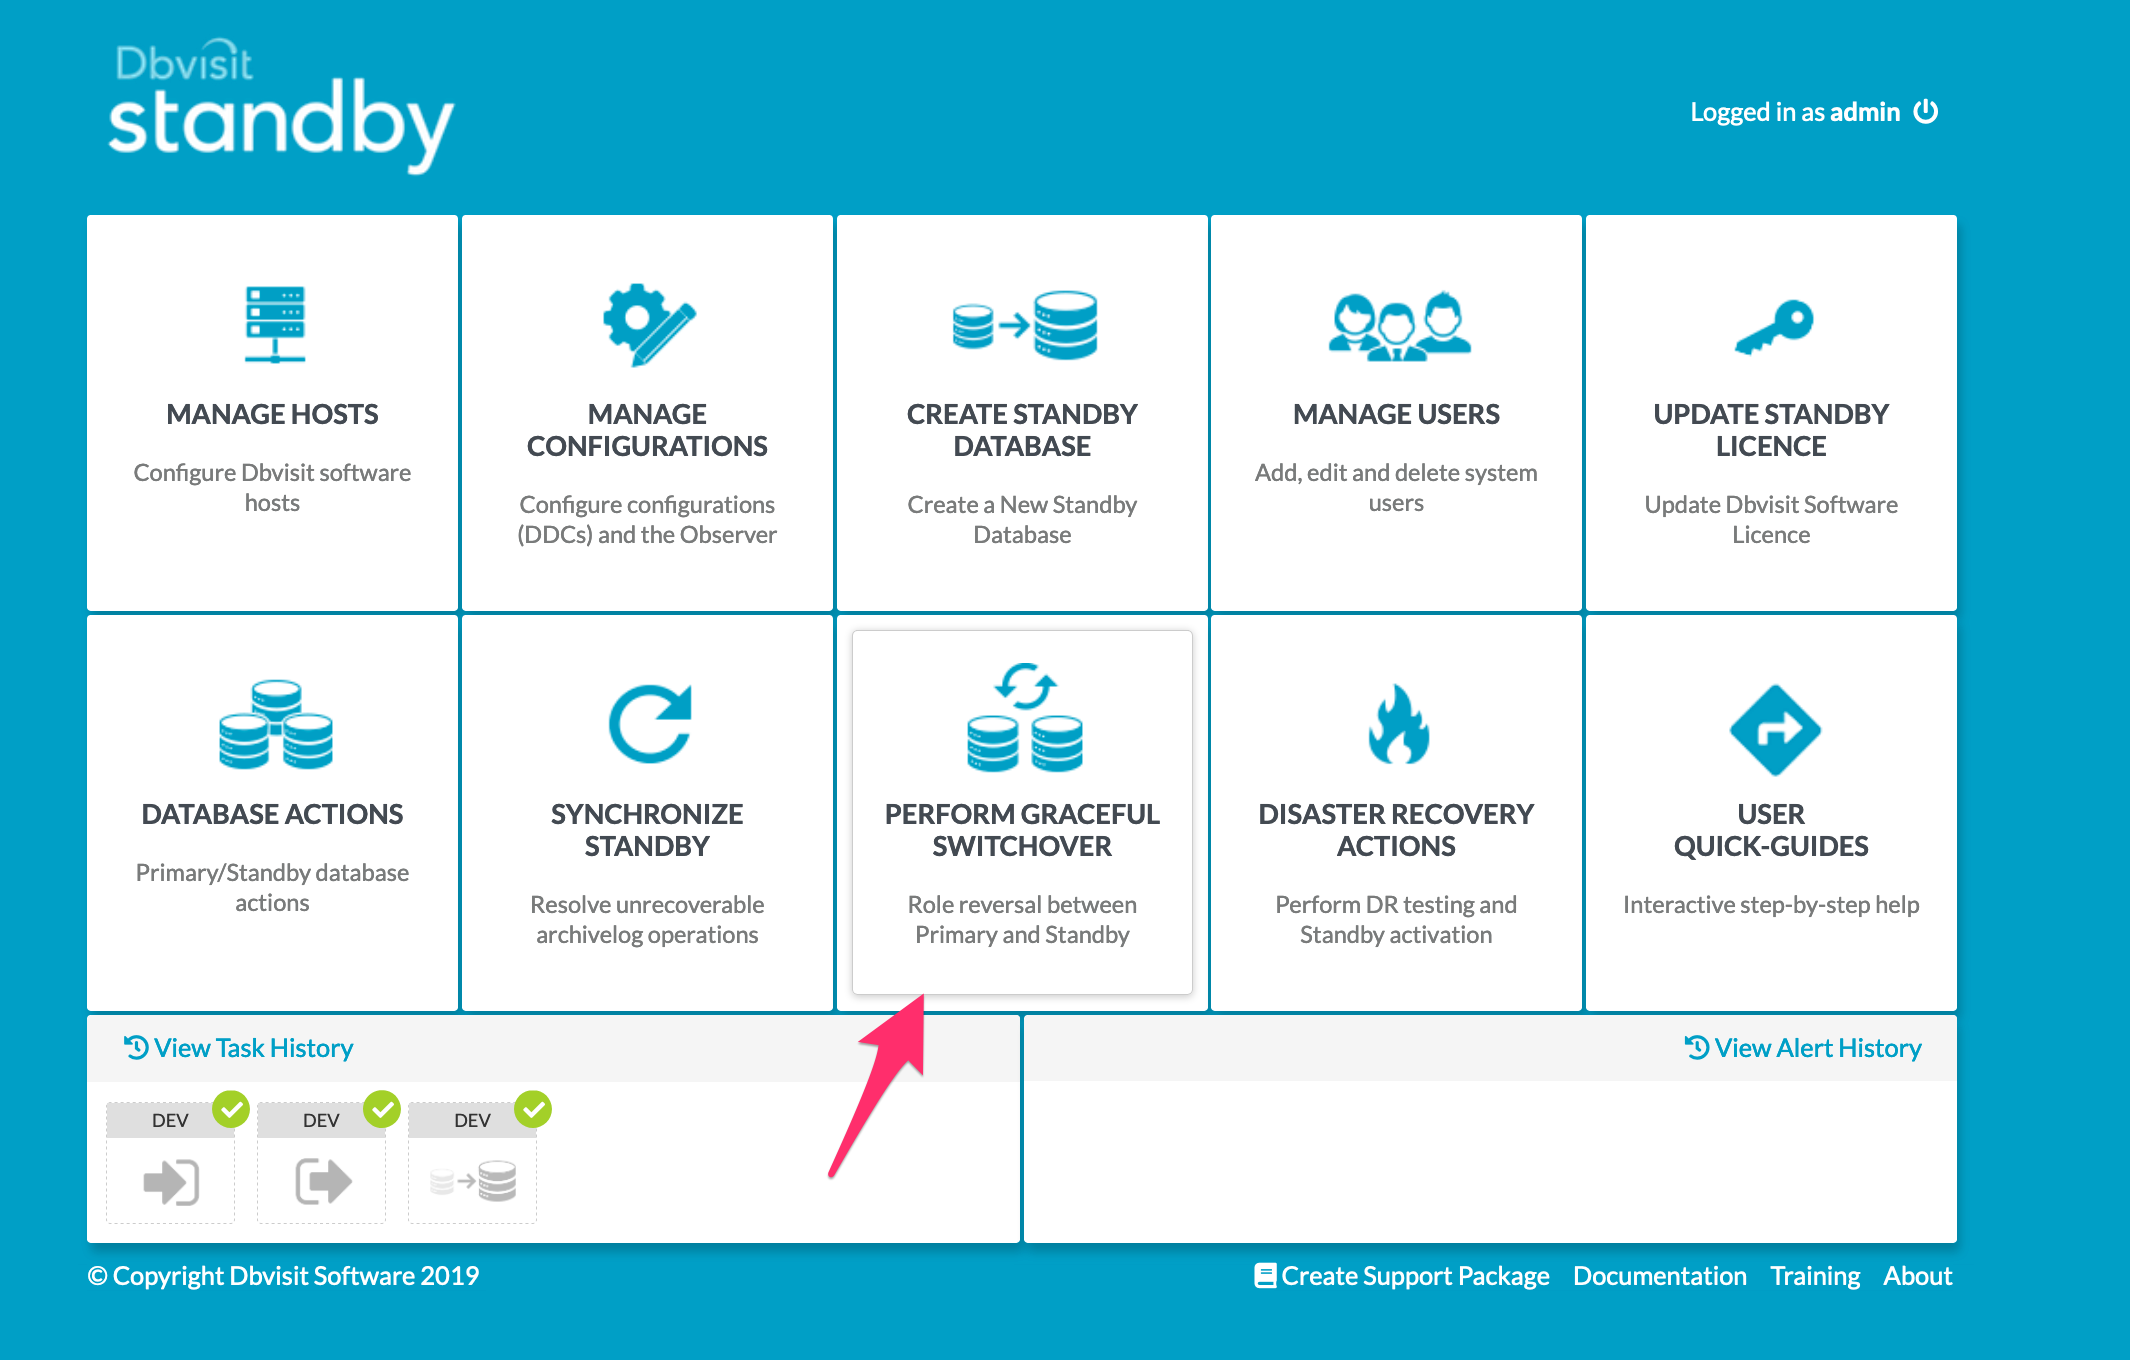
3.5 Performing Graceful Switchover
The following screenshots show a Graceful Switchover from one Cloud Standby to the other using the GUI. A first pre-requisite is to ensure that the daemons if started earlier are not running whilst the switchover is in progress.
3.5.1 Graceful Switchover Icon
3.5.3 Check Log Gap is Zero and Click Submit

3.5.4 Locate the Task on the Task Bar

3.5.5 Monitor the Activity
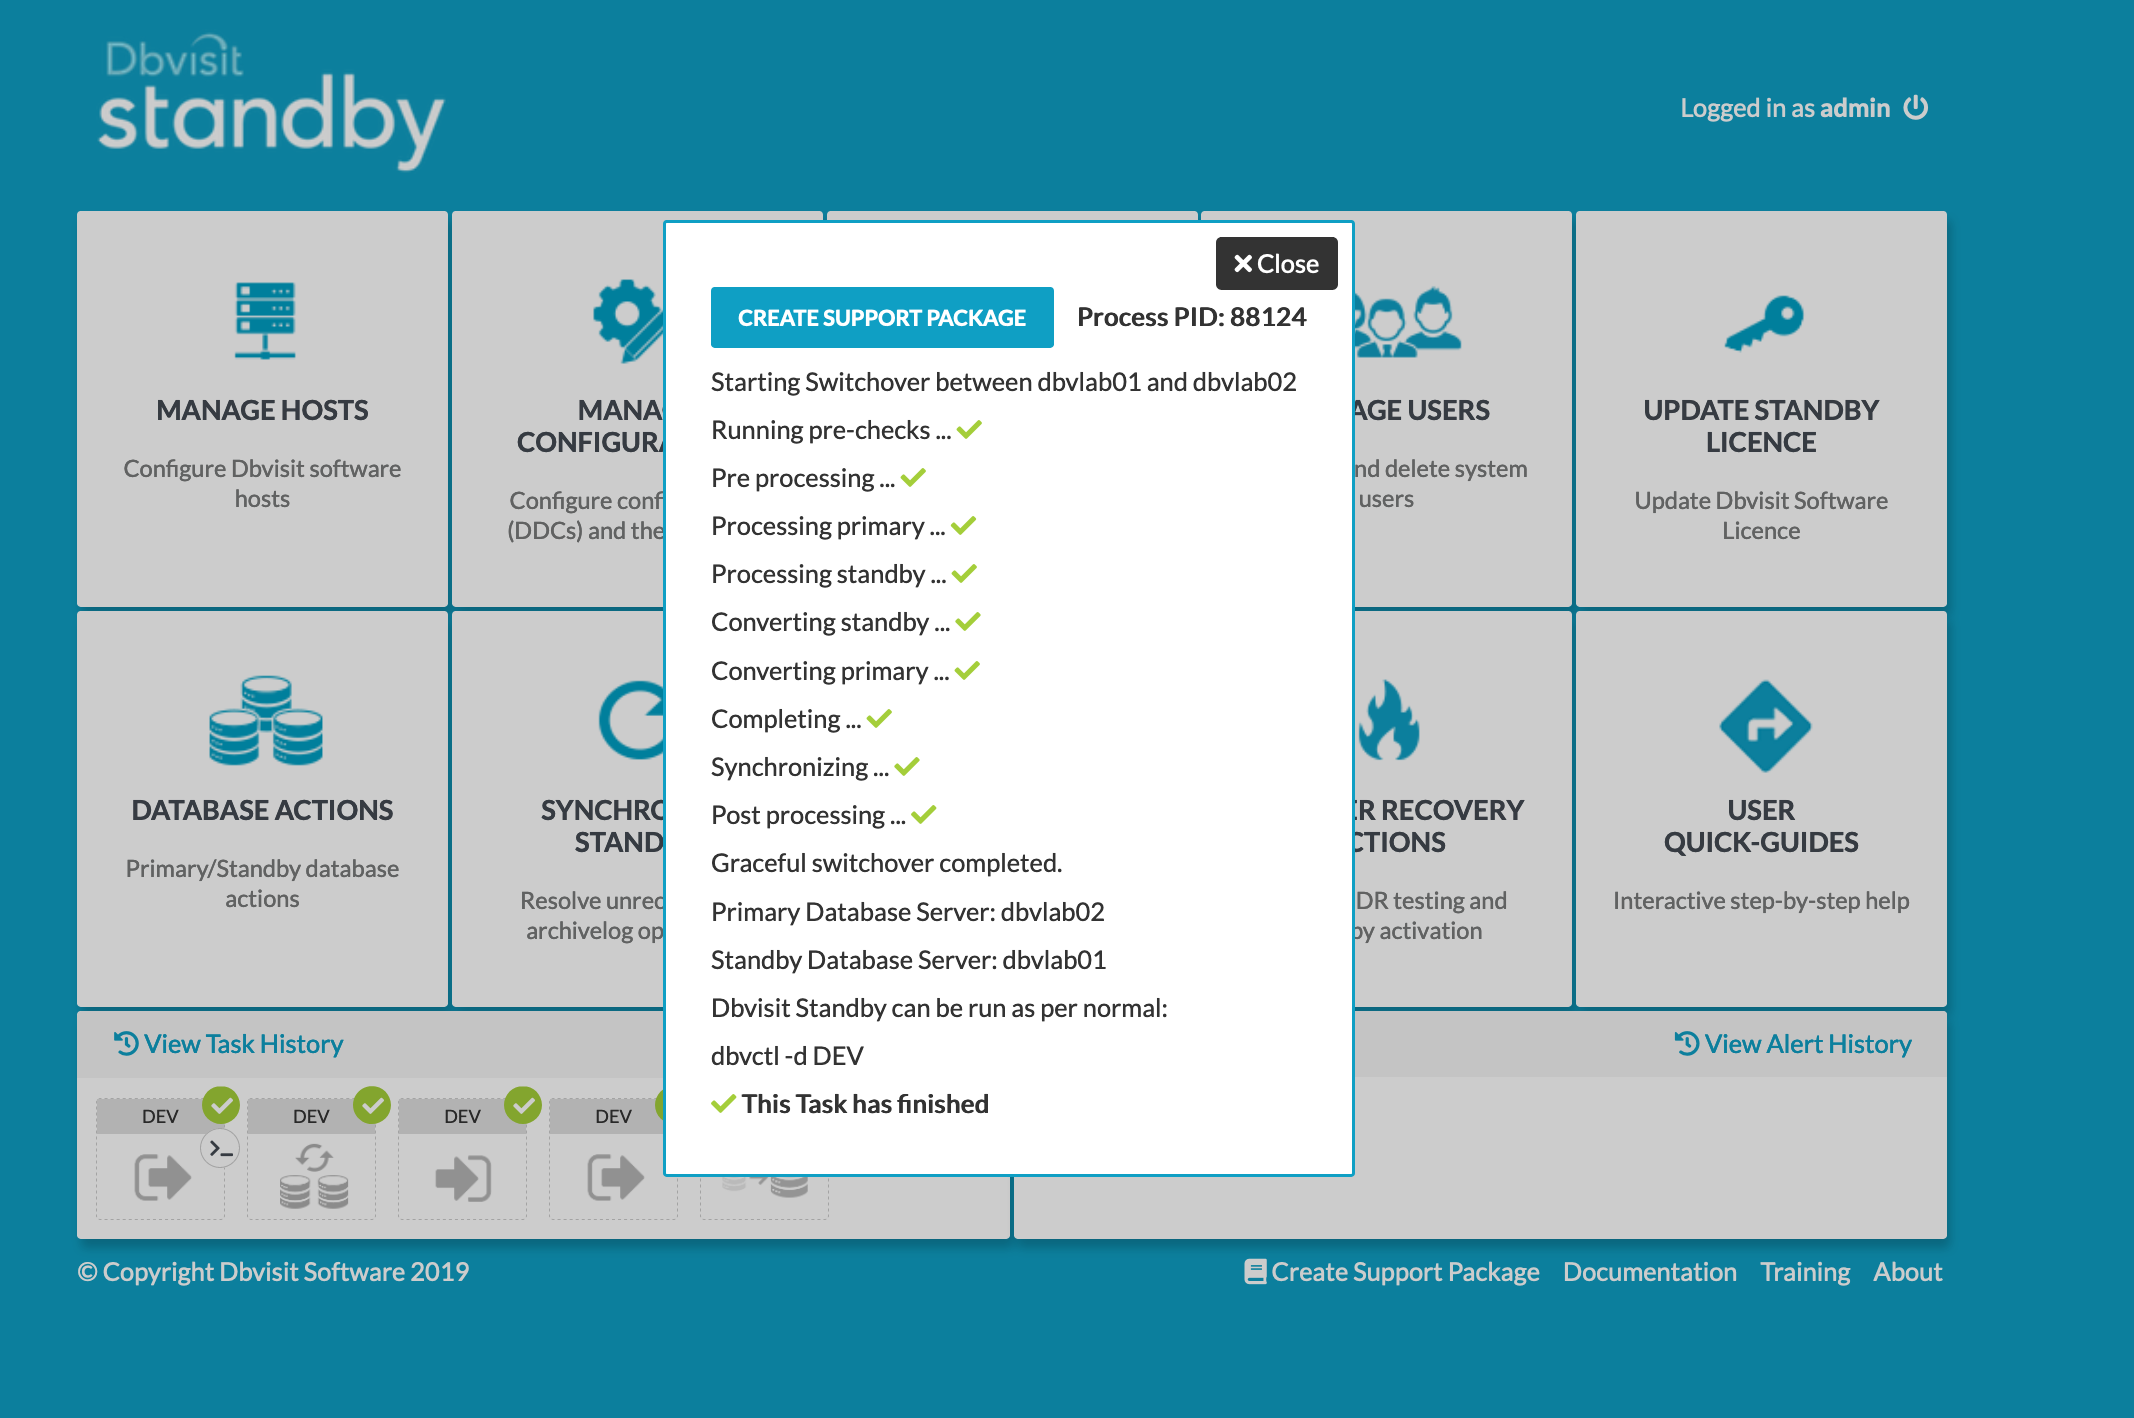
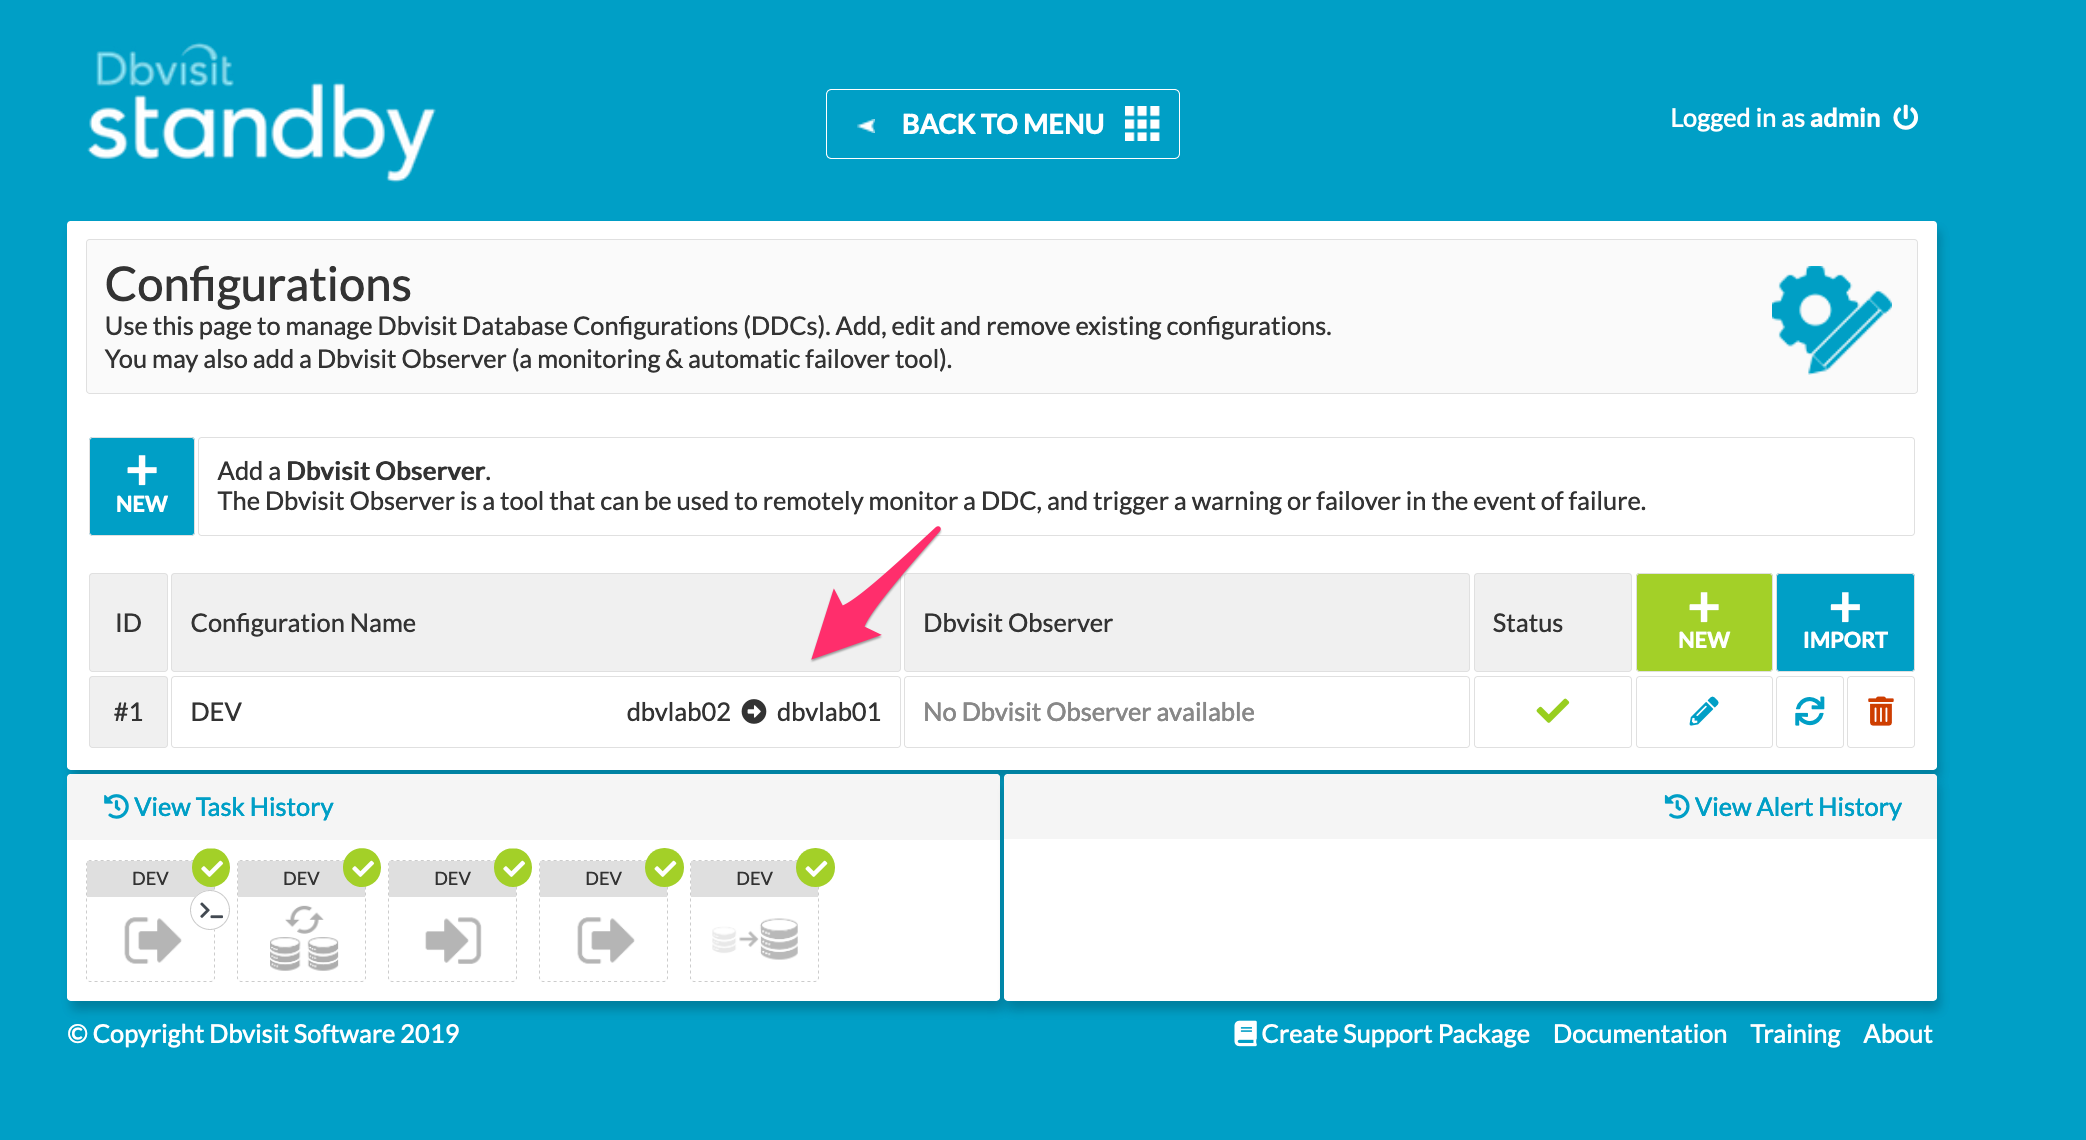
3.5.6 Verify Configuration Switch within the GUI
3.5.7 Verify the New Roles within each of the Databases
Verify the new database roles within the database
[oracle@dbvlab01 trace]$ sqlplus / as sysdba

SQL*Plus: Release 19.0.0.0.0 - Production on Wed Jul 31 08:51:51 2019
Version 19.3.0.0.0

Copyright (c) 1982, 2019, Oracle.  All rights reserved.

Connected to:
Oracle Database 19c Standard Edition 2 Release 19.0.0.0.0 - Production
Version 19.3.0.0.0

SQL> select name, database_role from v$database;

NAME	  DATABASE_ROLE
--------- ----------------
DEV	      PHYSICAL STANDBY

[oracle@dbvlab02 ~]$ sqlplus / as sysdba

SQL*Plus: Release 19.0.0.0.0 - Production on Wed Jul 31 08:51:51 2019
Version 19.3.0.0.0

Copyright (c) 1982, 2019, Oracle.  All rights reserved.

Connected to:
Oracle Database 19c Standard Edition 2 Release 19.0.0.0.0 - Production
Version 19.3.0.0.0

SQL> select name, database_role from v$database;

NAME	  DATABASE_ROLE
--------- ----------------
DEV	  	  PRIMARY

SQL>
3.6 Configuring the Observer
The observer process was started earlier so it can be simply added within the Manage Configurations Tab. However before starting it, a 2nd graceful switchover (1) has been performed and it was confirmed that hosts have returned to their original setup (2)

The Observer be added (3) by clicking on the "new" icon. Add in the observer host of dbvlab02 and the default passphrase of admin900
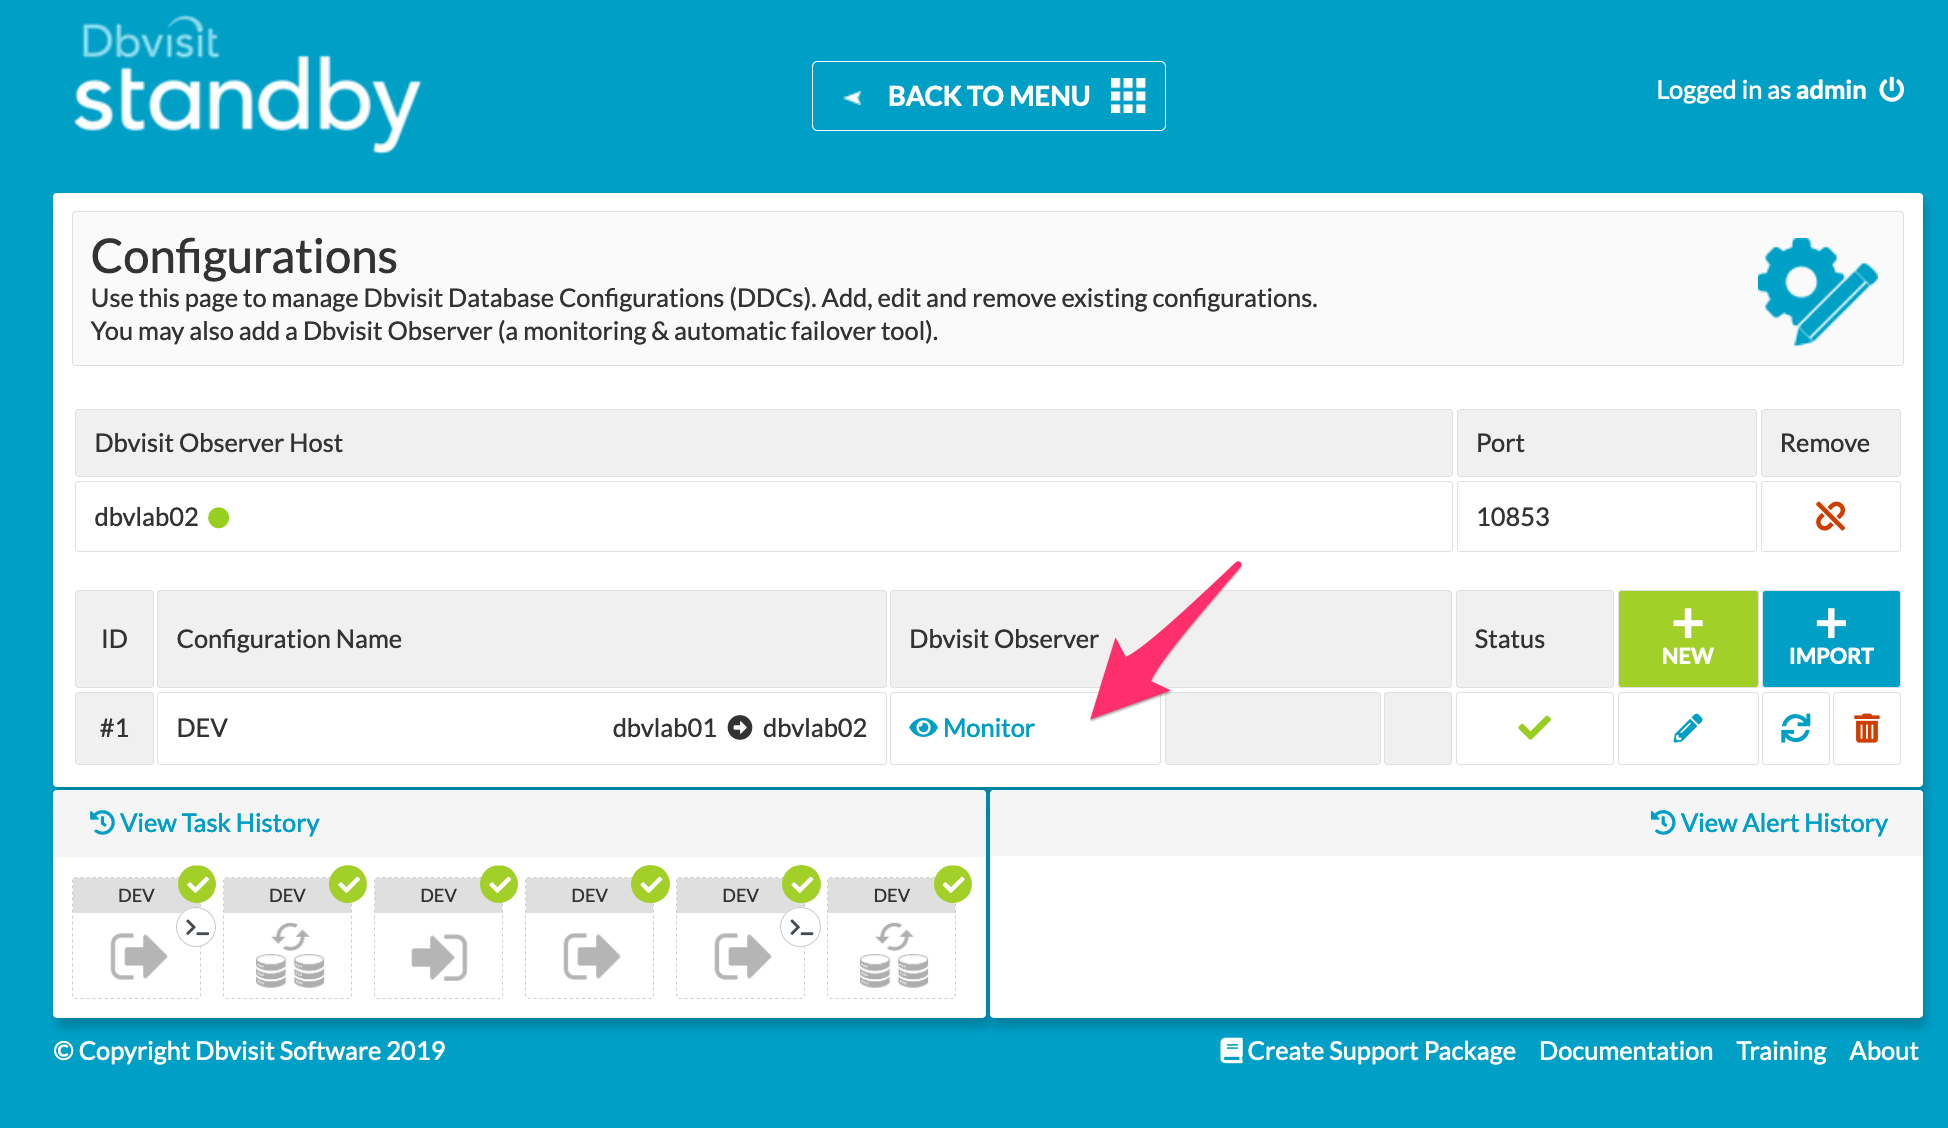
Clicking on the 'Monitor' means the system observer is actively watching the configuration for the DDC 'DEV' with the default settings.
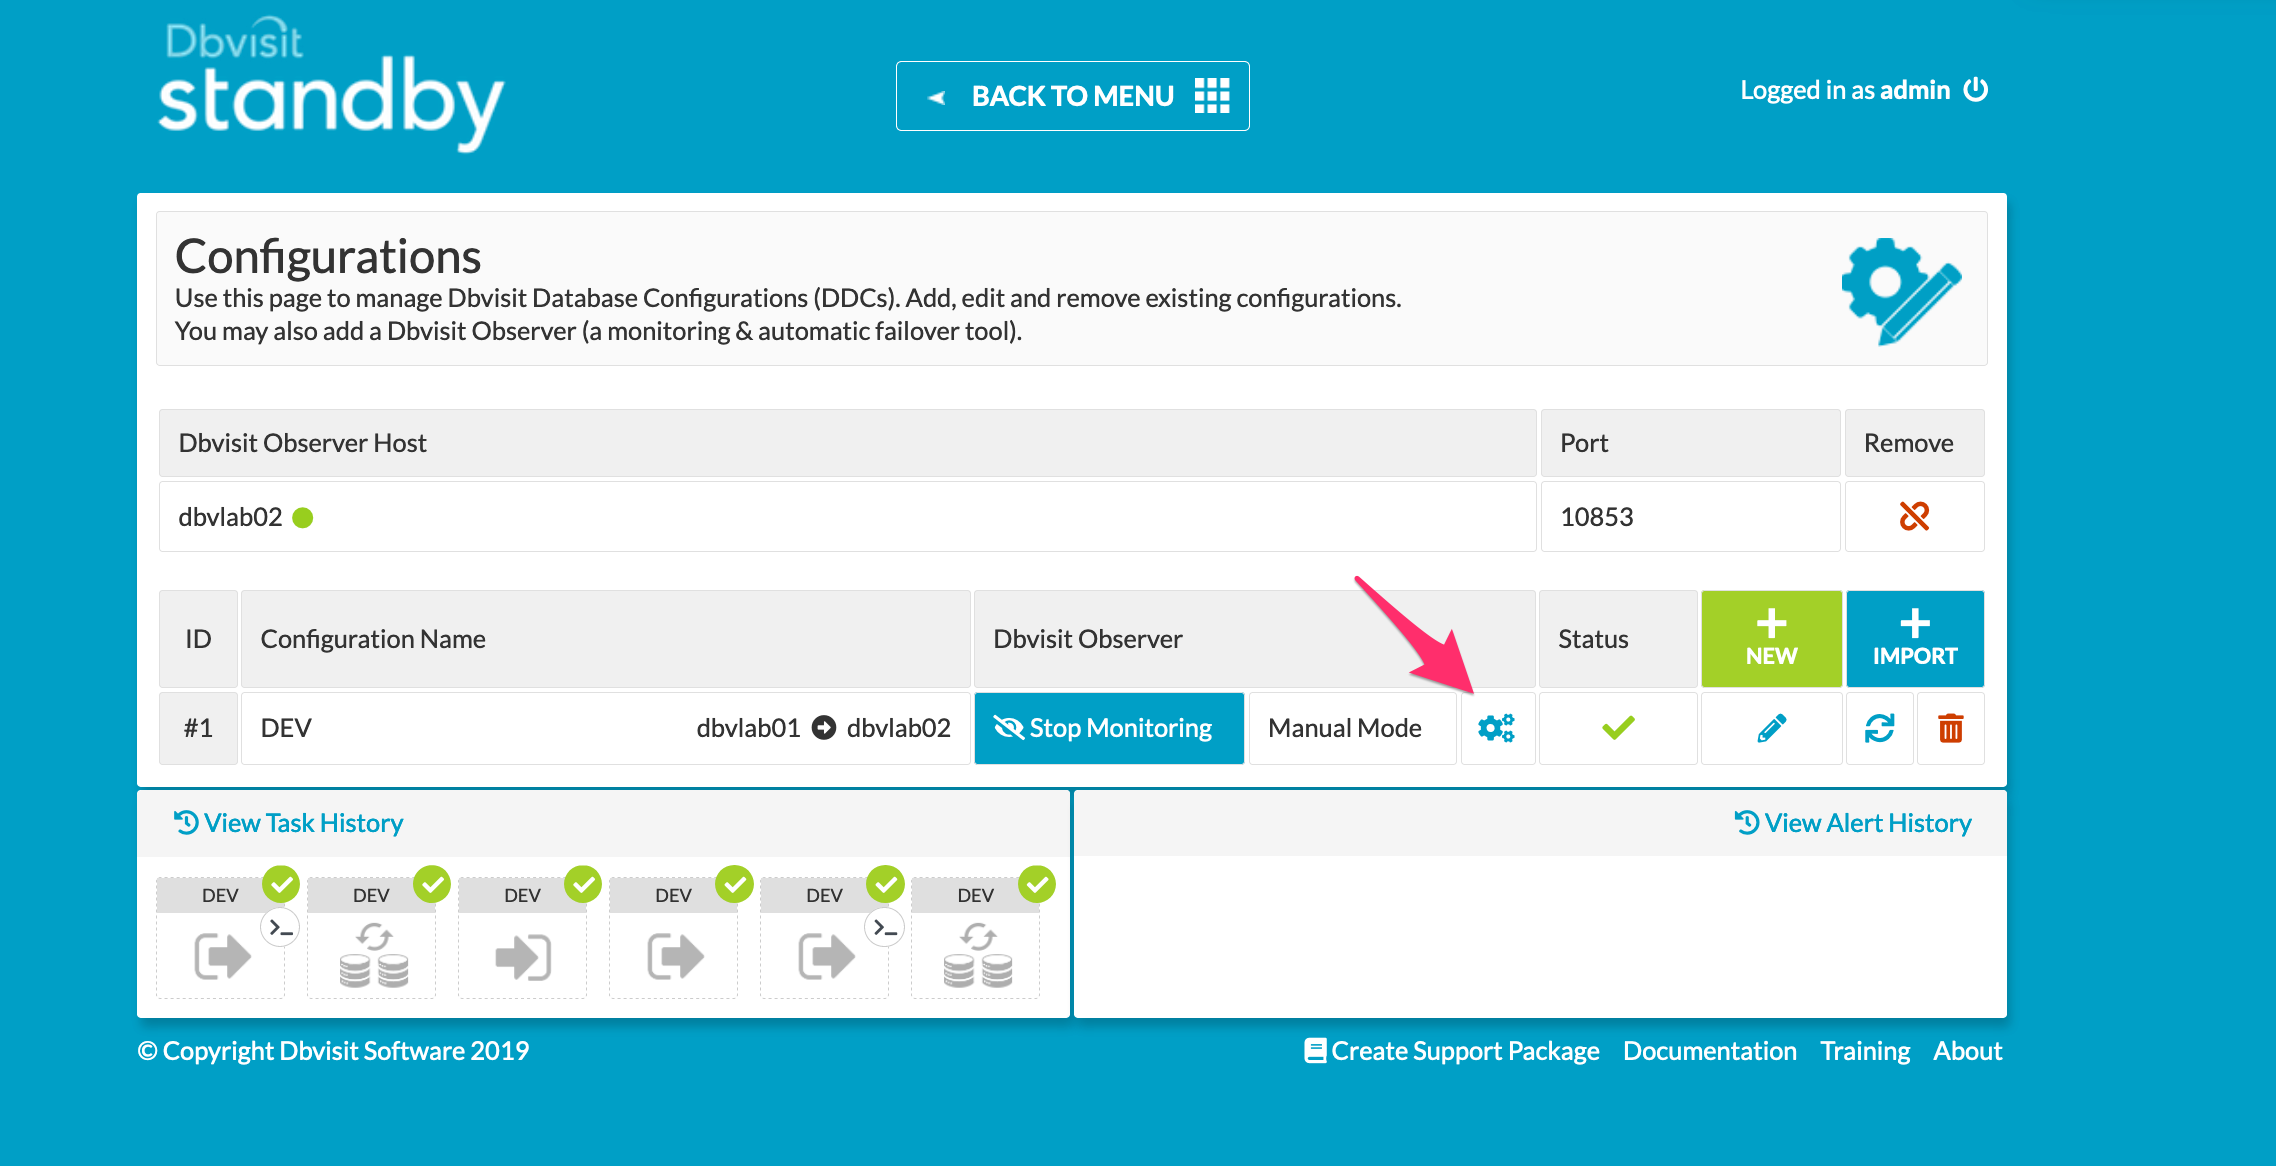
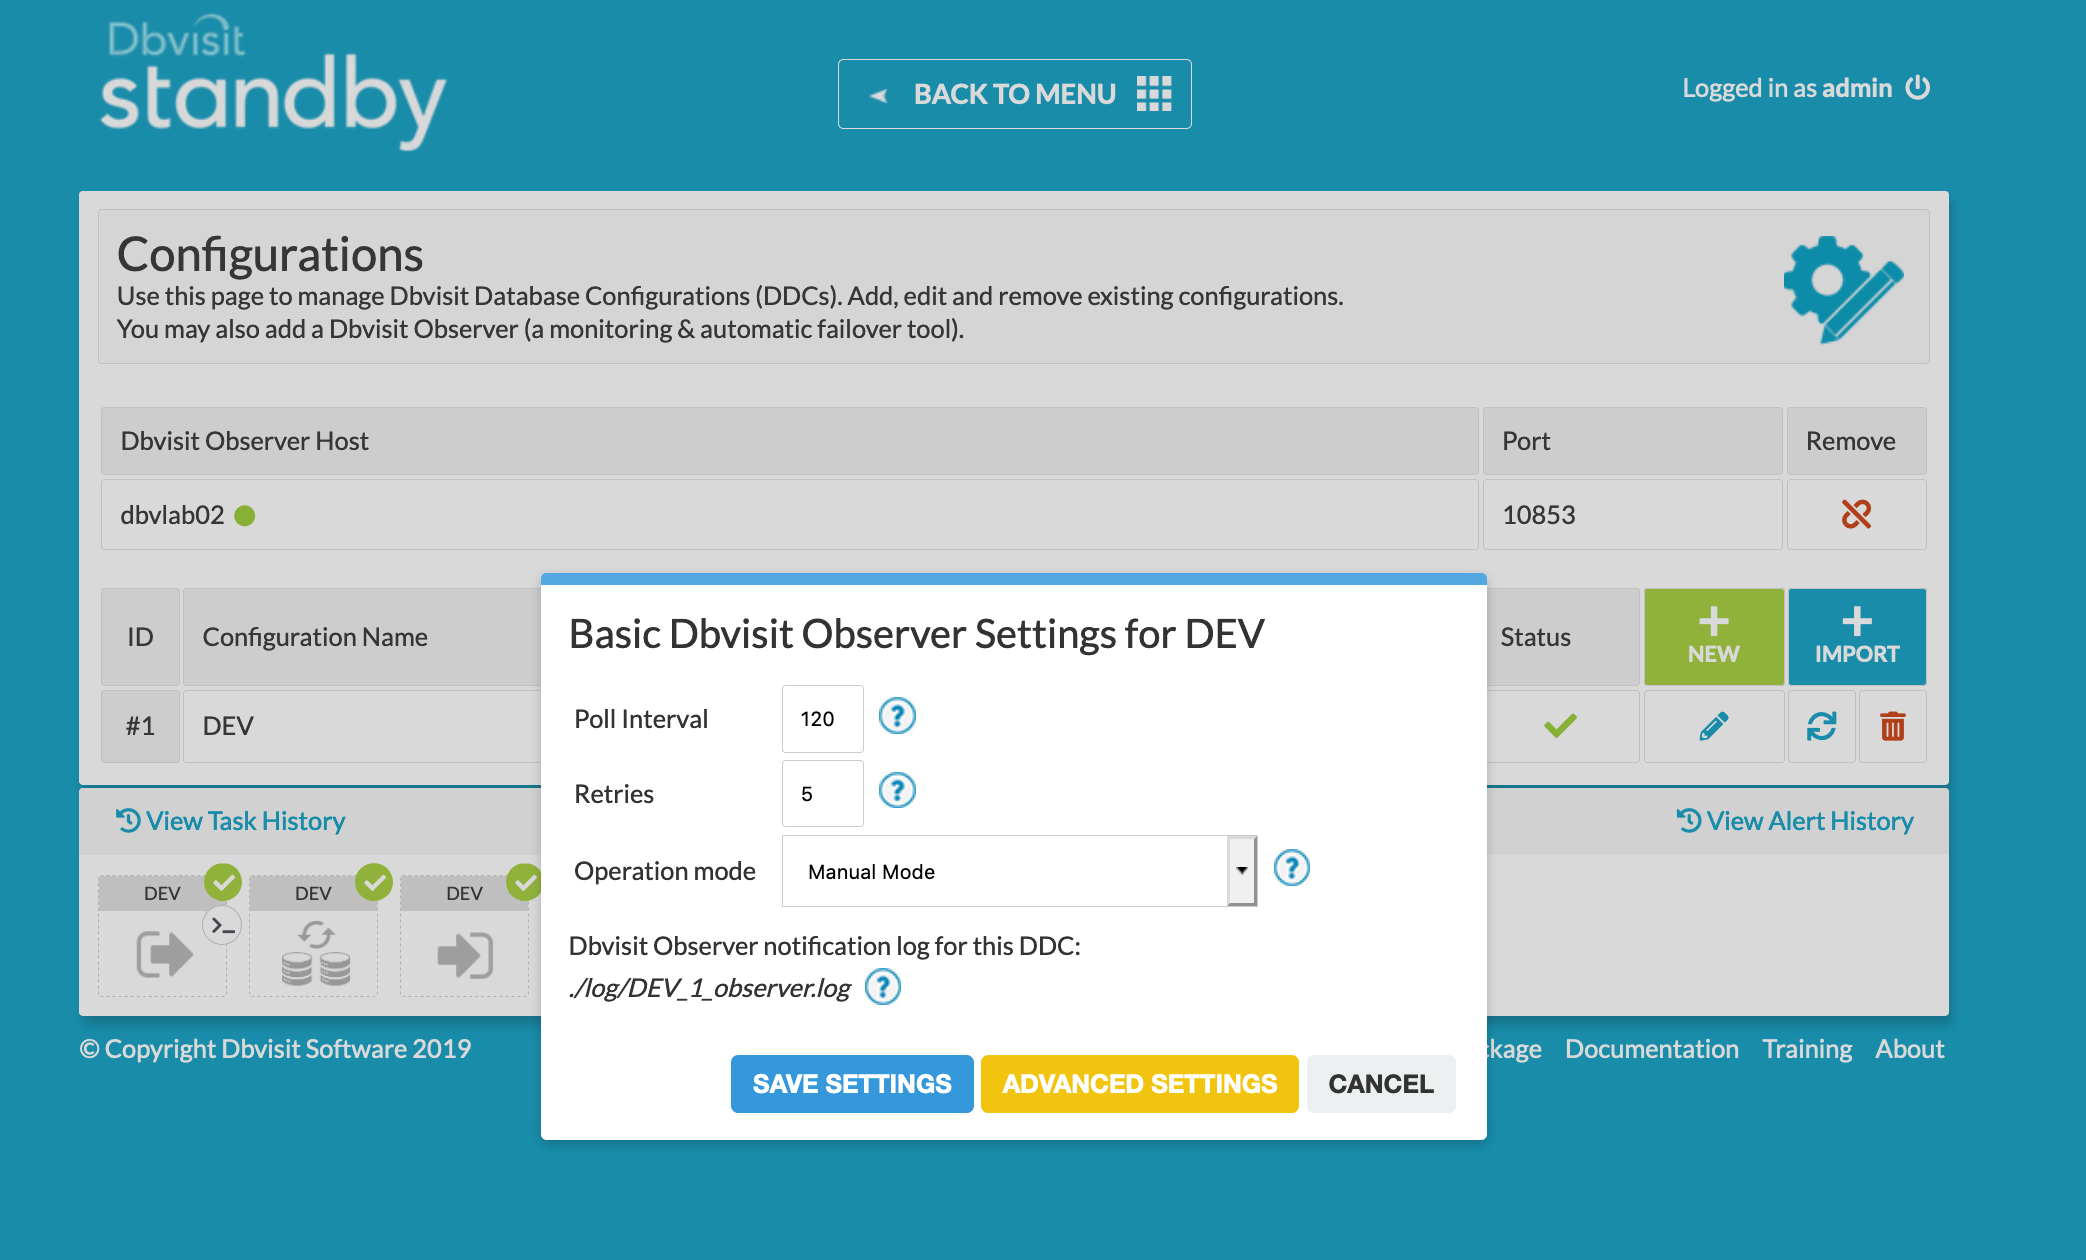
Once this is enabled it can be further configured via the settings icon to add notifications with either slack or email and user defined scripts can be added.
Further information on the observer can be found in the version 9 online documents section dedicated to the Automatic failover option.