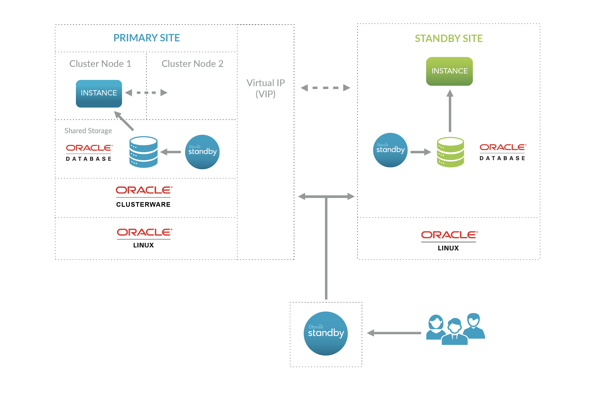
Using Dbvisit Standby with Oracle Clusterware
- Deepika Kumar (Deactivated)
- Jan Klinke
- Jakub Sejba
Introduction
The examples provided are of Dbvisit Standby Version 9.0.x, there should not be any changes on how this is being implemented in Dbvisit Standby Version 10
Also, this section is valid only for customer running on 19c versions below 19.7 (19.0, 19.3) - in those versions Standard Edition High Availability (SEHA) was not yet introduced and it was needed to make manual workaround for running the Oracle Database as active / passive. This is not needed in 19.7 and onwards, because SEHA takes care of everything.
Oracle Clusterware
- Configuration the Oracle Linux nodes using Oracle Linux 7
- Installing and configuration of the Oracle Clusterware - version 19c
- Configuration of Oracle ACFS (cluster filesystem)
- Installing the Oracle Database software - 19c SE2
- Creating a single instance database and adding it as a cluster resource
- Creating a Virtual IP that will be running on the “Active” node
- Installing Dbvisit Standby and adding it as cluster resources
- Creating a Standby Database on a 3rd server running Oracle Linux 7 with Oracle SE2 Database software installed
- Two Oracle Linux 7 (7.6) servers with latest updates applied
- I will be using two Virtual Machines running VirtualBox
- Shared Storage that is presented to both nodes
- In VirtualBox you can add a disk to node 1, then make it “sharable” and add the same disk to node 2. This works really well for small testing configurations and is not recommended for production.
- Two network interfaces in each node:
- Interface 1 - used for public
- Interface 2 - used for private interconnect traffic as well as ASM
- A DNS server
- You ideally want to use a DNS server to add all the various IP addresses that are used by the cluster.
- In my case, I just created a small BIND DNS server
- In my test configuration, I will use the following IP ranges and these values are in my DNS server, but I also added them to my local /etc/hosts file.
10.0.2.21    oel7clus1.oraclekiwi.co.nz oel7clus1 #Primary Node 1
10.0.2.22    oel7clus2.oraclekiwi.co.nz oel7clus2 #Primary Node 2
10.0.2.23    oel7clus1-vip.oraclekiwi.co.nz oel7clus1-vip
10.0.2.24    oel7clus2-vip.oraclekiwi.co.nz oel7clus2-vip
# 10.0.2.25  oel7clus-scan.oraclekiwi.co.nz oel7clus-scan ## The SCAN details in DNS
# 10.0.2.26  oel7clus-scan.oraclekiwi.co.nz oel7clus-scan
# 10.0.2.27  oel7clus-scan.oraclekiwi.co.nz oel7clus-scan
10.0.2.28    oel7clus-dbvip.oraclekiwi.co.nz oel7clus-dbvip # Cluster IP for Dbvisit
10.0.2.29    oel7fs1.oraclekiwi.co.nz oel7fs1 # Standby Server
Step 1: Oracle Linux preparation
root@oel7clus1 ~ : df -h
Filesystem             Size  Used Avail Use% Mounted on
devtmpfs               3.8G     0  3.8G   0% /dev
tmpfs                  3.8G     0  3.8G   0% /dev/shm
tmpfs                  3.8G   89M  3.7G   3% /run
tmpfs                  3.8G     0  3.8G   0% /sys/fs/cgroup
/dev/sda3              6.3G  3.6G  2.4G  61% /
tmpfs                  4.0G  4.0K  4.0G   1% /tmp
/dev/sda1              488M  279M  174M  62% /boot
/dev/mapper/oravg-u01   40G   49M   38G   1% /u01
tmpfs                  771M     0  771M   0% /run/user/0
tmpfs                  771M     0  771M   0% /run/user/1000
groupadd -g 501 oinstall
groupadd -g 502 dba
groupadd -g 503 oper
groupadd -g 504 asmadmin
groupadd -g 505 asmdba
groupadd -g 506 asmoper
groupadd -g 507 bkpdba
groupadd -g 508 dgdba
groupadd -g 509 kmdba
groupadd -g 510 racdba
useradd -m -g oinstall -G oinstall,dba,oper,asmadmin,asmdba,bkpdba,dgdba,kmdba -u 501 oracle
useradd -m -g oinstall -G oinstall,dba,asmadmin,asmdba,asmoper -u 502 grid
yum -y --enablerepo=ol7_latest,ol7_optional_latest,ol7_developer_EPEL install dkms ocfs2-tools-devel ocfs2-tools reflink btrfs-progs btrfs-progs-devel oracleasm-support kmod-oracleasm git rpmbuild patch bc binutils bzip2 bzip2-devel dos2unix gcc gcc-c++ glibc-static gzip libaio libaio-devel libgcc libstdc++ libstdc++-devel lsof make man man-pages net-tools nss-devel perl strace subversion sudo sysstat tar tree unix2dos unzip wget which zip zlib zlib-devel zlib-static gettext tcl tcl-devel openssh openssh-server xclock xhost psmisc xorg-x11-fonts* xorg-x11-server-Xvfb.x86_64 xterm libvncserver xorg-x11-server-devel avahi-libs tk libXtst gtk3 mesa-dri-drivers xorg-x11-utils screen bind-libs bind-utils compat-libcap1 compat-libstdc++-33 e2fsprogs-libs ethtool gssproxy keyutils ksh libaio-devel libbasicobjects libcollection libevent libini_config libnfsidmap libpath_utils libref_array libtirpc libverto-libevent mailx nfs-utils quota quota-nls rpcbind smartmontools tcp_wrappers gdb patch libnfs-utils nfs-utils dejavu*
cat >> /etc/pam.d/login <<EOF
session required pam_limits.so
EOF

echo 'oracle:Kiwi123' | chpasswd
echo 'grid:Kiwi123' | chpasswd
echo "oracle ALL=(ALL) NOPASSWD: ALL" >> /etc/sudoers.d/oracle
echo "grid ALL=(ALL) NOPASSWD: ALL" >> /etc/sudoers.d/grid
sed -i "s/^.*requiretty/#Defaults requiretty/" /etc/sudoers
cat >> /etc/sysctl.conf <<EOF
fs.aio-max-nr = 3145728
fs.file-max = 6815744
kernel.shmall = 1073741824
kernel.shmmax = 4398046511104
kernel.shmmni = 4096
kernel.sem = 250 32000 100 128
kernel.msgmax = 8192
kernel.msgmnb = 65536
net.ipv4.ip_local_port_range = 9000 65500
net.core.rmem_default=262144
net.core.rmem_max=4194304
net.core.wmem_default=262144
net.core.wmem_max=1048586
EOF

cat >> /etc/security/limits.conf <<EOF
grid soft nproc 2047
grid hard nproc 16384
grid soft nofile 4096
grid hard nofile 65536
oracle soft nofile 131072
oracle hard nofile 131072
oracle soft nproc 131072
oracle hard nproc 131072
oracle soft core unlimited
oracle hard core unlimited
oracle soft memlock 50000000
oracle hard memlock 50000000
EOF

cat >> /etc/profile <<EOF
if [ \$USER = "oracle" ] || [ \$USER = "grid" ]; then
if [ $SHELL = "/bin/ksh" ]; then
ulimit -p 16384
ulimit -n 65536
ulimit -s 10240
else
ulimit -u 16384 -n 65536 -s 10240
fi
umask 022
fi

EDITOR=vi;
export EDITOR

PS1="\u@\h\w$";
PS2="\u@ \h --> ";

export PS1
export PS2

NLS_DATE_FORMAT="dd/mm/yyyy:hh24:mi:ss"
export NLS_DATE_FORMAT
EOF

cat >> /etc/sysconfig/network <<EOF
NOZEROCONF=yes
10.0.2.21    oel7clus1.oraclekiwi.co.nz oel7clus1 #Primary Node 1
10.0.2.22    oel7clus2.oraclekiwi.co.nz oel7clus2 #Primary Node 2
10.0.2.23    oel7clus1-vip.oraclekiwi.co.nz oel7clus1-vip
10.0.2.24    oel7clus2-vip.oraclekiwi.co.nz oel7clus2-vip
# 10.0.2.25  oel7clus-scan.oraclekiwi.co.nz oel7clus-scan ## The SCAN details in DNS
# 10.0.2.26  oel7clus-scan.oraclekiwi.co.nz oel7clus-scan
# 10.0.2.27  oel7clus-scan.oraclekiwi.co.nz oel7clus-scan
10.0.2.28    oel7clus-dbvip.oraclekiwi.co.nz oel7clus-dbvip # Cluster IP for Dbvisit
10.0.2.29    oel7fs1.oraclekiwi.co.nz oel7fs1 # Standby Server
ssh-keygen -t rsa
ssh-copy-id -i ~/.ssh/id_rsa.pub oel7clus1
ssh-copy-id -i ~/.ssh/id_rsa.pub oel7clus2
grid@oel7clus1 ~ : ssh oel7clus1
Last login: Sun Sep  1 14:28:22 2019
grid@oel7clus1 ~ : ssh oel7clus2
Last login: Thu Aug 22 13:58:37 2019
grid@oel7clus2 ~ : exit
logout
Connection to oel7clus2 closed.
grid@oel7clus1 ~ : exit
logout
Connection to oel7clus1 closed.
grid@oel7clus1 ~ :
Step 2: Configure Disks
fdisk /dev/sdb
o
n
p
1
< press enter
< press enter
w
root@oel7clus1 ~ : fdisk /dev/sdb
Welcome to fdisk (util-linux 2.23.2).

Changes will remain in memory only, until you decide to write them.
Be careful before using the write command.

Device does not contain a recognized partition table
Building a new DOS disklabel with disk identifier 0x44bf62a8.

Command (m for help): o
Building a new DOS disklabel with disk identifier 0x1bc47716.

Command (m for help): n
Partition type:
   p   primary (0 primary, 0 extended, 4 free)
   e   extended
Select (default p): p
Partition number (1-4, default 1): 1
First sector (2048-6291455, default 2048):
Using default value 2048
Last sector, +sectors or +size{K,M,G} (2048-6291455, default 6291455):
Using default value 6291455
Partition 1 of type Linux and of size 3 GiB is set

Command (m for help): w
The partition table has been altered!

Calling ioctl() to re-read partition table.
Syncing disks.
root@oel7clus1 ~ :
root@oel7clus1 ~ : oracleasm configure -i
Configuring the Oracle ASM library driver.

This will configure the on-boot properties of the Oracle ASM library
driver.  The following questions will determine whether the driver is
loaded on boot and what permissions it will have.  The current values
will be shown in brackets ('[]').  Hitting <ENTER> without typing an
answer will keep that current value.  Ctrl-C will abort.

Default user to own the driver interface [grid]: grid
Default group to own the driver interface [asmadmin]: asmadmin
Start Oracle ASM library driver on boot (y/n) [y]: y
Scan for Oracle ASM disks on boot (y/n) [y]: y
Writing Oracle ASM library driver configuration: done


root@oel7clus1 ~ : systemctl restart oracleasm
root@oel7clus1 ~ : oracleasm createdisk ASMDISK1 /dev/sdb1
Writing disk header: done
Instantiating disk: done
root@oel7clus1 ~ : oracleasm createdisk ASMDISK2 /dev/sdc1
Writing disk header: done
Instantiating disk: done
root@oel7clus1 ~ : oracleasm listdisks
ASMDISK1
ASMDISK2
root@oel7clus1 ~ : oracleasm-discover
Using ASMLib from /opt/oracle/extapi/64/asm/orcl/1/libasm.so
[ASM Library - Generic Linux, version 2.0.12 (KABI_V2)]
Discovered disk: ORCL:ASMDISK1 [6289408 blocks (3220176896 bytes), maxio 1024, integrity none]
Discovered disk: ORCL:ASMDISK2 [62912512 blocks (32211206144 bytes), maxio 1024, integrity none]
Step 3: Installing Oracle Clusterware
cd /u01
mkdir -p app
cd app
mkdir grid 19.3.0 oracle
cd /u01
chown -R grid:oinstall app
chmod -R 775 app
cd app
chown -R oracle:oinstall oracle
grid@oel7clus1 /u01 : tree app
app
├── 19.3.0
├── grid
└── oracle
3 directories, 0 files
grid@oel7clus1 /u01/app/19.3.0 : unzip -q /install/LINUX.X64_193000_grid_home.zip
grid@oel7clus1 /u01/app/19.3.0 :
grid@oel7clus1 /u01/app/19.3.0 : ls
addnode     cv           env.ora       instantclient  lib      ord    precomp   root.sh         sqlpatch  utl
assistants  dbjava       evm           inventory      md       ords   QOpatch   root.sh.old     sqlplus   welcome.html
bin         dbs          gpnp          javavm         network  oss    qos       root.sh.old.1   srvm      wlm
cha         deinstall    gridSetup.sh  jdbc           nls      oui    racg      rootupgrade.sh  suptools  wwg
clone       demo         has           jdk            OPatch   owm    rdbms     runcluvfy.sh    tomcat    xag
crs         diagnostics  hs            jlib           opmn     perl   relnotes  sdk             ucp       xdk
css         dmu          install       ldap           oracore  plsql  rhp       slax            usm
grid@oel7clus1 /u01/app/19.3.0 :
grid@oel7clus1 /u01/app/19.3.0 : cd cv/rpm/
grid@oel7clus1 /u01/app/19.3.0/cv/rpm : ls
cvuqdisk-1.0.10-1.rpm
grid@oel7clus1 /u01/app/19.3.0/cv/rpm : sudo rpm -ivh cvuqdisk-1.0.10-1.rpm
Preparing...                          ################################# [100%]
    package cvuqdisk-1.0.10-1.x86_64 is already installed
grid@oel7clus1 /u01/app/19.3.0 : ./gridSetup.sh
Launching Oracle Grid Infrastructure Setup Wizard...
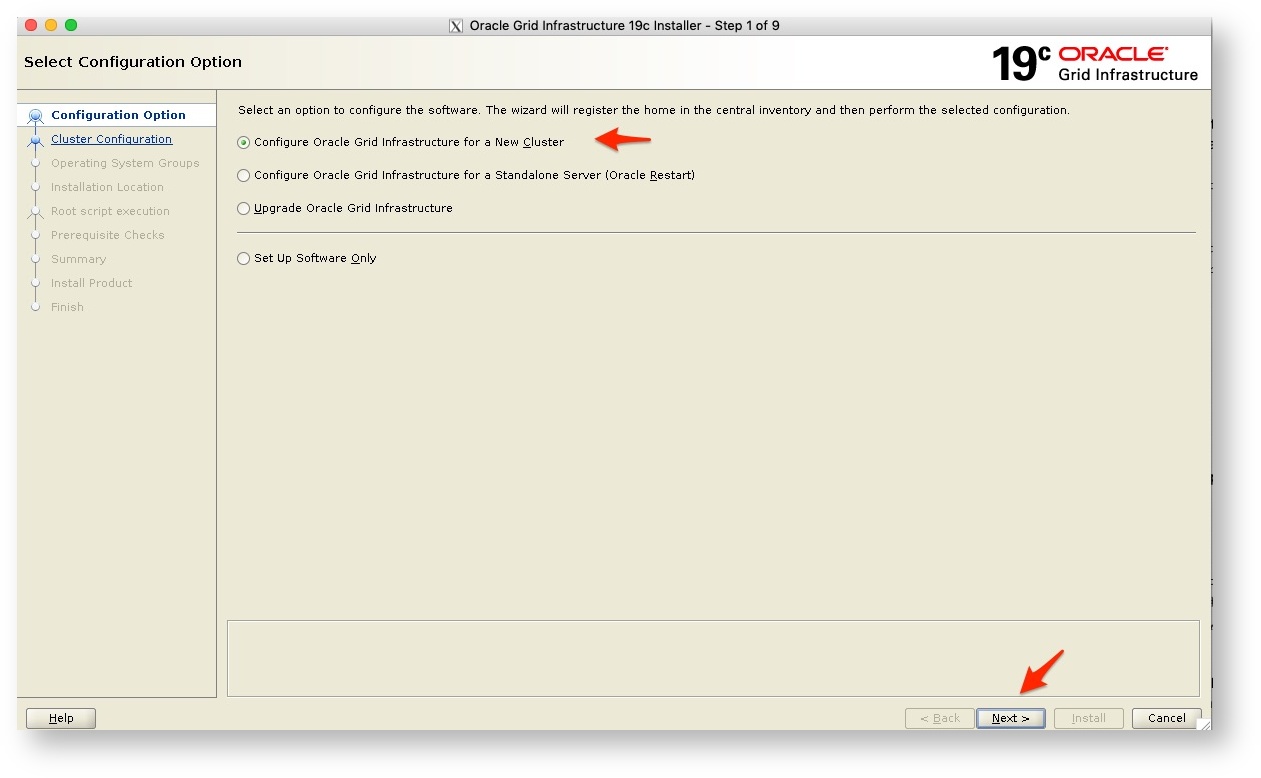
- As this is a new installation we pick Configure for a new cluster and click on next
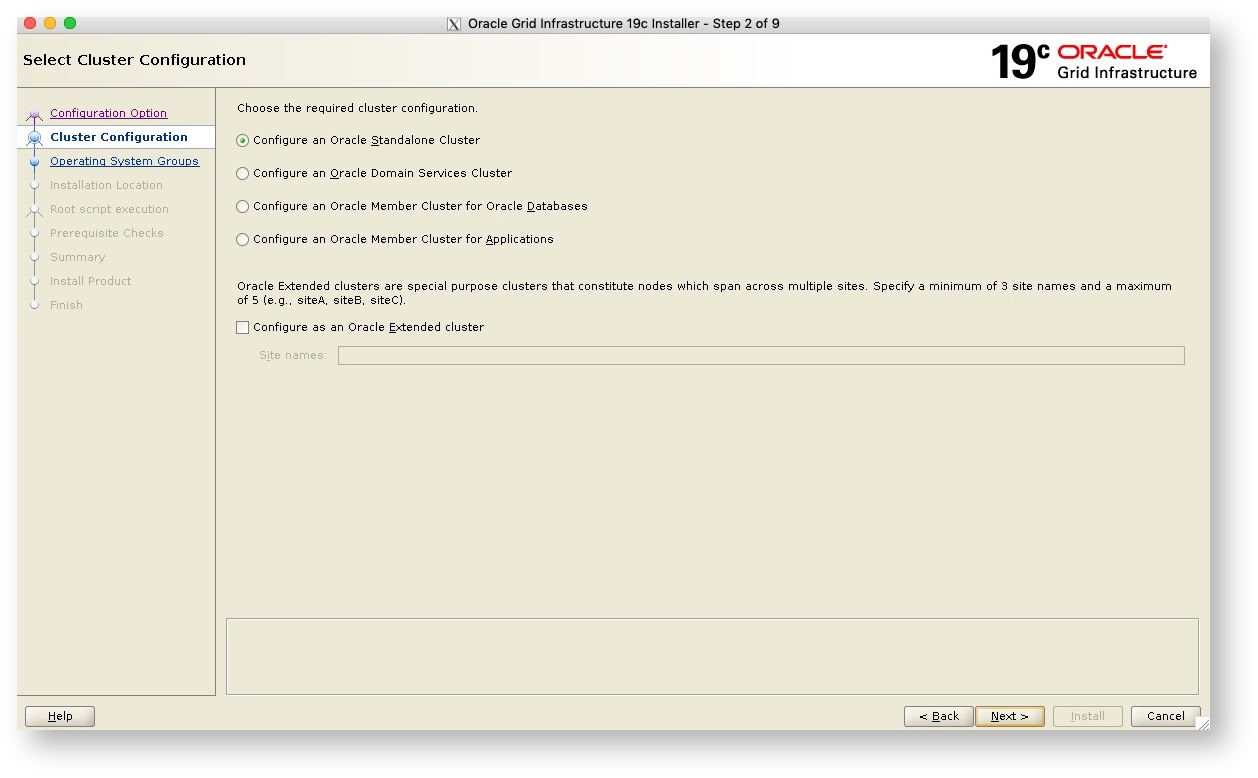
- The next screen as seen below we select a Standalone Cluster and click next to continue
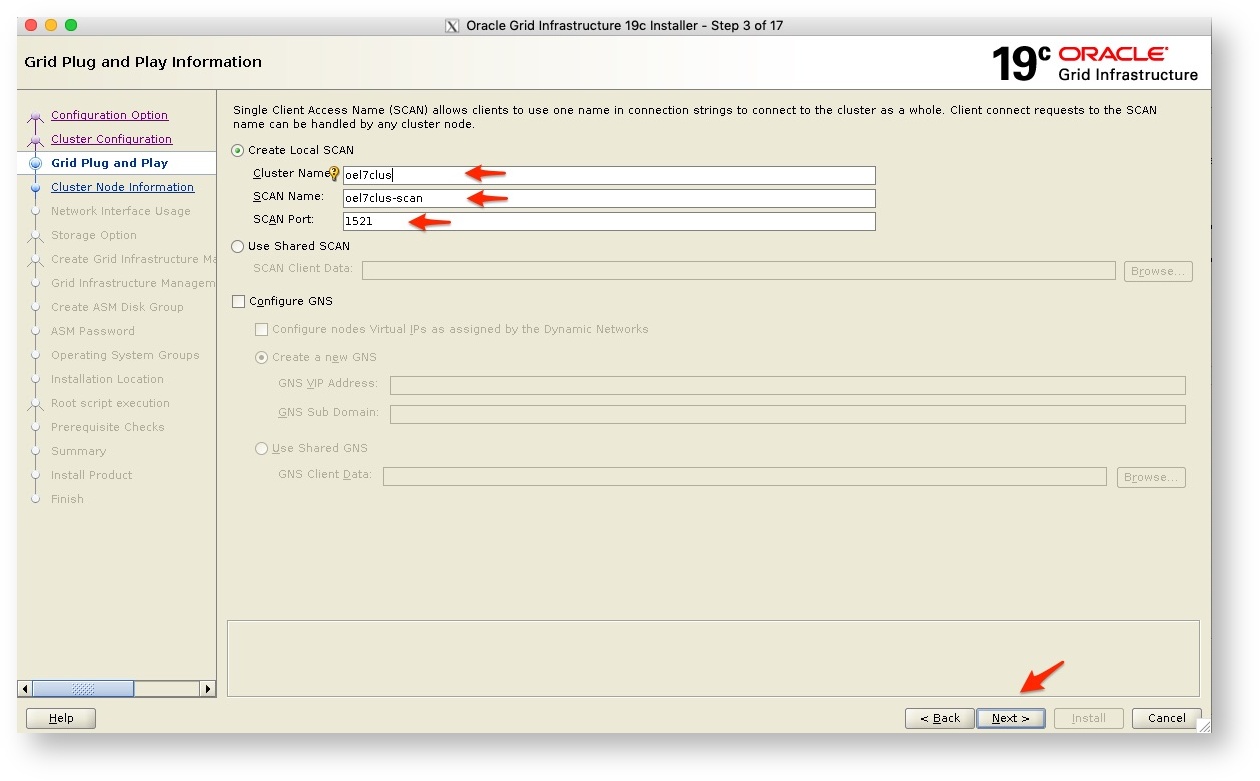
- Now are getting to the next step where you need to supply the cluster name as well as the SCAN name and port, remember you have to have these in the DNS server.
- For more detail on SCAN and SCAN listeners please see the Oracle Documentation as this is a big topic in itself
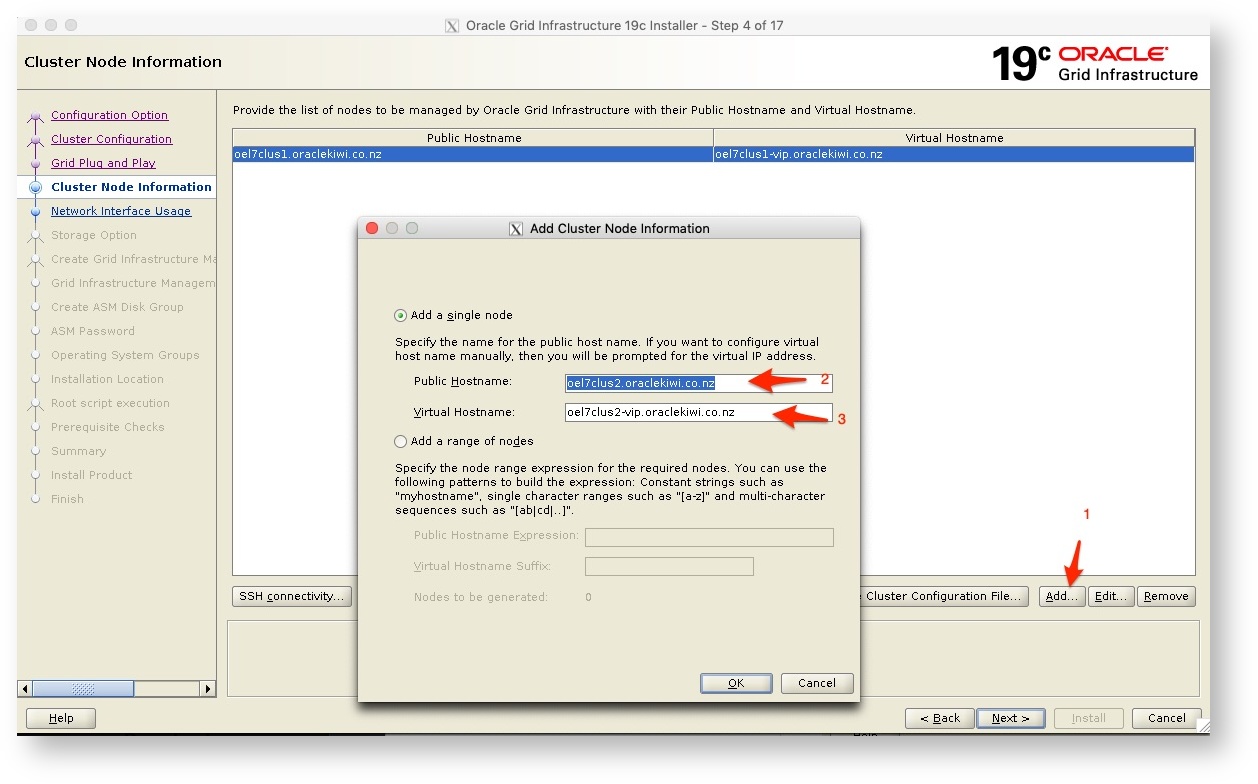
- Next, we get the screen where we need to supply the second node in the cluster’s details, this would be the public hostname as well as the Virtual IP/Hostname.
- Once you have supplied the details - and once again, these should be in your DNS server and resolvable.
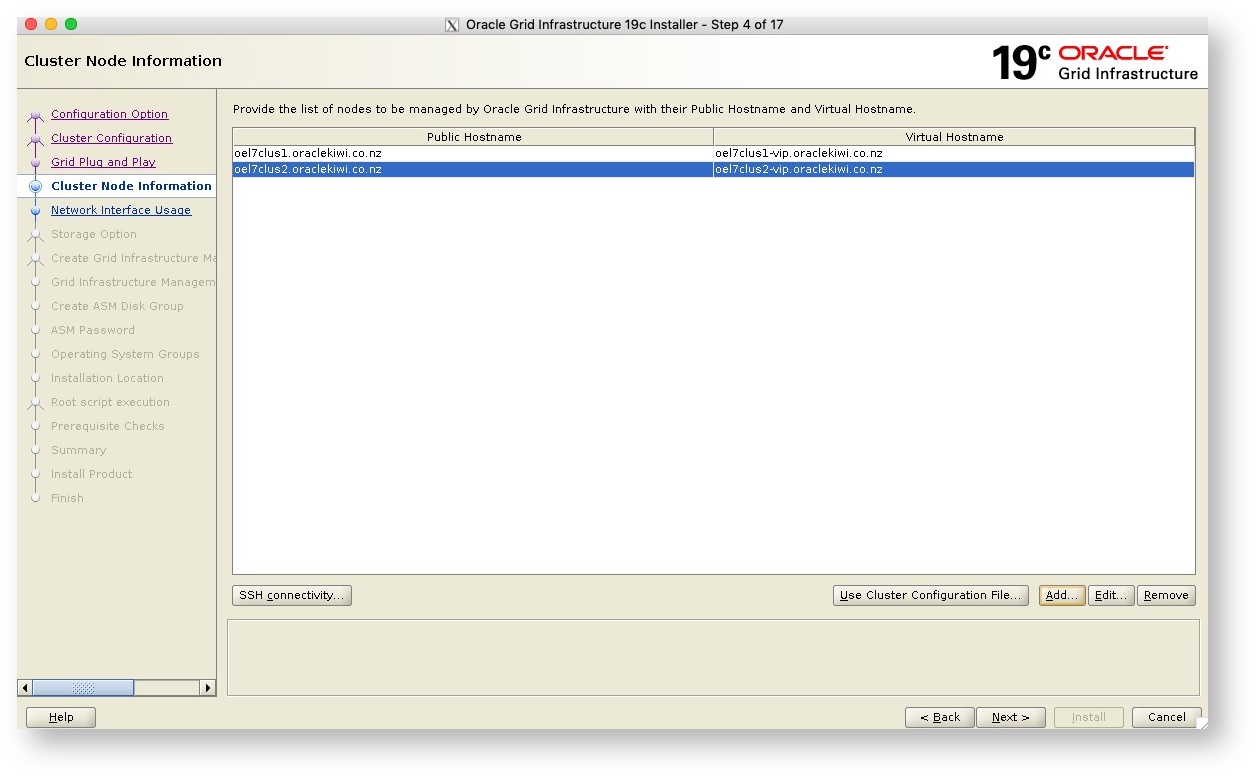
- Once you have added the details you will see the summary page, now click next to continue
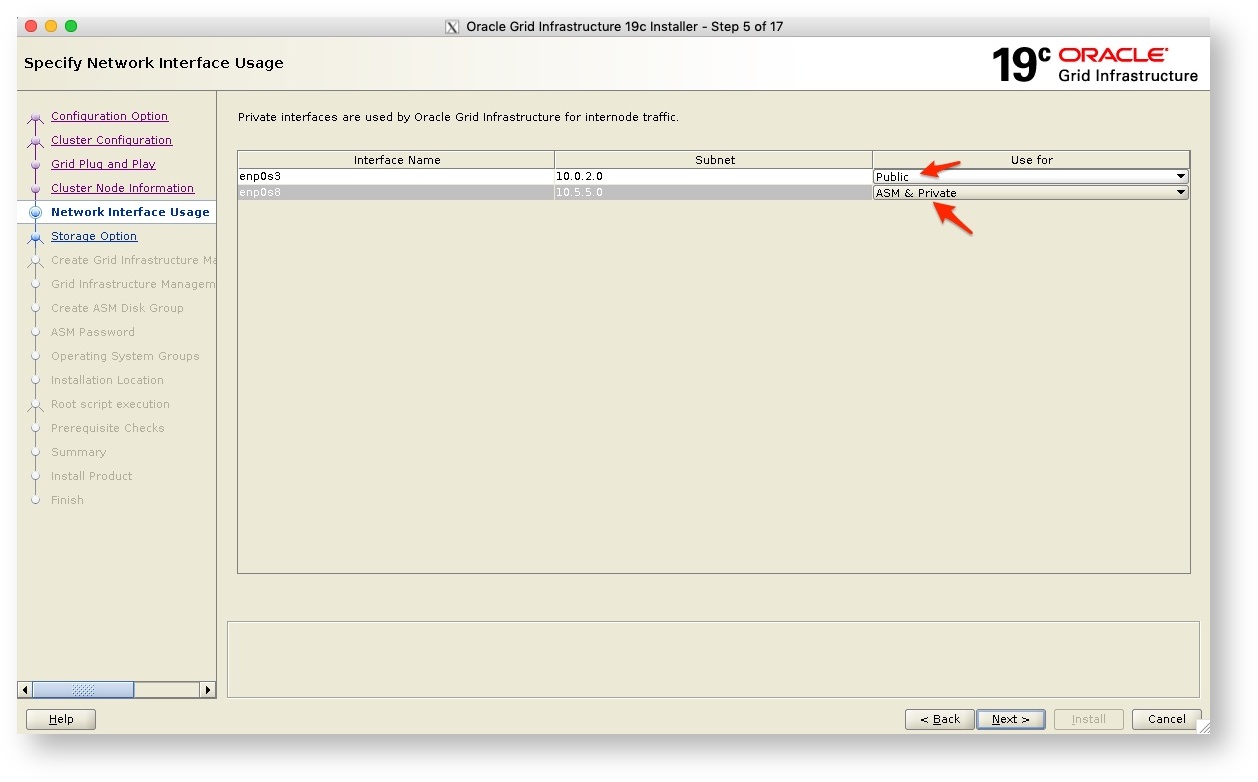
- Next, we get the option to specify which subnets to use as Public or ASM or Private. In my example I will use the one network interface (also used as the interconnect between the two servers) for both ASM but also as the private link.
- Next we are going to put the OCR and Voting disk on ASM, so we select Oracle Flex ASM for Storage

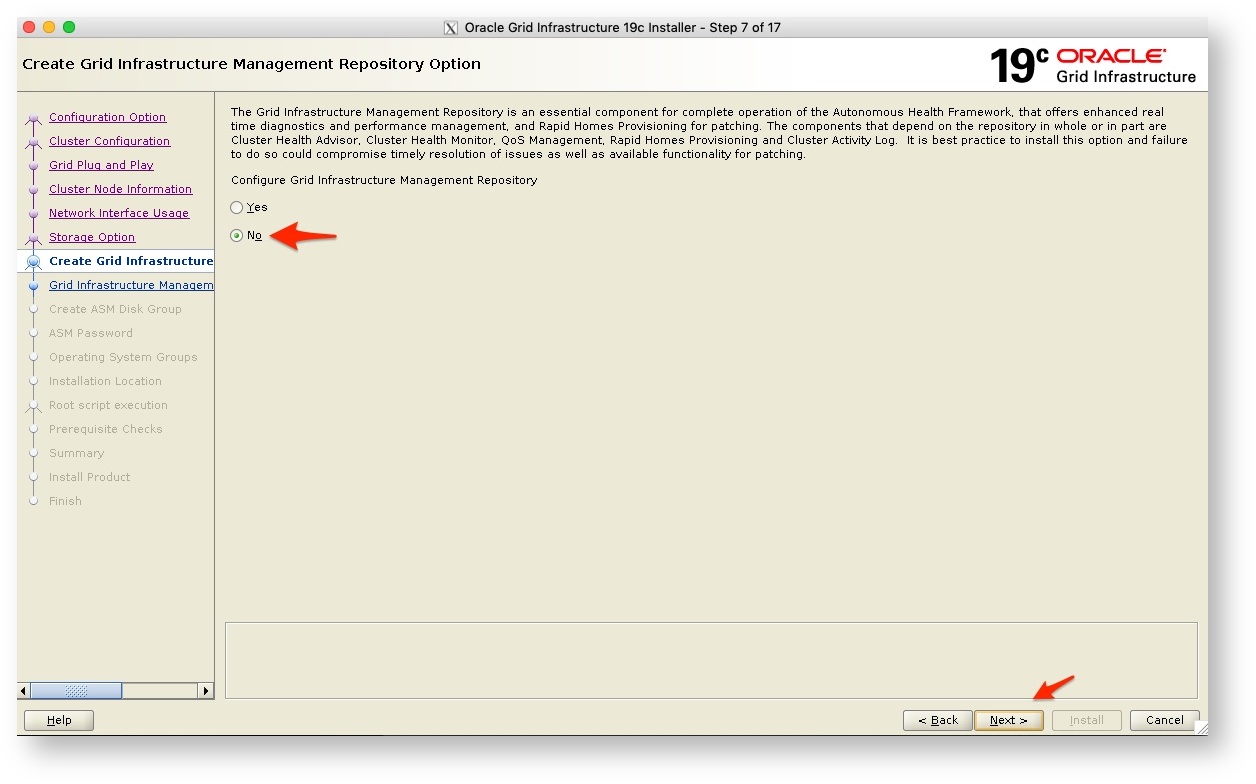
- Next, we get the option to not use the Grid Infrastructure Management repository. Now as this is a test configuration, I do not need this and will leave it out as this will save a little on resources, but for production configurations, you most likely will enable this as with it there are a number of benefits as listed on the screen.
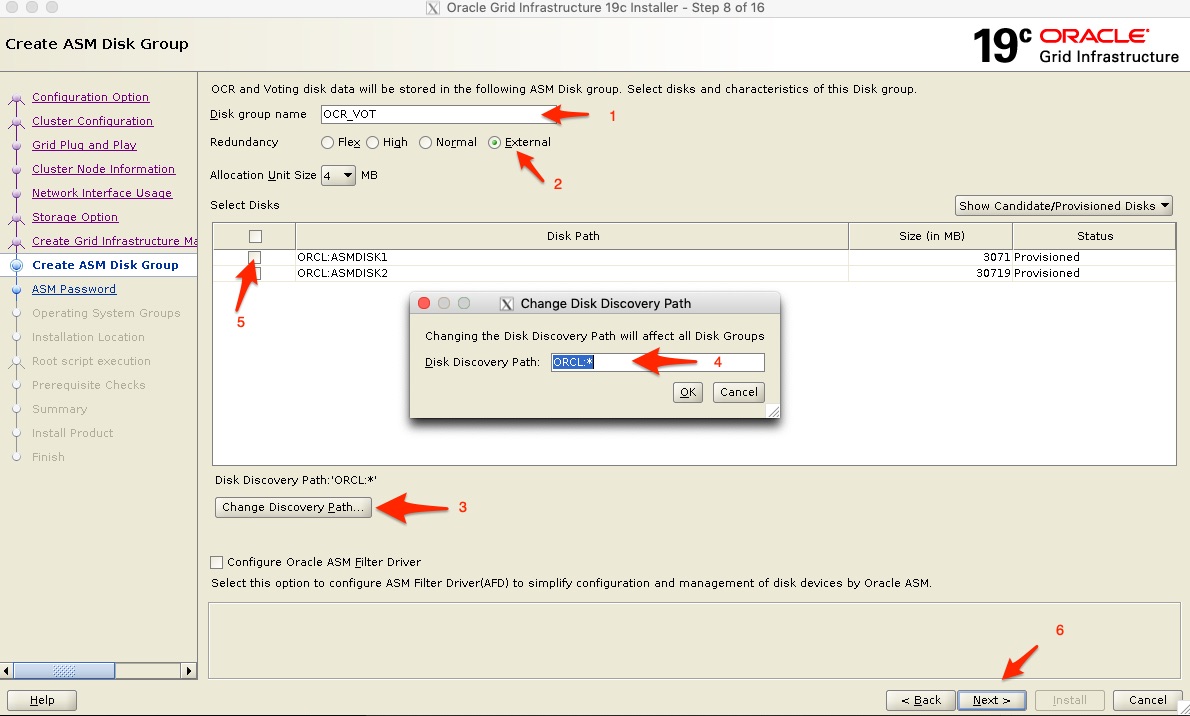
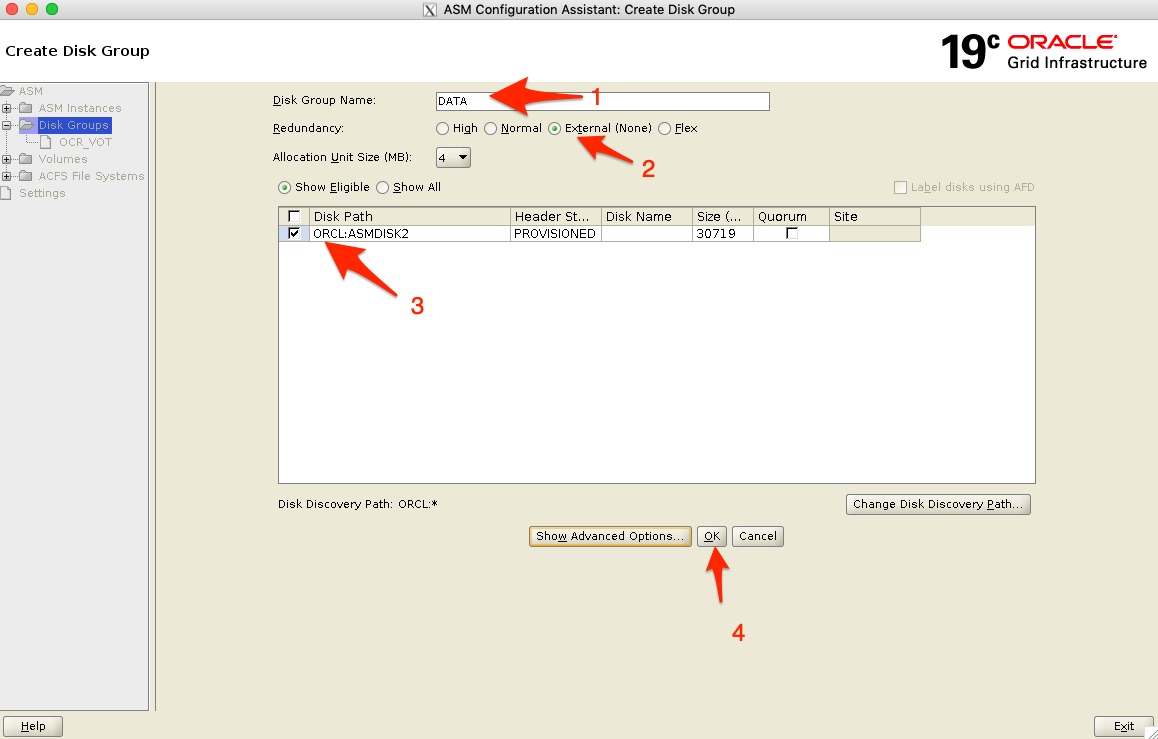
- Now we get to the Disk Groups, we first give the 1st Disk Group the name OCR_VOT (which is just a name I gave it to note this Disk Group is used for the OCR and Voting disks. It is a small disk and I select redundancy to external - you might want to review the Oracle Documentation on the redundancy levels. Note that depending on your redundancy level you may require twice the disk space.
- It might be that you do not see any disks to select (marked 5 below) - if that is the case, select “Change Discovery Path” marked with 3 below and set the Discovery Path to ORCL:* or whatever the path might be on your system, but as I am using ASMLIB in this example, I can use this path and it should then pick up the provisioned disks.
- I then select the first smaller disk only and click on next to continue.
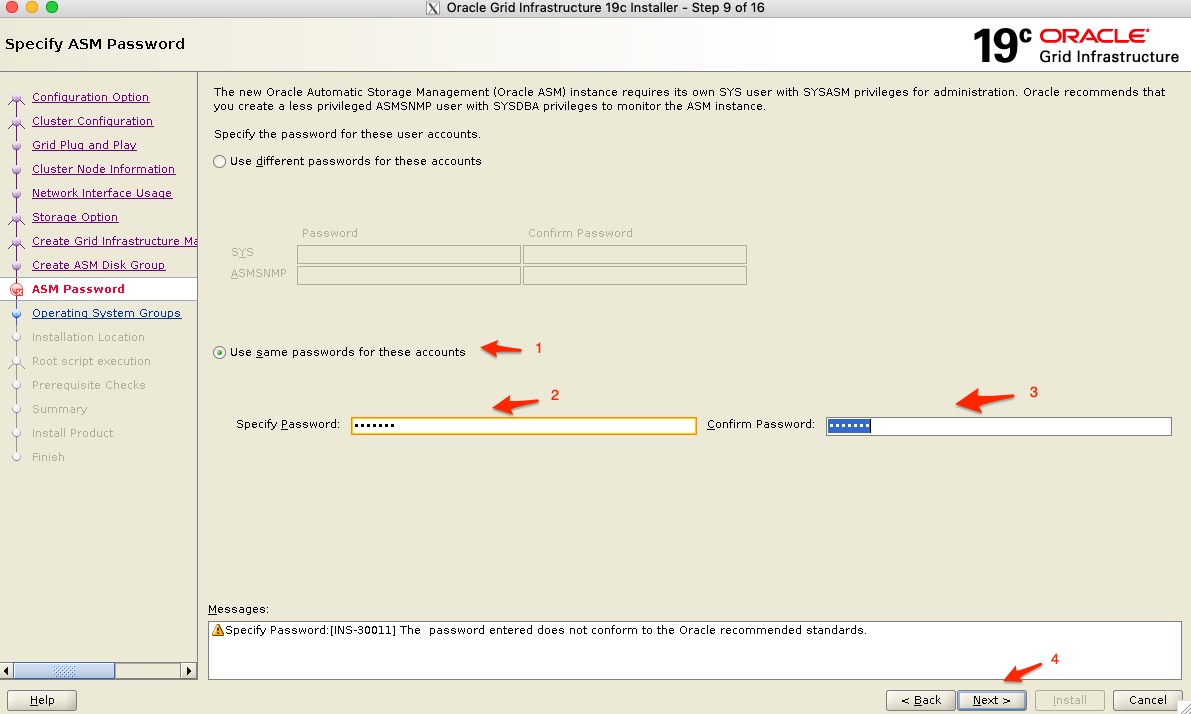
- Next you need to specify the ASM instance passwords. Now you should make sure you give it a complex password and depending on your configuration you may want to use various different passwords for the SYS and ASMSNMP accounts.
- In this example, I will use the same password for both
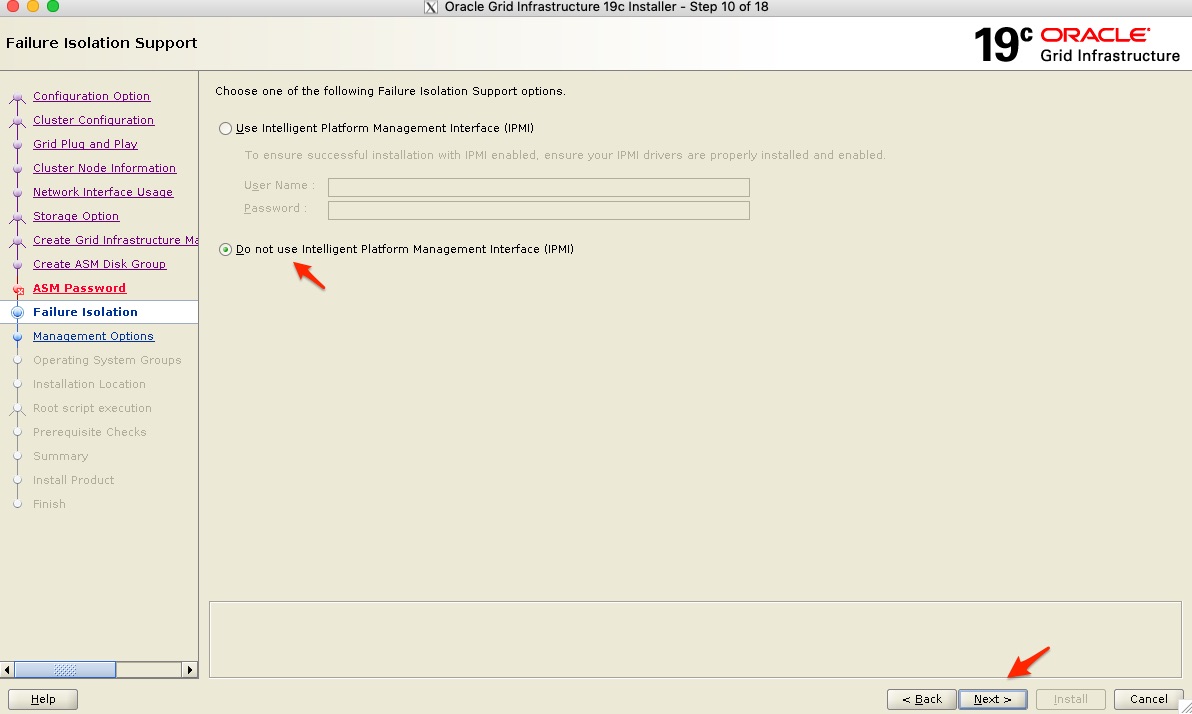
- I am not using IPMI so click next to continue
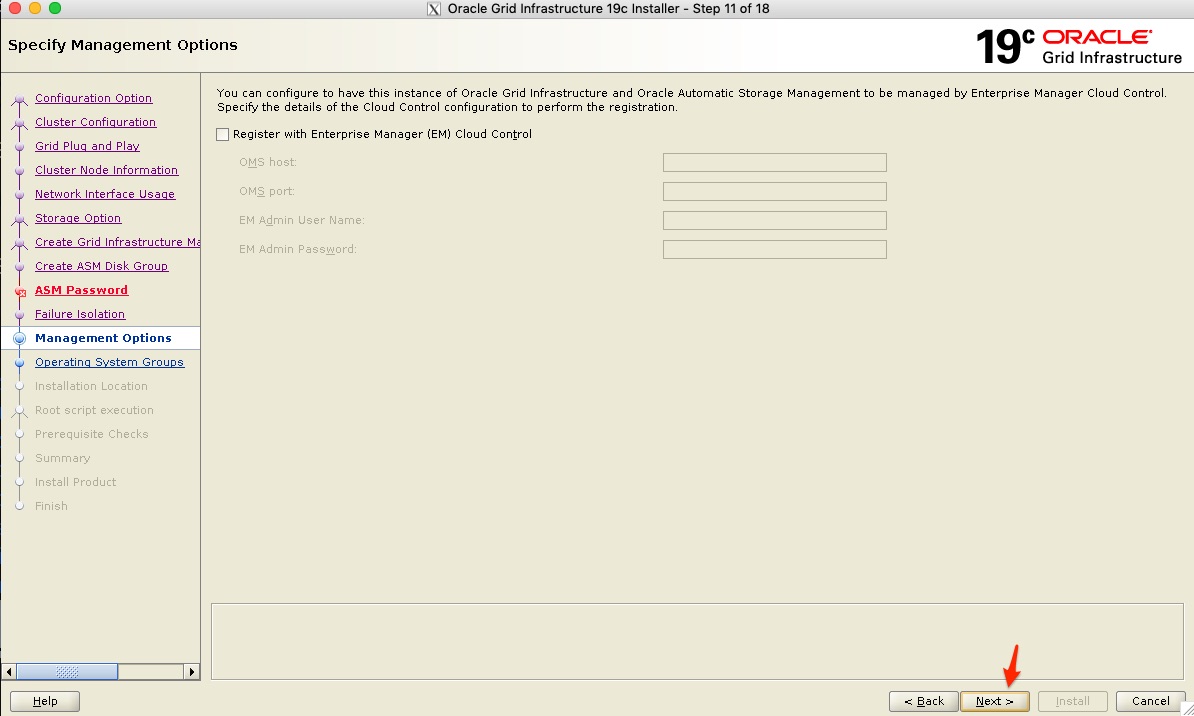
- In my configuration, I am not using Enterprise Manager, so I leave this step out and click next.
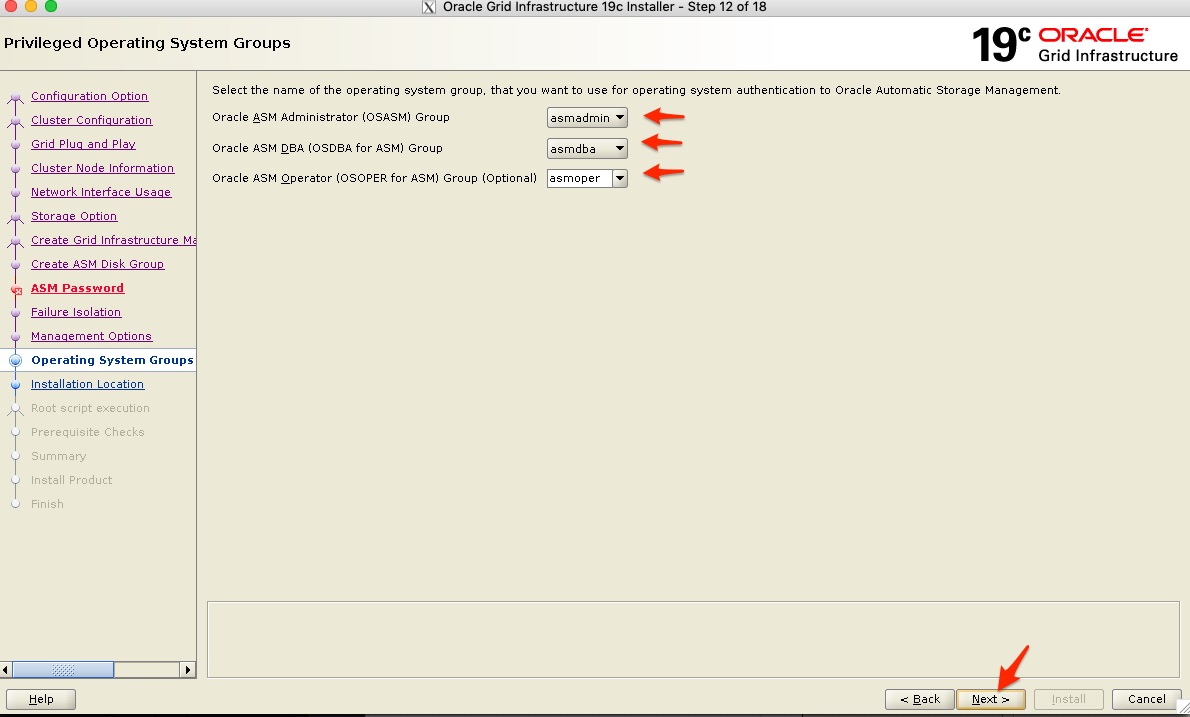
- Next specify the Groups as seen below and click next.
- My default groups that I have created and assigned to the grid UNIX user was automatically picked up.
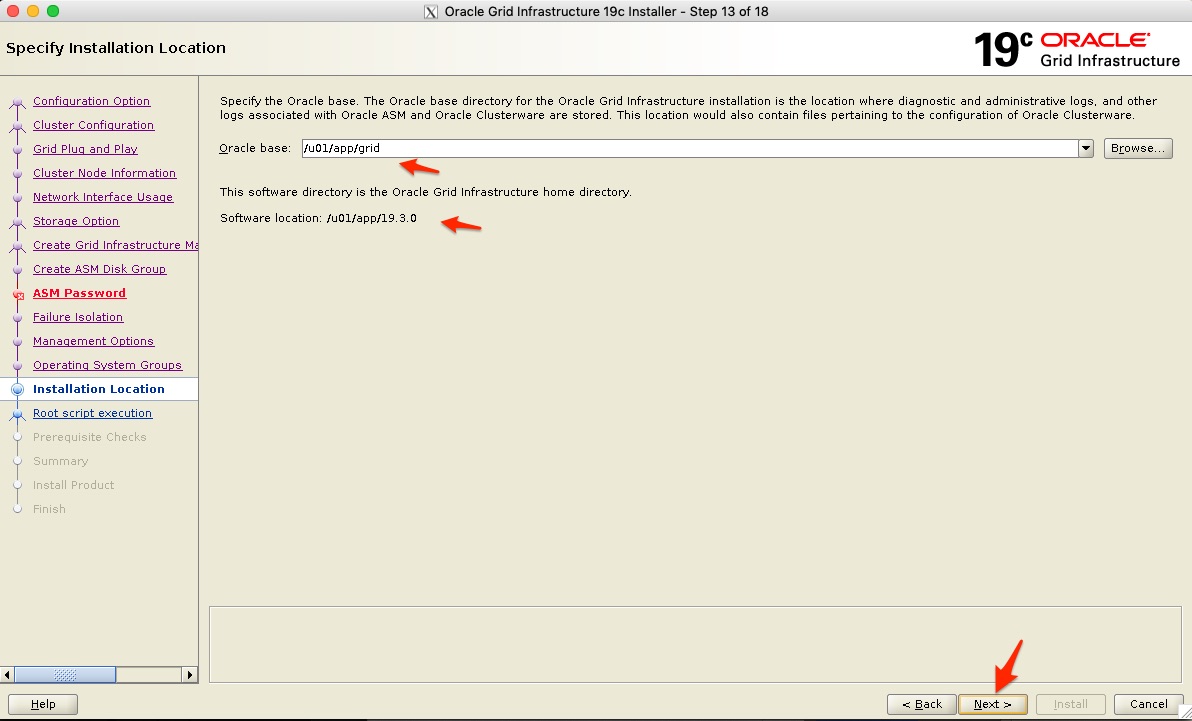
- Next confirm the Oracle Base location, which I leave as the default /u01/app/grid
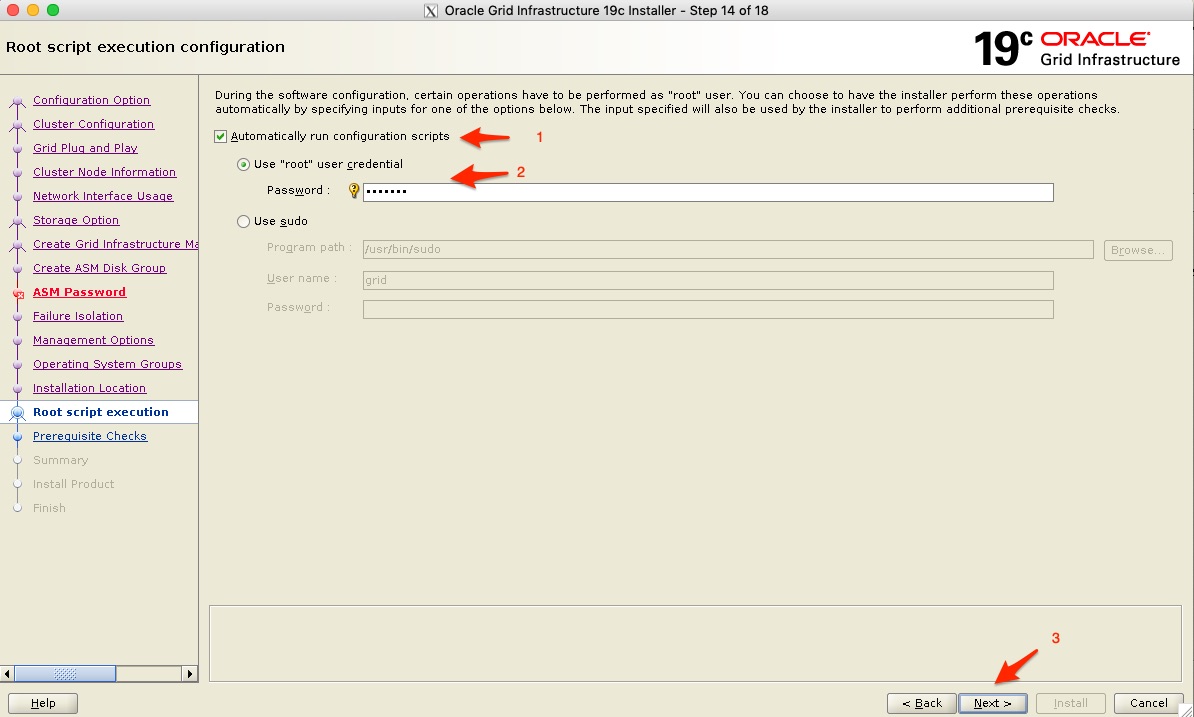
- Next I do want to execute the configuration scripts automatically - these are run as the root user, so you will need to specify the root password, or if you have “sudo” configured you can use that as well.
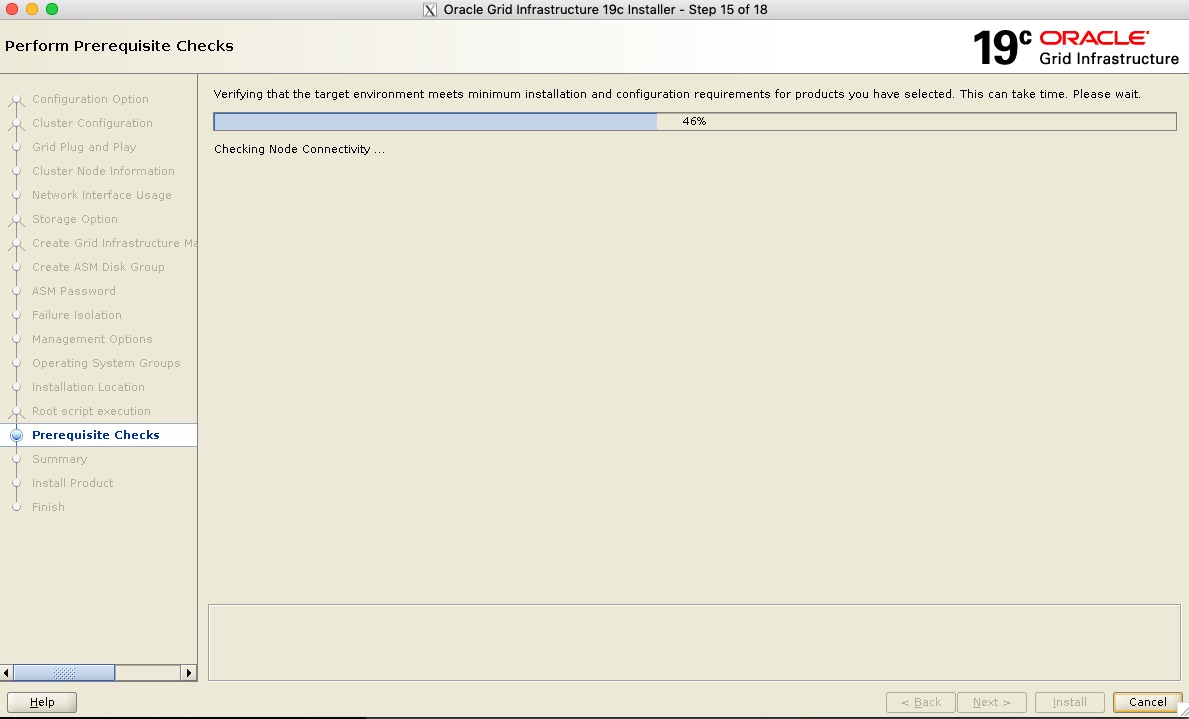
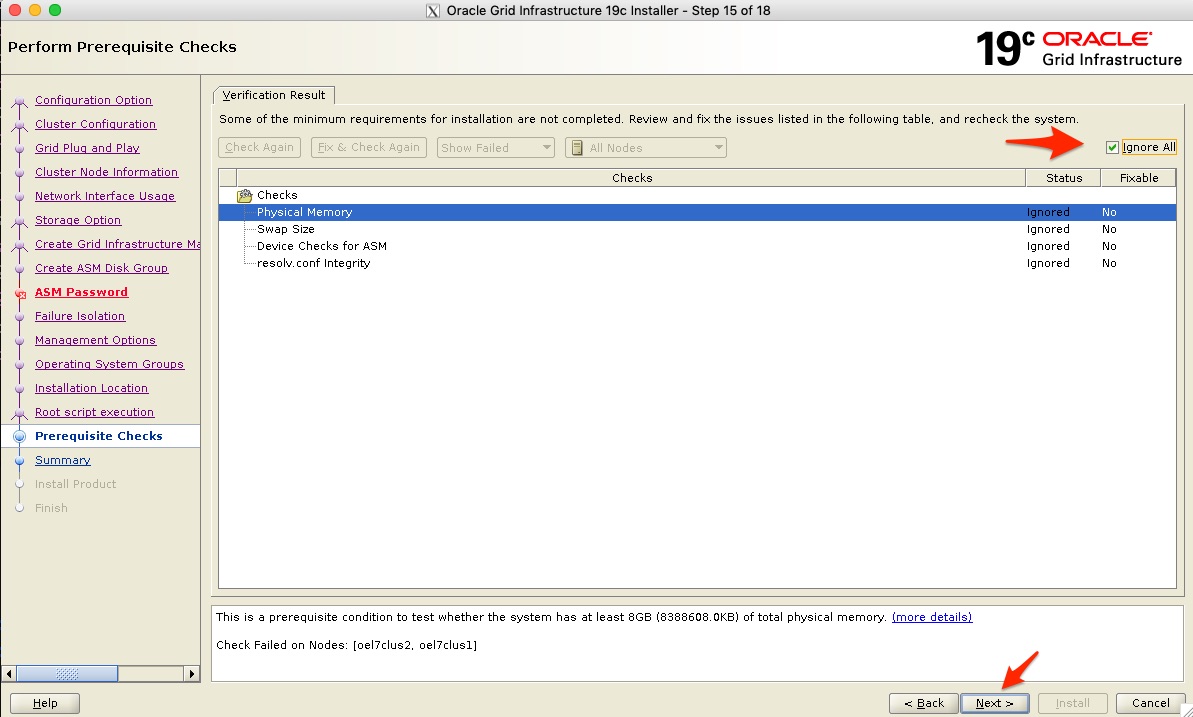
- Next verification will run to make sure you can continue
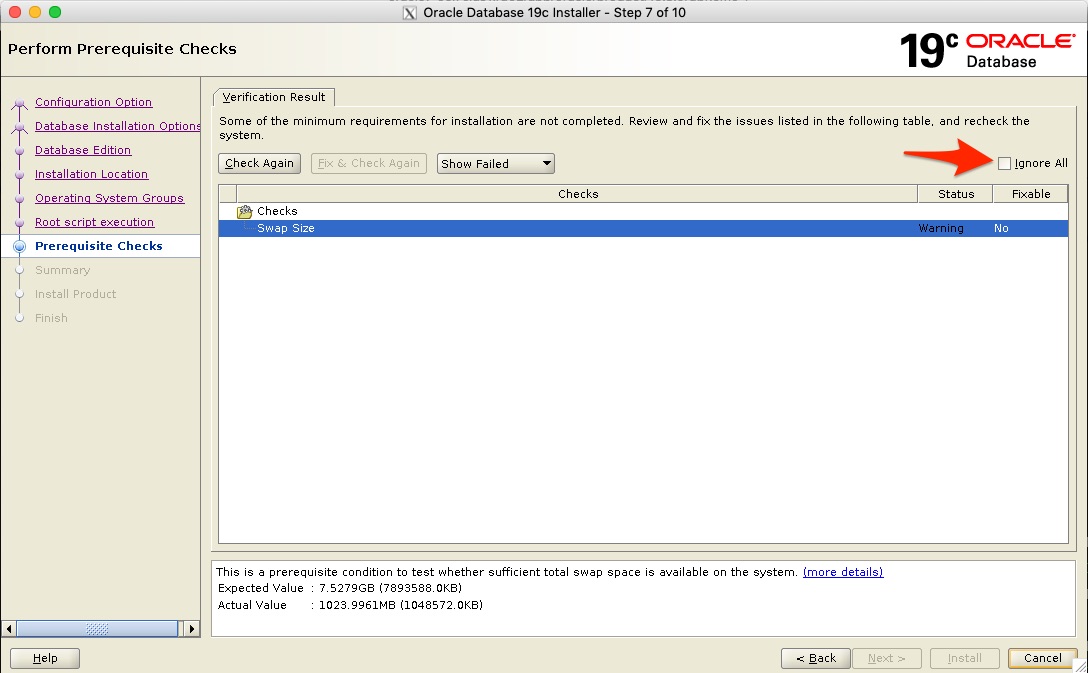
- In my configuration I did get a few checks that failed, after review, I found that my ASM devices were correct even though it was reported, the resolv.conf file where my DNS configuration is pointed was also correct. The Memory and swap space will specify recommended values, I am fine with the values on my test system and selected “Ignore All” and continued. In production configurations, you do want to make sure you meet the requirements.
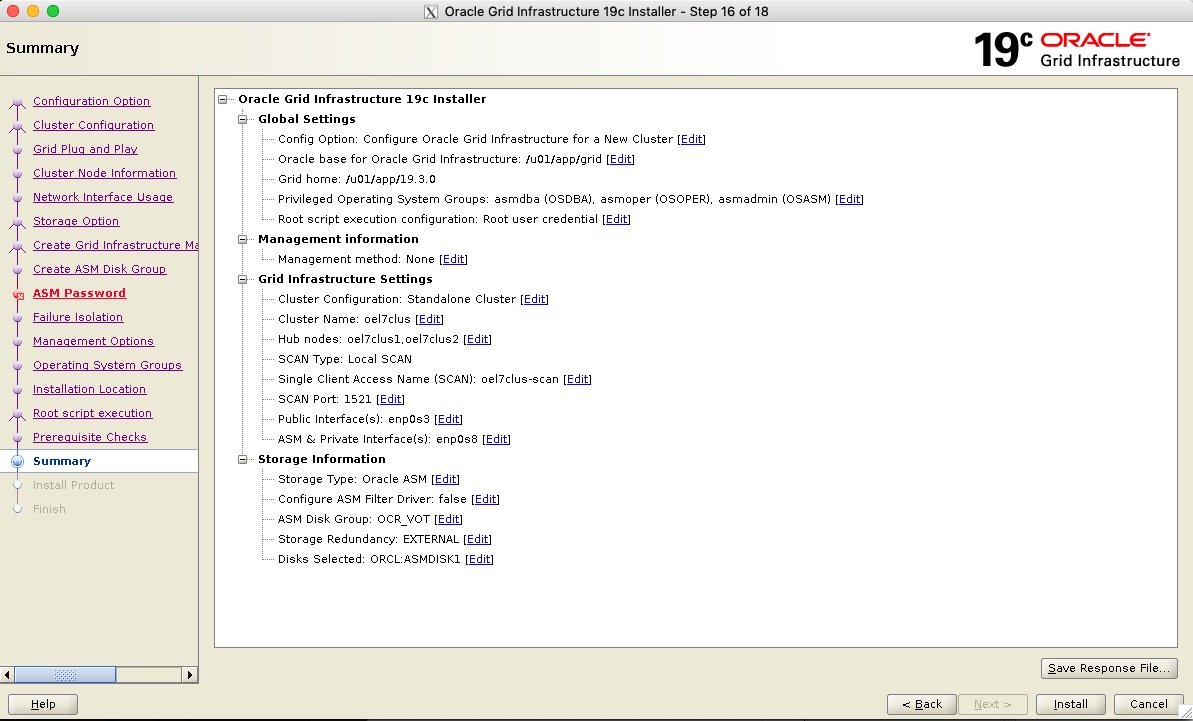
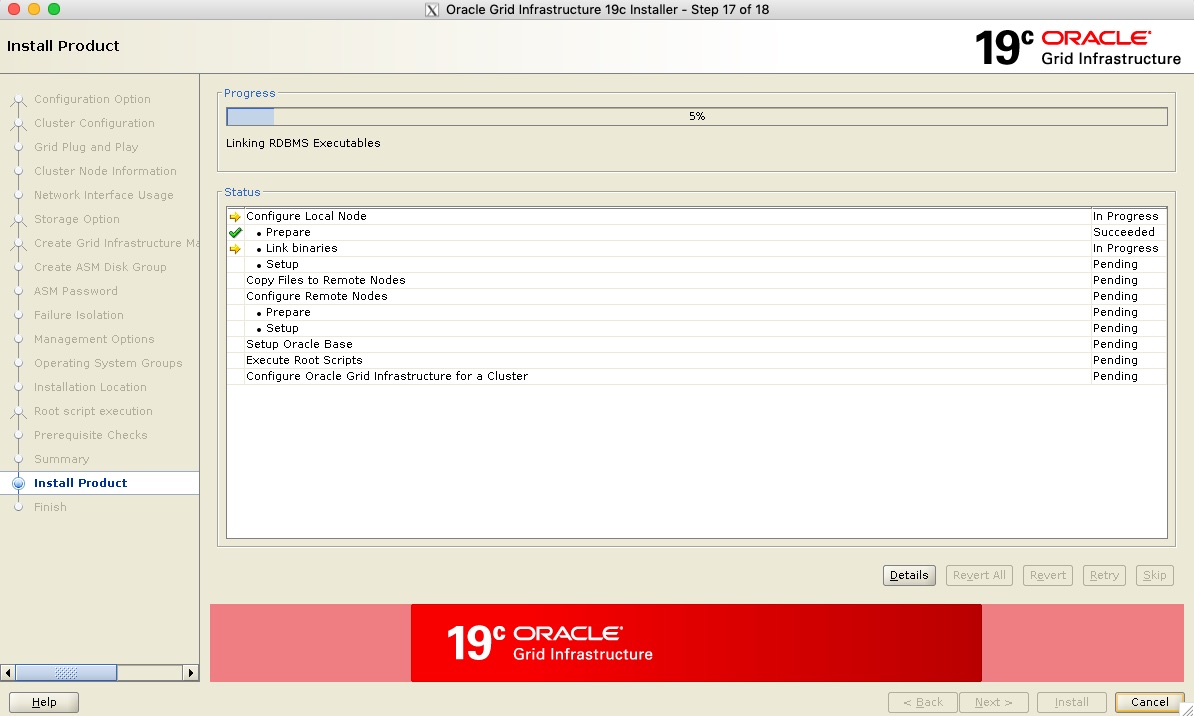
- You will get to a summary screen from where you can then start the installation configuration. Once you start this the process can take time.
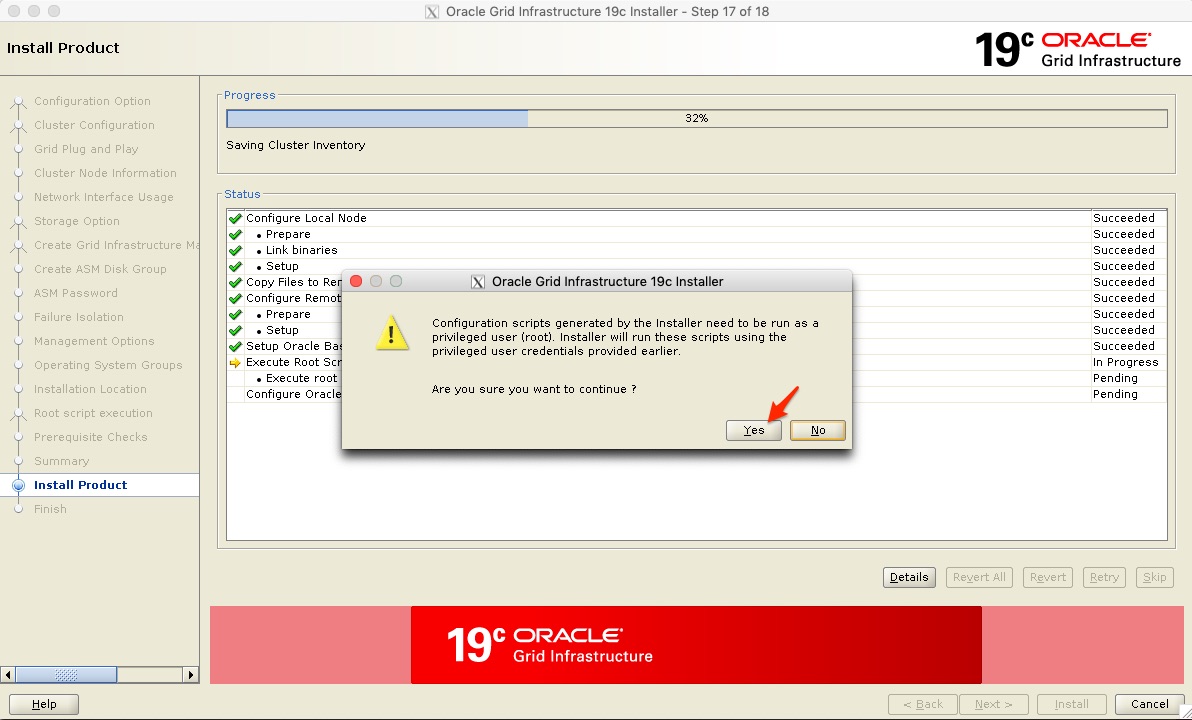
- After a while, you will be prompted to confirm you still want to run the configuration scripts as the root user.
- I do find this strange, as I did agree to this a few screens before, but all you have to do is click yes and the installer continues. Again note that this process can take time.
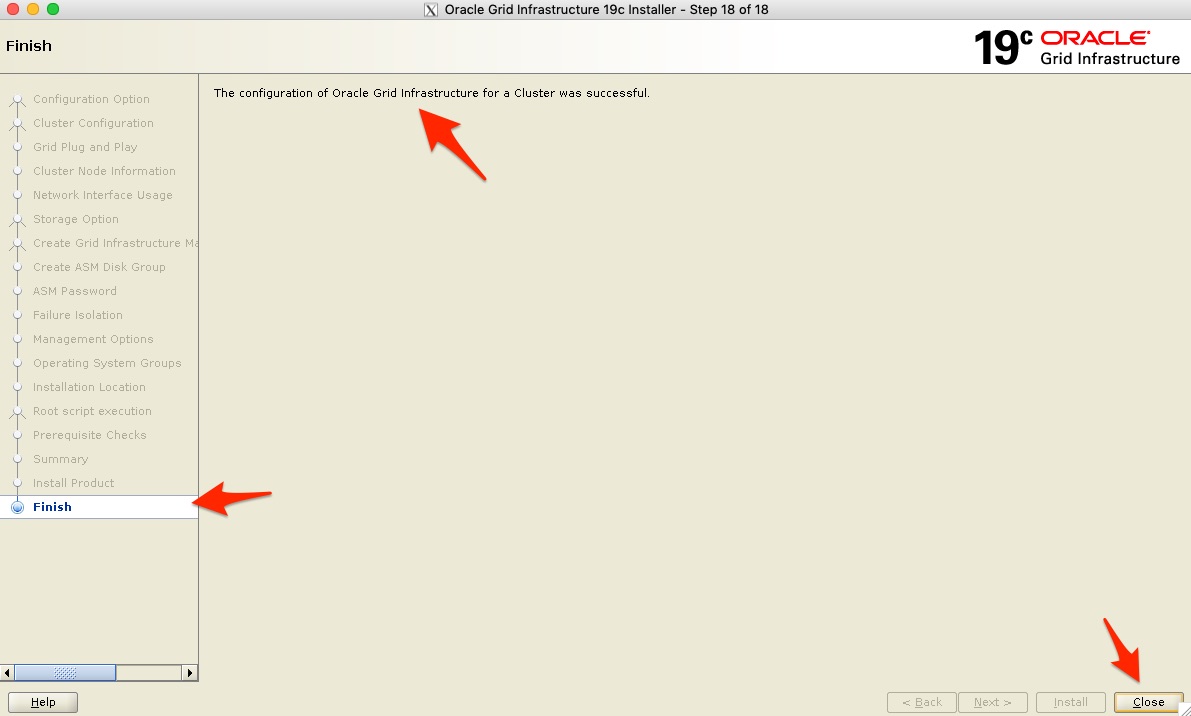
- Once everything is configured without any issues you will be directed to the last “Finish” screen, you can now click close.
grid@oel7clus1 /u01/app/19.3.0 : crsctl status resource -t
--------------------------------------------------------------------------------
Name           Target  State        Server                   State details
--------------------------------------------------------------------------------
Local Resources
--------------------------------------------------------------------------------
ora.LISTENER.lsnr
               ONLINE  ONLINE       oel7clus1                STABLE
               ONLINE  ONLINE       oel7clus2                STABLE
ora.chad
               ONLINE  ONLINE       oel7clus1                STABLE
               ONLINE  ONLINE       oel7clus2                STABLE
ora.net1.network
               ONLINE  ONLINE       oel7clus1                STABLE
               ONLINE  ONLINE       oel7clus2                STABLE
ora.ons
               ONLINE  ONLINE       oel7clus1                STABLE
               ONLINE  ONLINE       oel7clus2                STABLE
--------------------------------------------------------------------------------
Cluster Resources
--------------------------------------------------------------------------------
ora.ASMNET1LSNR_ASM.lsnr(ora.asmgroup)
      1        ONLINE  ONLINE       oel7clus1                STABLE
      2        ONLINE  ONLINE       oel7clus2                STABLE
      3        OFFLINE OFFLINE                               STABLE
ora.LISTENER_SCAN1.lsnr
      1        ONLINE  ONLINE       oel7clus2                STABLE
ora.LISTENER_SCAN2.lsnr
      1        ONLINE  ONLINE       oel7clus1                STABLE
ora.LISTENER_SCAN3.lsnr
      1        ONLINE  ONLINE       oel7clus1                STABLE
ora.OCR_VOT.dg(ora.asmgroup)
      1        ONLINE  ONLINE       oel7clus1                STABLE
      2        ONLINE  ONLINE       oel7clus2                STABLE
      3        OFFLINE OFFLINE                               STABLE
ora.asm(ora.asmgroup)
      1        ONLINE  ONLINE       oel7clus1                Started,STABLE
      2        ONLINE  ONLINE       oel7clus2                Started,STABLE
      3        OFFLINE OFFLINE                               STABLE
ora.asmnet1.asmnetwork(ora.asmgroup)
      1        ONLINE  ONLINE       oel7clus1                STABLE
      2        ONLINE  ONLINE       oel7clus2                STABLE
      3        OFFLINE OFFLINE                               STABLE
ora.cvu
      1        ONLINE  ONLINE       oel7clus1                STABLE
ora.oel7clus1.vip
      1        ONLINE  ONLINE       oel7clus1                STABLE
ora.oel7clus2.vip
      1        ONLINE  ONLINE       oel7clus2                STABLE
ora.qosmserver
      1        ONLINE  ONLINE       oel7clus1                STABLE
ora.scan1.vip
      1        ONLINE  ONLINE       oel7clus2                STABLE
ora.scan2.vip
      1        ONLINE  ONLINE       oel7clus1                STABLE
ora.scan3.vip
      1        ONLINE  ONLINE       oel7clus1                STABLE
--------------------------------------------------------------------------------
grid@oel7clus1 /u01/app/19.3.0 :
Step 4: Apply Patch to Oracle Clusterware (if required)
root@oel7clus1 ~ : . oraenv
ORACLE_SID = [root] ? +ASM1
The Oracle base has been set to /u01/app/grid
root@oel7clus1 ~ : ls /u01/app
19.3.0  grid  oracle  oraInventory
root@oel7clus1 ~ : export PATH=/u01/app/19.3.0/OPatch:$PATH
root@oel7clus1 ~ : which opatch
/u01/app/19.3.0/OPatch/opatch
root@oel7clus1 ~ : cd
root@oel7clus1 ~ : opatchauto apply /patch/patches/
29708769/        PatchSearch.xml
root@oel7clus1 ~ : opatchauto apply /patch/patches/29708769 -oh /u01/app/19.3.0
OPatchauto session is initiated at Sun Sep  1 16:14:04 2019
System initialization log file is /u01/app/19.3.0/cfgtoollogs/opatchautodb/systemconfig2019-09-01_04-14-07PM.log.
Session log file is /u01/app/19.3.0/cfgtoollogs/opatchauto/opatchauto2019-09-01_04-14-16PM.log
The id for this session is QTRD
Executing OPatch prereq operations to verify patch applicability on home /u01/app/19.3.0
Patch applicability verified successfully on home /u01/app/19.3.0
Bringing down CRS service on home /u01/app/19.3.0
CRS service brought down successfully on home /u01/app/19.3.0
Start applying binary patch on home /u01/app/19.3.0
Binary patch applied successfully on home /u01/app/19.3.0
Starting CRS service on home /u01/app/19.3.0
CRS service started successfully on home /u01/app/19.3.0
OPatchAuto successful.
--------------------------------Summary--------------------------------
Patching is completed successfully. Please find the summary as follows:
Host:oel7clus1
CRS Home:/u01/app/19.3.0
Version:19.0.0.0.0
Summary:
==Following patches were SKIPPED:
Patch: /patch/patches/29708769/29401763
Reason: This patch is already been applied, so not going to apply again.
==Following patches were SUCCESSFULLY applied:
Patch: /patch/patches/29708769/29834717
Log: /u01/app/19.3.0/cfgtoollogs/opatchauto/core/opatch/opatch2019-09-01_16-17-15PM_1.log
Patch: /patch/patches/29708769/29850993
Log: /u01/app/19.3.0/cfgtoollogs/opatchauto/core/opatch/opatch2019-09-01_16-17-15PM_1.log
Patch: /patch/patches/29708769/29851014
Log: /u01/app/19.3.0/cfgtoollogs/opatchauto/core/opatch/opatch2019-09-01_16-17-15PM_1.log
OPatchauto session completed at Sun Sep  1 16:27:04 2019
Time taken to complete the session 13 minutes, 1 second
root@oel7clus1 ~ :
root@oel7clus2 /patch : . oraenv
ORACLE_SID = [root] ? +ASM2
The Oracle base has been set to /u01/app/grid
root@oel7clus2 /patch : export PATH=/u01/app/19.3.0/OPatch:$PATH
root@oel7clus2 /patch : which opatch
/u01/app/19.3.0/OPatch/opatch
root@oel7clus2 /patch : opatchauto apply /patch/patches/29708769 -oh /u01/app/19.3.0
OPatchauto session is initiated at Sun Sep  1 17:05:18 2019
System initialization log file is /u01/app/19.3.0/cfgtoollogs/opatchautodb/systemconfig2019-09-01_05-05-21PM.log.
Session log file is /u01/app/19.3.0/cfgtoollogs/opatchauto/opatchauto2019-09-01_05-05-31PM.log
The id for this session is 6418
Executing OPatch prereq operations to verify patch applicability on home /u01/app/19.3.0
Patch applicability verified successfully on home /u01/app/19.3.0
Bringing down CRS service on home /u01/app/19.3.0
CRS service brought down successfully on home /u01/app/19.3.0
Start applying binary patch on home /u01/app/19.3.0
Binary patch applied successfully on home /u01/app/19.3.0
Starting CRS service on home /u01/app/19.3.0
CRS service started successfully on home /u01/app/19.3.0
OPatchAuto successful.
--------------------------------Summary--------------------------------
Patching is completed successfully. Please find the summary as follows:
Host:oel7clus2
CRS Home:/u01/app/19.3.0
Version:19.0.0.0.0
Summary:
==Following patches were SKIPPED:
Patch: /patch/patches/29708769/29401763
Reason: This patch is already been applied, so not going to apply again.
==Following patches were SUCCESSFULLY applied:
Patch: /patch/patches/29708769/29834717
Log: /u01/app/19.3.0/cfgtoollogs/opatchauto/core/opatch/opatch2019-09-01_17-08-19PM_1.log
Patch: /patch/patches/29708769/29850993
Log: /u01/app/19.3.0/cfgtoollogs/opatchauto/core/opatch/opatch2019-09-01_17-08-19PM_1.log
Patch: /patch/patches/29708769/29851014
Log: /u01/app/19.3.0/cfgtoollogs/opatchauto/core/opatch/opatch2019-09-01_17-08-19PM_1.log
OPatchauto session completed at Sun Sep  1 17:19:08 2019
Time taken to complete the session 13 minutes, 50 seconds
root@oel7clus2 /patch :
Step 5: Adding the DATA Diskgroup and ACFS Filesystem
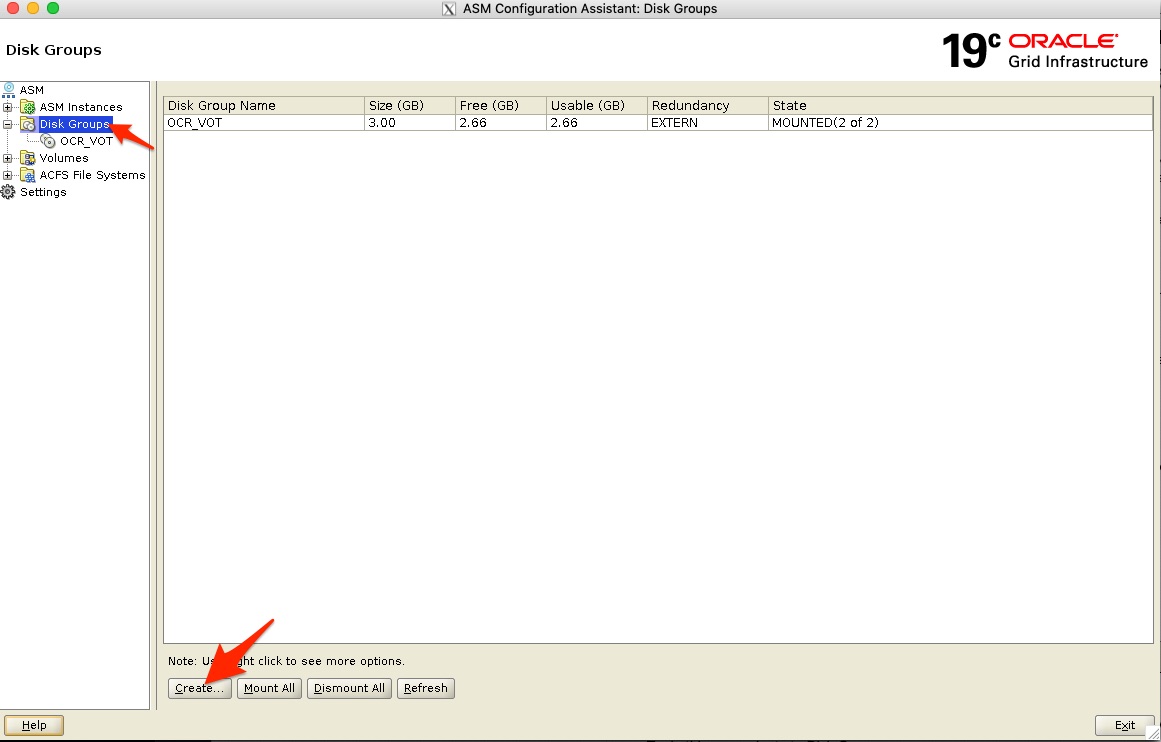
- Next we specify the Disk group name as “DATA”, again select redundancy as external (none) and then specify the larger disk (ASMDISK2 in this example) then click on OK to start the Disk Group creation which can take a minute.
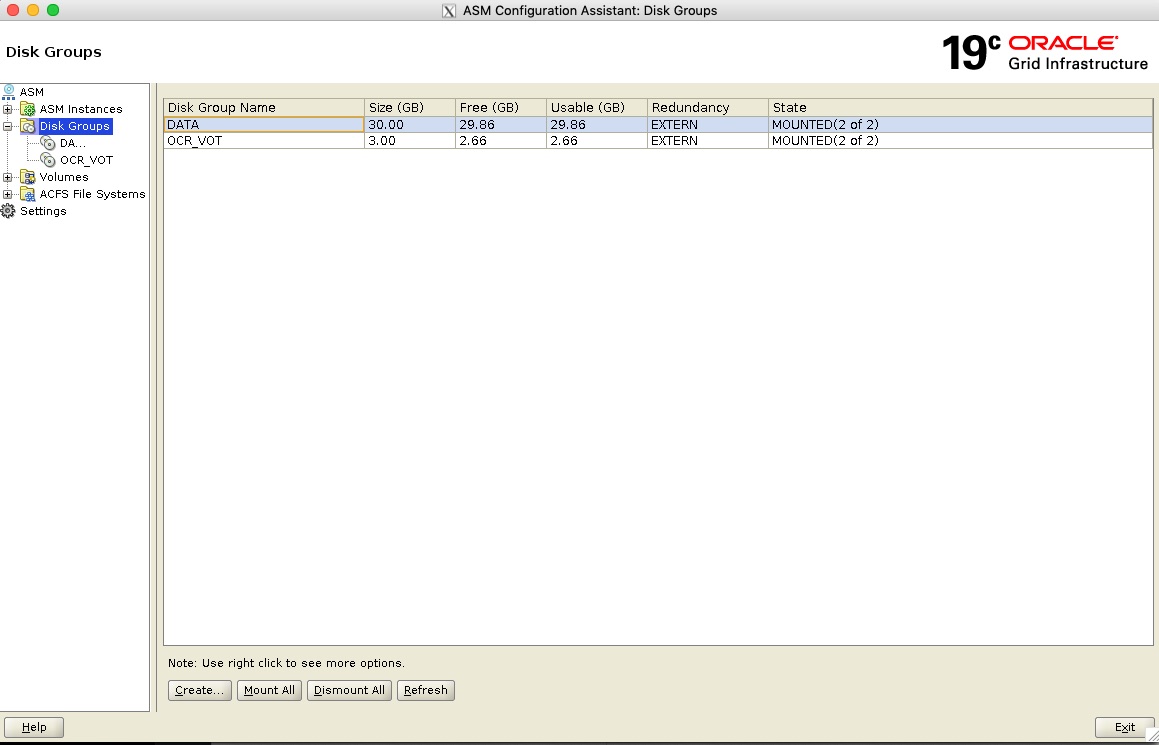
- When done you will see both your Disk Groups listed and “Mounted” on both systems - meaning it is available on both systems now.
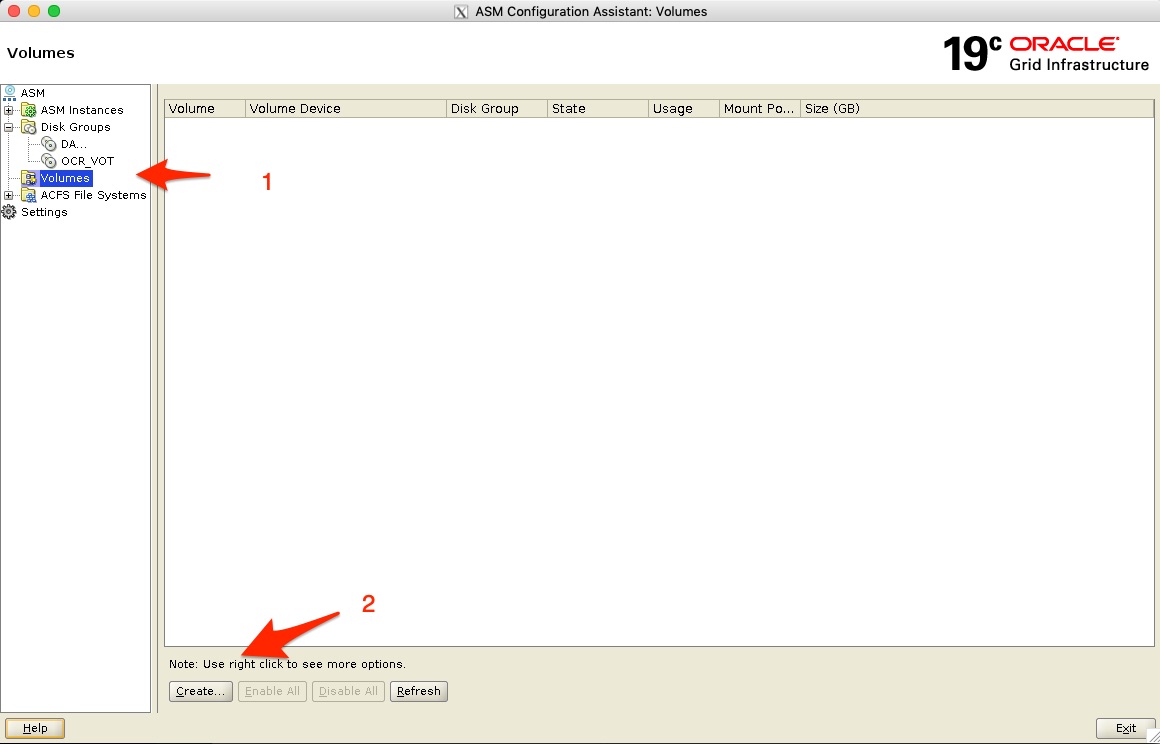
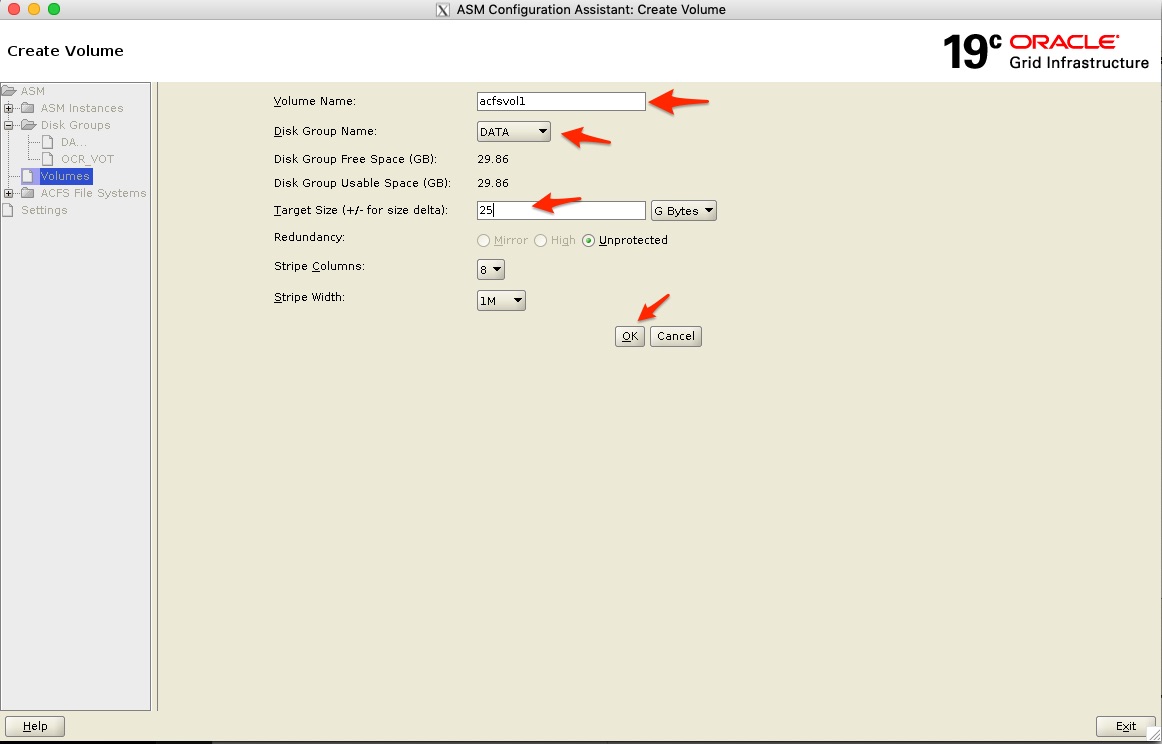
- Next we want to create a new Volume - I navigate to “Volumes” under Disk Groups and add the details as seen below and click on OK to create it.
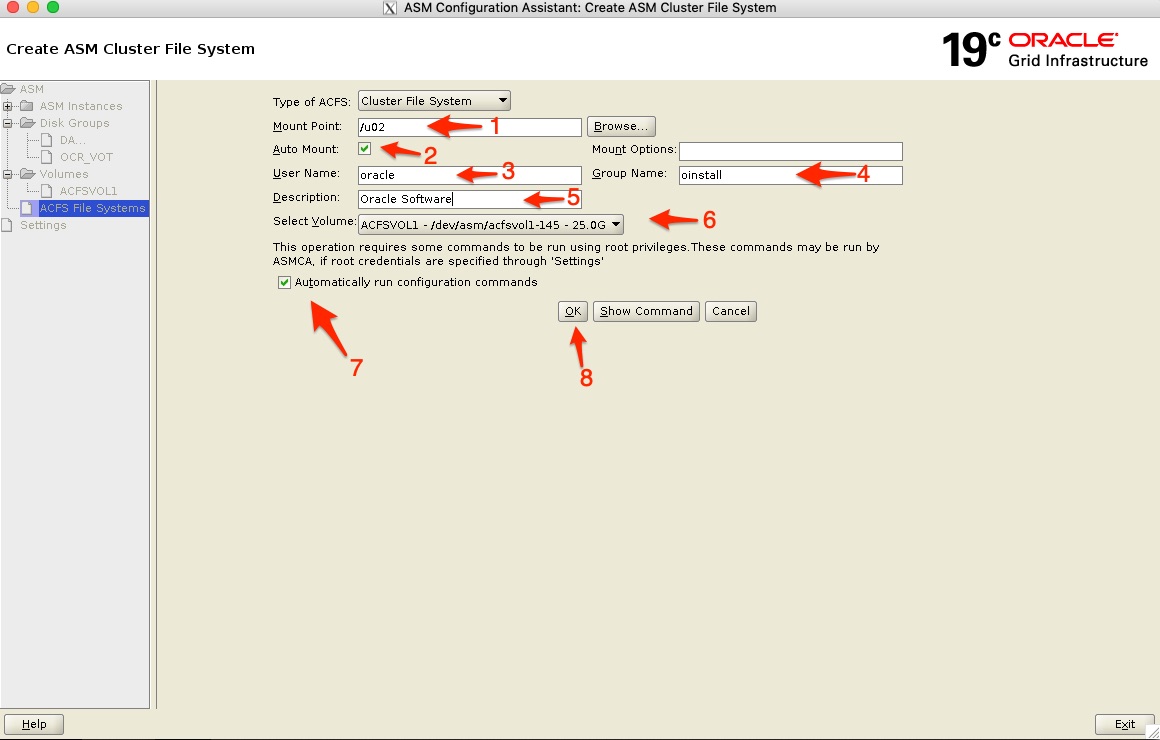
- Next I can now create the cluster file system - ACFS. Navigate to ACFS File Systems and click on create.
- Next fill in the details as seen below:
- 1) is the mount point I will use between the two systems in my case - /u02
- 2) I specify to auto mount this
- 3) I want to make sure the Unix “oracle” user owns this folder, so I add the “oracle” user as the owner and the primary group as “oinstall”
- 4) I just add a description, as I will install the Oracle 19c SE2 database software into /u02 I just specify Oracle Software
- 6) I select the volume I want to create the filesystem on (created above)
- 7) Automatically run the required configuration commands are selected and then click on OK (8) to continue
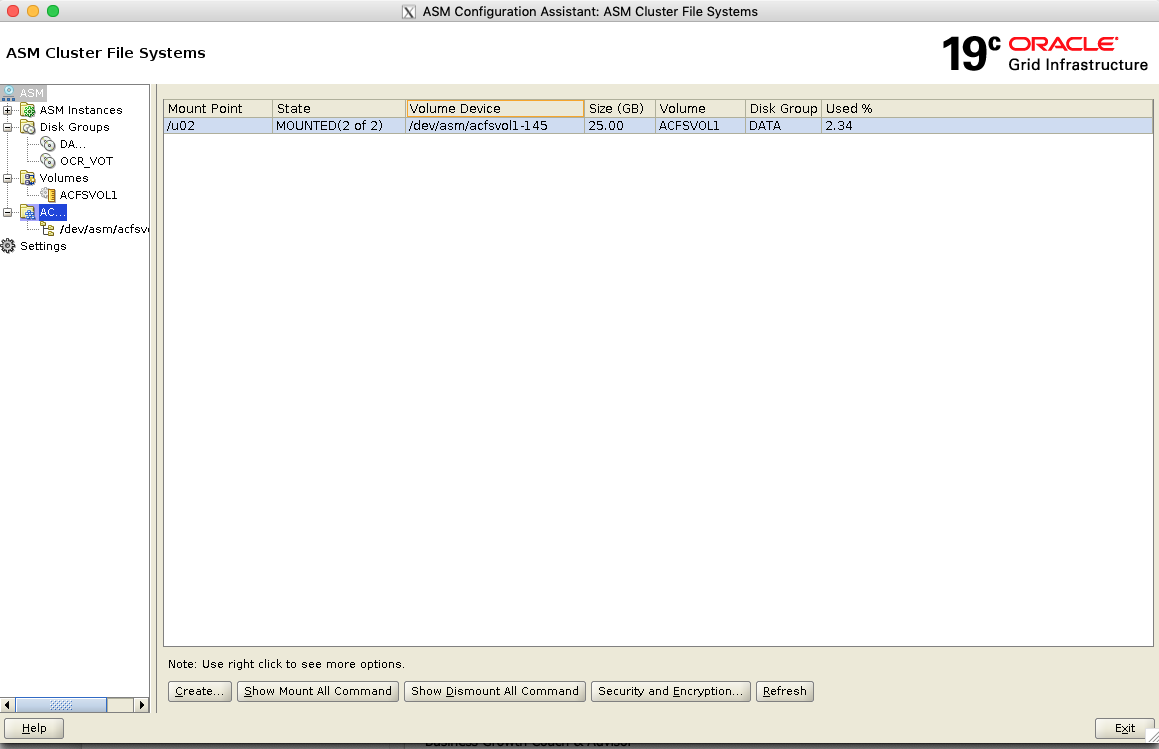
- This process can take a few minutes, but once done you will see something like below and the mounted is 2 of 2 - meaning that the /u02 filesystem is now mounted on both my cluster nodes. Excellent!
grid@oel7clus1 ~ : df -h
Filesystem             Size  Used Avail Use% Mounted on
devtmpfs               3.8G     0  3.8G   0% /dev
tmpfs                  3.8G  845M  3.0G  22% /dev/shm
tmpfs                  3.8G  257M  3.6G   7% /run
tmpfs                  3.8G     0  3.8G   0% /sys/fs/cgroup
/dev/sda3              6.3G  3.7G  2.3G  63% /
tmpfs                  4.0G   31M  4.0G   1% /tmp
/dev/sda1              488M  279M  174M  62% /boot
/dev/mapper/oravg-u01   40G   10G   28G  27% /u01
tmpfs                  771M     0  771M   0% /run/user/0
/dev/sdd1               20G  7.3G   12G  40% /install
tmpfs                  771M     0  771M   0% /run/user/502
/dev/asm/acfsvol1-145   25G  600M   25G   3% /u02
Step 6: Installing the Oracle Database SE2 Software
oracle@oel7clus1 ~ : cd /u02
oracle@oel7clus1 /u02 : ls
lost+found
oracle@oel7clus1 /u02 : mkdir -p app/oracle/product/19.3.0/dbhome_1
oracle@oel7clus1 /u02 : cd app/oracle/product/19.3.0/dbhome_1/
oracle@oel7clus1 /u02/app/oracle/product/19.3.0/dbhome_1 : ls
oracle@oel7clus1 /u02/app/oracle/product/19.3.0/dbhome_1 : unzip -q /install/LINUX.X64_193000_db_home.zip
oracle@oel7clus1 /u02/app/oracle/product/19.3.0/dbhome_1 : ls
addnode     bin    css  data    deinstall    dmu     env.ora  install        javavm  jlib  md       nls   OPatch   ord   oui   plsql    R      relnotes     root.sh.old.1  sdk           sqlj      srvm      usm  xdk
apex        clone  ctx  dbjava  demo         drdaas  has      instantclient  jdbc    ldap  mgw      odbc  opmn     ords  owm   precomp  racg   root.sh      runInstaller   slax          sqlpatch  suptools  utl
assistants  crs    cv   dbs     diagnostics  dv      hs       inventory      jdk     lib   network  olap  oracore  oss   perl  QOpatch  rdbms  root.sh.old  schagent.conf  sqldeveloper  sqlplus   ucp       wwg
oracle@oel7clus1 /u02/app/oracle/product/19.3.0/dbhome_1 :
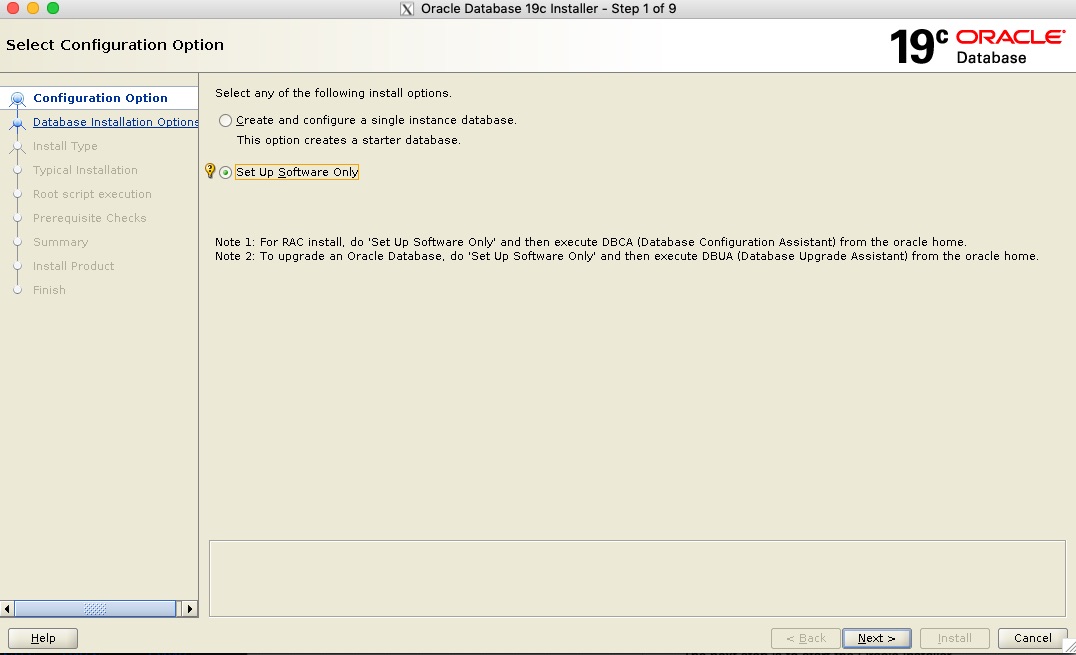
oracle@oel7clus1 /u02/app/oracle/product/19.3.0/dbhome_1 : ./runInstaller
Launching Oracle Database Setup Wizard...
- The installer start and I select to install the software only. I will create the database afterwards
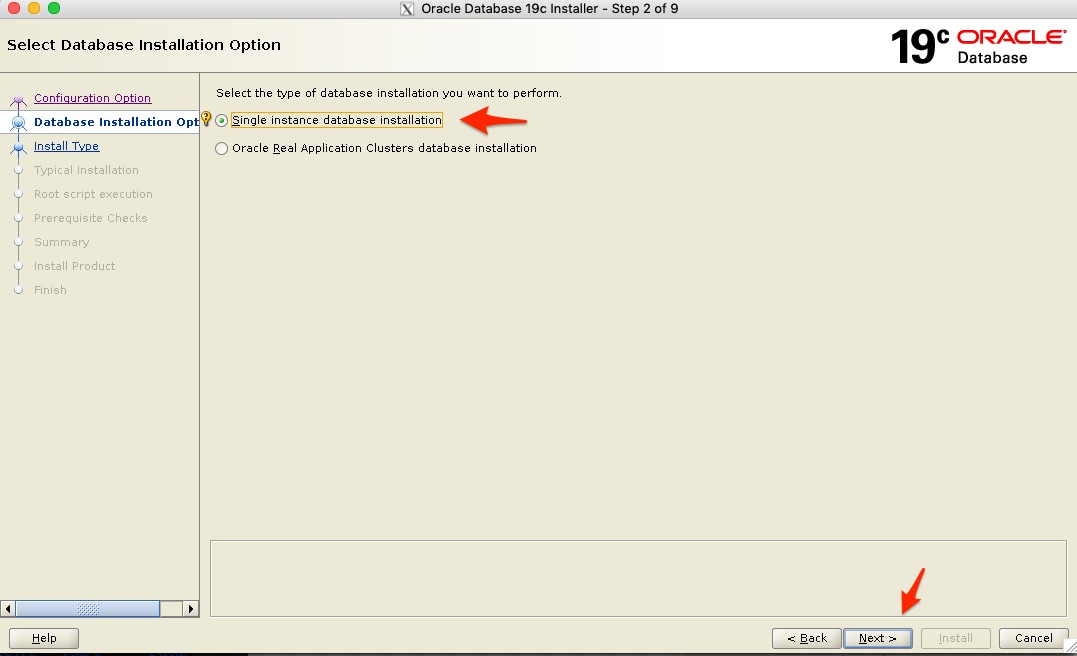
- Next I want to make sure I do not select Real. Application Cluster (RAC) - but Single Instance, as this is going to be an Oracle SE2 installation where Oracle RAC is not available.
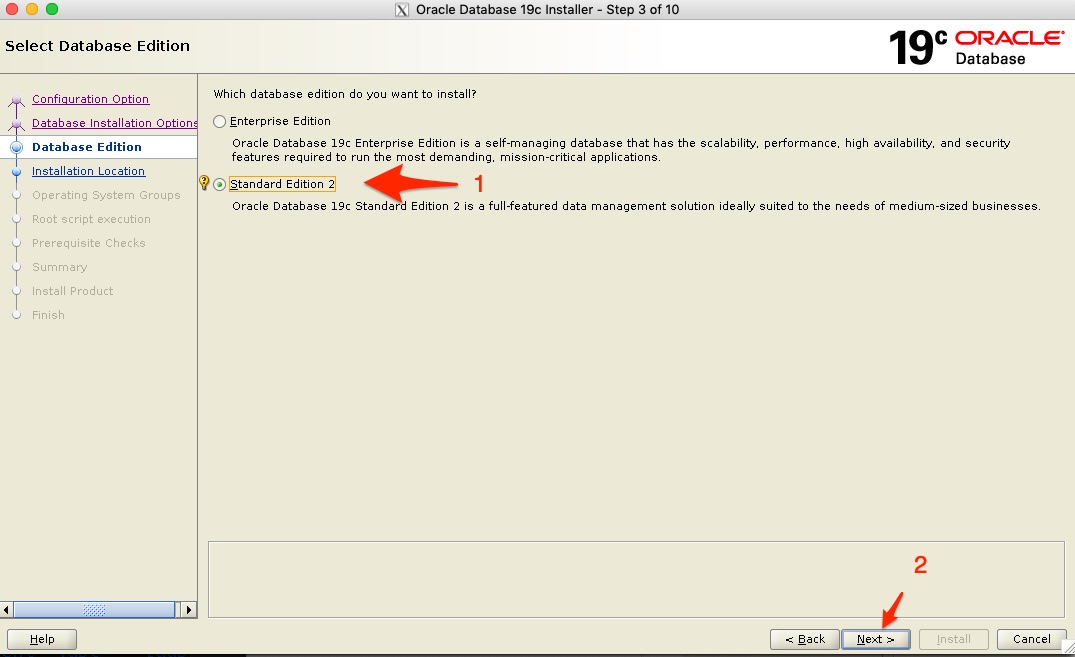
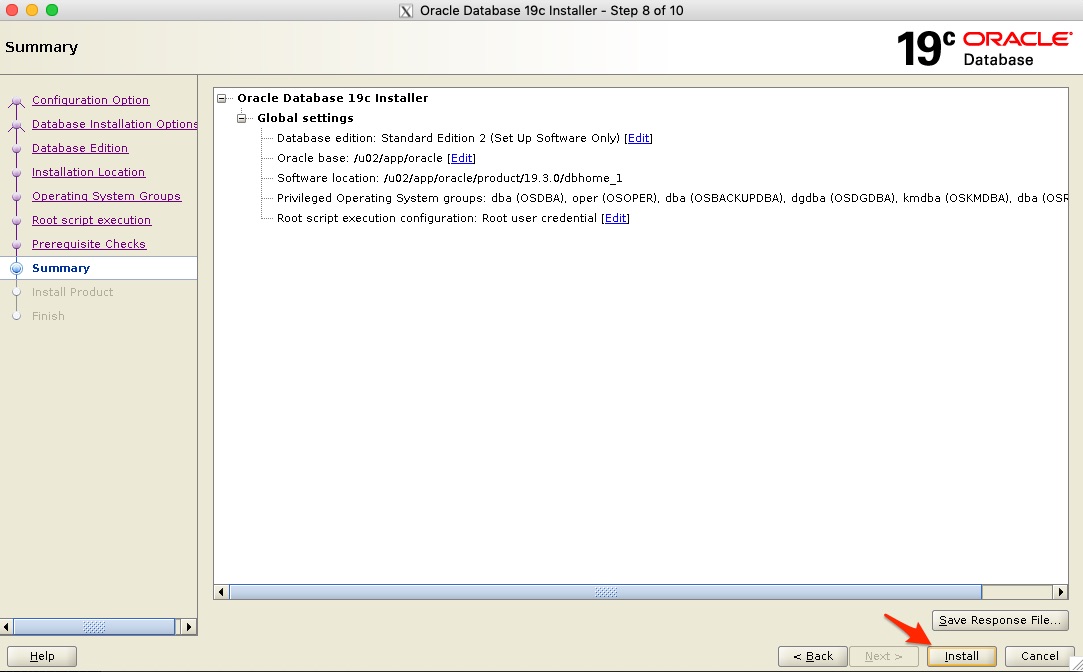
- Next we get the Database Edition - we select Standard Edition 2 and continue
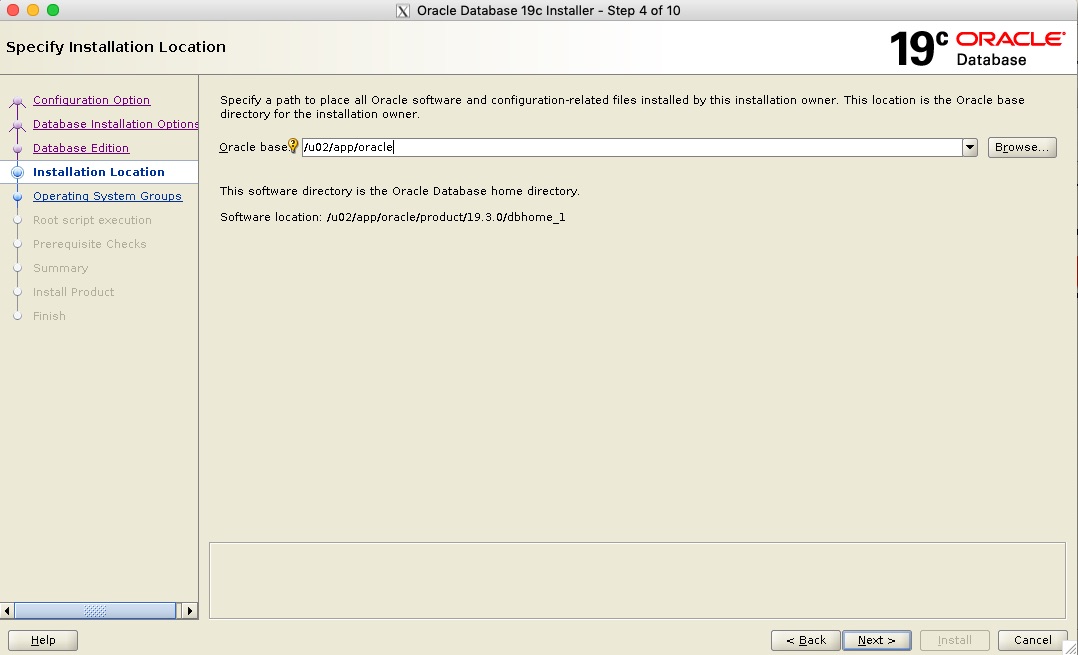
- Next we make sure we specify the Oracle Base location as the shared folder /u02 and in this case the path is /u02/app/oracle
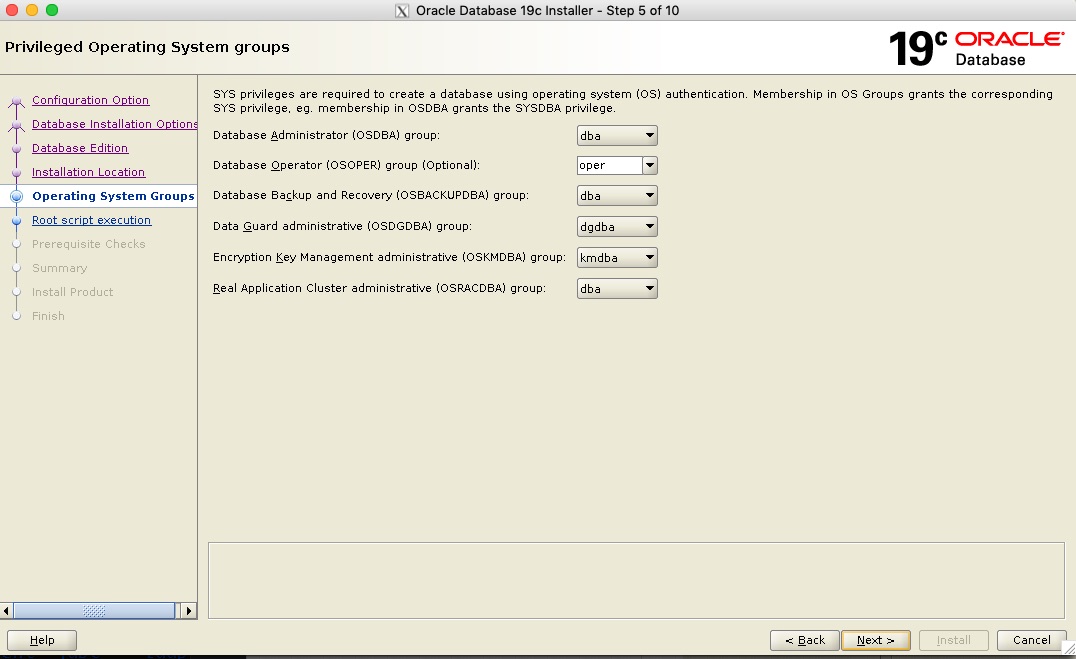
- Next the “oracle” Unix user groups are detected and auto-populated.
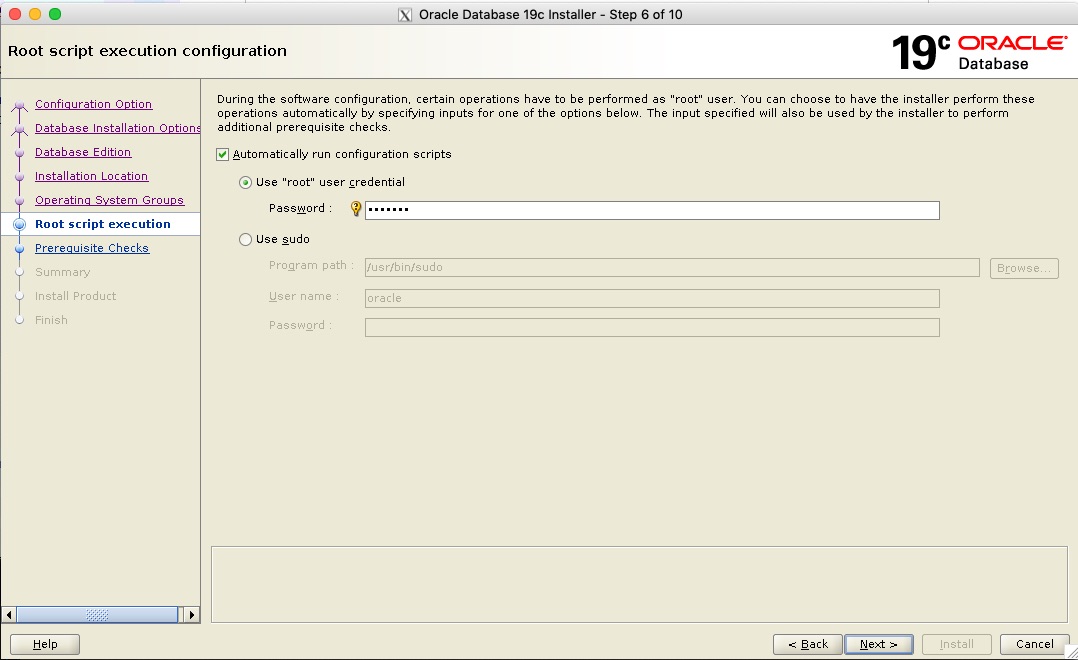
- Again I want to automatically run the configuration as the root user and supply the details
- Next the prerequisites complain about my swap space, I am ok with that and click on “ignore all” and continue
- We get the summary screen and continue with the installation
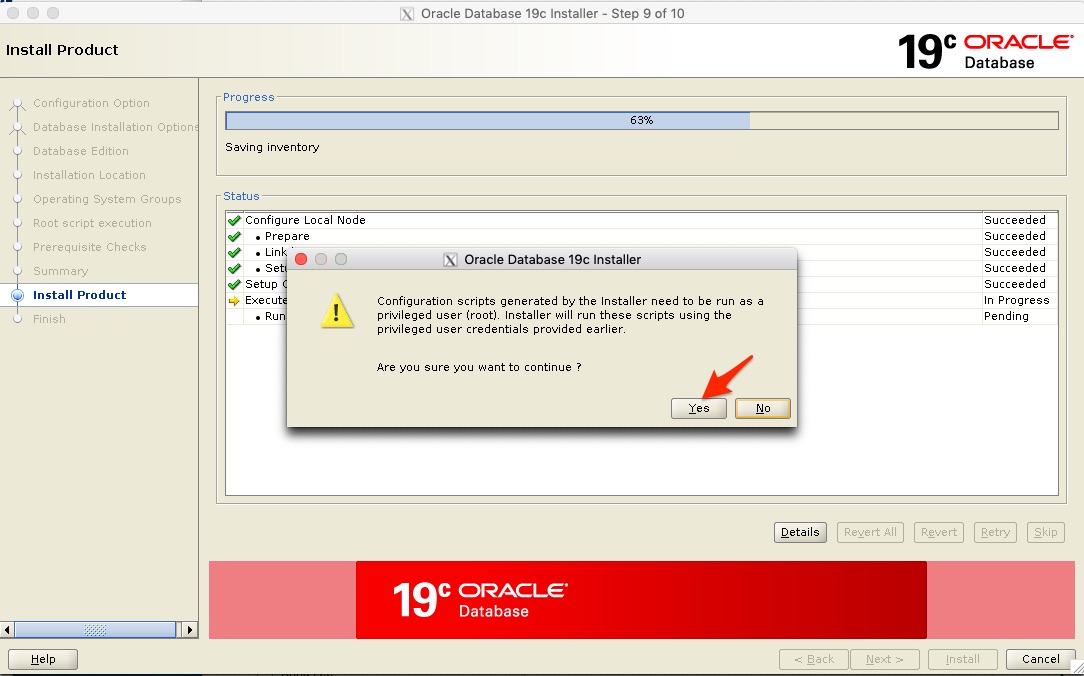
- This step can take time, you will be asked again to run the configuration - click yes to continue.
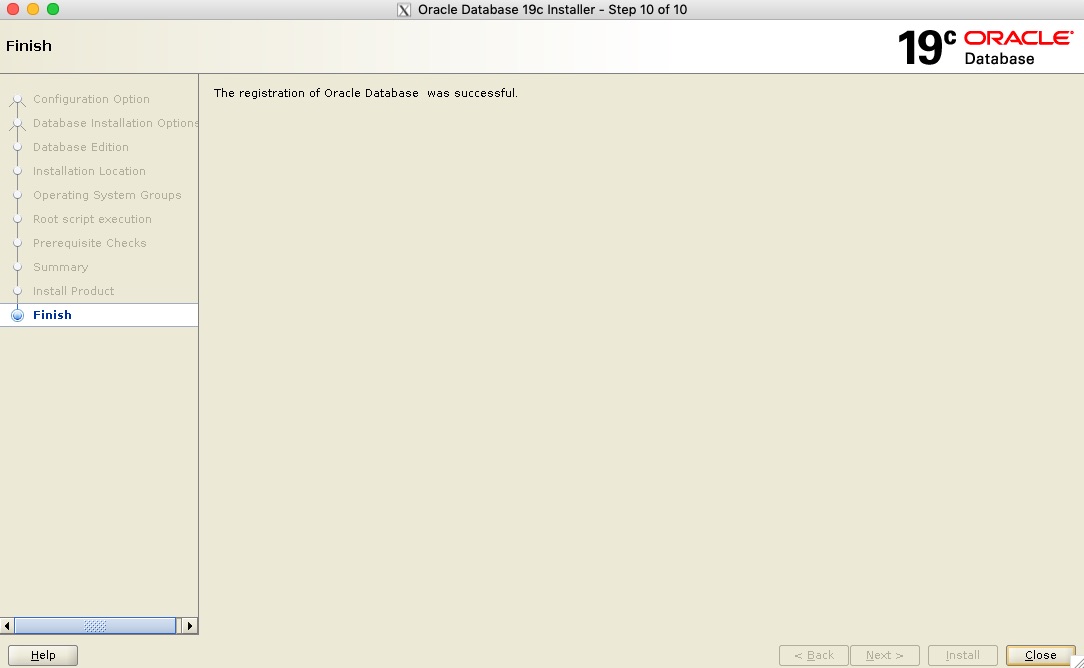
- Once the installation is done you will get the Finish screen. You have now successfully installed Oracle Database 19c SE2!
Step 7: Creating the Database using DBCA
dbca -createDatabase \
-silent \
-automaticMemoryManagement false \
-characterSet AL32UTF8 \
-createAsContainerDatabase false \
-datafileDestination /u02/oracle/oradata \
-enableArchive true \
-gdbName DEV \
-nationalCharacterSet AL16UTF16 \
-recoveryAreaDestination /u02/oracle/fast_recovery_area \
-redoLogFileSize 100 \
-storageType fs \
-sysPassword Kiwi123 \
-systemPassword Kiwi123 \
-templateName General_Purpose.dbc \
-totalMemory 850 \
-useOMF true
oracle@oel7clus1 /u02/app/oracle/product/19.3.0/dbhome_1 : . oraenv
ORACLE_SID = [oracle] ? a
ORACLE_HOME = [/home/oracle] ? /u02/app/oracle/product/19.3.0/dbhome_1
The Oracle base has been changed from /u01/app/oracle to /u02/app/oracle
oracle@oel7clus1 /u02/app/oracle/product/19.3.0/dbhome_1 : dbca -createDatabase \
oracle@oel7clus1 --> -silent \
oracle@oel7clus1 --> -automaticMemoryManagement false \
oracle@oel7clus1 --> -characterSet AL32UTF8 \
oracle@oel7clus1 --> -createAsContainerDatabase false \
oracle@oel7clus1 --> -datafileDestination /u02/oracle/oradata \
oracle@oel7clus1 --> -enableArchive true \
oracle@oel7clus1 --> -gdbName DEV \
oracle@oel7clus1 --> -nationalCharacterSet AL16UTF16 \
oracle@oel7clus1 --> -recoveryAreaDestination /u02/oracle/fast_recovery_area \
oracle@oel7clus1 --> -redoLogFileSize 100 \
oracle@oel7clus1 --> -storageType fs \
oracle@oel7clus1 --> -sysPassword Kiwi123 \
oracle@oel7clus1 --> -systemPassword Kiwi123 \
oracle@oel7clus1 --> -templateName General_Purpose.dbc \
oracle@oel7clus1 --> -totalMemory 850 \
oracle@oel7clus1 --> -useOMF true
[WARNING] [DBT-06208] The 'SYS' password entered does not conform to the Oracle recommended standards.
   CAUSE:
a. Oracle recommends that the password entered should be at least 8 characters in length, contain at least 1 uppercase character, 1 lower case character and 1 digit [0-9].
b.The password entered is a keyword that Oracle does not recommend to be used as password
   ACTION: Specify a strong password. If required refer Oracle documentation for guidelines.
[WARNING] [DBT-06208] The 'SYSTEM' password entered does not conform to the Oracle recommended standards.
   CAUSE:
a. Oracle recommends that the password entered should be at least 8 characters in length, contain at least 1 uppercase character, 1 lower case character and 1 digit [0-9].
b.The password entered is a keyword that Oracle does not recommend to be used as password
   ACTION: Specify a strong password. If required refer Oracle documentation for guidelines.
Prepare for db operation
10% complete
Registering database with Oracle Restart
14% complete
Copying database files
43% complete
Creating and starting Oracle instance
45% complete
49% complete
53% complete
56% complete
62% complete
Completing Database Creation
68% complete
70% complete
71% complete
Executing Post Configuration Actions
100% complete
Database creation complete. For details check the logfiles at:
/u02/app/oracle/cfgtoollogs/dbca/DEV.
Database Information:
Global Database Name:DEV
System Identifier(SID):DEV
Look at the log file "/u02/app/oracle/cfgtoollogs/dbca/DEV/DEV.log" for further details.
oracle@oel7clus1 /u02/app/oracle/product/19.3.0/dbhome_1 :
oracle@oel7clus1 /u02/app/oracle/product/19.3.0/dbhome_1 : srvctl status database -d DEV -v
Instance DEV is running on node oel7clus1. Instance status: Open.
Step 8: Adding a Virtual IP
Adding a Virtual IP that will be used by Dbvisit Standby and we can also build a dependancy on this IP for the Database and Dbvisit Standby resources to be added later. Meaning - if you relocate or switch the VIP to the other node, the resources will be stopped and started on the other node.
You could also use this IP address and create a new dedicated listener for the database. Now the IP address we will use in this example is 10.0.2.28 - it is added to the DNS and is known as "oel7clus-dbvip"
The following commands are used to create the Virtual IP:
root@oel7clus1 ~ : which appvipcfg
/u01/app/19.3.0/bin/appvipcfg
root@oel7clus1 ~ :

root@oel7clus1 ~ : appvipcfg create -network=1 -ip=10.0.2.28 -vipname=oel7clus-dbvip -user=root
Using configuration parameter file: /u01/app/19.3.0/crs/install/crsconfig_params
The log of current session can be found at:
  /u01/app/grid/crsdata/oel7clus1/scripts/appvipcfg.log

root@oel7clus1 ~ : crsctl setperm resource oel7clus-dbvip -u user:oracle:r-x
root@oel7clus1 ~ :

root@oel7clus1 ~ : crsctl status resource oel7clus-dbvip -v
NAME=oel7clus-dbvip
TYPE=app.appviptypex2.type
LAST_SERVER=
STATE=OFFLINE
TARGET=OFFLINE
CARDINALITY_ID=1
OXR_SECTION=0
RESTART_COUNT=0
FAILURE_COUNT=0
FAILURE_HISTORY=
ID=oel7clus-dbvip 1 1
INCARNATION=0
LAST_RESTART=NEVER
LAST_STATE_CHANGE=NEVER
STATE_DETAILS=
INTERNAL_STATE=STABLE
TARGET_SERVER=
RESOURCE_GROUP=
INSTANCE_COUNT=1

root@oel7clus1 ~ : crsctl start resource oel7clus-dbvip -n oel7clus1
CRS-2672: Attempting to start 'oel7clus-dbvip' on 'oel7clus1'
CRS-2676: Start of 'oel7clus-dbvip' on 'oel7clus1' succeeded
root@oel7clus1 ~ :


root@oel7clus1 ~ : crsctl status resource oel7clus-dbvip -t
--------------------------------------------------------------------------------
Name           Target  State        Server                   State details
--------------------------------------------------------------------------------
Cluster Resources
--------------------------------------------------------------------------------
oel7clus-dbvip
      1        ONLINE  ONLINE       oel7clus1                STABLE
--------------------------------------------------------------------------------
root@oel7clus1 ~ :
Now that we have the Virtual IP running on node 1 (oel7clus1) we can move onto the next step which is to modify the database resource.
Step 9: The Database Resource Modifications
One of the next challenges you will run into with the above configuration is when you try and fail-over or relocate the database instance from the first node in the cluster to the second node.
As the DBCA register the database as a resource, you can view the database details using the srvctl utility. Example:
oracle@oel7clus1 ~ : srvctl config database -d DEV
Database unique name: DEV
Database name: DEV
Oracle home: /u02/app/oracle/product/19.3.0/dbhome_1
Oracle user: oracle
Spfile: /u02/app/oracle/product/19.3.0/dbhome_1/dbs/spfileDEV.ora
Password file:
Domain:
Start options: open
Stop options: immediate
Database role: PRIMARY
Management policy: AUTOMATIC
Server pools:
Disk Groups:
Mount point paths: /u02
Services:
Type: SINGLE
OSDBA group: dba
OSOPER group: oper
Database instance: DEV
Configured nodes: oel7clus1
CSS critical: no
CPU count: 0
Memory target: 0
Maximum memory: 0
Default network number for database services:
Database is administrator managed
oracle@oel7clus1 ~ :
Now if you just attempt to perform a relocate you will get the following error:
oracle@oel7clus1 ~ : srvctl relocate database -d DEV -n oel7clus2
PRCD-1146 : Database DEV is not a RAC One Node database
Ok, so we are not using Oracle RAC and we are not using Oracle RAC One Node, we just have a stock standard single instance database that was created on shared storage.
So what can we do now? You might think that you are now stuck, but there is actually another option here. You can remove the database resource, and re-add it as standard resource.
Lets first look at the resource as it is now:
oracle@oel7clus1 ~ : . oraenv
ORACLE_SID = [DEV] ? +ASM1
The Oracle base has been changed from /u02/app/oracle to /u01/app/grid

oracle@oel7clus1 ~ : crsctl status resource ora.dev.db -v
NAME=ora.dev.db
TYPE=ora.database.type
LAST_SERVER=oel7clus1
STATE=ONLINE on oel7clus1
TARGET=ONLINE
CARDINALITY_ID=1
OXR_SECTION=0
RESTART_COUNT=0
FAILURE_COUNT=0
FAILURE_HISTORY=
ID=ora.dev.db 1 1
INCARNATION=2
LAST_RESTART=09/10/2019 11:04:31
LAST_STATE_CHANGE=09/10/2019 11:04:31
STATE_DETAILS=Open,HOME=/u02/app/oracle/product/19.3.0/dbhome_1
INTERNAL_STATE=STABLE
TARGET_SERVER=oel7clus1
RESOURCE_GROUP=
INSTANCE_COUNT=1
As you can see the type is "ora.database.type"
What we can do now is remove this resource, and then create our own custom resource to allow for the database instance to be moved between the nodes.
This will require a few steps to get this done.
- Remove the Database Resource (Outage Required)
- First we stop the database, then we remove it as a resource. This can be done with the srvctl utility.
Below are the commands executed to perform these tasks:
oracle@oel7clus1 ~ : srvctl stop database -d DEV
oracle@oel7clus1 ~ : srvctl status database -d DEV
Instance DEV is not running on node oel7clus1
oracle@oel7clus1 ~ : srvctl remove database -d DEV
Remove the database DEV? (y/[n]) y
oracle@oel7clus1 ~ :
oracle@oel7clus1 ~ : srvctl status database -d DEV
PRCD-1120 : The resource for database DEV could not be found.
PRCR-1001 : Resource ora.dev.db does not exist
- Next we need to create an "Action Script"
- This is a script that will be executed by Clusterware to start and stop the cluster resource. Now you can make this complex, or you can keep it simple, which is usually the best way to start.
Here is a sample action script used:
#!/bin/bash # # SAMPLE Action Script to start an Oracle Database ############################################## # Function to change database environments # Description: # Use oraenv to set the environment if needed # This is optional to set the environment ############################################## ## set following to ensure oraenv is picked up from /usr/local/bin export PATH=/usr/local/bin:$PATH export NLS_DATE_FORMAT='DD:MM:YYYY:HH24:MI:SS' ## Setting environment for the Oracle Instance set_env () { export ORAENV_ASK=NO export ORACLE_SID=$1 . oraenv >> /dev/null export ORAENV_ASK=YES } ################# ## Main Section ################# # This is logged to CRSD agent log file echo "`date` Action script '$_CRS_ACTION_SCRIPT' for resource [$_CRS_NAME] called for action $1" # set environment set_env DEV case "$1" in 'start') sqlplus -s /nolog <<!EOF connect / as sysdba startup; exit; !EOF RET=0 echo "Running start DEV database resource with return code $RET" ;; 'stop') sqlplus -s /nolog <<!EOF connect / as sysdba shutdown immediate; exit; !EOF RET=0 echo "Running stop DEV database resource with return code $RET" ;; 'check') NUM=`ps -ef | grep ora_pmon_DEV | grep -v grep | wc -l` if [ $NUM = 0 ]; then ## return code 1 for check means OFFLINE RET=1 else ## return code 0 for check means ONLINE RET=0 fi echo "Running check DEV database resource with return code $RET" ;; 'clean') sqlplus -s /nolog <<!EOF connect / as sysdba shutdown abort; exit; !EOF RET=0 echo "Running clean DEV database resource with return code $RET" ;; *) RET=1 echo "Usage: db-crs.sh start|stop|check|clean" ;; esac if [ $RET -eq 0 ]; then exit 0 else exit 1 fi- Now we need to place this script on the shared storage as it needs to be available for execution from either one of the cluster nodes. In this example I used "/u02/app/oracle/admin/DEV" - now remember /u02 is my shared ACFS filesystem that is mounted on both nodes
- Here are the steps:
oracle@oel7clus1 /u02/app/oracle/admin/DEV : mkdir scripts
oracle@oel7clus1 /u02/app/oracle/admin/DEV : cd scripts
oracle@oel7clus1 /u02/app/oracle/admin/DEV/scripts : vi db-crs.sh
oracle@oel7clus1 /u02/app/oracle/admin/DEV/scripts : chmod u+x db-crs.sh
oracle@oel7clus1 /u02/app/oracle/admin/DEV/scripts : ./db-crs.sh
Tue Sep 10 11:44:33 NZST 2019 Action script '' for resource [] called for action
Usage: db-crs.sh start|stop|check|clean
- Now remember my database DEV is down at the moment, but I can always use this script to start and stop it quickly as a test.
Now after the below I am happy that my script is executing correct, and yes I could add a lot more checks and output to the script, but as a basic starting point this will do.
oracle@oel7clus1 /u02/app/oracle/admin/DEV/scripts : ./db-crs.sh start
Tue Sep 10 11:46:41 NZST 2019 Action script '' for resource [] called for action start
ORACLE instance started.

Total System Global Area  671088184 bytes
Fixed Size		    8900152 bytes
Variable Size		  197132288 bytes
Database Buffers	  457179136 bytes
Redo Buffers		    7876608 bytes
Database mounted.
Database opened.
Running start DEV database resource with return code 0

oracle@oel7clus1 /u02/app/oracle/admin/DEV/scripts : ./db-crs.sh check
Tue Sep 10 11:47:07 NZST 2019 Action script '' for resource [] called for action check
Running check DEV database resource with return code 0

oracle@oel7clus1 /u02/app/oracle/admin/DEV/scripts : ./db-crs.sh stop
Tue Sep 10 11:47:12 NZST 2019 Action script '' for resource [] called for action stop
Database closed.
Database dismounted.
ORACLE instance shut down.
Running stop DEV database resource with return code 0
oracle@oel7clus1 /u02/app/oracle/admin/DEV/scripts :
- Next, create a cluster resource file with the details of the new resource we want to add. This just simplify the options to be passed in via the command line. You could do it all as one big command, but why not use a file that you can just reference and then easily update to your needs where required.
- The following example was used. You will see that it states a number of key parameters such as pointing at the action script to be used (created above).
Now you can go and review these parameters in the Oracle Documentation to find the right values for your configuration, but I am starting simple here to get you going. Remember always test on a test environment first before you do things in production, that way you can test various different options without affecting production, then once you find the parameters that work for you, and they are tested, you can then execute it in production.
- You might want to review the START_DEPENDENCIES and STOP_DEPENDENCIES as you might want to specify different values here to meet your requirements.
NAME = DEV.db
TYPE = cluster_resource
DESCRIPTION = Single Instance Oracle Database resource
ACL = owner:oracle:rwx,pgrp:oinstall:rwx,other::r--
ACTION_SCRIPT = /u02/app/oracle/admin/DEV/scripts/db-crs.sh
PLACEMENT = restricted
ACTIVE_PLACEMENT = 1
AUTO_START = restore
CARDINALITY = 1
CHECK_INTERVAL = 10
DEGREE = 1
ENABLED = 1
HOSTING_MEMBERS = oel7clus1 oel7clus2
LOGGING_LEVEL = 1
RESTART_ATTEMPTS = 1
START_DEPENDENCIES = hard (ora.data.acfsvol1.acfs,oel7clus-dbvip) weak (type:ora.listener.type,global:type:ora.scan_listener.type,uniform:ora.ons) pullup (ora.data.acfsvol1.acfs)
START_TIMEOUT = 600
STOP_DEPENDENCIES = hard (shutdown:ora.data.acfsvol1.acfs, oel7clus-dbvip)
STOP_TIMEOUT = 600
UPTIME_THRESHOLD = 1h
- Adding and starting the resource
- Next we want to add the new resource and once done start it:
oracle@oel7clus1 /u02/app/oracle/admin/DEV/scripts : crsctl add resource DEV.db -type cluster_resource -file /u02/app/oracle/admin/DEV/scripts/add-DEV-resource.sc
oracle@oel7clus1 /u02/app/oracle/admin/DEV/scripts : crsctl status resource DEV.db
NAME=DEV.db
TYPE=cluster_resource
TARGET=OFFLINE
STATE=OFFLINE

oracle@oel7clus1 /u02/app/oracle/admin/DEV/scripts : crsctl status resource DEV.db -v
NAME=DEV.db
TYPE=cluster_resource
LAST_SERVER=
STATE=OFFLINE
TARGET=OFFLINE
CARDINALITY_ID=1
OXR_SECTION=0
RESTART_COUNT=0
FAILURE_COUNT=0
FAILURE_HISTORY=
ID=DEV.db 1 1
INCARNATION=0
LAST_RESTART=NEVER
LAST_STATE_CHANGE=NEVER
STATE_DETAILS=
INTERNAL_STATE=STABLE
TARGET_SERVER=
RESOURCE_GROUP=
INSTANCE_COUNT=1

oracle@oel7clus1 /u02/app/oracle/admin/DEV/scripts : crsctl start resource DEV.db
CRS-2672: Attempting to start 'DEV.db' on 'oel7clus1'
CRS-2676: Start of 'DEV.db' on 'oel7clus1' succeeded

oracle@oel7clus1 /u02/app/oracle/admin/DEV/scripts : crsctl status resource DEV.db -v
NAME=DEV.db
TYPE=cluster_resource
LAST_SERVER=oel7clus1
STATE=ONLINE on oel7clus1
TARGET=ONLINE
CARDINALITY_ID=1
OXR_SECTION=0
RESTART_COUNT=0
FAILURE_COUNT=0
FAILURE_HISTORY=
ID=DEV.db 1 1
INCARNATION=1
LAST_RESTART=09/10/2019 12:03:17
LAST_STATE_CHANGE=09/10/2019 12:03:17
STATE_DETAILS=
INTERNAL_STATE=STABLE
TARGET_SERVER=oel7clus1
RESOURCE_GROUP=
INSTANCE_COUNT=1
- Now if we review the resources after the above we can see the following:
oracle@oel7clus1 /u02/app/oracle/admin/DEV/scripts : crsctl status resource -t
--------------------------------------------------------------------------------
Name           Target  State        Server                   State details
--------------------------------------------------------------------------------
Local Resources
--------------------------------------------------------------------------------
ora.DATA.ACFSVOL1.advm
               ONLINE  ONLINE       oel7clus1                STABLE
               ONLINE  ONLINE       oel7clus2                STABLE
ora.LISTENER.lsnr
               ONLINE  ONLINE       oel7clus1                STABLE
               ONLINE  ONLINE       oel7clus2                STABLE
ora.chad
               ONLINE  ONLINE       oel7clus1                STABLE
               ONLINE  ONLINE       oel7clus2                STABLE
ora.data.acfsvol1.acfs
               ONLINE  ONLINE       oel7clus1                mounted on /u02,STAB
                                                             LE
               ONLINE  ONLINE       oel7clus2                mounted on /u02,STAB
                                                             LE
ora.net1.network
               ONLINE  ONLINE       oel7clus1                STABLE
               ONLINE  ONLINE       oel7clus2                STABLE
ora.ons
               ONLINE  ONLINE       oel7clus1                STABLE
               ONLINE  ONLINE       oel7clus2                STABLE
ora.proxy_advm
               ONLINE  ONLINE       oel7clus1                STABLE
               ONLINE  ONLINE       oel7clus2                STABLE
--------------------------------------------------------------------------------
Cluster Resources
--------------------------------------------------------------------------------
DEV.db
      1        ONLINE  ONLINE       oel7clus1                STABLE
oel7clus-dbvip
      1        ONLINE  ONLINE       oel7clus1                STABLE
ora.ASMNET1LSNR_ASM.lsnr(ora.asmgroup)
      1        ONLINE  ONLINE       oel7clus1                STABLE
      2        ONLINE  ONLINE       oel7clus2                STABLE
      3        ONLINE  OFFLINE                               STABLE
ora.DATA.dg(ora.asmgroup)
      1        ONLINE  ONLINE       oel7clus1                STABLE
      2        ONLINE  ONLINE       oel7clus2                STABLE
      3        ONLINE  OFFLINE                               STABLE
ora.LISTENER_SCAN1.lsnr
      1        ONLINE  ONLINE       oel7clus2                STABLE
ora.LISTENER_SCAN2.lsnr
      1        ONLINE  ONLINE       oel7clus1                STABLE
ora.LISTENER_SCAN3.lsnr
      1        ONLINE  ONLINE       oel7clus1                STABLE
ora.OCR_VOT.dg(ora.asmgroup)
      1        ONLINE  ONLINE       oel7clus1                STABLE
      2        ONLINE  ONLINE       oel7clus2                STABLE
      3        OFFLINE OFFLINE                               STABLE
ora.asm(ora.asmgroup)
      1        ONLINE  ONLINE       oel7clus1                Started,STABLE
      2        ONLINE  ONLINE       oel7clus2                Started,STABLE
      3        OFFLINE OFFLINE                               STABLE
ora.asmnet1.asmnetwork(ora.asmgroup)
      1        ONLINE  ONLINE       oel7clus1                STABLE
      2        ONLINE  ONLINE       oel7clus2                STABLE
      3        OFFLINE OFFLINE                               STABLE
ora.cvu
      1        ONLINE  ONLINE       oel7clus1                STABLE
ora.oel7clus1.vip
      1        ONLINE  ONLINE       oel7clus1                STABLE
ora.oel7clus2.vip
      1        ONLINE  ONLINE       oel7clus2                STABLE
ora.qosmserver
      1        ONLINE  ONLINE       oel7clus1                STABLE
ora.scan1.vip
      1        ONLINE  ONLINE       oel7clus2                STABLE
ora.scan2.vip
      1        ONLINE  ONLINE       oel7clus1                STABLE
ora.scan3.vip
      1        ONLINE  ONLINE       oel7clus1                STABLE
--------------------------------------------------------------------------------
oracle@oel7clus1 /u02/app/oracle/admin/DEV/scripts :
- Next we want to add the new resource and once done start it:
- Updating /etc/oratab
- Now I know a number of DBAs prefer not to use the /etc/oratab file, but rather set things manually on their environment. I am not sure why you want to make things difficult, if you just add one entry into the /etc/oratab file for your database, you can easily move between environments using the ". oraenv" command.
- Now in my /etc/oratab files I have the following entries at the bottom:
- Node 1: oel7clus1
...
+ASM1:/u01/app/19.3.0:N
DEV:/u02/app/oracle/product/19.3.0/dbhome_1:N
- Node 2: oel7clus2
...
+ASM2:/u01/app/19.3.0:N
DEV:/u02/app/oracle/product/19.3.0/dbhome_1:N
- Node 1: oel7clus1
- Next we can test relocating our database resource.
- There is a few options here, but the first is you can just force the relocate of the database DEV.db resource and it will move the Virtual IP we added earlier as well as there is a HARD dependancy between them.
oracle@oel7clus1 /u02/app/oracle/admin/DEV/scripts : crsctl relocate resource DEV.db -f
CRS-2673: Attempting to stop 'DEV.db' on 'oel7clus1'
CRS-2677: Stop of 'DEV.db' on 'oel7clus1' succeeded
CRS-2673: Attempting to stop 'oel7clus-dbvip' on 'oel7clus1'
CRS-2677: Stop of 'oel7clus-dbvip' on 'oel7clus1' succeeded
CRS-2672: Attempting to start 'oel7clus-dbvip' on 'oel7clus2'
CRS-2676: Start of 'oel7clus-dbvip' on 'oel7clus2' succeeded
CRS-2672: Attempting to start 'DEV.db' on 'oel7clus2'
CRS-2676: Start of 'DEV.db' on 'oel7clus2' succeeded
- Or you can relocate the Virtual IP address (oel7clus-dbvip) and then the database will be moved as well due to the dependancy:
Now in the example below we run on the second node (oel7clus2) and we set the environment then execute the crsctl status resource command on the DEV.db and oel7clus-dbvip resources. We can see they are running on the second node, so the next step is to execute the relocate command on the oel7clus-dbvip Virtual IP:
oracle@oel7clus2 ~ : . oraenv
ORACLE_SID = [oracle] ? +ASM2
The Oracle base has been changed from /u01/app/oracle to /u01/app/grid

oracle@oel7clus2 ~ : crsctl status resource DEV.db -t
--------------------------------------------------------------------------------
Name           Target  State        Server                   State details
--------------------------------------------------------------------------------
Cluster Resources
--------------------------------------------------------------------------------
DEV.db
      1        ONLINE  ONLINE       oel7clus2                STABLE
--------------------------------------------------------------------------------
oracle@oel7clus2 ~ : crsctl status resource oel7clus-dbvip -t
--------------------------------------------------------------------------------
Name           Target  State        Server                   State details
--------------------------------------------------------------------------------
Cluster Resources
--------------------------------------------------------------------------------
oel7clus-dbvip
      1        ONLINE  ONLINE       oel7clus2                STABLE
--------------------------------------------------------------------------------

oracle@oel7clus2 ~ :
oracle@oel7clus2 ~ : crsctl relocate resource oel7clus-dbvip -f
CRS-2673: Attempting to stop 'DEV.db' on 'oel7clus2'
CRS-2677: Stop of 'DEV.db' on 'oel7clus2' succeeded
CRS-2673: Attempting to stop 'oel7clus-dbvip' on 'oel7clus2'
CRS-2677: Stop of 'oel7clus-dbvip' on 'oel7clus2' succeeded
CRS-2672: Attempting to start 'oel7clus-dbvip' on 'oel7clus1'
CRS-2676: Start of 'oel7clus-dbvip' on 'oel7clus1' succeeded
CRS-2672: Attempting to start 'DEV.db' on 'oel7clus1'
CRS-2676: Start of 'DEV.db' on 'oel7clus1' succeeded
- There is a few options here, but the first is you can just force the relocate of the database DEV.db resource and it will move the Virtual IP we added earlier as well as there is a HARD dependancy between them.
- Now at this stage we have the database added as a resource and it has a dependancy on the Virtual IP - oel7clus-dbvip. Now you can add a listener that use this virtual IP and move that between the nodes as well. I will leave this to you to perform this task if you require it, but next we will focus on adding Dbvisit Standby to the configuration, adding its components to Clusterware as resources as well.
Step 10: Installing Dbvisit Standby
In this section we will perform a Dbvisit Standby installation on the two node cluster but also on a single server that will be used as the standby server.
- We download the latest version of the Dbvisit Standby which at the time of writing this is: dbvisit-standby9.0.02-el7.zip
- The file is copied to the 1st node in the cluster (oel7clus1) under the user "oracle" home to a sub folder 9.0. This is just a temporary folder from where we will perform the installation.
- Below are the steps followed to install the Dbvisit Standby Core components onto the shared storage /u02
- Example:
oracle@oel7clus1 ~ : cd 9.0
oracle@oel7clus1 ~/9.0 : ls
dbvisit-standby9.0.02-el7.zip

oracle@oel7clus1 ~/9.0 : unzip dbvisit-standby9.0.02-el7.zip
Archive:  dbvisit-standby9.0.02-el7.zip
  inflating: dbvisit-standby9.0.02-el7.tar

oracle@oel7clus1 ~/9.0 : tar xf dbvisit-standby9.0.02-el7.tar

oracle@oel7clus1 ~/9.0 : ls
dbvisit  dbvisit-standby9.0.02-el7.tar  dbvisit-standby9.0.02-el7.zip  INSTALL.txt  README.txt

oracle@oel7clus1 ~/9.0 : cd dbvisit/installer/

oracle@oel7clus1 ~/9.0/dbvisit/installer : ./install-dbvisit

-----------------------------------------------------------
    Welcome to the Dbvisit software installer.
-----------------------------------------------------------

    It is recommended to make a backup of our current Dbvisit software
    location (Dbvisit Base location) for rollback purposes.

    Installer Directory /home/oracle/9.0/dbvisit

>>> Please specify the Dbvisit installation directory (Dbvisit Base).

    The various Dbvisit products and components - such as Dbvisit Standby,
    Dbvisit Dbvnet will be installed in the appropriate subdirectories of
    this path.

    Enter a custom value or press ENTER to accept default [/usr/dbvisit]:
     > /u02/dbvisit
    DBVISIT_BASE = /u02/dbvisit

    -----------------------------------------------------------
    Component      Installer Version   Installed Version
    -----------------------------------------------------------
    standby        9.0.02_0_gbd40c486                                not installed
    dbvnet         9.0.02_0_gbd40c486                                not installed
    dbvagent       9.0.02_0_gbd40c486                                not installed
    dbvserver      9.0.02_0_gbd40c486                                not installed
    observer       1.02                                              not installed

    -----------------------------------------------------------

    What action would you like to perform?
       1 - Install component(s)
       2 - Uninstall component(s)
       3 - Exit

    Your choice: 1

    Choose component(s):
       1 - Core Components (Dbvisit Standby Cli, Dbvnet, Dbvagent)
       2 - Dbvisit Standby Core (Command Line Interface)
       3 - Dbvnet (Dbvisit Network Communication)
       4 - Dbvagent (Dbvisit Agent)
       5 - Dbvserver (Dbvisit Central Console) - Not available on Solaris/AIX
       6 - Dbvisit Observer (Automatic Failover Option) - Not available on Solaris/AIX
    Press ENTER to exit Installer

    Your choice: 1

-----------------------------------------------------------
    Summary of the Dbvisit STANDBY configuration
-----------------------------------------------------------
    DBVISIT_BASE /u02/dbvisit

    Press ENTER to continue

-----------------------------------------------------------
    About to configure DBVISIT DBVNET
-----------------------------------------------------------

>>> Please specify the Local host name to be used by Dbvnet on this server.

    Dbvnet will be listening on the local IP Address on this server which
    resolve to the host name specified here.
    If using a cluster or virtual IP make sure the host name or alias
    specified here resolve to the IP address local to where dbvnet is
    installed.  The host name should resolve to IPv4 address, if not
    you can use an IPv4 IP address instead of host name.

    Enter a custom value or press ENTER to accept default [oel7clus1]:
     > oel7clus-dbvip

>>> Please specify the Local Dbvnet PORT to be used.

    Dbvnet will be listening on the specified port for incoming connections
    from remote dbvnet connections.  Please make sure that this port is not
    already in use or blocked by any firewall.  You may choose any value
    between 1024 and 65535, however the default of 7890 is recommended.

    Enter a custom value or press ENTER to accept default [7890]:
     > 7890


>>> Please specify the Remote host name to be used by Dbvnet.

    By default Dbvnet will use this remote hostname for any remote
    connections.  Dbvnet must be installed and configured on the specified
    remote host. If using a cluster or virtual IP make sure the host name
    or alias specified here resolve to the IP address local to where dbvnet
    is installed.
    If you are unsure about the remote host name during installation, use
    the default value which will be the current local hostname.
    The host name should resolve to IPv4 address, if not
    you can use an IPv4 IP address instead of host name.

    Enter a custom value or press ENTER to accept default [oel7clus1]:
     > oel7fs1


>>> Please specify the Remote Dbvnet PORT to be used.

    Dbvnet will connect to the remote server on this specified port.
    On the remote host Dbvnet will be listening on the specified port for
    incoming connections. Please make sure that this port is not already in
    use or blocked by any firewall.  You may choose any value between 1024
    and 65535, however the default of 7890 is recommended.

    Enter a custom value or press ENTER to accept default [7890]:
     > 7890


>>> Please specify the Dbvnet Passphrase to be used for secure connections.

    The passphrase provided must be the same in both the local and remote
    Dbvnet installations.  It is used to establish a secure (encrypted)
    Dbvnet connections

    Enter a custom value:
     > kiwi123

-----------------------------------------------------------
    Summary of the Dbvisit DBVNET configuration
-----------------------------------------------------------
    DBVISIT_BASE /u02/dbvisit
    DBVNET_LOCAL_HOST oel7clus-dbvip
    DBVNET_LOCAL_PORT 7890
    DBVNET_REMOTE_HOST oel7fs1
    DBVNET_REMOTE_PORT 7890
    DBVNET_PASSPHRASE kiwi123

    Press ENTER to continue

-----------------------------------------------------------
    About to configure DBVISIT DBVAGENT
-----------------------------------------------------------


>>> Please specify the host name to be used for the Dbvisit Agent.

    The Dbvisit Agent (Dbvagent) will be listening on this local address.
    If you are using the Dbvserver (GUI) - connections from the GUI will be
    established to the Dbvisit Agent. The Dbvisit Agent address must be
    visible from the Dbvserver (GUI) installation.
    If using a cluster or virtual IP make sure the host name or alias
    specified here resolve to the IP address local to where dbvnet is
    installed.
    The host name should resolve to IPv4 address, if not you can use
    an IPv4 IP address instead of host name.

    Enter a custom value or press ENTER to accept default [oel7clus1]:
     > oel7clus-dbvip


>>> Please specify the listening PORT number for Dbvagent.

    The Dbvisit Agent (Dbvagent) will be listening on the specified port for
    incoming requests from the GUI (Dbvserver).  Please make sure that this
    port is not already in use or blocked by any firewall.  You may choose
    any value between 1024 and 65535, however the default of 7891 is
    recommended.

    Enter a custom value or press ENTER to accept default [7891]:
     > 7891


>>> Please specify passphrase for Dbvagent

    Each Dbvisit Agent must have a passpharse specified.  This passphrase
    does not have to match between all the servers.  It will be used to
    establish a secure connection between the GUI (Dbvserver) and the
    Dbvisit Agent.

    Enter a custom value:
     > kiwi123

-----------------------------------------------------------
    Summary of the Dbvisit DBVAGENT configuration
-----------------------------------------------------------
    DBVISIT_BASE /u02/dbvisit
    DBVAGENT_LOCAL_HOST oel7clus-dbvip
    DBVAGENT_LOCAL_PORT 7891
    DBVAGENT_PASSPHRASE kiwi123

    Press ENTER to continue

-----------------------------------------------------------
    About to install Dbvisit STANDBY
-----------------------------------------------------------
    NTF repo installed.
    Component standby installed.

-----------------------------------------------------------
    About to install Dbvisit DBVNET
-----------------------------------------------------------
    Component dbvnet installed.

-----------------------------------------------------------
    About to install Dbvisit DBVAGENT
-----------------------------------------------------------
    Component dbvagent installed.

    -----------------------------------------------------------
    Component      Installer Version   Installed Version
    -----------------------------------------------------------
    standby        9.0.02_0_gbd40c486                                9.0.02_0_gbd40c486
    dbvnet         9.0.02_0_gbd40c486                                9.0.02_0_gbd40c486
    dbvagent       9.0.02_0_gbd40c486                                9.0.02_0_gbd40c486
    dbvserver      9.0.02_0_gbd40c486                                not installed
    observer       1.02                                              not installed

    -----------------------------------------------------------

    What action would you like to perform?
       1 - Install component(s)
       2 - Uninstall component(s)
       3 - Exit

    Your choice: 3

>>> Installation completed
    Install log /tmp/dbvisit_install.log.201909101237.

oracle@oel7clus1 ~/9.0/dbvisit/installer : cd /u02/dbvisit

oracle@oel7clus1 /u02/dbvisit : ls
dbvagent  dbvnet  standby

oracle@oel7clus1 /u02/dbvisit : tree -d .
.
├── dbvagent
│   ├── conf
│   ├── doc
│   ├── log
│   └── tmp
├── dbvnet
│   ├── conf
│   ├── doc
│   └── log
└── standby
    ├── conf
    ├── doc
    ├── gs
    ├── lib
    ├── log
    ├── pid
    ├── tmp
    └── trace

18 directories
oracle@oel7clus1 /u02/dbvisit :
- Now we have Dbvisit Standby installed on the shared storage, we can test by starting the Dbvagent and Dbvnet components:
oracle@oel7clus1 /u02/dbvisit : cd dbvnet
oracle@oel7clus1 /u02/dbvisit/dbvnet : ./dbvnet -d start
Dbvnet daemon started.

oracle@oel7clus1 /u02/dbvisit/dbvnet : cd ../dbvagent/
oracle@oel7clus1 /u02/dbvisit/dbvagent : ./dbvagent -d start
Dbvagent daemon started.

oracle@oel7clus1 /u02/dbvisit/dbvagent : ps -ef|egrep 'dbvnet|dbvagent' |grep -v grep
oracle   32446     1  0 12:44 ?        00:00:00 ./dbvnet -d start
oracle   32569     1  0 12:44 ?        00:00:00 ./dbvagent -d start
- Next we need to install Dbvisit Standby on the Standby server, in this case it is called "oel7fs1" - it is a standalone server with Oracle Database 19c SE2 installed.
- The steps are similar to above, but in this case we also install the Web server component - Dbvserver.
- Note: in 9.0.02 we introduced the automatic failover option, this option is not installed in this configuration.
- Example installation steps:
oracle@oel7fs1 ~/9.0 : ls -ld /usr/dbvisit
drwxr-xr-x. 2 oracle oinstall 4096 Sep 10 09:46 /usr/dbvisit

oracle@oel7fs1 ~/9.0 : ls -l
total 81572
-rw-r--r--. 1 oracle oinstall 83529352 Sep 10 12:48 dbvisit-standby9.0.02-el7.zip

oracle@oel7fs1 ~/9.0 : unzip dbvisit-standby9.0.02-el7.zip
Archive:  dbvisit-standby9.0.02-el7.zip
  inflating: dbvisit-standby9.0.02-el7.tar

oracle@oel7fs1 ~/9.0 : tar xf dbvisit-standby9.0.02-el7.tar

oracle@oel7fs1 ~/9.0 : cd dbvisit/installer/

oracle@oel7fs1 ~/9.0/dbvisit/installer : ./install-dbvisit

-----------------------------------------------------------
    Welcome to the Dbvisit software installer.
-----------------------------------------------------------

    It is recommended to make a backup of our current Dbvisit software
    location (Dbvisit Base location) for rollback purposes.

    Installer Directory /home/oracle/9.0/dbvisit

>>> Please specify the Dbvisit installation directory (Dbvisit Base).

    The various Dbvisit products and components - such as Dbvisit Standby,
    Dbvisit Dbvnet will be installed in the appropriate subdirectories of
    this path.

    Enter a custom value or press ENTER to accept default [/usr/dbvisit]:
     >
    DBVISIT_BASE = /usr/dbvisit

    -----------------------------------------------------------
    Component      Installer Version   Installed Version
    -----------------------------------------------------------
    standby        9.0.02_0_gbd40c486                                not installed
    dbvnet         9.0.02_0_gbd40c486                                not installed
    dbvagent       9.0.02_0_gbd40c486                                not installed
    dbvserver      9.0.02_0_gbd40c486                                not installed
    observer       1.02                                              not installed

    -----------------------------------------------------------

    What action would you like to perform?
       1 - Install component(s)
       2 - Uninstall component(s)
       3 - Exit

    Your choice: 1

    Choose component(s):
       1 - Core Components (Dbvisit Standby Cli, Dbvnet, Dbvagent)
       2 - Dbvisit Standby Core (Command Line Interface)
       3 - Dbvnet (Dbvisit Network Communication)
       4 - Dbvagent (Dbvisit Agent)
       5 - Dbvserver (Dbvisit Central Console) - Not available on Solaris/AIX
       6 - Dbvisit Observer (Automatic Failover Option) - Not available on Solaris/AIX
    Press ENTER to exit Installer

    Your choice: 1

-----------------------------------------------------------
    Summary of the Dbvisit STANDBY configuration
-----------------------------------------------------------
    DBVISIT_BASE /usr/dbvisit

    Press ENTER to continue

-----------------------------------------------------------
    About to configure DBVISIT DBVNET
-----------------------------------------------------------

>>> Please specify the Local host name to be used by Dbvnet on this server.

    Dbvnet will be listening on the local IP Address on this server which
    resolve to the host name specified here.
    If using a cluster or virtual IP make sure the host name or alias
    specified here resolve to the IP address local to where dbvnet is
    installed.  The host name should resolve to IPv4 address, if not
    you can use an IPv4 IP address instead of host name.

    Enter a custom value or press ENTER to accept default [oel7fs1]:
     > oel7fs1

>>> Please specify the Local Dbvnet PORT to be used.

    Dbvnet will be listening on the specified port for incoming connections
    from remote dbvnet connections.  Please make sure that this port is not
    already in use or blocked by any firewall.  You may choose any value
    between 1024 and 65535, however the default of 7890 is recommended.

    Enter a custom value or press ENTER to accept default [7890]:
     > 7890


>>> Please specify the Remote host name to be used by Dbvnet.

    By default Dbvnet will use this remote hostname for any remote
    connections.  Dbvnet must be installed and configured on the specified
    remote host. If using a cluster or virtual IP make sure the host name
    or alias specified here resolve to the IP address local to where dbvnet
    is installed.
    If you are unsure about the remote host name during installation, use
    the default value which will be the current local hostname.
    The host name should resolve to IPv4 address, if not
    you can use an IPv4 IP address instead of host name.

    Enter a custom value or press ENTER to accept default [oel7fs1]:
     > oel7clus-dbvip


>>> Please specify the Remote Dbvnet PORT to be used.

    Dbvnet will connect to the remote server on this specified port.
    On the remote host Dbvnet will be listening on the specified port for
    incoming connections. Please make sure that this port is not already in
    use or blocked by any firewall.  You may choose any value between 1024
    and 65535, however the default of 7890 is recommended.

    Enter a custom value or press ENTER to accept default [7890]:
     > 7890


>>> Please specify the Dbvnet Passphrase to be used for secure connections.

    The passphrase provided must be the same in both the local and remote
    Dbvnet installations.  It is used to establish a secure (encrypted)
    Dbvnet connections

    Enter a custom value:
     > kiwi123

-----------------------------------------------------------
    Summary of the Dbvisit DBVNET configuration
-----------------------------------------------------------
    DBVISIT_BASE /usr/dbvisit
    DBVNET_LOCAL_HOST oel7fs1
    DBVNET_LOCAL_PORT 7890
    DBVNET_REMOTE_HOST oel7clus-dbvip
    DBVNET_REMOTE_PORT 7890
    DBVNET_PASSPHRASE kiwi123

    Press ENTER to continue

-----------------------------------------------------------
    About to configure DBVISIT DBVAGENT
-----------------------------------------------------------


>>> Please specify the host name to be used for the Dbvisit Agent.

    The Dbvisit Agent (Dbvagent) will be listening on this local address.
    If you are using the Dbvserver (GUI) - connections from the GUI will be
    established to the Dbvisit Agent. The Dbvisit Agent address must be
    visible from the Dbvserver (GUI) installation.
    If using a cluster or virtual IP make sure the host name or alias
    specified here resolve to the IP address local to where dbvnet is
    installed.
    The host name should resolve to IPv4 address, if not you can use
    an IPv4 IP address instead of host name.

    Enter a custom value or press ENTER to accept default [oel7fs1]:
     > oel7fs1


>>> Please specify the listening PORT number for Dbvagent.

    The Dbvisit Agent (Dbvagent) will be listening on the specified port for
    incoming requests from the GUI (Dbvserver).  Please make sure that this
    port is not already in use or blocked by any firewall.  You may choose
    any value between 1024 and 65535, however the default of 7891 is
    recommended.

    Enter a custom value or press ENTER to accept default [7891]:
     > 7891


>>> Please specify passphrase for Dbvagent

    Each Dbvisit Agent must have a passpharse specified.  This passphrase
    does not have to match between all the servers.  It will be used to
    establish a secure connection between the GUI (Dbvserver) and the
    Dbvisit Agent.

    Enter a custom value:
     > kiwi123

-----------------------------------------------------------
    Summary of the Dbvisit DBVAGENT configuration
-----------------------------------------------------------
    DBVISIT_BASE /usr/dbvisit
    DBVAGENT_LOCAL_HOST oel7fs1
    DBVAGENT_LOCAL_PORT 7891
    DBVAGENT_PASSPHRASE kiwi123

    Press ENTER to continue

-----------------------------------------------------------
    About to install Dbvisit STANDBY
-----------------------------------------------------------
    NTF repo installed.
    Component standby installed.

-----------------------------------------------------------
    About to install Dbvisit DBVNET
-----------------------------------------------------------
    Component dbvnet installed.

-----------------------------------------------------------
    About to install Dbvisit DBVAGENT
-----------------------------------------------------------
    Component dbvagent installed.

    -----------------------------------------------------------
    Component      Installer Version   Installed Version
    -----------------------------------------------------------
    standby        9.0.02_0_gbd40c486                                9.0.02_0_gbd40c486
    dbvnet         9.0.02_0_gbd40c486                                9.0.02_0_gbd40c486
    dbvagent       9.0.02_0_gbd40c486                                9.0.02_0_gbd40c486
    dbvserver      9.0.02_0_gbd40c486                                not installed
    observer       1.02                                              not installed

    -----------------------------------------------------------

    What action would you like to perform?
       1 - Install component(s)
       2 - Uninstall component(s)
       3 - Exit

    Your choice: 1

    Choose component(s):
       1 - Core Components (Dbvisit Standby Cli, Dbvnet, Dbvagent)
       2 - Dbvisit Standby Core (Command Line Interface)
       3 - Dbvnet (Dbvisit Network Communication)
       4 - Dbvagent (Dbvisit Agent)
       5 - Dbvserver (Dbvisit Central Console) - Not available on Solaris/AIX
       6 - Dbvisit Observer (Automatic Failover Option) - Not available on Solaris/AIX
    Press ENTER to exit Installer

    Your choice: 5

-----------------------------------------------------------
    About to configure DBVISIT DBVSERVER
-----------------------------------------------------------


>>> Please specify the host name to be used for Dbvserver


    The Dbvisit Web Server (Dbvserver) will be listening on this local
    address. If using a cluster or virtual IP make sure the host name or
    alias specified here resolve to the IP address local to where Dbvserver
    is installed.
    If you are unsure about the remote host name during installation, use
    the default value which will be the current local hostname.
    The host name should resolve to IPv4 address, if not you can use
    an IPv4 IP address instead of host name.

    Enter a custom value or press ENTER to accept default [oel7fs1]:
     > oel7fs1


>>> Please specify the listening port number for Dbvserver on the local server

    You may choose any value between 1024 and 65535.  The default recommended
    value is 4433.

    Note: if you can not access this port after the installation has
    finished, then please double-check your server firewall settings
    to ensure the selected port is open.
    Enter a custom value or press ENTER to accept default [4433]:
     > 4433


>>> Please specify the host name (or IPv4 address) to be used for Dbvserver public interface


    In most cases this will be the same as the listener address, if not sure
    use the same value as the listener address.

    The Dbvisit Web Server (Dbvserver) will be listening on the local
    listener address. The public address can be set to an external IP
    example a firewall address in case the Central Console (Dbvserver)
    and agents (Primary and Standby Database servers) have a firewall
    inbetween them.  The public interface address will be passed to
    the agents during communication for sending information back.
    If you are unsure about the public host address, use
    the default value which will be the current local hostname.
    The host name should resolve to IPv4 address, if not you can use
    an IPv4 IP address instead of host name.
    Enter a custom value or press ENTER to accept default [oel7fs1]:
     > oel7fs1

-----------------------------------------------------------
    Summary of the Dbvisit DBVSERVER configuration
-----------------------------------------------------------
    DBVISIT_BASE /usr/dbvisit
    DBVSERVER_LOCAL_HOST oel7fs1
    DBVSERVER_LOCAL_PORT 4433
    DBVSERVER_PUBLIC_HOST oel7fs1

    Press ENTER to continue

-----------------------------------------------------------
    About to install Dbvisit DBVSERVER
-----------------------------------------------------------
    Component dbvserver installed.

    -----------------------------------------------------------
    Component      Installer Version   Installed Version
    -----------------------------------------------------------
    standby        9.0.02_0_gbd40c486                                9.0.02_0_gbd40c486
    dbvnet         9.0.02_0_gbd40c486                                9.0.02_0_gbd40c486
    dbvagent       9.0.02_0_gbd40c486                                9.0.02_0_gbd40c486
    dbvserver      9.0.02_0_gbd40c486                                9.0.02_0_gbd40c486
    observer       1.02                                              not installed

    -----------------------------------------------------------

    What action would you like to perform?
       1 - Install component(s)
       2 - Uninstall component(s)
       3 - Exit

    Your choice: 3

>>> Installation completed
    Install log /tmp/dbvisit_install.log.201909101248.
oracle@oel7fs1 ~/9.0/dbvisit/installer :

oracle@oel7fs1 ~/9.0/dbvisit/installer : cd /usr/dbvisit

oracle@oel7fs1 /usr/dbvisit : ls
dbvagent  dbvnet  dbvserver  standby

oracle@oel7fs1 /usr/dbvisit : tree -d .
.
├── dbvagent
│   ├── conf
│   ├── doc
│   ├── log
│   └── tmp
├── dbvnet
│   ├── conf
│   ├── doc
│   └── log
├── dbvserver
│   ├── conf
│   ├── doc
│   └── log
└── standby
    ├── conf
    ├── doc
    ├── gs
    ├── lib
    ├── log
    ├── pid
    ├── tmp
    └── trace

22 directories

oracle@oel7fs1 /usr/dbvisit : cd dbvnet
oracle@oel7fs1 /usr/dbvisit/dbvnet : ./dbvnet -d start
Dbvnet daemon started.

oracle@oel7fs1 /usr/dbvisit/dbvnet : cd ../dbvagent
oracle@oel7fs1 /usr/dbvisit/dbvagent : ./dbvagent -d start
Dbvagent daemon started.

oracle@oel7fs1 /usr/dbvisit/dbvagent : cd ../dbvserver
oracle@oel7fs1 /usr/dbvisit/dbvserver : ./dbvserver -d start
Dbvserver daemon started.

oracle@oel7fs1 /usr/dbvisit/dbvserver :
- You will also notice in the last steps above we started the Dbvisit Standby components (dbvnet, dbvagent and dbvserver).
- Next we can now navigate to the Dbvisit Standby GUI (Central Console) to create a new Dbvisit Standby Configuration (DDC) and then the Standby Database.
- Here are a few extracts to explain the configuration. Please note for more details on adding hosts, creating the configuration and the standby database, please see the Dbvisit Standby documentation.
- Host Overview:
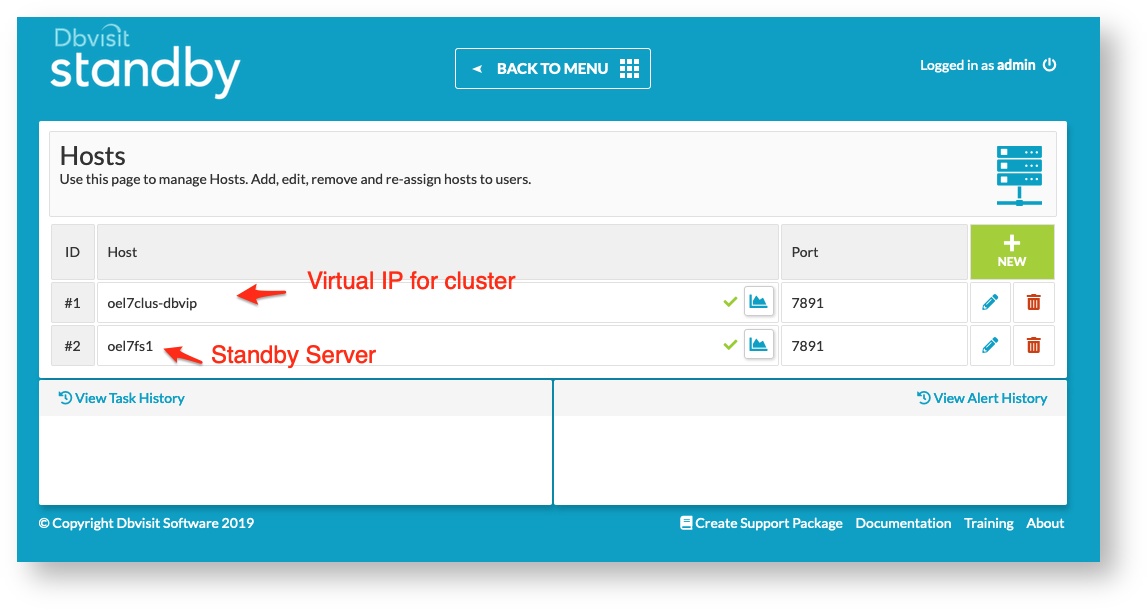
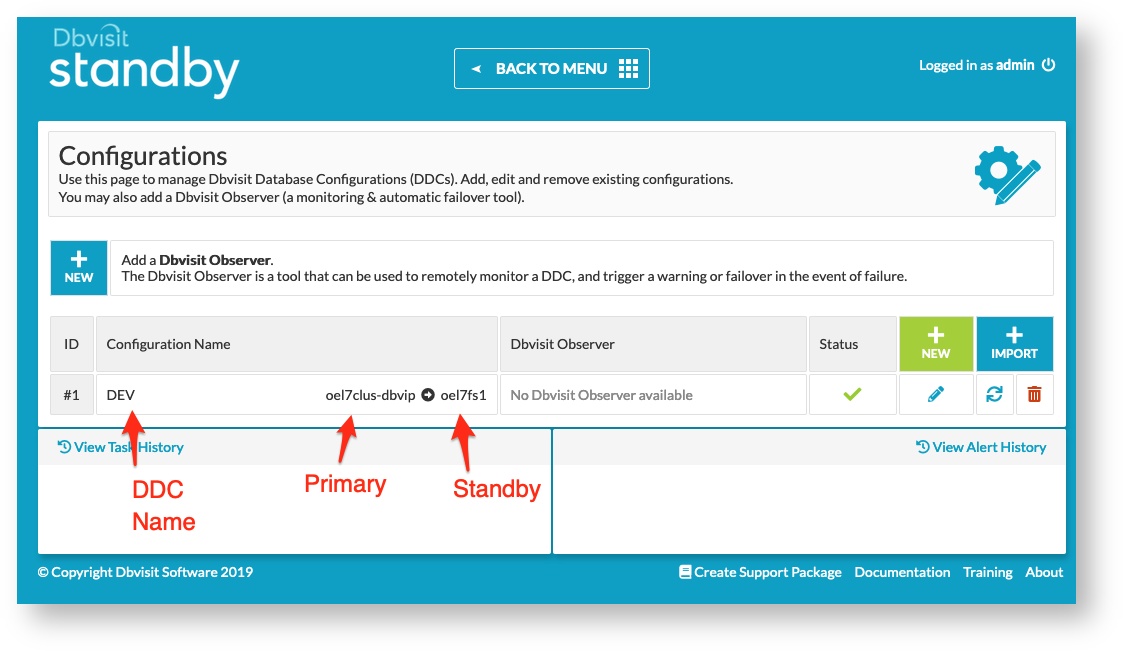
- DDC Configuration:
- Now remember the primary is a cluster and shared storage is used. Dbvisit Standby was installed in /u02/dbvisit and on the standby we installed into the default /usr/dbvisit
- Remember during the DDC creation that you pick the correct DBVISIT_BASE and ORACLE_HOME values as the primary and standby may be different
- Standby Database Creation:
- Follow the standard procedure to create the standby database. Now my standby server filesystem look like below:
aelsnz@oel7fs1 ~ : df -h
Filesystem                   Size  Used Avail Use% Mounted on
devtmpfs                     1.4G     0  1.4G   0% /dev
tmpfs                        1.4G     0  1.4G   0% /dev/shm
tmpfs                        1.4G  8.6M  1.4G   1% /run
tmpfs                        1.4G     0  1.4G   0% /sys/fs/cgroup
/dev/sda3                    6.3G  3.9G  2.2G  65% /
/dev/sda1                    488M  278M  175M  62% /boot
tmpfs                        271M     0  271M   0% /run/user/0
tmpfs                        271M     0  271M   0% /run/user/1000
/dev/mapper/oravg-orahomelv   30G  7.1G   21G  26% /u01
/dev/mapper/oravg-oradblv     20G   65M   19G   1% /u02
- Now the Oracle Home is /u01/app/oracle/product/19.3.0/dbhome_1
- The database will be stored in /u02 and making use of Oracle Managed Files (OMF) - so the following locations are used:
- db_create_file_dest = /u02/oracle/oradata
- fast_recovery_area = /u02/oracle/fast_recovery_area
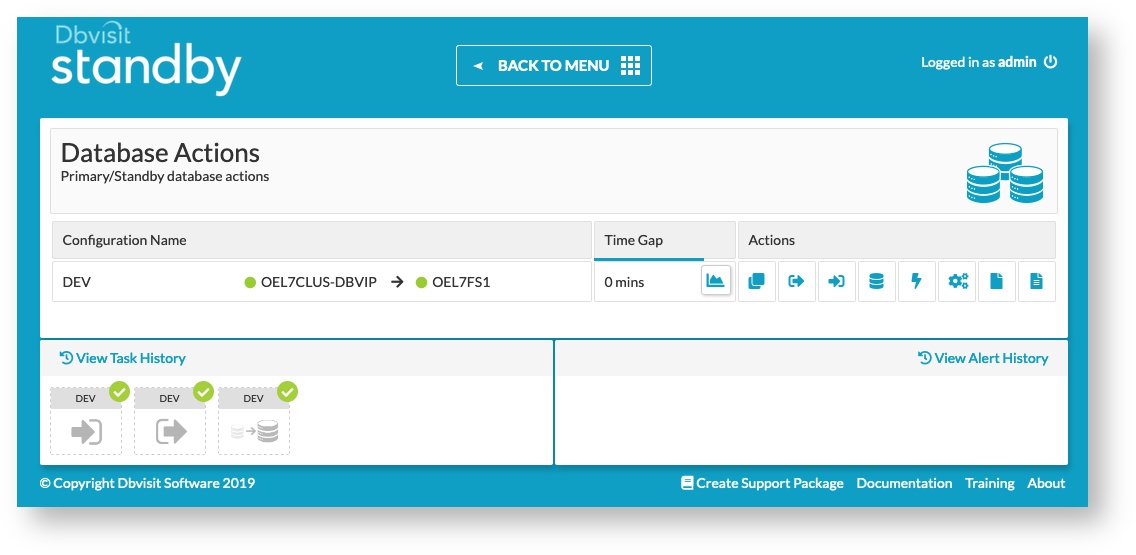
- Once the standby database creation is complete I have the following task details:

- Now that a fully functional primary/standby configuration in Dbvisit Standby, below are just a sample of the Database Actions screen where I showed that logs were shipped and applied.
Step 11: Adding Dbvnet and Dbvagent as Cluster Resources
The next step is to add Dbvnet and Dbvagent as cluster resources with a dependancy on the cluster virtual IP created earlier.
This can be done by adding an action script for Dbvnet and Dbvagent and then adding them as cluster resources.
Here are two sample scripts:
dbvnet-crs.sh
#!/usr/bin/bash
# set -x
#
# Dbvnet Action Script

##############################################
#  Function to change database environments
# Description:
# Use oraenv to set the environment if needed
# This is optional to set the environment
##############################################

## set following to ensure oraenv is picked up from /usr/local/bin
export PATH=/usr/local/bin:$PATH
NUM=0

set_env ()
{
  export ORAENV_ASK=NO
  export ORACLE_SID=$1
  . oraenv >> /dev/null
  export ORAENV_ASK=YES
  export USER=oracle
}

#################
## Main Section
#################

# This is logged to CRSD agent log file
echo "`date` Action script '$_CRS_ACTION_SCRIPT' for resource [$_CRS_NAME] called for action $1"

# set environment
set_env QA
cd /u02/dbvisit/dbvnet


case "$1" in
     'start')
           ./dbvnet -d start
           RET=0
           echo "Running start dbvnet resource with return code $RET"
     ;;

     'stop')
           NUM=`ps -ef | grep dbvnet | egrep -v 'grep|dbvnet-crs|resource' | wc -l`
           if [ $NUM = 0 ]; then
             ## do a cleanup of pid
             ./dbvnet -d stop
             RET=0
           else
             ## now stop the dbvnet
             ./dbvnet -d stop
             NUM=`ps -ef | grep dbvnet | grep -v grep | wc -l`
             if [ $NUM = 0 ]; then
               RET=0
             else
               RET=1
             fi
           fi
           echo "Running stop dbvnet resource with return code $RET"
     ;;

     'check')
           NUM=`ps -ef | grep dbvnet | egrep -v 'grep|dbvnet-crs|resource' | wc -l`
           if [ $NUM = 0 ]; then
             ## return code 1 for check means OFFLINE
             RET=1
           else
             ## return code 0 for check means ONLINE
             RET=0
           fi
           echo "Running check dbvnet resource with return code $RET"
     ;;

     'clean')
           for c1 in `ps -ef|grep dbvnet |egrep -v 'grep|dbvnet-crs|resource'| awk '{print $2}'` ;
           do
             echo "...force kill dbvnet pid $c1"
             kill -9 $c1
           done
           ## do some cleanup
           ./dbvnet -d stop
           RET=0
           echo "Running clean dbvnet resource with return code $RET"
     ;;
     *)
       echo "Usage: ./dbvnet-csr.sh start|stop|clean|clean"
       RET=0
     ;;
esac

if [ $RET -eq 0 ]; then
  exit 0
else
  exit 1
fi
dbvagent-crs.sh
#!/usr/bin/bash
# set -x
#
# Dbvnet Action Script

##############################################
#  Function to change database environments
# Description:
# Use oraenv to set the environment if needed
# This is optional to set the environment
##############################################

## set following to ensure oraenv is picked up from /usr/local/bin
export PATH=/usr/local/bin:$PATH
NUM=0

set_env ()
{
  export ORAENV_ASK=NO
  export ORACLE_SID=$1
  . oraenv >> /dev/null
  export ORAENV_ASK=YES
  export USER=oracle
}

#################
## Main Section
#################

# This is logged to CRSD agent log file
echo "`date` Action script '$_CRS_ACTION_SCRIPT' for resource [$_CRS_NAME] called for action $1"

# set environment
set_env QA
cd /u02/dbvisit/dbvagent


case "$1" in
     'start')
           ./dbvagent -d start
           RET=0
           echo "Running start dbvagent resource with return code $RET"
     ;;

     'stop')
           NUM=`ps -ef | grep dbvagent | egrep -v 'grep|dbvagent-crs|resource' | wc -l`
           if [ $NUM = 0 ]; then
             ## do a cleanup of pid
             ./dbvagent -d stop
             RET=0
           else
             ## now stop the dbvagent
             ./dbvagent -d stop
             NUM=`ps -ef | grep dbvagent | grep -v grep | wc -l`
             if [ $NUM = 0 ]; then
               RET=0
             else
               RET=1
             fi
           fi
           echo "Running stop dbvagent resource with return code $RET"
     ;;

     'check')
           NUM=`ps -ef | grep dbvagent | egrep -v 'grep|dbvagent-crs|resource' | wc -l`
           if [ $NUM = 0 ]; then
             ## return code 1 for check means OFFLINE
             RET=1
           else
             ## return code 0 for check means ONLINE
             RET=0
           fi
           echo "Running check dbvagent resource with return code $RET"
     ;;

     'clean')
           for c1 in `ps -ef|grep dbvagent |egrep -v 'grep|dbvagent-crs|resource'| awk '{print $2}'` ;
           do
             echo "...force kill dbvagent pid $c1"
             kill -9 $c1
           done
           ## do some cleanup
           ./dbvagent -d stop
           RET=0
           echo "Running clean dbvagent resource with return code $RET"
     ;;
     *)
       echo "Usage: ./dbvagent-csr.sh start|stop|check|clean"
       RET=0
     ;;
esac

if [ $RET -eq 0 ]; then
  exit 0
else
  exit 1
fi
Below is example commands of adding these two components - Note that while doing this you have to stop dbvnet and dbvagent, then after adding them as cluster resources, you can start them using the crsctl start resource command.
crsctl add resource dbvnet -type cluster_resource -attr "ACTION_SCRIPT=/u02/dbvisit/dbvnet/dbvnet-crs.sh, RESTART_ATTEMPTS=3, START_TIMEOUT=60, STOP_TIMEOUT=60, CHECK_INTERVAL=10,
          START_DEPENDENCIES='hard(oel7clus-dbvip) pullup(oel7clus-dbvip)'
         ,STOP_DEPENDENCIES='hard(oel7clus-dbvip)'
          ACL='owner:oracle:rwx,pgrp:oinstall:rwx,other::r--'
          PLACEMENT='favored'
          HOSTING_MEMBERS='oel7clus1'"


crsctl add resource dbvagent -type cluster_resource -attr "ACTION_SCRIPT=/u02/dbvisit/dbvagent/dbvagent-crs.sh, RESTART_ATTEMPTS=3, START_TIMEOUT=60, STOP_TIMEOUT=60, CHECK_INTERVAL=10,
          START_DEPENDENCIES='hard(oel7clus-dbvip) pullup(oel7clus-dbvip)'
         ,STOP_DEPENDENCIES='hard(oel7clus-dbvip)'
          ACL='owner:oracle:rwx,pgrp:oinstall:rwx,other::r--'
          PLACEMENT='favored'
          HOSTING_MEMBERS='oel7clus1'"
Step 12: Adding a Pre/Post Processing script
One important step you will need to perform is to add a Dbvisit Standby pre/post-processing script. This is a script that gets executed prior to or after certain Dbvisit Functions. Example, if you are performing a Graceful Switchover and you want to perform certain tasks prior or after the switchover, like moving application connection details or updating DNS or anything can script, you can use this script to help you achieve this.
Now, why do you need one in this scenario you may ask, well the Database Resource created above DEV.db is now going to automatically failover or restart if you perform an SQLPLUS or RMAN restart of the database and not use the Cluster Resource command (crsctl start|stop resource DEV.db).
This becomes important when you want to perform a Graceful Switchover, during which the primary database is stopped and converted to a standby. Now if you do not disable the cluster resource during this operation, Clusterware will attempt to restart the database or will fail-over to the second node.
Now, this can easily be avoided by setting the cluster resource attribute ENABLED=0 and then once the Graceful Switchover is complete set it back to one.
This can easily be done by a pre/post-processing script. Now a sample is provided in the DBVISIT_BASE/doc subfolder of any installation. You can take this file move it to shared storage in the cluster - we recommend DBVISIT_BASE/standby or DBVISIT_BASE/conf
Here is a short extract of this script in the above example, showing the setting of the resource to ENABLED=0
#!/bin/bash
#
# Description:
# ===========
# This script is provided by Dbvisit Software Limited as an example
# pre/post processing script.  This script can be used to perform
# custom tasks (pre) before Dbvisit Standby execute, or (post) following
# a successful execution.
#
# NOTE: This script is a basic template and you will need to add custom code
# to this script to perform the required tasks you want to perform as
# part of pre or post dbvisit processing.
#
# This script should be added to the Dbvisit Database Configuration (DDC) file
# Example: PRE_POST_PROCESSING=/usr/local/bin/pre-post-dbvisit.sh
#
# Dbvisit STandby will pass two parameters to this script
#  Parameter 1 can be one of two possible values:  [pre|post]
#  Parameter 2 can be one number from 1 to 8:  [1|2|3|4|5|6|7|8]
#
# Usage:  ./pre-post-dbvisit.sh [pre|post] [1|2|3|4|5|6|7|8]
#
# Example: ./pre-post-dbvisit.sh pre 1
#
# Parameter explanation:
# =====================
#  pre  = Pre Dbvisit Processing step
#  post = Post Dbvisit Processing step
#  1	= Dbvisit is executed on primary and will be sending logs to standby
#  2	= Dbvisit is executed on standby and will be applying logs
#  3	= Dbvisit Graceful Switchover is executed on primary
#  4	= Dbvisit Graceful Switchover is executed on standby
#  5	= Dbvisit Activation is executed on standby
#  6  = Standby Database is opened read-only
#  7  = Dbvisit Create Standby Database is executed on primary (post only)
#  8  = Dbvisit Create Standby Database is executed on standby (post only)
#
# Note: This script is an example only and should be tested first before
#        it is used in a production environment.
#
# To enable debugging, uncomment following line:
# set -x
#
###########################################
#  Function to echo usage
###########################################
usage ()
{
  program=`basename $0`

cat <<EOF
Usage:
   ${program} [pre|post] [1|2|3|4|5|6|7|8]
       [pre|post}      - Specify if Pre or Post processing is being performed
       [1|2|3|4|5|6|7|8] - Indicate Dbvisit operation being performed
        -h             - display the usage

        pre  = Pre Dbvisit Processing step
        post = Post Dbvisit Processing step
        1 = Dbvisit is executed on primary and will be sending logs to standby
        2 = Dbvisit is executed on standby and will be applying logs
        3 = Dbvisit Graceful Switchover is executed on primary
        4 = Dbvisit Graceful Switchover is executed on standby
        5 = Dbvisit Activation is executed on standby
        6 = Standby Database is opened read-only
        7 = Dbvisit Create Standby Database is executed on primary (post only)
        8 = Dbvisit Create Standby Database is executed on standby (post only)

   Example, to perform a task on the standby server following activation:

        ${program} post 5

EOF
exit 1

}

###########################################
#  Function to setup parameter variables
#  Description:
#    Specify any global settings in this section
###########################################
setup_parameters ()
{
  ## Below are some example values
  export PATH=$PATH:/bin:/usr/bin:/usr/local/bin
  export NLS_DATE_FORMAT='DD/MM/YYYY HH24:MI:SS'
  SERVER=`uname -n`
  dbvisit_base=/u02/dbvisit
  logfile=${dbvisit_base}/standby/log/pre-post-dbvisit.log
}

################################################
#  Function to change database environments
#  Description:
#    Use oraenv to set the environment if needed
#    This is optional to set the environment
################################################
set_env ()
{
  export ORAENV_ASK=NO
  export ORACLE_SID=$1
  . oraenv >> /dev/null
  export ORAENV_ASK=YES
}

###########################################
#  Function to Add text to logfile
###########################################
addLog()
{
  # comment 1st line below to remove echo back to user and to only write to log
  echo "`date +%d-%h-%Y:%H:%M:%S` : ${1}"
  echo "`date +%d-%h-%Y:%H:%M:%S` : ${1}" >> ${logfile}
}


### Add your custom functions here
###

disable_cluster_resource () {
   ## This example we are testing if runninig on clusterware, if resource exist
   ## disable it, as shutdown of database can cause resource to restart it again....
   server_name=`uname -n`
   if [ "${server_name}" = "dbvclus1.dbvisit.co.nz" ]; then
      set_env +ASM1
   else
      set_env +ASM2
   fi

   crsctl modify resource DEV.db -attr "ENABLED=0"

}

enable_cluster_resource () {
   ## This example we are testing if runninig on clusterware, if resource exist
   ## disable it, as shutdown of database can cause resource to restart it again....
   ## at end of operation we want to enable it again
   server_name=`uname -n`
   if [ "${server_name}" = "dbvclus1.dbvisit.co.nz" ]; then
      set_env +ASM1
   else
      set_env +ASM2
   fi

   crsctl modify resource DEV.db -attr "ENABLED=1"

}


##########################
##########################
####
#### MAIN PROGRAM SECTION
####
##########################
##########################

## First call function to set the environment or specific global variables
setup_parameters

## Test input values, must be 2 values, if not exit
if test $# -lt 2
then
  echo "Cannot execute, 2 values must be specified as input..."
  usage
  exit 99
fi


if [ ${1} = "pre" ] || [ ${1} = "post" ]
then
  if ! [[ $2 =~ ^[1-8]$ ]]
  then
     echo "2nd Parameter must be a number between 1 and 8"
     usage
     exit 97
  fi
else
  echo "1st Parameter must be \"pre\" or \"post\"";
  usage
  exit 98
fi


### Now that values are valid, execute required code block

   case ${1} in
   pre)
           addLog "Start Pre Processing"
           case ${2} in
             1)
                addLog "Primary Database Send"
                ## add custom code here or call custom function
                ;;
             2)
                addLog "Standby Database Apply"
                ## add custom code here or call custom function
                ;;
             3)
                addLog "Primary Server Graceful Switchover"
                if [ "${SERVER}" = "dbvclus1.dbvisit.co.nz" ] || [ "${SERVER}" = "dbvclus2.dbvisit.co.nz" ]; then
                  disable_cluster_resource "DEV.db"
                fi
                ## add custom code here or call custom function
                ;;
             4)
                addLog "Standby Server Graceful Switchover"
                ## add custom code here or call custom function
                if [ "${SERVER}" = "dbvclus1.dbvisit.co.nz" ] || [ "${SERVER}" = "dbvclus2.dbvisit.co.nz" ]; then
                  disable_cluster_resource "DEV.db"
                fi
                ;;
             5)
                addLog "Standby Database Activate"
                ## add custom code here or call custom function
                ;;
             6)
                addLog "Standby Database Read-Only"
                ## add custom code here or call custom function
                ;;
           esac
           ;;

   post)

           addLog "Start post Processing"
           case ${2} in
             1)
                addLog "Primary Database Send"
                ## add custom code here or call custom function
                ;;
             2)
                addLog "Standby Database Apply"
                ## add custom code here or call custom function

                # Uncomment/edit lines below to compress archive logs in ARCHDEST
                # on the standby when logs are transferred uncompressed
                # Perl script compress_archdest must be located in the same
                # directory as the pre-post processing shell script
                # Param ${3} is passed from dbvctl and is used by script
                # compress_archdest.pl

                #compress_method="/bin/gzip"

                # uncompliled script requires perl to be installed
                #perl compress_archdest.pl ${3} --compress_method "$compress_method" >> ${logfile}

                # Script compress_archdest.pl can be compiled
                #compress_archdest ${3} --compress_method "$compress_method" >> ${logfile}
                ;;
             3)
                addLog "Primary Server Graceful Switchover"
                ## add custom code here or call custom function
                if [ "${SERVER}" = "dbvclus1.dbvisit.co.nz" ] || [ "${SERVER}" = "dbvclus2.dbvisit.co.nz" ]; then
                  enable_cluster_resource "DEV.db"
                fi
                ;;
             4)
                addLog "Standby Server Graceful Switchover"
                ## add custom code here or call custom function
                addLog "Primary Server Graceful Switchover"
                if [ "${SERVER}" = "dbvclus1.dbvisit.co.nz" ] || [ "${SERVER}" = "dbvclus2.dbvisit.co.nz" ]; then
                  enable_cluster_resource "DEV.db"
                fi
                ;;
             5)
                addLog "Standby Database Activate"
                ## add custom code here or call custom function
                ;;
             6)
                addLog "Standby Database Read-Only"
                ## add custom code here or call custom function
                ;;
             7)
                addLog "Primary Server Create Standby Database"
                ## add custom code here or call custom function
                ;;
             8)
                addLog "Standby Server Create Standby Database"
                ## add custom code here or call custom function
                ;;
           esac
           ;;
   esac
Testing the pre/post processing script is easy, you can just pass in the parameters and then review the ENABLED attribute of the DEV.db resource.
Example:
oracle@dbvclus1 /u02/dbvisit/standby/conf : ./pre_post_processing.sh pre 3
11-Sep-2019:14:22:21 : Start Pre Processing
11-Sep-2019:14:22:21 : Primary Server Graceful Switchover

oracle@dbvclus1 /u02/dbvisit/standby/conf : crsctl status resource DEV.db -f|grep ENABLED
ENABLED=0


oracle@dbvclus1 /u02/dbvisit/standby/conf : ./pre_post_processing.sh post 3
11-Sep-2019:14:22:33 : Start post Processing
11-Sep-2019:14:22:33 : Primary Server Graceful Switchover

oracle@dbvclus1 /u02/dbvisit/standby/conf : crsctl status resource DEV.db -f|grep ENABLED
ENABLED=1