Creating two standby databases on same server
- Anton Els (Deactivated)
- Jakub Sejba
- Vijayganesh Sivaprakasam
Example 1: Windows - with Oracle Managed Files (OMF) being used
In this example, we will show you how to create the secondary standby database taking into account that the primary and standby databases are making use of Oracle Managed Files (OMF).
For more detail on Oracle Managed Files please see the Oracle Documentation - https://docs.oracle.com/cd/E11882_01/server.112/e25494/omf.htm#ADMIN11493
Please note that in this example, the idea is not to ship logs more than once between the primary and standby database servers. Example, we will send logs for the first DDC (primary → standby pair). The second standby database configuration will use the exact same locations for ARCHDEST and ARCSOURCE than the first DDC - what we mean with this is that when the primary sends logs to the standby server for the first standby database, the logs will be located in (ARCHDEST) example: C:\app\oracle\dbvisit_arch\DEV
This location will then be used as ARCHDEST for the second standby database as well, which means as logs arrive, they are not just available for the first standby, but also for the second, which means the second standby database can just apply the logs and a second transfer of the archive logs from primary to the second standby database is not required.
Environment Overview
The example below is between two Windows 2016R2 systems running Oracle Database 12.2 Standard Edition 2 where one Pluggable Database is used - Note that the fact that this is using a pluggable database or is 12.2 does not make the processes different for a non-container database or even an 11g environment.
- The primary system is: kiwi2016a
- The standby system is: kiwi2016b
- The Primary Oracle Database is called: DEV
Important, the default DB_NAME is DEV and the default DB_UNIQUE_NAME for the primary and first standby database was left at the default which is same as DB_NAME which means DB_UNIQUE_NAME=DEV
The first "primary → standby" configuration file (DDC) name is DEVDR1.
Important to note that the default locations for the ARCHDEST and ARCSOURCE values were used which would be:
- ARCDEST=C:\app\oracle\dbvisit_arch\DEV
- ARCHSOURCE=C:\app\oracle\dbvisit_arch\DEV
As mentioned in this example the DB_NAME and DB_UNIQUE_NAME is DEV for the primary and first standby database.
As Oracle Managed Files (OMF) is used, the (OMF) locations specified is:
- db_create_file_dest=c:\app\oracle\oradata
- db_recovery_file_dest=c:\app\oracle\fast_recovery_area\DEV
Creating the 2nd DDC file
The example assumes that the first DDC called DEVDR1 was already created and that a standby database is created and running.
To create the second DDC file, follow the same process as normal, BUT, make sure you adjust the following settings:
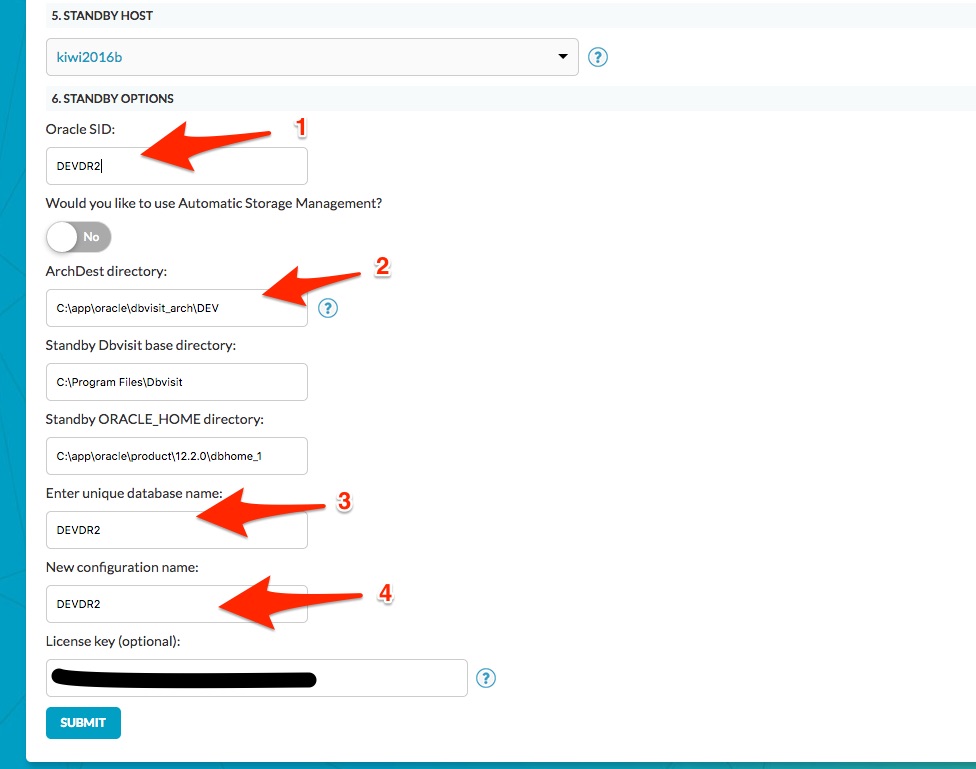
- Make sure the Oracle SID (Instance Name) value is changed to not be the same as the first standby database. In this example, the first standby database has the same as the primary which is DEV. In this example, we will change the second standby database to have Oracle SID set to DEVDR2. This means that the Oracle Service on windows will be called DEVDR2 and the instance name will be set to DEVDR2.
- Make sure you use the exact same ARCHDEST location for the second configuration as what you are using for the first. In this example we use: C:\app\oracle\dbvisit_arch\DEV
- IMPORTANT - Make sure the unique database name (DB_UNIQUE_NAME) value is changed to NOT be the same as the existing standby database. Keeping this name similar to the new Oracle SID is a good idea. Example to keep it simple, we will make it DEVDR2. This is important as we are using Oracle Managed Files (OMF) the directory structure will use the DB_UNIQUE_NAME value to help keep files separate between the two standby databases.
- The 4th change is to give it a new unique configuration name (DDC) - in this case keeping it same as the Oracle SID and Unique Name make sense and we call it DEVDR2
Below is an example of the above steps:
Once you have created the second configuration you will see the two listed under the Configurations page (Example below)
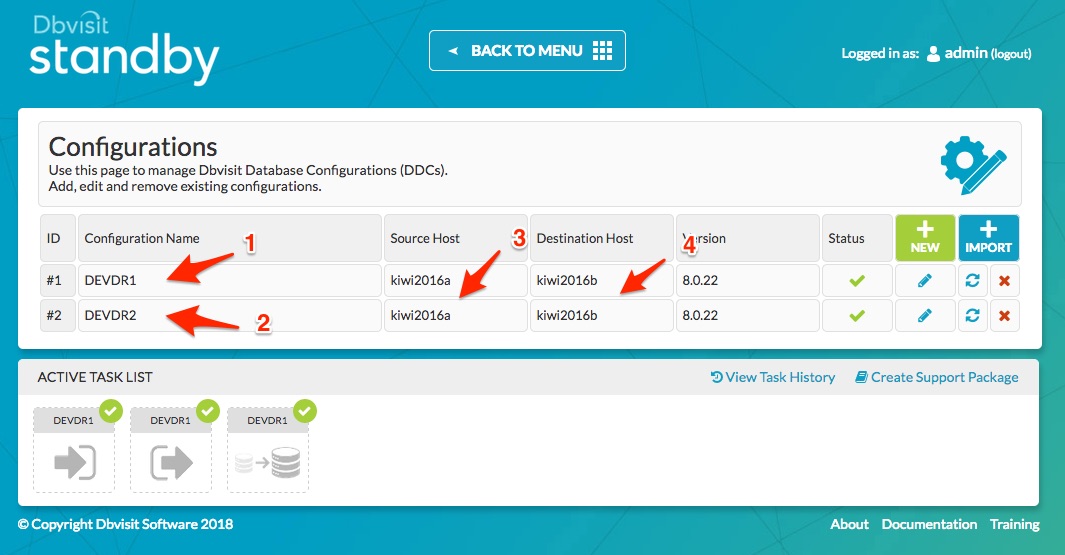
- We see the first DDC for the first primary → standby pair called DEVDR1
- The second DDC that was created for the primary → 2nd standby pair is called DEVDR2 (created in the previous step)
- As you can see the primary server is the same for both DDCs
- The standby server is also the same - as mentioned we are creating two standby configurations for one primary database.
Creating the 2nd Standby Database
The next step is to create the second standby database (CSD).
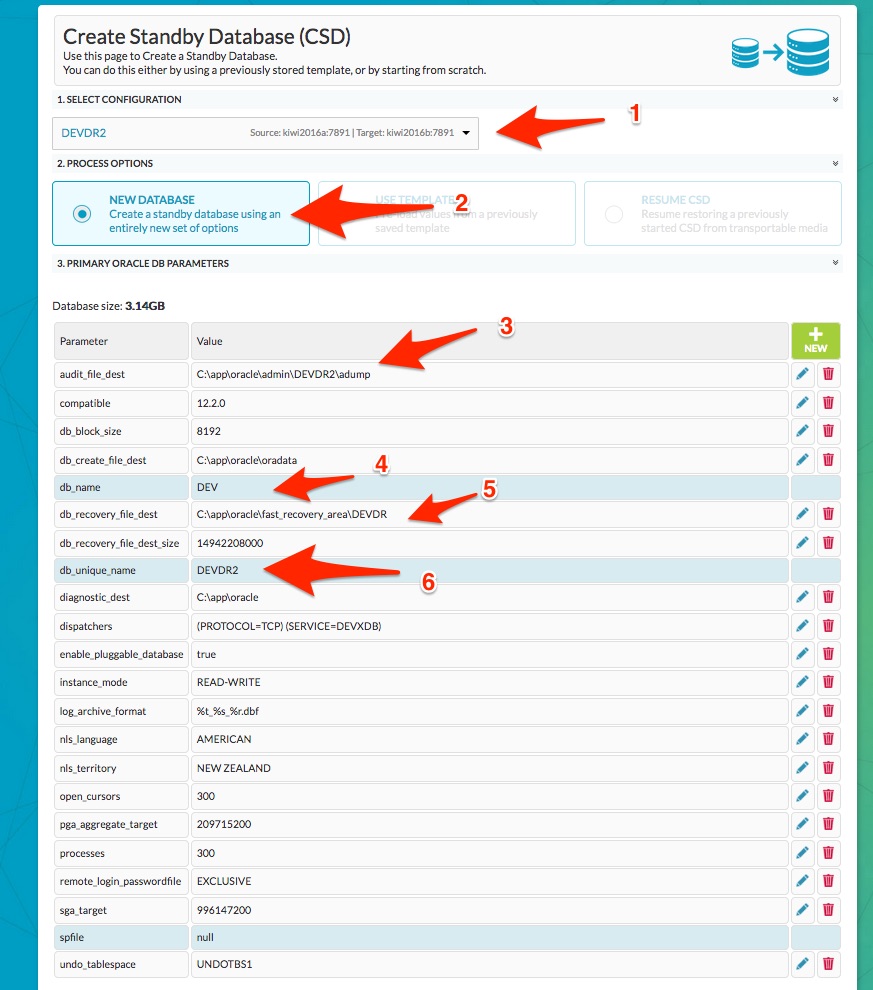
We navigate to the CSD screen and select the second DDC - DEVDR2. A few validations will take place and once done the screen will expand and show the available options (see example below)
Important, there are a few database parameters that must be set. As we are using Oracle Managed Files (OMF) we have to set fewer parameters than if we did not (If NON-OMF was used the db_file_name_convert and log_file_name_convert parameters would need to be set)
The following is set (using the example below)
- Select the DDC - DEVDR2
- Select "NEW DATABASE"
- Adjust the AUDIT_FILE_DEST value to not use same as the first standby but to be unique - in this example: c:\app\oracle\admin\DEVDR2\adump
- As you can see the DB_NAME is locked, you cannot change this.
- Adjust the DB_RECOVERY_FILE_DEST to be unique to keep it separate from previous standby - and to keep it simple. It is set to c:\app\oracle\fast_recovery_area\DEVDR2
- As we have specified during the DDC creation that the DB_UNIQUE_NAME will be DEVDR2 it is already set and cannot be modified - (to modify this if you have named it wrong - remove and recreate the DDC file then restart CSD)
NOTE: in the example, the DB_CREATE_FILE_DEST is left the same as primary and 1st standby c:\app\oracle\oradata (note that as OMF is used, files will be created under c:\app\oracle\oradata\<db_unique_name> which in this example will be c:\app\oracle\oradata\DEVDR\...)
Keeping the 2nd standby up to date
Once the Create Standby Database (CSD) process is complete, we can ship and apply logs. Now we can do this for both DDCs but keep in mind ideally we just want to ship logs once - from the first DDC (DEVDR1) and then only have the second standby database apply logs that were already shipped.
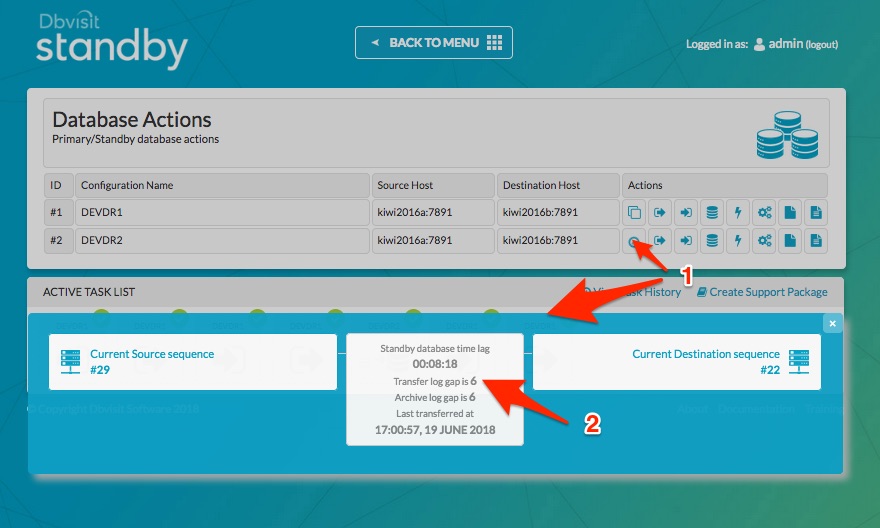
Example, if we have shipped a few logs for 1st DDC - DEVDR1 and we then run a log gap report for the second DDC we can see that as expected there are logs shown to still be shipped and applied, even though these logs might have already been shipped by the 1st DDC.
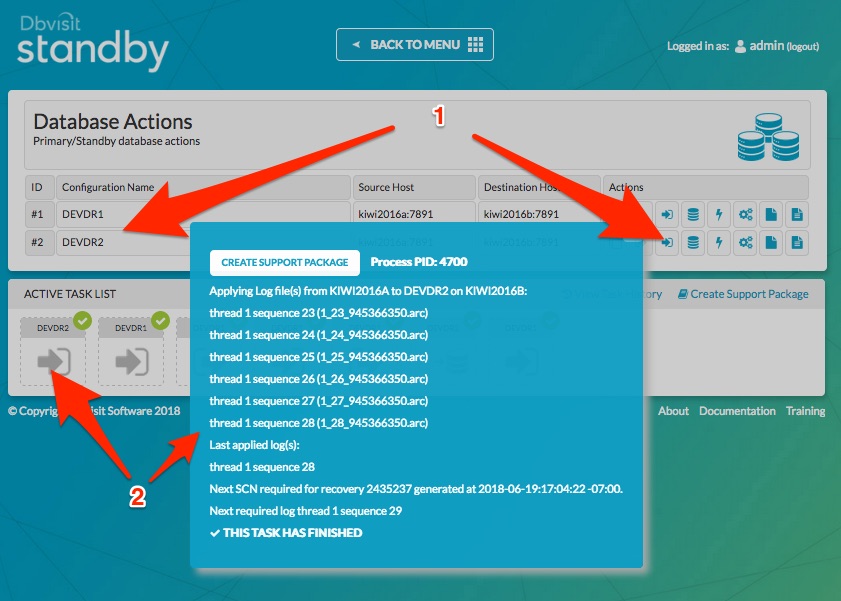
Now instead of shipping the logs, we just run the apply of logs for the second DDC - DEVDR2 and you will notice that as the logs were already shipped by the first DDC run - the logs are being applied (remember they share the same ARCHDEST location)
But the catch now is if we run a log gap report after this we will see that there is still a "Transfer GAP" of 6 (see below). This is expected, as we never shipped logs from primary to standby for this DDC - so the repository does now know these logs were already on the standby due to the first DDC already shipping them.
The next step that is required is to update the Dbvisit Standby repository (located on the primary server under the DBVISIT_BASE/standby/conf directory and is named DB_NAME.db - so the two DDC files will share this repository)
The method used to do this is to run the -R option from the command line interface (dbvctl -d <ddc> -R) which will re-sync the repository. In summary, it will review the status of the standby and then ship only new logs that are needed (if any) and then update the repository.
Below are the steps to explain how this is done.
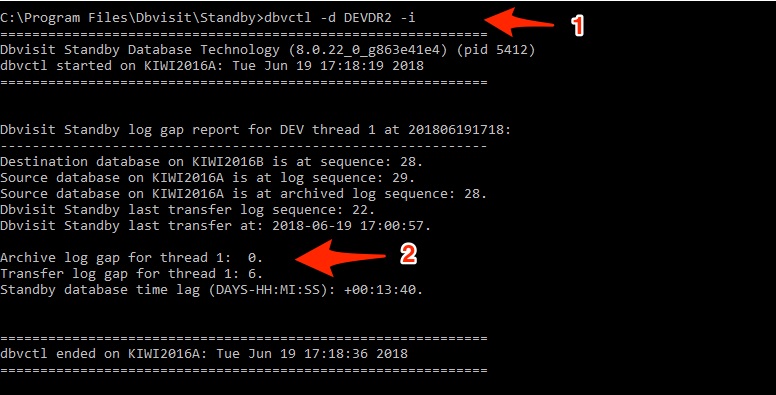
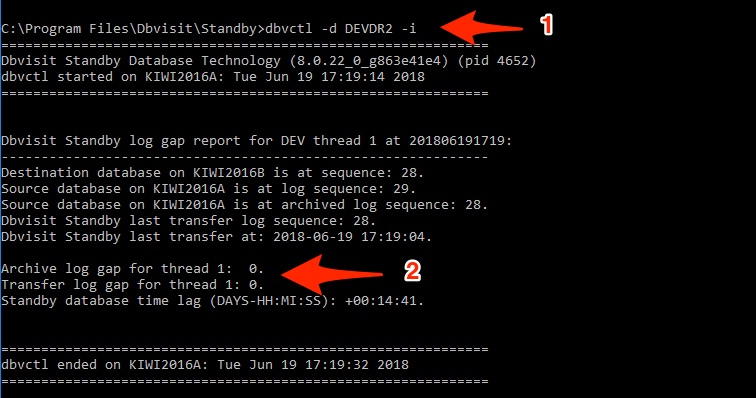
Step 1: Run the Log gap report (dbvctl -d <ddc> -i)
You will see that there is the transfer gap, but no archive gap - which means the standby is up to date with all archive logs available being applied.
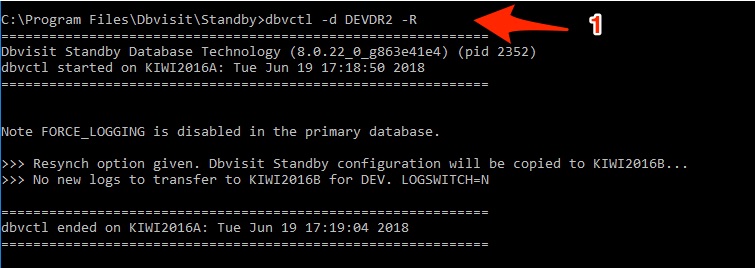
Step 2: Re-sync the repository (dbvctl -d <ddc> -R)
Running the -R command to resync the standby database and the repository the following will happen:
The standby database will be asked for status and what the last log was that was applied, it will then compare this with the primary and if there is still logs to be shipped it will ship only what is needed.
Now the important step - once the above is done it will update the repository and set what the last log was that was transferred.
Step 3: Review Log Gap Report
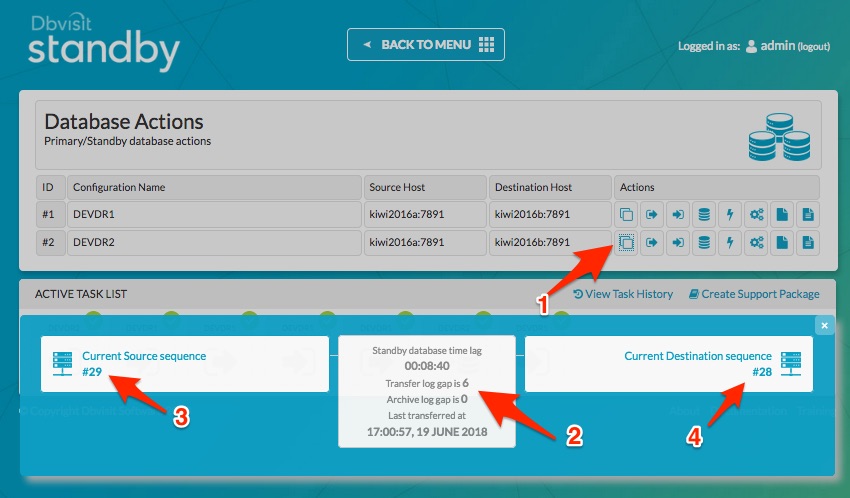
The next step is to review the log gap report and as we can see it now states that the Archive Log Gap and Transfer Gap is both 0 - which is expected.
Next Steps
Now that we know how this can be done the following steps should be followed:
- Schedule / Run Daemon for the first DDC - in this example DEVDR1 so that logs are shipped and applied as normal.
- Schedule the second DDC - DEVDR2 to only apply logs on your required schedule - Using the Windows Scheduler (or Unix Cron if using Unix) is recommended.
- Run the above "dbvctl -d <ddc> -R" on the primary for the second DDC (DEVDR2) just after you have the schedule run to apply logs (step 2 above).
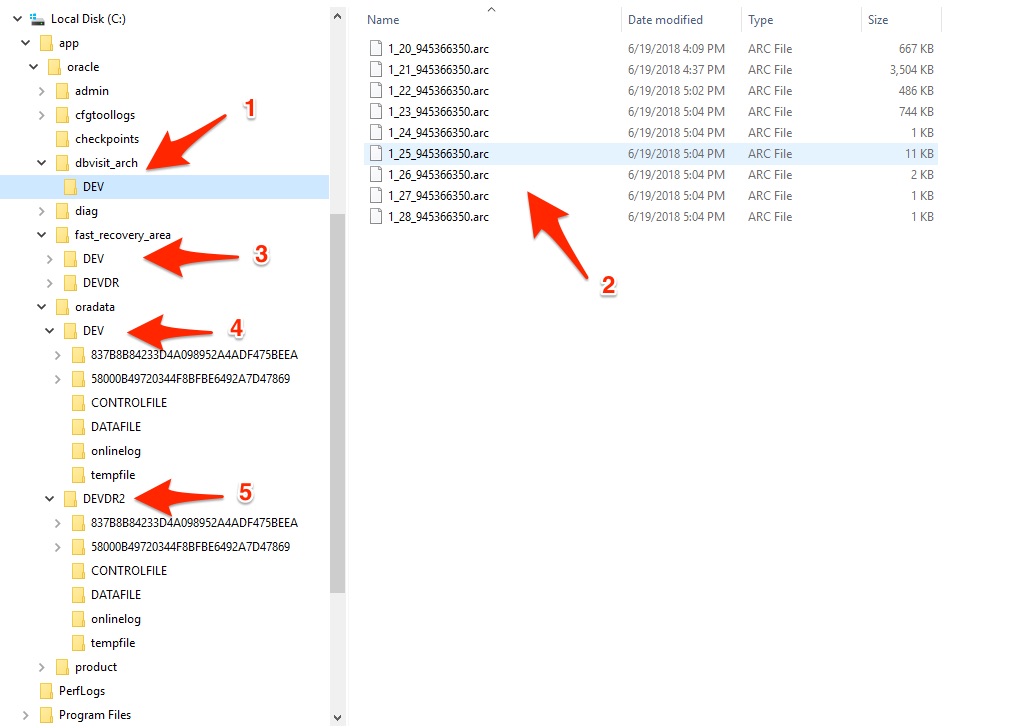
Below is a summary of what the directory structure on the standby server will look like with the two standby databases.
Again please note Oracle Managed Files - OMF, is used and that the ARCHDEST location for both DEVDR1 and DEVDR2 DDCs are same (shared)