Installation Steps - Windows
- Anton Els (Deactivated)
This section will cover the installation of Dbvisit Standby on Microsoft Windows systems.
The current recommended and supported Operating Systems (Windows based) include:
- Windows 2003 (32bit and 64bit)
- Windows 2008 (32bit and 64bit)
Important pre-requisite steps on Windows based environments:
- It is recommended to install Dbvisit Standby as the same user that installed the Oracle Database Software
- Ensure that the user that will be used to run Dbvisit Standby is part of the windows ORA_DBA group
- Open the Dbvnet port 7890 on both primary and standby server. This port should not be blocked by the local Windows Firewall.
- Open the Dbvserver Web-based interface port 8081 (default for http) and if you are planning on using https, open port 8443.
- Before you start the Dbvisit Standby version 7 installation, it is recommended to stop the Dbvserver (and Dbvnet) services if you have a previously installed version.
- Make sure you stop all Dbvisit Standby Schedules before you start the new installation.
The default ports used by Dbvisit Standby on Windows based environments are 7890 for the network communication (Dbvnet) and 8081 used for the Web-based interface (Dbvserver).
By default the web-based interface is enabled on HTTP (port 8081) only. If HTTPS is required, the dbvserver.conf file will need to be updated (discussed later in this section) and Dbvserver service restarted.
Installing Dbvisit Standby
The first step is to download the Dbvisit Standby installation file. Example download file in this example is dbvisit-standby7.0.04_win32.zip.
Download the file and extract the installer into a temporary location. Start the installer by running: Dbvisit-Standby7.0.04-Inst.exe
It is recommended to install Dbvisit Standby as the same Operating System user used to Install the Oracle Database Software and Make sure this user account is part of the ORA_DBA Windows group
Important: Dbvisit Standby software needs to be installed on both the primary and standby servers.
Step 1: Start the Installer

- Start the installer, by running the Installer file, example "Dbvisit-STandby7.0.04-Inst.exe"
- Once the installer start, click on Next to start
Step 2: License Agreement

- Review the License Agreement
- Click on "I Agree" to continue with the Installer
Step 3: Review Pre-requisites

- Review the logged on User. It is recommended to use the same user account used to perform the Oracle Database software installation
- It is recommended to use the same account on both primary and standby server.
- Windows security settings, such as UAC and group policies might interfere with Dbvisit Standby. It is recommended to review your policies and disable User Account Control (UAC) for the account used to run Dbvisit Standby.
Step 4: Choose Components to Install

- Review the options to install. It is recommended to install all 3 components:
- Dbvisit Standby (Required), this is the Dbvisit Standby Core module, including the Command Line Interface (CLI)
- Dbvisit Dbvserver (Optional), this option provides the Web Based user interface, as well as the Dbvisit Standby Scheduler. This option is not required, and if the Web Based interface is not required, this option does not need to be installed.
- Dbvisit Dbvnet (Required), this option must be installed. Dbvnet provides the network communication between the Primary and Standby server and must be installed. As of Dbvisit Standby version 7, SSH is not and cannot be used anymore.
- Click on next to continue
Step 5: Installation Folder (DBVISIT_BASE)

- Select the Dbvisit Standby installation folder, also known as the DBVISIT_BASE location. On windows the default location is under "C:\Program Files" if installed on 32bit Windows and "C:\Program Files (x86)". You may select a different location, but the default is recommended.
- Not the storage requirements. The default Dbvisit Standby installation is approx. 125MB in size. This location where Dbvisit Standby is to be installed, will also hold the log and trace files. It is recommended that you have at least an additional 100MB to 200MB of disk space.
- Click on "Install" to continue
Once you click on install, the installation process will start. If you have an earlier version of Dbvisit Standby installed, such as version 6.0.54, the Dbvserver Service will be stopped and removed to allow for the new software to be installed and started. It is recommend to stop the Dbvserver (and Dbvnet if previously installed) before you star the Dbvisit Standby version 7 installation.
Step 6: Installation - Dbvserver (Web Based GUI)

- The Dbvserver (Web Based Interface) Software was installed and the next step will be to create the Dbvserver Windows Service. This step will require you to provide the password for the currently logged on User. This use will be used to run the Dbvserver service.
- Click on Yes to continue
Step 7: Creating Dbvserver Service

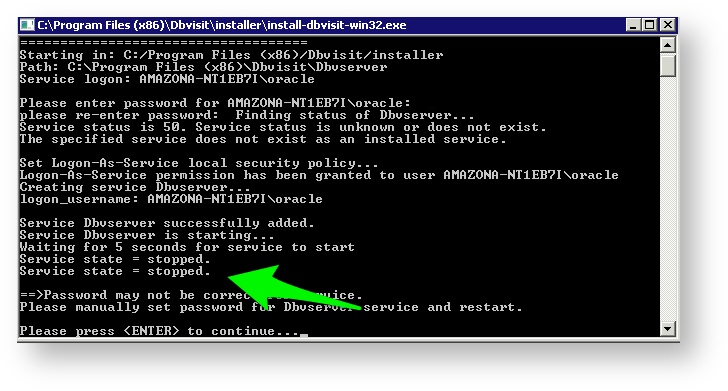
- Specify the logged on user's password
- The service creation will start, once complete, the service will be in a Started State
Note: If you do not provide the correct password for the user to start the service, the service will fail to start. The following message can be displayed.

If you do get the above use the Windows Services and update the password and manually restart the Dbvserver service, example:

Windows 2003 and 2008 has a 30second limit for services to be started.
If the Dbvserver Service does not start within this 30seconds the startup will be terminated and an message similar to the one below will be displayed:
Press <ENTER> to continue. Note that the Dbvisit Standby Installer will attempt a restart of this service.
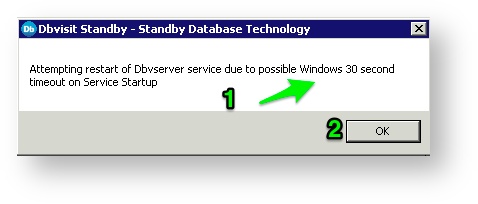
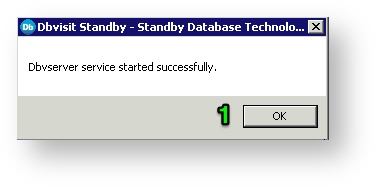
The installer will attempt a second restart of the service and will display an update on the status of the service.
Step 8: Creating the Dbvnet Windows Service

- During this step, Dbvisit Standby networking component - Dbvnet is installed. The Dbvnet software is using port 7890 by default to communicate between the primary and standby server. It is recommended that you make sure this port is not blocked by any firewall between the primary and standby servers.
- Click on Yes to continue with the creation of the Dbvnet Windows service.

- You will be asked to supply the currently logged on user password, which is required for the creation of the Dbvnet Windows service.
- Once the password is supplied the Dbvnet Windows service is created and started
If you do get issues with the Dbvnet service not starting, it is recommended to review the password supplied and that you re-enter the password from the Windows Services console. Then manually restart the Dbvnet Windows service.
Step 9: Dbvisit Standby Setup

- The final screen of the new Dbvisit Standby installation is a summary highlighting the next steps:
- Start the Dbvisit Standby Configuration:
- Using the Command Line: c:\Program Files (x86)\Dbvisit\Standby\dbvisit_setup.exe
- Using the Web Based Interface: From menu, click on Setup then New Dbvisit Standby Configuration
- Start the Dbvisit Standby Configuration:
- The Configuration step needs to be executed on the primary server. The first step is to create the Dbvisit Standby Configuration (DDC) file for the primary/standby configuration (one DDC file per primary-standby database pair should be configured).
- Click on OK to continue.
Step 10: End of installation

Once the installation is complete, click on Finish.
Step 11: Install Dbvisit Standby on the Standby server - Repeat step 1-10 on Standby server.
After installing Dbvisit Standby on the primary make sure you have installed the software on the standby server as well.
You can now continue to the next step which is to configure Dbvisit Standby (create a DDC file)