Create Standby Database (CSD)
- Deepika Kumar (Deactivated)
- Charmaigne Bezuidenhout (Deactivated)
- Jan Klinke
Introduction
Dbvisit Standby can assist in creating the standby database. Dbvisit Standby supports the creation of standby databases even if ASM or OMF are used. If you are still using RAW devices, Dbvisit Standby version 9 can also support this.
Dbvisit Standby version 9 also supports the creation of an Oracle RAC enabled standby database. There are a number of prerequisites before this can be performed. For example, the standby environment must already have the Clusterware (GI) installed and ASM storage configured, as well as have the Oracle Database software installed, this option will be discussed in more detail in this section.
Before getting into the more advanced configurations it is important to first make sure you understand the basics and then move onto the more advanced configurations.
Dbvisit Standby version 9 will guide you through the creation of the standby process, and by answering a few short questions you will be ready to start the process.
Creating a standby database can be done in three ways:
- Creating the standby database manually (this option will not be discussed in this guide - for more detail please see the Oracle Documentation)
- Creating the standby database using the Dbvisit Standby Core - Command Line Interface
- Creating the standby database using the Central Console - GUI
Please note that this guide will refer to the Create Standby Database process as the CSD process.
If using ASM based databases, we do not recommend the use of ASM aliases but to rather use Oracle Managed File naming.
If you do create a standby database where ASM is used and the primary database is making use of ASM aliases, the standby database will only end up with OMF datafiles and ASM aliases will not be created.
ASM Aliases can be created post CSD either using a post-processing script or by manually creating them.
For more detail see: Pre/Post Processing#Pre/PostProcessing-ASMAliases
As a prerequisite, you have to make sure that the Primary database uses SPFILE and not PFILE before running the Create Standby Database process.
If you are using ODA machines, It is required that you create the dbstorages before creating the standby databases using Dbvisit. Please refer the blog for further details.
http://blog.dbvisit.com/configuring-dbvisit-standby-on-an-oda/
On this page:
2. Creating The Standby Database - Command Line
Creating the Standby Database is an easy process if you are familiar with your Database environment and have followed all the pre-requisites when installing the Dbvisit Standby software. Create Standby Database via command line has to be started from Primary server.
Please ensure you have adequate available space on the standby server to copy the RMAN backup and restore backup copy that this process does.
This section will focus on using the command line interface using the dbvctl command: ./dbvctl --csd
To quickly obtain the usage (syntax) of the CSD command run: "./dbvctl -h --csd"
[oracle@dbv1 standby]$ ./dbvctl -d DEV --csd -h
    Create a new standby database

    dbvctl -d <ddc> --csd [--mode CLI|BATCH|GUI] [--restart] [--noprompt] [-j json_file] [--dump_template]

    --mode           CLI default
    --restart        Restart previous run in BATCH mode if incompleted
    --json           Json file in GUI mode
    --noprompt       No confirmation prompts
    --dump_template  Json file to write an existing template to

[oracle@dbv1 standby]$
When running the CSD process from the command line, you are not required to use the options listed in brackets [] example:
[--mode CLI|BATCH|GUI] [--restart] [--noprompt] [-j json_file] [--dump_template]
These are optional parameters.
2.1. Creating Single Instance Standby (non-RAC)
In the following example we will create a standby database based on the following information:
- Primary Server Details:
- Server Name: dbv1
- DB_NAME: DEV
- DB_UNIQUE_NAME: DEV
- The database is in archivelog mode
- Database archive log destination is set to the default recovery area (FRA) - /u01/app/oracle/fast_recovery_area
- There is a local backup folder /u01/app/oracle/backup which has sufficient space to hold a full compressed backup of the primary DEV database (RMAN Backup)
- The database data files are located in /u01/app/oracle/oradata/DEV
- NON-OMF is used
- One controlfiles are located in /u01/app/oracle/oradata/DEV and the second one in the FRA - /u01/app/oracle/fast_recovery_area/DEV
- Standby Server Details:
- Server Name: dbv2
- The DB_NAME and DB_UNIQUE_NAME will be the same as the primary
- The same folder structure as the primary will be used
- The Oracle Database software is already installed on the standby server and match the same version and edition of the primary
- The standby server also has a /u01/app/oracle/backup folder with sufficient space for a full RMAN database backup
In this example, the ideal configuration is used. This means that the primary and standby database servers are an exact match with regards to storage and the directory structure.
In this case, it will not be required to set any additional parameters such as the db_file_name_convert or log_file_name_convert parameters.
We can now start the process by running the following command from the primary server: ./dbvctl -d DEV --csd
The example output below shows the detail steps followed:
[oracle@dbv1 standby]$ ./dbvctl -d DEV --csd

>>> Running pre-checks please wait... done
What would you like to do:
   1 - Create standby database (and optionally save settings in template)
   2 - Help
   3 - Terminate processing
   Please enter your choice [1]: 1

-------------------------------------------------------------------------------

=>Do you want to use TRANSPORTABLE MEDIA to transfer the database backup to the
standby server? Transportable media is an external device such as a USB drive
that is first plugged into the primary server and then manually transferred to
the standby site and plugged into the standby server to continue the process.
It can be used for large databases or slow networks.
Specifying No means the network will be used to transfer the database backup.
[N]:
Your input: N

Is this correct? <Yes/No> [Yes]:

-------------------------------------------------------------------------------

=>Do you want to perform backup, transfer and restore operations in parallel
when possible? [Y]: Y
Your input: Y

Is this correct? <Yes/No> [Yes]:

-------------------------------------------------------------------------------
A temporary location must be specified on dbv1 where the database will be
backed up to first.
This location must be big enough to hold RMAN backup of the whole database
(1.39GB).

=>Specify the location on this server: [/usr/tmp]: /u01/app/oracle/backup
Your input: /u01/app/oracle/backup

Is this correct? <Yes/No> [Yes]:

-------------------------------------------------------------------------------
A temporary location must be specified on dbv2 where the database backup will
be copied to before moving to specified locations.

=>Specify location on remote server: [/u01/app/oracle/backup]: /u01/app/oracle/backup
Your input: /u01/app/oracle/backup

Is this correct? <Yes/No> [Yes]:

The following oracle database parameters will be set in the standby database pfile or spfile:
-------------------------------------------------------------------------------
SID            NAME                                    VALUE

*              audit_file_dest                         /u01/app/oracle/admin/DEV/adump
*              compatible                              11.2.0.4.0
*              control_files                           /u01/app/oracle/oradata/DEV/control01.ctl,/u01/app/oracle/fast_recovery_area/DEV/control02.ctl
*              db_block_size                           8192
*              db_domain
*              db_name                                 DEV
*              db_recovery_file_dest                   /u01/app/oracle/fast_recovery_area
*              db_recovery_file_dest_size              4385144832
*              db_unique_name                          DEV
*              diagnostic_dest                         /u01/app/oracle
*              dispatchers                             (PROTOCOL=TCP) (SERVICE=DEVXDB)
*              java_jit_enabled                        false
*              open_cursors                            300
*              pga_aggregate_target                    222298112
*              processes                               150
*              remote_login_passwordfile               EXCLUSIVE
*              sga_target                              667942912
*              spfile                                  OS default
*              undo_tablespace                         UNDOTBS1

-------------------------------------------------------------------------------
What would you like to do:
   1 - Proceed with creating the standby database
   2 - Edit oracle database parameters for the standby database pfile/spfile
   3 - Terminate processing
   Please enter your choice [1]: 1

Validating oracle database parameters... please wait
=>SUCCEEDED

-------------------------------------------------------------------------------

=>Create standby database template for DEV using provided answers? [Y]: Y
Your input: 1

Is this correct? <Yes/No> [Yes]:

-------------------------------------------------------------------------------

=>Continue with creating a standby database? (If No processing will terminate,
the saved template will be available for future use) [Y]: Y
Your input: 1

Is this correct? <Yes/No> [Yes]:

>>> dbvctl will now run a pre-flight check for standby database creation. An attempt will
    be made to create a standby (s)pfile using oracle standby database parameters, followed
    by trying to start the standby instance. If this step fails, then please double-check
    the following items before re-running dbvctl again:

    1) Review the standby database parameters you have supplied and provide valid values
    unless a template is used.
    2) Recreate the template to provide valid values for standby database parameters if a
    template is used.

>>> Running pre-flight check for standby creation, please wait... done

>>> Creating standby control file... done

WARNING: FORCE_LOGGING is disabled in the primary database!

>>> Total database size for DEV is 1.39GB

>>> Backing up primary database...

    Backing up datafile 1... done
    Backing up datafile 2... done
    Backing up datafile 3... done
    Backing up datafile 4... done

>>> Transferring backup from dbv1 to dbv2...

    Transferring /u01/app/oracle/backup/DBV_DEV_CSD_DBF_1_02u0745n_1_1.RMAN... done
    Transferring /u01/app/oracle/backup/DBV_DEV_CSD_DBF_1_03u07466_1_1.RMAN... done
    Transferring /u01/app/oracle/backup/DBV_DEV_CSD_DBF_2_04u07468_1_1.RMAN... done
    Transferring /u01/app/oracle/backup/DBV_DEV_CSD_DBF_3_05u0746g_1_1.RMAN... done
    Transferring /u01/app/oracle/backup/DBV_DEV_CSD_DBF_4_06u0746n_1_1.RMAN... done

>>> Starting standby database DEV on dbv2 mount... done

>>> Restoring datafiles on dbv2...

    Restoring datafile 1... done
    Restoring datafile 2... done
    Restoring datafile 3... done
    Restoring datafile 4... done

>>> Renaming standby redo logs and tempfiles on dbv2... done

>>> Completing standby database creation... done

>>> Standby database created.

>>> Performing checkpoint and archiving logs... done

>>> Synchronising standby... done

PID:266
TRACE:266_dbvctl_csd_DEV_201904291308.trc
Once the above process is complete, you should be able to send and apply logs which are shown below.
2.1.1. Sending Logs
Sending archive logs to the standby database can be done by running the following command: ./dbvctl -d <DDC>
Example:
[oracle@dbv1 standby]$ ./dbvctl -d DEV
=============================================================
Dbvisit Standby Database Technology (9.0.0_1271_g4b00fb49) (pid 629)
dbvctl started on dbv1: Mon Apr 29 13:22:34 2019
=============================================================

>>> Obtaining information from standby database (RUN_INSPECT=Y)... done
    Thread: 1 Archive log gap: 0. Transfer log gap: 0

Note FORCE_LOGGING is disabled in the primary database.

>>> Sending heartbeat message... skipped
>>> Performing a log switch... done
>>> Transferring Log file(s) from DEV on dbv1 to dbv2:

    thread 1 sequence 11 (o1_mf_1_11_gddngxc5_.arc)... done

=============================================================
dbvctl ended on dbv1: Mon Apr 29 13:22:41 2019
=============================================================
2.1.2. Applying Logs
Applying archive logs on the standby database run the following command: ./dbvctl -d <DDC>
Example:
[oracle@dbv2 standby]$ ./dbvctl -d DEV
=============================================================
Dbvisit Standby Database Technology (9.0.0_1271_g4b00fb49) (pid 1164)
dbvctl started on dbv2: Mon Apr 29 13:23:15 2019
=============================================================


>>> Applying Log file(s) from dbv1 to DEV on dbv2:

    thread 1 sequence 11 (1_11_1004372670.arc)... done
    Last applied log(s):
    thread 1 sequence 11

    Next SCN required for recovery 1128090 generated at 2019-04-29:13:22:37 +12:00.
    Next required log thread 1 sequence 12

=============================================================
dbvctl ended on dbv2: Mon Apr 29 13:23:16 2019
=============================================================
2.1.3. Running the log gap report
To ensure the primary and standby databases are up to date, you can run the Log Gap Report using the following command from the primary database server:./dbvctl -d <DDC> -i
Example:
[oracle@dbv1 standby]$ ./dbvctl -d DEV -i
=============================================================
Dbvisit Standby Database Technology (9.0.0_1271_g4b00fb49) (pid 666)
dbvctl started on dbv1: Mon Apr 29 13:23:49 2019
=============================================================

Dbvisit Standby log gap report for DEV at 201904291323:
-------------------------------------------------------------
Description       | SCN          | Timestamp
-------------------------------------------------------------
Source              1128122        2019-04-29:13:23:49 +12:00
Destination         1128090        2019-04-29:13:22:37 +12:00

Standby database time lag (DAYS-HH:MI:SS): +00:01:12

Report for Thread 1
-------------------
SOURCE
Current Sequence 12
Last Archived Sequence 11
Last Transferred Sequence 11
Last Transferred Timestamp 2019-04-29 13:22:41

DESTINATION
Recovery Sequence 12

Transfer Log Gap 0
Apply Log Gap 0

=============================================================
dbvctl ended on dbv1: Mon Apr 29 13:23:51 2019
=============================================================
2.2. Creating a filesystem based Standby Database for ASM storage based primary
In this example, we will show you how to create the standby database when the primary database is a single instance database using ASM based storage and the standby database server will be using Filesystem based storage.
Please note that we do recommend a Primary and Standby storage match, meaning if a primary is using ASM, ideally the standby database server should as well and should have the same disk group layout. This is to ensure the primary and standby database servers match as much as possible.
- On the primary Oracle Managed Files (OMF) is used and the diskgroup in use is +DATA (kiwi701 is the primary).
- On the standby database server, the database files will make use of /u01/app/oracle/oradata and /u01/app/oracle/fast_recovery_area as the datafile location and recovery area(kiwi703 is the standby).
You will notice in this example we have to modify the "db_create_file_dest" and the "db_recovery_file_dest" to point the filesystem locations.
2.2.1. Example
[oracle@kiwi701 /usr/dbvisit/standby]$ ./dbvctl -d DEV --csd --noprompt

>>> Running pre-checks please wait... done
What would you like to do:
   1 - Create standby database (and optionally save settings in template)
   2 - Create standby database using existing template (previously saved)
   3 - Help
   4 - Terminate processing
   Please enter your choice [1]: 1

-------------------------------------------------------------------------------

=>Do you want to use TRANSPORTABLE MEDIA to transfer the database backup to the
standby server? Transportable media is an external device such as a USB drive
that is first plugged into the primary server and then manually transferred to
the standby site and plugged into the standby server to continue the process.
It can be used for large databases or slow networks.
Specifying No means the network will be used to transfer the database backup.
[N]:

-------------------------------------------------------------------------------

=>Do you want to perform backup, transfer and restore operations in parallel
when possible? [Y]:

-------------------------------------------------------------------------------
A temporary location must be specified on kiwi701 where the database will be
backed up to first.
This location must be big enough to hold RMAN backup of the whole database
(2.69GB).

=>Specify the location on this server: [/usr/tmp]: /home/oracle/temp

-------------------------------------------------------------------------------
A temporary location must be specified on kiwi703 where the database backup
will be copied to before moving to specified locations.

=>Specify location on remote server: [/home/oracle/temp]:
You choose to create a non ASM standby database. Please change all Oracle
database parameters values pointing to ASM locations to point to valid
filesystem locations on the standby server.

The following oracle database parameters will be set in the standby database pfile or spfile:
-------------------------------------------------------------------------------
SID            NAME                                    VALUE

*              audit_file_dest                         /u01/app/oracle/admin/DEV/adump
*              compatible                              12.2.0
*              db_block_size                           8192
*              db_create_file_dest                     +DATA
*              db_domain                               oraclekiwi.co.nz
*              db_file_name_convert
*              db_name                                 DEV
*              db_recovery_file_dest                   +DATA
*              db_recovery_file_dest_size              2147483648
*              db_unique_name                          DEV
*              diagnostic_dest                         /u01/app/oracle
*              dispatchers                             (PROTOCOL=TCP) (SERVICE=DEVXDB)
*              enable_pluggable_database               true
*              instance_mode                           READ-WRITE
*              log_archive_format                      %t_%s_%r.dbf
*              log_file_name_convert
*              nls_language                            AMERICAN
*              nls_territory                           AMERICA
*              open_cursors                            300
*              pga_aggregate_target                    313524224
*              processes                               300
*              remote_login_passwordfile               EXCLUSIVE
*              sga_target                              938475520
*              spfile                                  OS default
*              undo_tablespace                         UNDOTBS1

-------------------------------------------------------------------------------
What would you like to do:
   1 - Proceed with creating the standby database
   2 - Edit oracle database parameters for the standby database pfile/spfile
   3 - Terminate processing
   Please enter your choice [1]: 2

WARNING: Do NOT use single or double quotes to enclose parameter values!
Separate multiple values with a comma. If a comma is part of a value, escape it
with a backslash.
If a comma is part of a value, escape it with a backslash.

=>Enter full parameter name: []: db_create_file_dest
   1 - Remove from the standby parameter file
       (parameter will be set to default value)
   2 - New value in the standby parameter file

=>Please enter your choice: []: 2

=>Enter new value (leave blank to set to null) []: /u01/app/oracle/oradata
Validating ... please wait

The following oracle database parameters will be set in the standby database pfile or spfile:
-------------------------------------------------------------------------------
SID            NAME                                    VALUE

*              audit_file_dest                         /u01/app/oracle/admin/DEV/adump
*              compatible                              12.2.0
*              db_block_size                           8192
*              db_create_file_dest                     /u01/app/oracle/oradata
*              db_domain                               oraclekiwi.co.nz
*              db_file_name_convert
*              db_name                                 DEV
*              db_recovery_file_dest                   +DATA
*              db_recovery_file_dest_size              2147483648
*              db_unique_name                          DEV
*              diagnostic_dest                         /u01/app/oracle
*              dispatchers                             (PROTOCOL=TCP) (SERVICE=DEVXDB)
*              enable_pluggable_database               true
*              instance_mode                           READ-WRITE
*              log_archive_format                      %t_%s_%r.dbf
*              log_file_name_convert
*              nls_language                            AMERICAN
*              nls_territory                           AMERICA
*              open_cursors                            300
*              pga_aggregate_target                    313524224
*              processes                               300
*              remote_login_passwordfile               EXCLUSIVE
*              sga_target                              938475520
*              spfile                                  OS default
*              undo_tablespace                         UNDOTBS1

-------------------------------------------------------------------------------
What would you like to do:
   1 - Proceed with creating the standby database
   2 - Edit oracle database parameters for the standby database pfile/spfile
   3 - Terminate processing
   Please enter your choice [1]: 2

WARNING: Do NOT use single or double quotes to enclose parameter values!
Separate multiple values with a comma. If a comma is part of a value, escape it
with a backslash.
If a comma is part of a value, escape it with a backslash.

=>Enter full parameter name: []: db_recovery_file_dest
   1 - Remove from the standby parameter file
       (parameter will be set to default value)
   2 - New value in the standby parameter file

=>Please enter your choice: []: 2

=>Enter new value (leave blank to set to null) []: /u01/app/oracle/fast_recovery_area
Validating ... please wait

The following oracle database parameters will be set in the standby database pfile or spfile:
-------------------------------------------------------------------------------
SID            NAME                                    VALUE

*              audit_file_dest                         /u01/app/oracle/admin/DEV/adump
*              compatible                              12.2.0
*              db_block_size                           8192
*              db_create_file_dest                     /u01/app/oracle/oradata
*              db_domain                               oraclekiwi.co.nz
*              db_file_name_convert
*              db_name                                 DEV
*              db_recovery_file_dest                   /u01/app/oracle/fast_recovery_area
*              db_recovery_file_dest_size              2147483648
*              db_unique_name                          DEV
*              diagnostic_dest                         /u01/app/oracle
*              dispatchers                             (PROTOCOL=TCP) (SERVICE=DEVXDB)
*              enable_pluggable_database               true
*              instance_mode                           READ-WRITE
*              log_archive_format                      %t_%s_%r.dbf
*              log_file_name_convert
*              nls_language                            AMERICAN
*              nls_territory                           AMERICA
*              open_cursors                            300
*              pga_aggregate_target                    313524224
*              processes                               300
*              remote_login_passwordfile               EXCLUSIVE
*              sga_target                              938475520
*              spfile                                  OS default
*              undo_tablespace                         UNDOTBS1

-------------------------------------------------------------------------------
What would you like to do:
   1 - Proceed with creating the standby database
   2 - Edit oracle database parameters for the standby database pfile/spfile
   3 - Terminate processing
   Please enter your choice [1]: 1

Validating oracle database parameters... please wait
=>SUCCEEDED

-------------------------------------------------------------------------------

=>Create standby database template for DEV using provided answers? [Y]: Y

-------------------------------------------------------------------------------

=>Continue with creating a standby database? (If No processing will terminate,
the saved template will be available for future use) [Y]:

>>> dbvctl will now run a pre-flight check for standby database creation. An attempt will
    be made to create a standby (s)pfile using oracle standby database parameters, followed
    by trying to start the standby instance. If this step fails, then please double-check
    the following items before re-running dbvctl again:

    1) Review the standby database parameters you have supplied and provide valid values
    unless a template is used.
    2) Recreate the template to provide valid values for standby database parameters if a
    template is used.

>>> Running pre-flight check for standby creation, please wait... done

>>> Creating standby control file... done

WARNING: FORCE_LOGGING is disabled in the primary database!

>>> Total database size for DEV is 2.69GB

>>> Backing up primary database...

    Backing up datafile 1... done
    Backing up datafile 3... done
    Backing up datafile 4... done
    Backing up datafile 5... done
    Backing up datafile 6... done
    Backing up datafile 7... done
    Backing up datafile 8... done
    Backing up datafile 9... done
    Backing up datafile 10... done
    Backing up datafile 11... done
    Backing up datafile 12... done

>>> Transferring backup from kiwi701 to kiwi703...

    Transferring /home/oracle/temp/DBV_DEV_CSD_DBF_1_04u0hek5_1_1.RMAN... done
    Transferring /home/oracle/temp/DBV_DEV_CSD_DBF_3_06u0helr_1_1.RMAN... done
    Transferring /home/oracle/temp/DBV_DEV_CSD_DBF_4_08u0henn_1_1.RMAN... done
    Transferring /home/oracle/temp/DBV_DEV_CSD_DBF_5_0au0heoc_1_1.RMAN... done
    Transferring /home/oracle/temp/DBV_DEV_CSD_DBF_6_0cu0hepk_1_1.RMAN... done
    Transferring /home/oracle/temp/DBV_DEV_CSD_DBF_7_0eu0here_1_1.RMAN... done
    Transferring /home/oracle/temp/DBV_DEV_CSD_DBF_8_0gu0hes6_1_1.RMAN... done
    Transferring /home/oracle/temp/DBV_DEV_CSD_DBF_9_0iu0heso_1_1.RMAN... done
    Transferring /home/oracle/temp/DBV_DEV_CSD_DBF_10_0ku0hetq_1_1.RMAN... done
    Transferring /home/oracle/temp/DBV_DEV_CSD_DBF_11_0mu0hf00_1_1.RMAN... done
    Transferring /home/oracle/temp/DBV_DEV_CSD_DBF_12_0ou0hf0g_1_1.RMAN... done

>>> Starting standby database DEV on kiwi703 mount... done

>>> Restoring datafiles on kiwi703...

    Restoring datafile 1... done
    Restoring datafile 3... done
    Restoring datafile 4... done
    Restoring datafile 5... done
    Restoring datafile 6... done
    Restoring datafile 7... done
    Restoring datafile 8... done
    Restoring datafile 9... done
    Restoring datafile 10... done
    Restoring datafile 11... done
    Restoring datafile 12... done

>>> Renaming standby redo logs and tempfiles on kiwi703... done

>>> Completing standby database creation... done

>>> Standby database created.

>>> Performing checkpoint and archiving logs... done

>>> Synchronising standby... done

PID:3081
TRACE:3081_dbvctl_csd_DEV_201905021103.trc
We recommend that following a successful standby database creation you first run Dbvisit Standby manually once to ship and apply logs before you schedule it or run the Daemon process.
2.2.2. Sending Logs
[oracle@kiwi701 /usr/dbvisit/standby]$ ./dbvctl -d DEV
=============================================================
Dbvisit Standby Database Technology (9.0.0_1271_g4b00fb49) (pid 4110)
dbvctl started on kiwi701: Thu May  2 11:26:46 2019
=============================================================

>>> Obtaining information from standby database (RUN_INSPECT=Y)... done
    Thread: 1 Archive log gap: 0. Transfer log gap: 0

Note FORCE_LOGGING is disabled in the primary database.

>>> Sending heartbeat message... skipped
>>> Performing a log switch... done
>>> Transferring Log file(s) from DEV on kiwi701 to kiwi703:

    thread 1 sequence 4 (thread_1_seq_4.349.1007206027)... done

=============================================================
dbvctl ended on kiwi701: Thu May  2 11:27:14 2019
=============================================================
2.2.3. Applying Logs
[oracle@kiwi703 /usr/dbvisit/standby]$ ./dbvctl -d DEV
=============================================================
Dbvisit Standby Database Technology (9.0.0_1271_g4b00fb49) (pid 3747)
dbvctl started on kiwi703: Thu May  2 11:31:35 2019
=============================================================


>>> Applying Log file(s) from kiwi701 to DEV on kiwi703:

    thread 1 sequence 4 (1_4_1007124153.arc)... done
    Last applied log(s):
    thread 1 sequence 4

    Next SCN required for recovery 1554427 generated at 2019-05-02:11:27:06 +12:00.
    Next required log thread 1 sequence 5

=============================================================
dbvctl ended on kiwi703: Thu May  2 11:31:38 2019
=============================================================
2.3. Creating a Single Instance Standby for an Oracle RAC Primary
In this example, we are going to create a single instance standby database using filesystem based storage for a RAC enabled primary database.
Key points to note with regards to this configuration:
- The standby database is using Filesystem Based storage:
- database files will be located in /u01/app/oracle/oradata and /u01/app/oracle/fast_recovery_area.
- Oracle Managed Files (OMF) is used
- The standby database will be created without using transportable media, meaning backups will be created locally in a temporary area (which must have sufficient disk space to hold a full compressed database backup)
- The creation process can take time. To estimate the time, keep in mind we need to create a full compressed database backup, copy the files to the standby database server and then perform a full restore
- In the example below, we modify the SPFILE parameters as the standby database is using filesystem based storage, not ASM.
2.3.1. Example
oracle@kiwi81[/acfs/dbvisit/standby]: ./dbvctl -d MYDEV --csd --noprompt

>>> Running pre-checks please wait... done
What would you like to do:
   1 - Create standby database (and optionally save settings in template)
   2 - Help
   3 - Terminate processing
   Please enter your choice [1]: 1

-------------------------------------------------------------------------------

=>Do you want to use TRANSPORTABLE MEDIA to transfer the database backup to the
standby server? Transportable media is an external device such as a USB drive
that is first plugged into the primary server and then manually transferred to
the standby site and plugged into the standby server to continue the process.
It can be used for large databases or slow networks.
Specifying No means the network will be used to transfer the database backup.
[N]:

-------------------------------------------------------------------------------

=>Do you want to perform backup, transfer and restore operations in parallel
when possible? [Y]:

-------------------------------------------------------------------------------
A temporary location must be specified on kiwi812-vip where the database will
be backed up to first.
This location must be big enough to hold RMAN backup of the whole database
(1.33GB).

=>Specify the location on this server: [/usr/tmp]: /acfs/tmp

-------------------------------------------------------------------------------
A temporary location must be specified on kiwi91 where the database backup will
be copied to before moving to specified locations.

=>Specify location on remote server: [/acfs/tmp]: /home/oracle/temp

-------------------------------------------------------------------------------

=>Do you want to register a newly created standby database with Oracle Restart?
[N]:
You choose to create a non ASM standby database. Please change all Oracle
database parameters values pointing to ASM locations to point to valid
filesystem locations on the standby server.

The following oracle database parameters will be set in the standby database pfile or spfile:
-------------------------------------------------------------------------------
SID            NAME                                    VALUE

*              audit_file_dest                         /u01/app/oracle/admin/MYDEV/adump
*              compatible                              11.2.0.4.0
*              db_block_size                           8192
*              db_create_file_dest                     +DATA
*              db_domain
*              db_file_name_convert
*              db_name                                 MYDEV
*              db_recovery_file_dest                   +FRA
*              db_recovery_file_dest_size              4621074432
*              db_unique_name                          MYDEV
*              diagnostic_dest                         /u01/app/oracle
*              dispatchers                             (PROTOCOL=TCP) (SERVICE=MYDEVXDB)
*              log_archive_format                      %t_%s_%r.dbf
*              log_file_name_convert
*              memory_target                           1161822208
*              open_cursors                            300
*              processes                               150
*              remote_login_passwordfile               exclusive
*              spfile                                  OS default
*              undo_tablespace                         UNDOTBS1

-------------------------------------------------------------------------------
What would you like to do:
   1 - Proceed with creating the standby database
   2 - Edit oracle database parameters for the standby database pfile/spfile
   3 - Terminate processing
   Please enter your choice [1]: 2

WARNING: Do NOT use single or double quotes to enclose parameter values!
Separate multiple values with a comma. If a comma is part of a value, escape it
with a backslash.
If a comma is part of a value, escape it with a backslash.

=>Enter full parameter name: []: db_create_file_dest
   1 - Remove from the standby parameter file
       (parameter will be set to default value)
   2 - New value in the standby parameter file

=>Please enter your choice: []: 2

=>Enter new value (leave blank to set to null) []: /u01/app/oracle/oradata
Validating ... please wait

The following oracle database parameters will be set in the standby database pfile or spfile:
-------------------------------------------------------------------------------
SID            NAME                                    VALUE

*              audit_file_dest                         /u01/app/oracle/admin/MYDEV/adump
*              compatible                              11.2.0.4.0
*              db_block_size                           8192
*              db_create_file_dest                     /u01/app/oracle/oradata
*              db_domain
*              db_file_name_convert
*              db_name                                 MYDEV
*              db_recovery_file_dest                   +FRA
*              db_recovery_file_dest_size              4621074432
*              db_unique_name                          MYDEV
*              diagnostic_dest                         /u01/app/oracle
*              dispatchers                             (PROTOCOL=TCP) (SERVICE=MYDEVXDB)
*              log_archive_format                      %t_%s_%r.dbf
*              log_file_name_convert
*              memory_target                           1161822208
*              open_cursors                            300
*              processes                               150
*              remote_login_passwordfile               exclusive
*              spfile                                  OS default
*              undo_tablespace                         UNDOTBS1

-------------------------------------------------------------------------------
What would you like to do:
   1 - Proceed with creating the standby database
   2 - Edit oracle database parameters for the standby database pfile/spfile
   3 - Terminate processing
   Please enter your choice [1]: 2

WARNING: Do NOT use single or double quotes to enclose parameter values!
Separate multiple values with a comma. If a comma is part of a value, escape it
with a backslash.
If a comma is part of a value, escape it with a backslash.

=>Enter full parameter name: []: db_recovery_file_dest
   1 - Remove from the standby parameter file
       (parameter will be set to default value)
   2 - New value in the standby parameter file

=>Please enter your choice: []: 2

=>Enter new value (leave blank to set to null) []: /u01/app/oracle/fast_recovery_area
Validating ... please wait

The following oracle database parameters will be set in the standby database pfile or spfile:
-------------------------------------------------------------------------------
SID            NAME                                    VALUE

*              audit_file_dest                         /u01/app/oracle/admin/MYDEV/adump
*              compatible                              11.2.0.4.0
*              db_block_size                           8192
*              db_create_file_dest                     /u01/app/oracle/oradata
*              db_domain
*              db_file_name_convert
*              db_name                                 MYDEV
*              db_recovery_file_dest                   /u01/app/oracle/fast_recovery_area
*              db_recovery_file_dest_size              4621074432
*              db_unique_name                          MYDEV
*              diagnostic_dest                         /u01/app/oracle
*              dispatchers                             (PROTOCOL=TCP) (SERVICE=MYDEVXDB)
*              log_archive_format                      %t_%s_%r.dbf
*              log_file_name_convert
*              memory_target                           1161822208
*              open_cursors                            300
*              processes                               150
*              remote_login_passwordfile               exclusive
*              spfile                                  OS default
*              undo_tablespace                         UNDOTBS1

-------------------------------------------------------------------------------
What would you like to do:
   1 - Proceed with creating the standby database
   2 - Edit oracle database parameters for the standby database pfile/spfile
   3 - Terminate processing
   Please enter your choice [1]: 1

Validating oracle database parameters... please wait
=>SUCCEEDED

-------------------------------------------------------------------------------

=>Create standby database template for MYDEV using provided answers? [Y]:

-------------------------------------------------------------------------------

=>Continue with creating a standby database? (If No processing will terminate,
the saved template will be available for future use) [Y]:

>>> dbvctl will now run a pre-flight check for standby database creation. An attempt will
    be made to create a standby (s)pfile using oracle standby database parameters, followed
    by trying to start the standby instance. If this step fails, then please double-check
    the following items before re-running dbvctl again:

    1) Review the standby database parameters you have supplied and provide valid values
    unless a template is used.
    2) Recreate the template to provide valid values for standby database parameters if a
    template is used.

>>> Running pre-flight check for standby creation, please wait... done

>>> Creating standby control file... done

WARNING: FORCE_LOGGING is disabled in the primary database!

>>> Total database size for MYDEV1 is 1.33GB

>>> Backing up primary database...

    Backing up datafile 1... done
    Backing up datafile 2... done
    Backing up datafile 3... done
    Backing up datafile 4... done
    Backing up datafile 5... done

>>> Transferring backup from kiwi812-vip to kiwi91...

    Transferring /acfs/tmp/DBV_MYDEV_CSD_DBF_1_09u2bos2_1_1.RMAN... done
    Transferring /acfs/tmp/DBV_MYDEV_CSD_DBF_1_0au2bpkp_1_1.RMAN... done
    Transferring /acfs/tmp/DBV_MYDEV_CSD_DBF_2_0bu2bplj_1_1.RMAN... done
    Transferring /acfs/tmp/DBV_MYDEV_CSD_DBF_3_0cu2bq2h_1_1.RMAN... done
    Transferring /acfs/tmp/DBV_MYDEV_CSD_DBF_4_0du2bq2v_1_1.RMAN... done
    Transferring /acfs/tmp/DBV_MYDEV_CSD_DBF_5_0eu2bq4f_1_1.RMAN... done

>>> Starting standby database MYDEV on kiwi91 mount... done

>>> Restoring datafiles on kiwi91...

    Restoring datafile 1... done
    Restoring datafile 2... done
    Restoring datafile 3... done
    Restoring datafile 4... done
    Restoring datafile 5... done

>>> Renaming standby redo logs and tempfiles on kiwi91... done

>>> Completing standby database creation... done

>>> Standby database created.

>>> Performing checkpoint and archiving logs... done

>>> Synchronising standby... done

PID:3133
TRACE:3133_dbvctl_csd_MYDEV_201905241346.trc
2.3.2. Review Directory Structure on Standby
Once the restore is complete we now have our standby database. If we review the directory structure on the standby server we will notice the following:
oracle@kiwi91[/home/oracle/temp]: cd /u01/app/oracle/oradata/
oracle@kiwi91[/u01/app/oracle/oradata]: ls
MYDEV
oracle@kiwi91[/u01/app/oracle/oradata]: tree .
.
└── MYDEV
    ├── controlfile
    │   └── o1_mf_gggmyk9q_.ctl
    ├── datafile
    │   ├── o1_mf_sysaux_gggorbkk_.dbf
    │   ├── o1_mf_system_gggo6kwj_.dbf
    │   ├── o1_mf_undotbs1_gggoy1ds_.dbf
    │   ├── o1_mf_undotbs2_gggoyo3f_.dbf
    │   └── o1_mf_users_gggoyc9n_.dbf
    ├── onlinelog
    └── tempfile

5 directories, 6 files
oracle@kiwi91[/u01/app/oracle/oradata]: cd ../fast_recovery_area/
oracle@kiwi91[/u01/app/oracle/fast_recovery_area]: tree .
.
└── MYDEV
    ├── archivelog
    │   └── 2019_05_24
    ├── controlfile
    │   └── o1_mf_gggmyl0d_.ctl
    └── onlinelog

5 directories, 1 file
oracle@kiwi91[/u01/app/oracle/fast_recovery_area]:
The next step is to ship and apply logs manually before we enable either a schedule (using the CRON scheduler) or by running Dbvisit Standby as a Daemon process (background process) using the "dbvctl -d <DDC> -D start|stop|status" option.
2.3.3. Sending Logs from primary RAC
oracle@kiwi81[/acfs/dbvisit/standby]: ./dbvctl -d MYDEV
=============================================================
Dbvisit Standby Database Technology (9.0.0_1383_g276092d5) (pid 15777)
dbvctl started on kiwi812-vip: Fri May 24 14:39:22 2019
=============================================================

>>> Obtaining information from standby database (RUN_INSPECT=Y)... done
    Thread: 1 Archive log gap: 0. Transfer log gap: 0
    Thread: 2 Archive log gap: 1. Transfer log gap: 0

Note FORCE_LOGGING is disabled in the primary database.

>>> Performing a log switch... done
>>> Transferring Log file(s) from MYDEV1 on kiwi812-vip to kiwi91:

    thread 1 sequence 14 (thread_1_seq_14.507.1009118397)... done
    thread 2 sequence 6 (thread_2_seq_6.506.1009118399)... done

=============================================================
dbvctl ended on kiwi812-vip: Fri May 24 14:40:09 2019
=============================================================
2.3.4. Applying logs on standby: kiwi91
oracle@kiwi91[/usr/dbvisit/standby]: ./dbvctl -d MYDEV
=============================================================
Dbvisit Standby Database Technology (9.0.0_1383_g276092d5) (pid 2323)
dbvctl started on kiwi91: Fri May 24 14:41:19 2019
=============================================================


>>> Applying Log file(s) from kiwi812-vip to MYDEV on kiwi91:

    thread 1 sequence 14 (1_14_1009025610.arc)... done
    thread 2 sequence 5 (2_5_1009025610.arc)... done
    thread 2 sequence 6 (2_6_1009025610.arc)... done
    thread 1 sequence 14 (1_14_1009025610.arc)... done
    Last applied log(s):
    thread 1 sequence 14
    thread 2 sequence 6

    Next SCN required for recovery 1118495 generated at 2019-05-24:14:39:56 +12:00.
    Next required log thread 1 sequence 15

=============================================================
dbvctl ended on kiwi91: Fri May 24 14:41:28 2019
=============================================================
We have now successfully created the standby database.
3. Creating the Standby Database - Central Console (GUI)
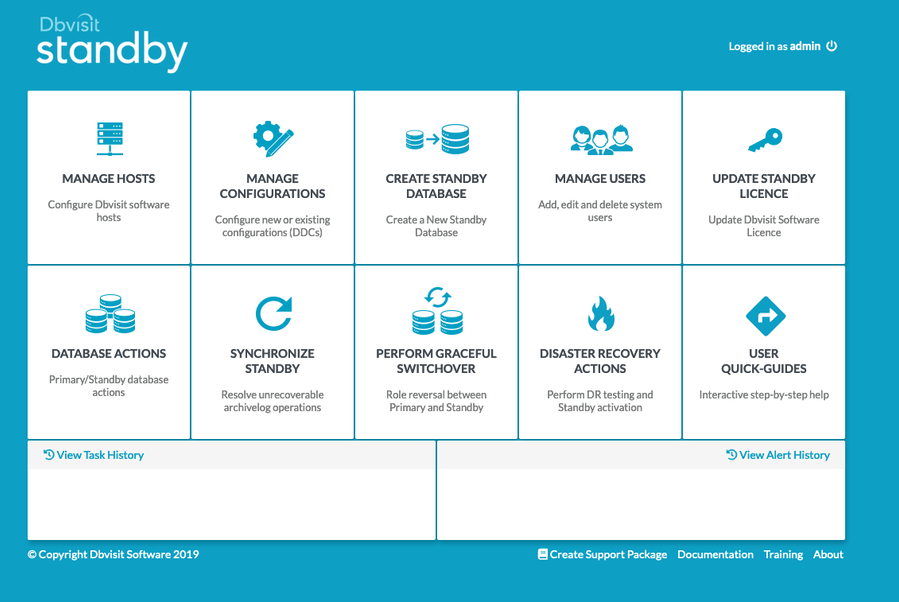
Create a Standby Database is one of the most important functions of Dbvisit Standby. Launch it by clicking the Create Standby Database button from the main page.
3.1. Creating Single Instance Standby
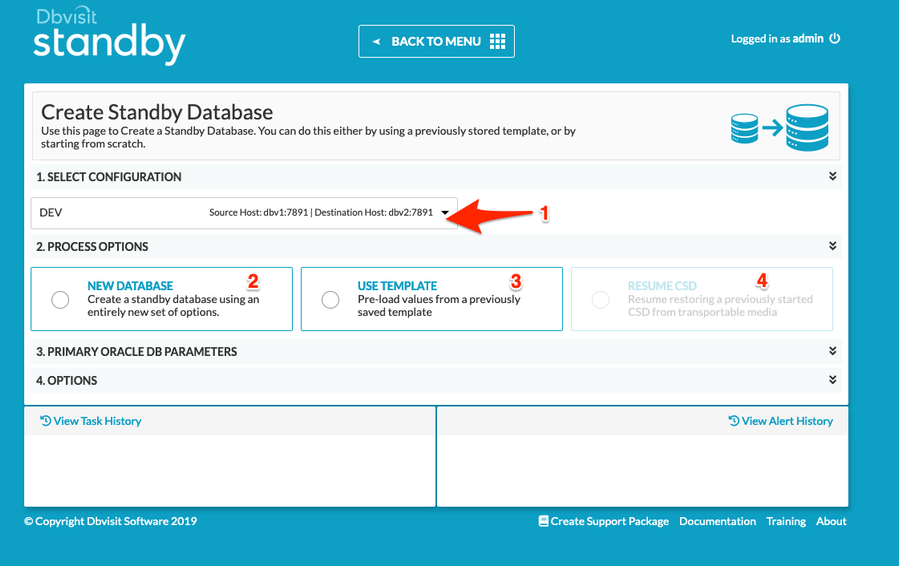
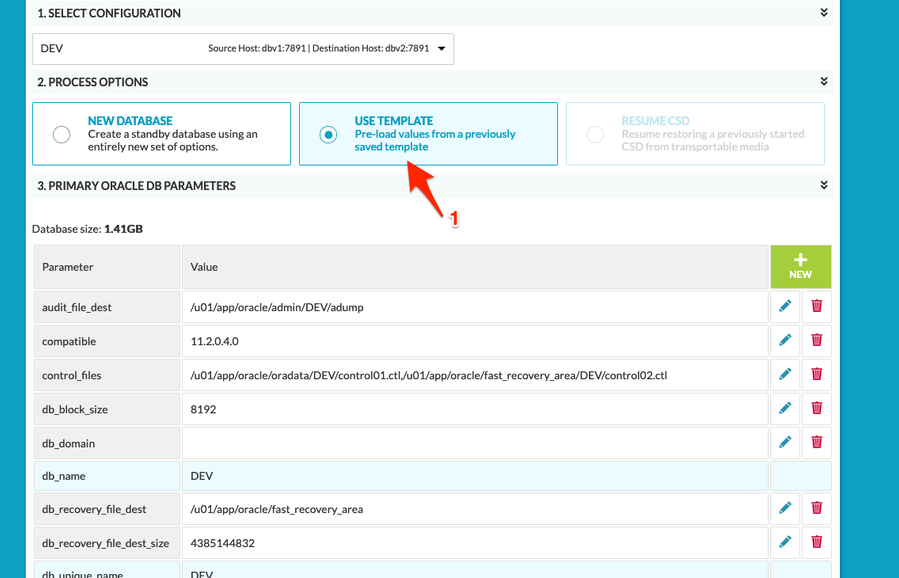
Begin by selecting the Configuration/DDC to work with [1]. Next, you will need to select one of three possible process options:
- New Database [2]: This will allow you to set up a new Standby Database completely from scratch. You will need to review system parameters and add/edit values as necessary. This is the default CSD process mode.
- Use Template [3]: Using this option you can run a CSD process using values saved from a previous successful operation. This is a good way to repeat similar/identical CSD operations without having to manually change system parameters each time.
- Resume CSD [4]: Initially disabled, this option becomes available if a previous CSD operation did not fully complete for whatever reason. This could be because you are creating a Standby database using the Transportable Media option (more on this below), or because an error has occurred that you need to resolve before re-trying to restore your database logs.
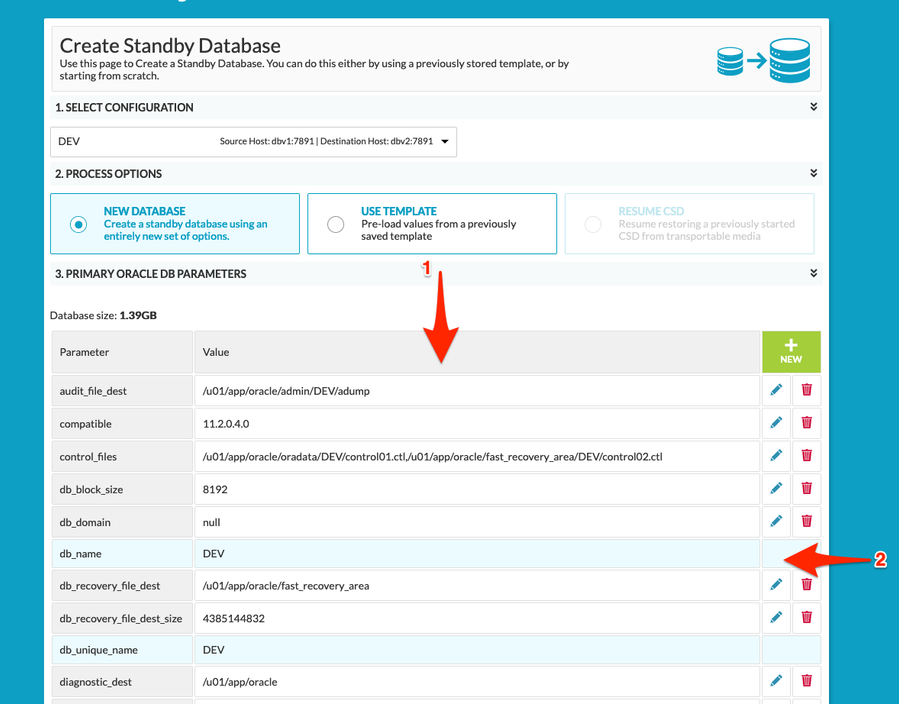
After selecting this option, you will need to review the system parameters presented in the table below the option selectors [1].
Please refer to Section 7.4: Edit DDC of this guide for tips on how to use the parameter table. Parameters highlighted with a blue background cannot be altered [2].
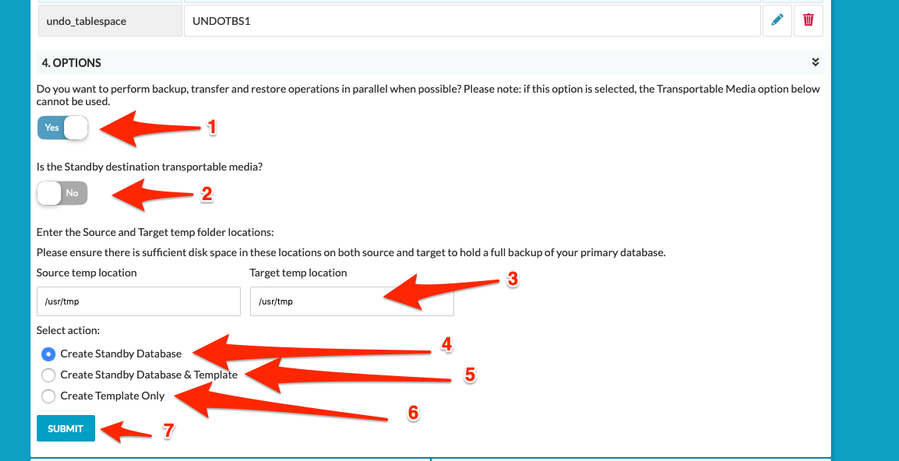
Following the parameter table are several Options:
- Parallel Option [ 1]: This can be enabled if you want dbvisit to determine if the transfer of the backup files can be done in parallel as well as the restore of the datafile if this option is enabled you cannot use the Transportable Media option [2]
- Transportable media [2]: Set this to Yes if you want to use a physical medium to manually move your database backup files. You may wish to do this if your database is very large and it would be faster to use a physical drive to move the data.
NOTE: Choosing to use Transportable Media will effectively split the CSD process into two distinct parts: Backup and Restore. Once all necessary data is Backed up onto your Transportable Media, you will need to physically move it to the Destination Host and continue the process into the Restore stage. For details, please see section 3.2: Using Transportable Media below. Windows system login If you are using a Windows environment with Oracle 12c, you will need to enter the username and password of the Windows user that will run the Oracle service.
- Source and Target temp location [3]: Please ensure both of these locations have enough disk space to hold a full backup of your primary database.
- Action:
- Create a Standby Database [4] will start the process without saving your parameter settings.
- Create Standby Database & Template [5] will start the process AND save your parameter settings in a template. Next time you run a CSD process, you can instantly reload values from this template to speed up your work.
- Create Template Only [6] will ONLY create the template with your saved parameters. The CSD process itself will NOT be initiated.
Once all the options above are set, please click Submit [7] to initiate the Create Standby Database process.
OPTION: Use Template [1]
This option works exactly the same as Option 1 above, except all the values in the parameter table are loaded from a Template created during a previous iteration of the CSD process. This can be a good way to save time by reusing previously set values for complex installations.
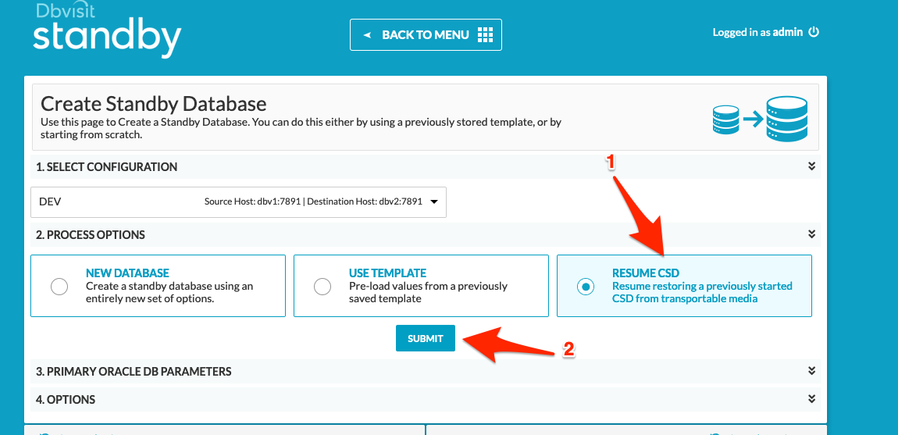
OPTION: Resume CSD [1]
This option, normally disabled, will only become available if a previously initiated CSD process has stopped before completion. Most often, this will be because you have chosen to use the Transportable Media option, and the system is waiting for you to move the database backup files to the correct location before proceeding. Once you have moved the files, selecting this option and clicking Submit [2] will resume the process from where it stopped. NOTE: You can also do this from within the Task Details pane of the relevant CSD task - more on this in section 10 below.
Another reason this option is available may be because an error has occurred after the primary database backup step. In this case, you may be able to modify Configuration/DDC parameters, or other system settings, to resolve the error and resume the CSD process without having to re-run the database backup step.
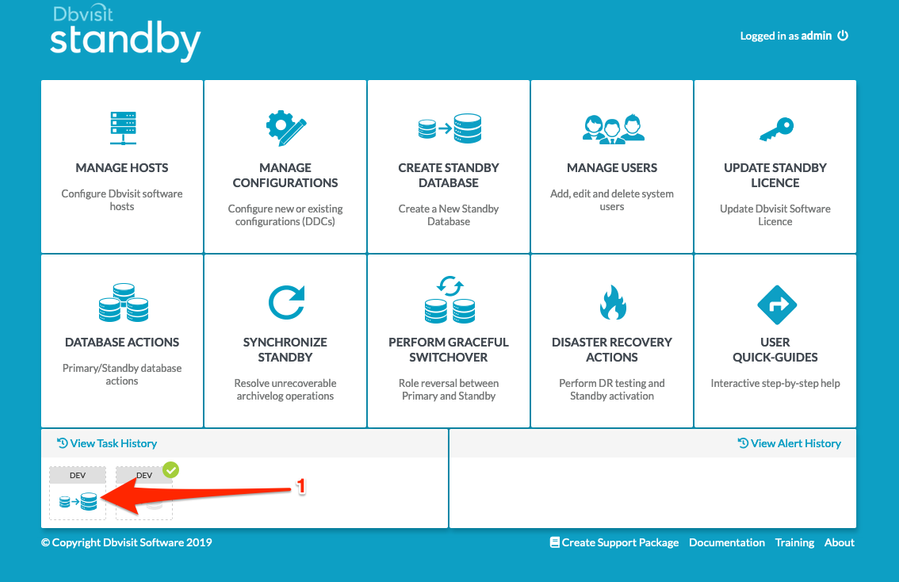
Once the CSD process is underway, you can track it as a separate Task in the Active Task List [1].
3.2. Using Transportable Media Option
If you are using the transportable media option, you need to make sure that the temporary backup location you selected on the CSD main screen has full permissions for the database user.
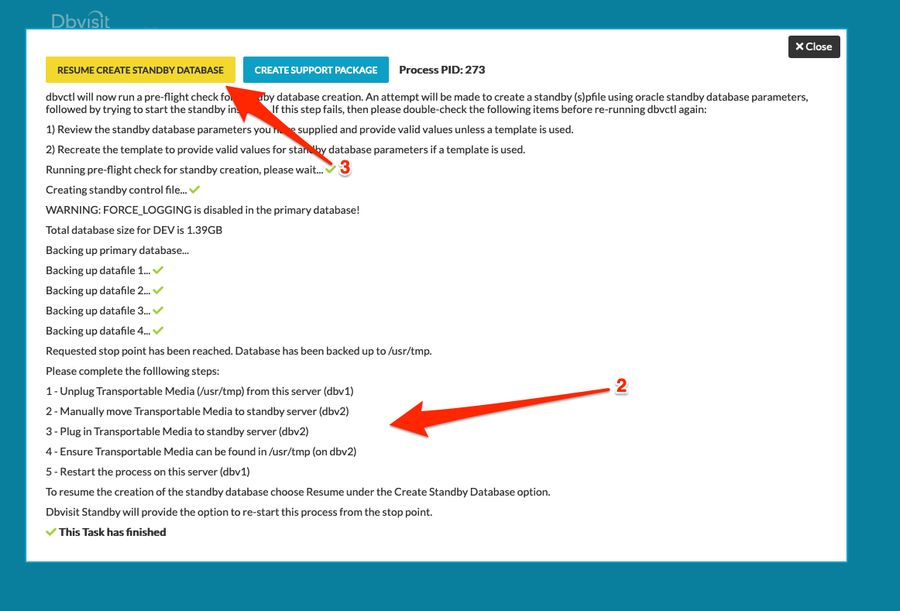
Once the CSD process is started, the high-level steps are:
- A local backup will be created in the location specified as the source temporary backup directory - this should be your external drive, i.e. your Transportable Media.
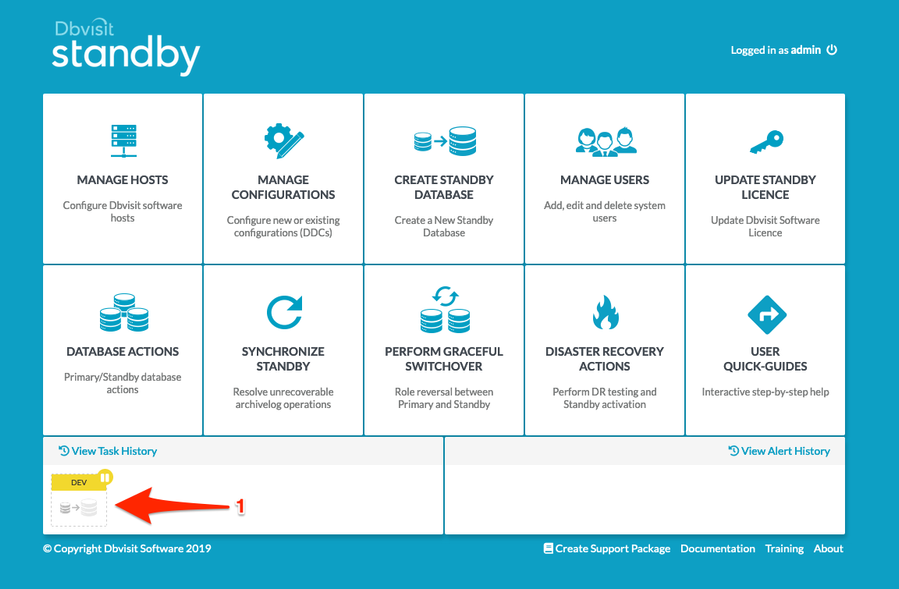
- Once the Backup is complete, the process will be stopped and a pause option will become available in the Active Task List.
- The external storage must now be transferred to the standby site (Destination Host) and mounted to the temporary backup location previously specified.
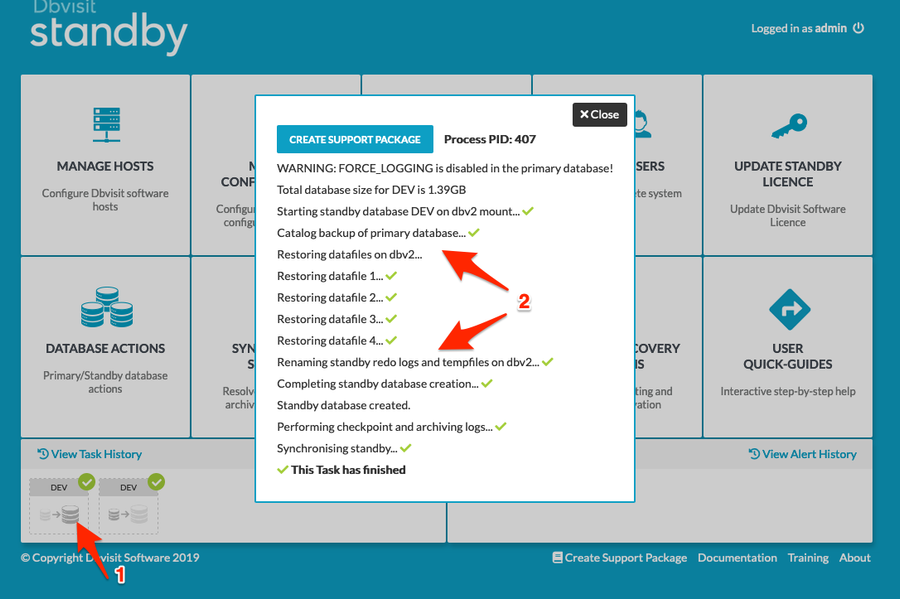
- Once this is done, clicking on the paused CSD task in the Active Task List and then the Resume Create Standby Database button will resume the CSD process.
The images below provide an example of how a paused (waiting for Transportable Media to be moved) CSD process looks:
4. Creating an Oracle 12c Multitenant Standby Database
There are a few important pre-requisites that you need to be aware of when using Oracle 12c Multitenant option:
- Before creating a standby database, ensure that the primary database already has the required PDB created.
- Dbvisit Standby is focussed on Oracle Standard Edition (SE, SE1 and SE2) and in the case of using 12c, you are allowed to use Oracle Standard Edition 2 (SE2) with one single pluggable database. Using more than one PDB does require an Enterprise Edition license and the Multitenant Option.
- Using Oracle Managed Files (OMF) is recommended, especially when using ASM.
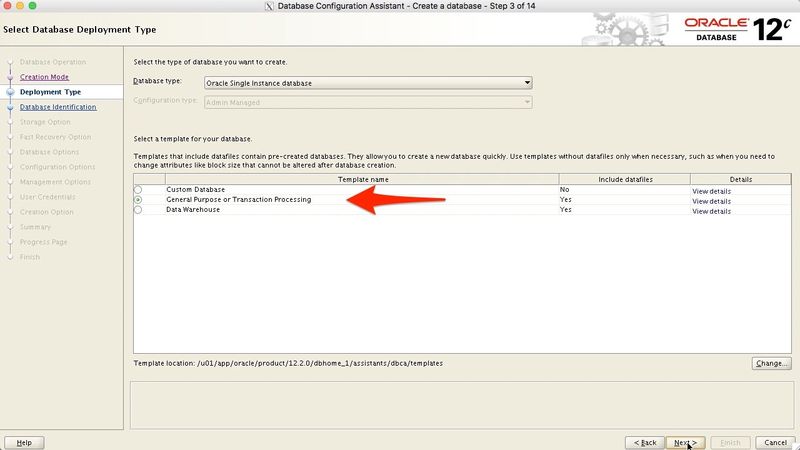
Please note that when you are using the Oracle-supplied templates - example the General Purpose one, you might notice that the primary SEED database is not actually located under the SEED GUID. However, when you create the standby database using Dbvisit Standby, the SEED will be placed under the GUID (as long as OMF is used).
To explain what we mean by this, let's review an example using Oracle Database 12.2.
In this example we would like to highlight that if you created a primary database using the DBCA option and you used one of the standard templates provided by Oracle - example General Purpose as shown in figure below, and Oracle Managed Files (OMF) is used, the default directory for the SEED database would not match the GUID for the seed database.
The end result showing the directory locations for the primary database can be seen below:
SQL> select con_id, guid, name from v$pdbs order by 1;

    CON_ID GUID 			    NAME
---------- -------------------------------- ---------------
	 2 4BC09721B301127AE053AB02000AED63 PDB$SEED
	 3 4BC0AAB740DC1B8EE053AB02000A550F DEVPDB1
	 4 4BC0AB691AA11BA3E053AB02000A93C4 DEVPDB2

SQL>


...
...


ASMCMD> find DEV *
+DATA/DEV/4700A987085B3DFAE05387E5E50A8C7B/
+DATA/DEV/4700A987085B3DFAE05387E5E50A8C7B/DATAFILE/
+DATA/DEV/4700A987085B3DFAE05387E5E50A8C7B/DATAFILE/SYSAUX.270.939821503
+DATA/DEV/4700A987085B3DFAE05387E5E50A8C7B/DATAFILE/SYSTEM.271.939821503
+DATA/DEV/4700A987085B3DFAE05387E5E50A8C7B/DATAFILE/UNDOTBS1.272.939821503
+DATA/DEV/4BC09721B301127AE053AB02000AED63/
+DATA/DEV/4BC09721B301127AE053AB02000AED63/TEMPFILE/
+DATA/DEV/4BC09721B301127AE053AB02000AED63/TEMPFILE/TEMP.273.939821531
+DATA/DEV/4BC0AAB740DC1B8EE053AB02000A550F/
+DATA/DEV/4BC0AAB740DC1B8EE053AB02000A550F/DATAFILE/
+DATA/DEV/4BC0AAB740DC1B8EE053AB02000A550F/DATAFILE/SYSAUX.277.939821859
+DATA/DEV/4BC0AAB740DC1B8EE053AB02000A550F/DATAFILE/SYSTEM.276.939821859
+DATA/DEV/4BC0AAB740DC1B8EE053AB02000A550F/DATAFILE/UNDOTBS1.275.939821859
+DATA/DEV/4BC0AAB740DC1B8EE053AB02000A550F/DATAFILE/USERS.279.939821869
+DATA/DEV/4BC0AAB740DC1B8EE053AB02000A550F/TEMPFILE/
+DATA/DEV/4BC0AAB740DC1B8EE053AB02000A550F/TEMPFILE/TEMP.278.939821863
+DATA/DEV/4BC0AB691AA11BA3E053AB02000A93C4/
+DATA/DEV/4BC0AB691AA11BA3E053AB02000A93C4/DATAFILE/
+DATA/DEV/4BC0AB691AA11BA3E053AB02000A93C4/DATAFILE/SYSAUX.282.939821871
+DATA/DEV/4BC0AB691AA11BA3E053AB02000A93C4/DATAFILE/SYSTEM.281.939821871
+DATA/DEV/4BC0AB691AA11BA3E053AB02000A93C4/DATAFILE/UNDOTBS1.280.939821871
+DATA/DEV/4BC0AB691AA11BA3E053AB02000A93C4/DATAFILE/USERS.284.939821881
+DATA/DEV/4BC0AB691AA11BA3E053AB02000A93C4/TEMPFILE/
+DATA/DEV/4BC0AB691AA11BA3E053AB02000A93C4/TEMPFILE/TEMP.283.939821875
+DATA/DEV/AUTOBACKUP/
+DATA/DEV/AUTOBACKUP/2017_03_28/
+DATA/DEV/AUTOBACKUP/2017_03_28/s_939822437.285.939822437
+DATA/DEV/CONTROLFILE/
+DATA/DEV/CONTROLFILE/Current.261.939821487
+DATA/DEV/CONTROLFILE/Current.262.939821487
+DATA/DEV/DATAFILE/
+DATA/DEV/DATAFILE/SYSAUX.258.939821419
+DATA/DEV/DATAFILE/SYSTEM.257.939821383
+DATA/DEV/DATAFILE/UNDOTBS1.259.939821443
+DATA/DEV/DATAFILE/USERS.260.939821445
+DATA/DEV/ONLINELOG/
+DATA/DEV/ONLINELOG/group_1.263.939821489
+DATA/DEV/ONLINELOG/group_1.266.939821491
+DATA/DEV/ONLINELOG/group_2.264.939821489
+DATA/DEV/ONLINELOG/group_2.267.939821491
+DATA/DEV/ONLINELOG/group_3.265.939821489
+DATA/DEV/ONLINELOG/group_3.268.939821491
+DATA/DEV/PARAMETERFILE/
+DATA/DEV/PARAMETERFILE/spfile.274.939821703
+DATA/DEV/TEMPFILE/
+DATA/DEV/TEMPFILE/TEMP.269.939821499
The standby database created in this example is making use of Filesystem Based storage - but importantly also using Oracle Managed Files.
When the standby database is created, the db_create_file_dest and db_recovery_file_dest was set. Note setting the required db_create_online_log_dest_n is recommended but not required.
[oracle@kiwi703 /u01/app/oracle/oradata]$ tree .
.
└── DEV
    ├── 4BC09721B301127AE053AB02000AED63
    │   └── datafile
    │       ├── o1_mf_sysaux_dfmhwrpg_.dbf
    │       ├── o1_mf_system_dfmhw6r1_.dbf
    │       └── o1_mf_undotbs1_dfmhxh38_.dbf
    ├── 4BC0AAB740DC1B8EE053AB02000A550F
    │   └── datafile
    │       ├── o1_mf_sysaux_dfmhy7gj_.dbf
    │       ├── o1_mf_system_dfmhxocz_.dbf
    │       ├── o1_mf_undotbs1_dfmhysjj_.dbf
    │       └── o1_mf_users_dfmhyy0r_.dbf
    ├── 4BC0AB691AA11BA3E053AB02000A93C4
    │   └── datafile
    │       ├── o1_mf_sysaux_dfmhznkc_.dbf
    │       ├── o1_mf_system_dfmhz29y_.dbf
    │       ├── o1_mf_undotbs1_dfmj07hy_.dbf
    │       └── o1_mf_users_dfmj0d42_.dbf
    ├── controlfile
    │   └── o1_mf_dfmhsrmz_.ctl
    ├── datafile
    │   ├── o1_mf_sysaux_dfmhvhyz_.dbf
    │   ├── o1_mf_system_dfmht9ph_.dbf
    │   ├── o1_mf_undotbs1_dfmhw2hy_.dbf
    │   └── o1_mf_users_dfmhxbs3_.dbf
    ├── onlinelog
    └── tempfile

11 directories, 16 files
5. Adding Datafiles to Primary Database
Normally, Oracle does not propagate the adding of datafiles on the primary database to the standby database. This must be done manually on the standby database.
Dbvisit Standby will automatically add the datafile to the standby database. Dbvisit Standby will attempt to generate a new name for a standby datafile, in case the primary name cannot be used due to different storage type (ASM and non-ASM) or different database file structure between the primary and standby.
There are some restrictions to automatically adding the datafiles to the standby database.
Note 1: There must be sufficient space on the standby server for Dbvisit Standby to add the datafile. If there is not sufficient space, then Oracle will generate an error message which will be captured by Dbvisit Standby and an alert will be sent.
Note 2: This feature is independent of the Oracle parameter STANDBY_FILE_MANAGEMENT. Dbvisit Standby will detect if STANDBY_FILE_MANAGEMENT has added the datafile to the standby database, and if so, Dbvisit Standby will not add the datafile.
Note 3: STANDBY_FILE_MANAGEMENT can only be used in Enterprise Edition and should not be set in Standard Edition.
Every time Dbvisit Standby runs on the primary, it takes a snapshot of primary datafile ids and names and saves it in the repository.
It detects if new data files have been added to the primary since the last run. If so Dbvisit Standby creates a new text file "datafiles_ORACLE_SID_DEST.txt" and ships it to the standby server to the location specified by parameter LOGDIR_DR, before proceeding with transferring redo logs.
Every time Dbvisit Standby runs on the standby, it reads the file datafiles_ORACLE_SID_DEST.txt and uses the primary datafile names to work out the location and name of a new standby datafile should one has to be added to the standby database. Actions related to recreating of a new standby control file are logged to Dbvisit Standby output and trace file.
This approach has certain limitations and Dbvisit may fail to obtain the primary name for a new standby datafile, if a delayed lag is set for the standby, or if the datafile(s) have been dropped and added to the primary in between two consequent Dbvisit runs and Oracle happened to reuse file ids.
To deal with this limitation Dbvisit first attempts to obtain the primary name for the new standby datafile from the datafiles_ORACLE_SID_DEST.txt file. If that fails, Dbvisit looks for Oracle error message ORA-01274 that contains the primary name of the new datafile. If the error message is not present in the sqlplus output, Dbvisit will attempt to create a new standby datafile as an OMF file, but only if the creation of OMF files is enabled on the standby. This functionality can be turned off by setting the global ADD_DATAFILE_FORCE_OMF to N (default Y).
Dbvisit Standby can by default only add a maximum of 10 data files per session. This is controlled by the MAX_DATAFILES_TO_ADD a parameter that can be set in the Dbvisit Database Configuration File (DDC)
When Using ASM
If the Standby database is making use of ASM, using OMF (Oracle Managed Files) is recommended.
Important
If ASM is used on the standby database for database storage, datafiles on the standby database will be created as Oracle Managed Files (OMF).
If a new datafile was added to the primary database the same process will be followed as mentioned above where the "datafiles_ORACLE_SID_DEST.txt" file is used, but if the standby database is making use of ASM and OMF is enabled - db_create_file_dest is set to a specific disk group - the standby database datafiles will be added as OMF files. (Aliases will not be used).
6. Videos
6.1 Create Standby Database - Filesystem to Filesystem
6.2 Create Standby Database - ASM to Filesystem
6.3 Create Standby Database - ASM to ASM
Part 1
Part 2
6.4 Create Cascade Standby Database
Part 1
Part 2
6.5 Create Standby database using Transportable Media
|