Configuring Oracle Database Appliance and Dbvisit Standby v9
- Deepika Kumar (Deactivated)
- Jan Klinke
- Charmaigne Bezuidenhout (Deactivated)
Introduction
The examples provided are of Dbvisit Standby Version 8.0.x, there should not be any changes on how this is being implemented in Dbvisit Standby Version 9.0
An Oracle Database Appliance X6 is similar in many ways to an Exadata, in that it is a pre-tuned machine built to run Oracle databases.
But the cost of buying one of these machines is far less than that of it's Exadata cousin. And with the launch of the X6 series last year, it is the first
the engineered system to support Oracle Standard Edition.
The X6-2S that is used for testing is optimized to run Single Instances and this entry level machine is very appealing to small and medium businesses.
A summary of the details for both parts is shown in the table below:
Primary | Standby | Cloud Standby | ||
Machine Name | ODAS1 | ODAS2 | DBVCLD01 | |
Type | ODA X6-2 S | ODA X6-2 S | Oracle Database as Service (DBaaS) | |
OS | REL 6 | REL 6 | REL 6 | |
Oracle Version | 12.1.0.2 Standard Edition | 12.1.0.2 Standard Edition | 12.1.0.2 Standard Edition | |
Databases | DBV1 | DBV2 | DBV1 | DBV2 |
CDB / Non-CDB | CDB | Non-CDB | CDB | Non-CDB |
DB Storage | ASM | ACFS | ASM | ACFS |
Dbvisit Standby | 8.0.14.19191 | 8.0.14.19191 | 8.0.14.19191 | 8.0.14.19191 |
1. Configuring Dbvisit Standby v8 between a Primary and Standby Oracle Database Appliance (ODA) 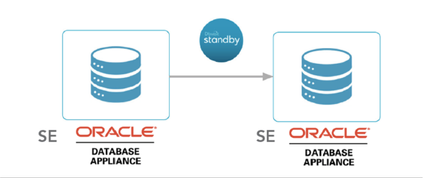
The steps required to configure Dbvisit Standby between two ODA machines are similar to a non-ODA setup. However, there are a couple of quirks that need to be kept in mind and we will explore these later on.
Having access to two 'blank' ODA X6-2 (The Dbvisit ODA Datasheet here) machines with just the OS pre-installed to perform some tests. So we could create 2 new Oracle Databases. Knowing we wanted to demo ODA to Oracle Cloud in a separate test, we decided to create an Oracle 12c CDB database with ASM storage (DBV1) and an Oracle 12c non-CDB database with ACFS filesystem storage (DBV2). This was in order to demonstrate as much of the functionality as possible.
During the database creation, as a part of the database create job SSH equivalence is set for oracle user for both the nodes and this is removed as soon as the database is created, So if you are using SSH instead of dbvnet for the Dbvisit Standby, please take a backup of the keys before creating the database using odacli. You can restore the keys once the database creation is completed.
We would recommend using dbvnet to avoid the above issue.
The issue has been raised with Oracle on this issue 28399738 has been logged with development for this issue. The fix for this issues is planned to be included in the next release 18.7
After logging into the management URL
creating a Database in ODA couldn't be easier. You simply click 'create database' from the Oracle Database Appliance, Databases tab. 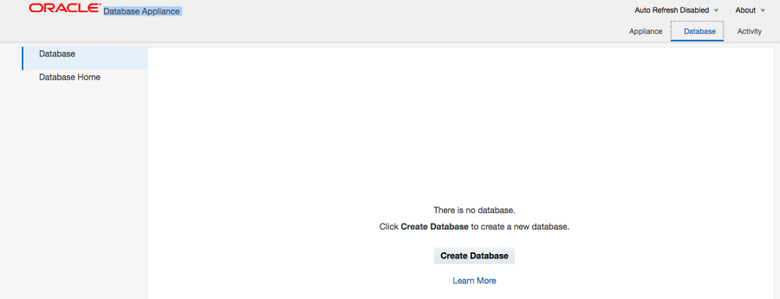
The graphic below shows the creation of the first of the 2 databases DBV1 (12c CDB with ASM). 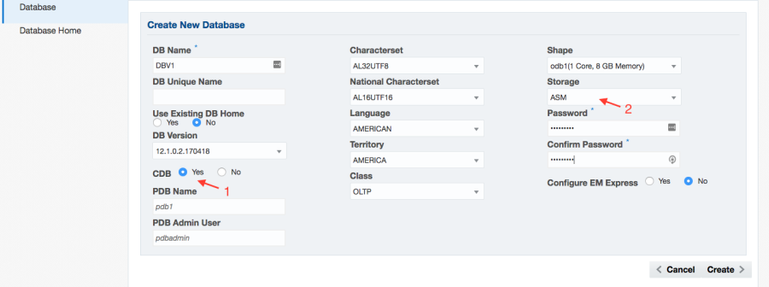
Once the "Create" button is pressed, the screen displays a creation job that can either be monitored as root via the command line tool (odacli) or graphically via a job.
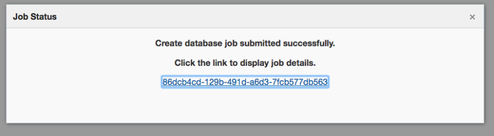
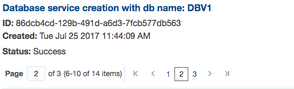
The creation of the database also generates an Oracle Home. The Oracle Homes for the primary databases are created (if you choose to have 2 instead of 1) with each database creation. However, on the Standby host, if there are not yet any databases there will be no Oracle Homes. Keep this in mind and we'll cover this point again later when creating the Standby DDC.
At this time, we choose to also create the 2nd Database DBV2, opting to create a 2nd Oracle Home and having ACFS as the storage option. 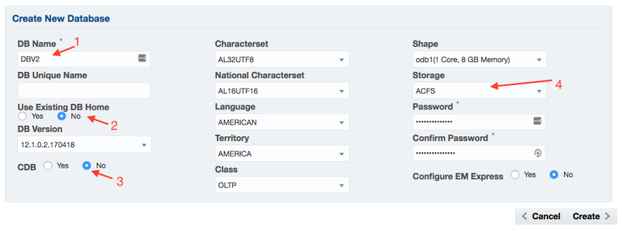
Once these databases were created, we can also view both of them and their associated storages from the command line utility (odacli).
[root@odas1 ~]# odacli list-dbstorages
ID Type DBUnique Name Status
---------------------------------------- ------ -------------------- ----------
a33565f6-af30-4bff-a4ea-cb7b71beead0 Asm DBV1 Configured
8847001e-f209-4c4d-a39f-1b50e5707ff3 Acfs DBV2 Configured
[root@odas1 ~]# odacli describe-dbstorage -i a33565f6-af30-4bff-a4ea-cb7b71beead0
DBStorage details
----------------------------------------------------------------
ID: a33565f6-af30-4bff-a4ea-cb7b71beead0
DB Name: DBV1
DBUnique Name: DBV1
DB Resource ID: f4ff4bb5-f102-4bef-8865-e05b4f777711
Storage Type: Asm
DATA Location: DATA
RECO Location: RECO
REDO Location: RECO
State: ResourceState(status=Configured)
Created: July 25, 2017 1:44:09 AM CEST
UpdatedTime: July 25, 2017 1:44:10 AM CEST
[root@odas1 ~]# odacli describe-dbstorage -i 8847001e-f209-4c4d-a39f-1b50e5707ff3
DBStorage details
----------------------------------------------------------------
ID: 8847001e-f209-4c4d-a39f-1b50e5707ff3
DB Name: DBV2
DBUnique Name: DBV2
DB Resource ID: 204fd4e5-ce81-4845-a027-5d154594a599
Storage Type: Acfs
DATA Location: /u02/app/oracle/oradata/DBV2
RECO Location: /u03/app/oracle/fast_recovery_area/
REDO Location: /u03/app/oracle/redo/
State: ResourceState(status=Configured)
Created: July 25, 2017 2:11:10 AM CEST
UpdatedTime: July 25, 2017 2:11:43 AM CEST
[root@odas1 ~]# odacli list-databases
ID DB Name DB Version CDB Class Shape Storage Status DbHomeID
---------------------------------------- ---------- ------------ ------ -------- -------- -------- ------------ ---------------------------------------
f4ff4bb5-f102-4bef-8865-e05b4f777711 DBV1 12.1.0.2 true OLTP odb1 ASM Configured 6b4bd46b-6fea-473d-a49e-4dca8b9fdaa8
204fd4e5-ce81-4845-a027-5d154594a599 DBV2 12.1.0.2 false OLTP odb1 ACFS Configured ac865770-d73d-4afe-9cb9-a27f48d99e0
With these created, it's worthwhile to now consider the standby node. Here, we need to pre-create both the standby database storage and add an Oracle Home. In order to demonstrate both the ease of using the command line and the GUI, we decided to create both the storage and the new Oracle Home from the command line as shown below.
If you are running later versions of ODA the steps for preparing standby server are bit different than on X6. The preparation of Standby server before installing Dbvisit Standby product is following:
Create Database Home with command:
odacli create-dbhome -v 12.1.0.2.170418 -de SE
Create Instance with instance-only option:
odacli create-database -u DBV1 -n DBV1 -m -r ASM -dh 8de7a0d0-f916-485e-bac4-7a4e392d7f0b -io
Storage and database resource will be created. New Instance will be started in NOMOUNT mode on standby server.
You need to shutdown the instance manually:
export ORACLE_SID=DBV1
sqlplus "/as sysdba"
SQL> shu abort;
No further steps with odacli are needed on the standby server and you can proceed with Dbvisit Standby installation
NOTE: by default the new standby database shape is set to "odb1" and this can't be changed, but it's not an issue since memory is defined by standby DB startup parameters and CPU limitation is not effective without resource manager (which is not available on SE). Redo log size is also carried over from the primary.
When Having issues registering standby instance with odacli it is also possible to perform graceful switchover with Dbvisit Standby GUI and register the standby instance with odacli when it will have the primary role.
[root@odas2 ~]# odacli create-dbstorage -n DBV1 -r ASM
{
"jobId" : "6227b92f-d829-4db6-96ab-350fda05a177",
"status" : "Created",
"message" : null,
"reports" : [ ],
"createTimestamp" : "July 25, 2017 03:11:21 AM CEST",
"resourceList" : [ ],
"description" : "Database storage service creation with db name: DBV1",
"updatedTime" : "July 25, 2017 03:11:21 AM CEST"
}
[root@odas2 ~]# odacli list-jobs
ID Description Created Status
---------------------------------------- ----------------------------------------------------------- ----------------------------------- ----------
98e6954b-81bc-4d40-8963-a84a35d8b3a4 Repository Update July 20, 2017 8:02:32 PM CEST Success
29caa2bb-1dac-4f05-acaa-c0c498ec3b1b Repository Update July 20, 2017 8:26:15 PM CEST Success
2af9409d-36fc-4bc5-8cb8-aed9b0c3448e Provisioning service creation July 20, 2017 8:38:09 PM CEST Success
034d9be5-88ee-4e9f-b459-dbd24c9cb404 Repository Update July 20, 2017 8:54:57 PM CEST Success
6227b92f-d829-4db6-96ab-350fda05a177 Database storage service creation with db name: DBV1 July 25, 2017 3:11:21 AM CEST Success
[root@odas2 ~]# odacli list-dbstorages
ID Type DBUnique Name Status
---------------------------------------- ------ -------------------- ----------
e282c8f6-5533-4ca9-b8f9-778be71fff39 Asm DBV1 Configured

[root@odas2 ~]# odacli describe-dbstorage -i e282c8f6-5533-4ca9-b8f9-778be71fff39
DBStorage details
----------------------------------------------------------------
ID: e282c8f6-5533-4ca9-b8f9-778be71fff39
DB Name: DBV1
DBUnique Name: DBV1
DB Resource ID:
Storage Type: Asm
DATA Location: DATA
RECO Location: RECO
REDO Location: RECO
State: ResourceState(status=Configured)
Created: July 25, 2017 3:11:21 AM CEST
UpdatedTime: July 25, 2017 3:11:21 AM CEST

[root@odas2 ~]# odacli list-dbhomes
No database home found

[root@odas2 ~]# odacli create-dbhome -v 12.1.0.2
{
"jobId" : "51be424a-e52b-4153-8067-d6a35126f667",
"status" : "Created",
"message" : "Create Database Home",
"reports" : [ ],
"createTimestamp" : "July 26, 2017 02:10:45 AM CEST",
"resourceList" : [ {
"resourceId" : "8de7a0d0-f916-485e-bac4-7a4e392d7f0b",
"resourceType" : "DbHome",
"jobId" : "51be424a-e52b-4153-8067-d6a35126f667",
"updatedTime" : "July 26, 2017 02:10:45 AM CEST"
} ],
"description" : "Database Home OraDB12102_home1 creation with version :12.1.0.2",
"updatedTime" : "July 26, 2017 02:10:45 AM CEST"
}
[root@odas2 ~]# odacli list-dbhomes
ID Name DB Version Home Location Status
---------------------------------------- -------------------- -------------------------------- --------------------------------------------- ----------
8de7a0d0-f916-485e-bac4-7a4e392d7f0b OraDB12102_home1 12.1.0.2.170418 /u01/app/oracle/product/12.1.0.2/dbhome_1 Creating

[root@odas2 ~]# odacli list-dbhomes
ID Name DB Version Home Location Status
---------------------------------------- -------------------- -------------------------------- --------------------------------------------- ----------
8de7a0d0-f916-485e-bac4-7a4e392d7f0b OraDB12102_home1 12.1.0.2.170418 /u01/app/oracle/product/12.1.0.2/dbhome_1 Configured
Download and copy (SCP) over the Dbvisit Standby v8 binaries to each node.
$ scp dbvisit-standby8.0.14-el6.zip root@odas2:/home/oracle/software
dbvisit-standby8.0.14-el6.zip 100% 70MB 139.8KB/s 08:36
$ scp dbvisit-standby8.0.14-el6.zip root@odas1:/home/oracle/software
dbvisit-standby8.0.14-el6.zip 100% 70MB 181.3KB/s 06:38
From there we can proceed with a normal installation of Dbvisit Standby v8
[oracle@odas2 software]$ unzip dbvisit-standby8.0.14-el6.zip
Archive: dbvisit-standby8.0.14-el6.zip
inflating: dbvisit-standby8.0.14-el6.tar
[oracle@odas2 software]$ tar -xvf dbvisit-standby8.0.14-el6.tar
– As root, create and change ownership of /usr/dbvisit
[root@odas1 software]# mkdir /usr/dbvisit
[root@odas1 software]# chown oracle:oinstall /usr/dbvisit
[oracle@odas1 ~]$ cd software/dbvisit/installer/
[oracle@odas1 installer]$ ./install-dbvisit
-----------------------------------------------------------
Welcome to the Dbvisit software installer.
-----------------------------------------------------------
It is recommended to make a backup of our current Dbvisit software
location (Dbvisit Base location) for rollback purposes.
Installer Directory /home/oracle/software/dbvisit
>>> Please specify the Dbvisit installation directory (Dbvisit Base).
The various Dbvisit products and components - such as Dbvisit Standby,
Dbvisit Dbvnet will be installed in the appropriate subdirectories of
this path.
Enter a custom value or press ENTER to accept default [/usr/dbvisit]:
>
DBVISIT_BASE = /usr/dbvisit
-----------------------------------------------------------
Component Installer Version Installed Version
-----------------------------------------------------------
standby 8.0.14.19191 not installed
dbvnet 2.0.14.19191 not installed
dbvagent 2.0.14.19191 not installed
dbvserver 2.0.14.19191 not installed
-----------------------------------------------------------
What action would you like to perform?
1 - Install component(s)
2 - Uninstall component(s)
3 - Terminate
Your choice: 1
Which component do you want to install?
1 - Core Components (Dbvisit Standby Cli, Dbvnet, Dbvagent)
2 - Dbvisit Standby Core (Command Line Interface)
3 - Dbvnet (Dbvisit Network Communication)
4 - Dbvagent (Dbvisit Agent)
5 - Dbvserver (Dbvisit Central Console)
6 - Exit Installer
Your choice: 1
-----------------------------------------------------------
Summary of the Dbvisit STANDBY configuration
-----------------------------------------------------------
DBVISIT_BASE /usr/dbvisit
Press ENTER to continue
-----------------------------------------------------------
About to configure DBVISIT DBVNET
-----------------------------------------------------------
>>> Please specify the Local host name to be used by Dbvnet on this server.
Dbvnet will be listening on the local IP Address on this server which
resolve to the host name specified here.
If using a cluster or virtual IP make sure the host name or alias
specified here resolve to the IP address local to where dbvnet is
installed.
Enter a custom value or press ENTER to accept default [odas1]:
>
>>> Please specify the Local Dbvnet PORT to be used.
Dbvnet will be listening on the specified port for incoming connections
from remote dbvnet connections. Please make sure that this port is not
already in use or blocked by any firewall. You may choose any value
between 1024 and 65535, however the default of 7890 is recommended.
Enter a custom value or press ENTER to accept default [7890]:
>

>>> Please specify the Remote host name to be used by Dbvnet.
By default Dbvnet will use this remote hostname for any remote
connections. Dbvnet must be installed and configured on the specified
remote host. If using a cluster or virtual IP make sure the host name
or alias specified here resolve to the IP address local to where dbvnet
is installed.
If you are unsure about the remote host name during installation, use
the default value which will be the current local hostname.
Enter a custom value or press ENTER to accept default [odas1]:
> odas2

>>> Please specify the Remote Dbvnet PORT to be used.
Dbvnet will connect to the remote server on this specified port.
On the remote host Dbvnet will be listening on the specified port for
incoming connections. Please make sure that this port is not already in
use or blocked by any firewall. You may choose any value between 1024
and 65535, however the default of 7890 is recommended.
Enter a custom value or press ENTER to accept default [7890]:
>

>>> Please specify the Dbvnet Passphrase to be used for secure connections.
The passphrase provided must be the same in both the local and remote
Dbvnet installations. It is used to establish a secure (encrypted)
Dbvnet connections
Enter a custom value:
> kiwi123
-----------------------------------------------------------
Summary of the Dbvisit DBVNET configuration
-----------------------------------------------------------
DBVISIT_BASE /usr/dbvisit
DBVNET_LOCAL_HOST odas1
DBVNET_LOCAL_PORT 7890
DBVNET_REMOTE_HOST odas2
DBVNET_REMOTE_PORT 7890
DBVNET_PASSPHRASE kiwi123
Press ENTER to continue
-----------------------------------------------------------
About to configure DBVISIT DBVAGENT
-----------------------------------------------------------

>>> Please specify the host name to be used for the Dbvisit Agent.
The Dbvisit Agent (Dbvagent) will be listening on this local address.
If you are using the Dbvserver (GUI) - connections from the GUI will be
established to the Dbvisit Agent. The Dbvisit Agent address must be
visible from the Dbvserver (GUI) installation.
If using a cluster or virtual IP make sure the host name or alias
specified here resolve to the IP address local to where dbvnet is
installed.
Enter a custom value or press ENTER to accept default [odas1]:
>

>>> Please specify the listening PORT number for Dbvagent.
The Dbvisit Agent (Dbvagent) will listening on the specified port for
incoming requests from the GUI (Dbvserver). Please make sure that this
port is not already in use or blocked by any firewall. You may choose
any value between 1024 and 65535, however the default of 7891 is
recommended.
Enter a custom value or press ENTER to accept default [7891]:
>

>>> Please specify passphrase for Dbvagent
Each Dbvisit Agent must have a passpharse specified. This passphrase
does not have to match between all the servers. It will be used to
establish a secure connection between the GUI (Dbvserver) and the
Dbvisit Agent.
Enter a custom value:
> kiwi123
-----------------------------------------------------------
Summary of the Dbvisit DBVAGENT configuration
-----------------------------------------------------------
DBVISIT_BASE /usr/dbvisit
DBVAGENT_LOCAL_HOST odas1
DBVAGENT_LOCAL_PORT 7891
DBVAGENT_PASSPHRASE kiwi123
Press ENTER to continue
-----------------------------------------------------------
About to install Dbvisit STANDBY
-----------------------------------------------------------
Component standby installed.
Press ENTER to continue
-----------------------------------------------------------
About to install Dbvisit DBVNET
-----------------------------------------------------------
Component dbvnet installed.
Press ENTER to continue
-----------------------------------------------------------
About to install Dbvisit DBVAGENT
-----------------------------------------------------------
Component dbvagent installed.
Press ENTER to continue
-----------------------------------------------------------
Component Installer Version Installed Version
-----------------------------------------------------------
standby 8.0.14.19191 8.0.14.19191
dbvnet 2.0.14.19191 2.0.14.19191
dbvagent 2.0.14.19191 2.0.14.19191
dbvserver 2.0.14.19191 not installed ---- Leaving this for the standby node
-----------------------------------------------------------
What action would you like to perform?
1 - Install component(s)
2 - Uninstall component(s)
3 - Terminate
Your choice: 3
>>> Installation completed
Install log /tmp/dbvisit_install.log.201707250354.
[oracle@odas1 installer]$
We can then repeat the exercise on the Standby server, also installing dbvserver.
Press ENTER to continue
-----------------------------------------------------------
Component Installer Version Installed Version
-----------------------------------------------------------
standby 8.0.14.19191 8.0.14.19191
dbvnet 2.0.14.19191 2.0.14.19191
dbvagent 2.0.14.19191 2.0.14.19191
dbvserver 2.0.14.19191 not installed
-----------------------------------------------------------
What action would you like to perform?
1 - Install component(s)
2 - Uninstall component(s)
3 - Terminate
Your choice: 1
Which component do you want to install?
1 - Core Components (Dbvisit Standby Cli, Dbvnet, Dbvagent)
2 - Dbvisit Standby Core (Command Line Interface)
3 - Dbvnet (Dbvisit Network Communication)
4 - Dbvagent (Dbvisit Agent)
5 - Dbvserver (Dbvisit Central Console)
6 - Exit Installer
Your choice: 5
-----------------------------------------------------------
About to configure DBVISIT DBVSERVER
-----------------------------------------------------------

>>> Please specify the host name to be used for Dbvserver

The Dbvisit Web Server (Dbvserver) will be listening on this local
address. If using a cluster or virtual IP make sure the host name or
alias specified here resolve to the IP address local to where Dbvserver
is installed.
If you are unsure about the remote host name during installation, use
the default value which will be the current local hostname.
Enter a custom value or press ENTER to accept default [odas2]:
>

>>> Please specify the listening port number for Dbvserver on the local server
You may choose any value between 1024 and 65535. The default recommended
value is 4433.
Note: if you can not access this port after the installation has
finished, then please double-check your server firewall settings
to ensure the selected port is open.
Enter a custom value or press ENTER to accept default [4433]:
>
-----------------------------------------------------------
Summary of the Dbvisit DBVSERVER configuration
-----------------------------------------------------------
DBVISIT_BASE /usr/dbvisit
DBVSERVER_LOCAL_HOST odas2
DBVSERVER_LOCAL_PORT 4433
Press ENTER to continue
-----------------------------------------------------------
About to install Dbvisit DBVSERVER
-----------------------------------------------------------
Component dbvserver installed.
Press ENTER to continue
-----------------------------------------------------------
Component Installer Version Installed Version
-----------------------------------------------------------
standby 8.0.14.19191 8.0.14.19191
dbvnet 2.0.14.19191 2.0.14.19191
dbvagent 2.0.14.19191 2.0.14.19191
dbvserver 2.0.14.19191 2.0.14.19191
-----------------------------------------------------------
What action would you like to perform?
1 - Install component(s)
2 - Uninstall component(s)
3 - Terminate
Your choice: 3
>>> Installation completed
Install log /tmp/dbvisit_install.log.201707250359.
[oracle@odas2 installer]$
A quick reminder of the Dbvisit Standby v8 Components are shown below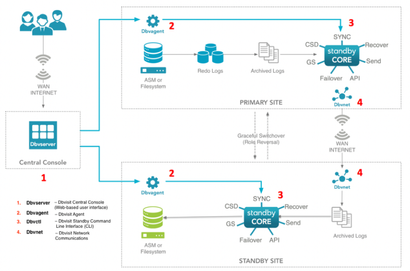
Once the binaries are installed we can start the corresponding processes: dbvnet and dbvagent on the primary server ODAS1 and additionally dbvserver on the standby site ODAS2
[oracle@odas1 ~]$ cd /usr/dbvisit/dbvnet
[oracle@odas1 dbvnet]$ ./dbvnet -d start
[oracle@odas1 dbvnet]$ cd ../dbvagent/
[oracle@odas1 dbvagent]$ ./dbvagent -d start
[oracle@odas2 ~]$ cd /usr/dbvisit/dbvnet
[oracle@odas2 dbvnet]$ ./dbvnet -d start
[oracle@odas2 dbvnet]$ cd ../dbvagent/
[oracle@odas2 dbvagent]$ ./dbvagent -d start
[oracle@odas2 dbvagent]$ cd ../dbvserver
[oracle@odas2 dbvserver]$ ./dbvserver -d start
From here we can fire up the GUI and proceed with creating the first database configuration.
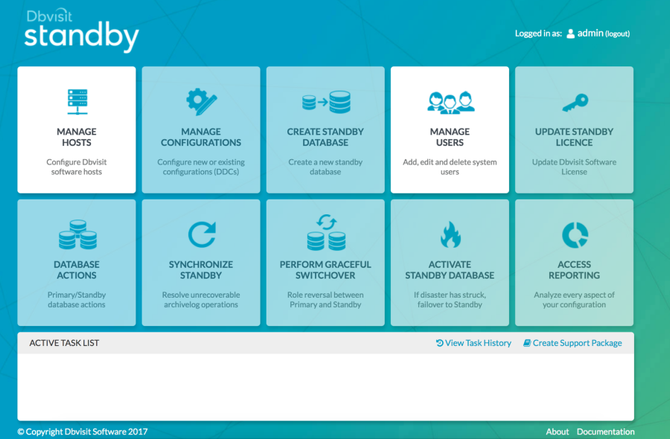
Click on the "Manage Hosts" tab to add the two ODA hosts.
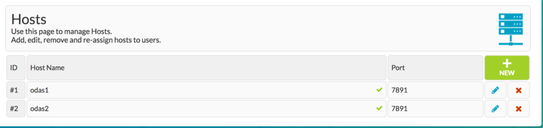
Once these hosts are in place and the two 'green-ticks' confirm they are accessible, we can move to the next stop of Managing Configurations. The first part of this screen is straightforward and describes the Primary ODA Database details. However, we've chosen to highlight the standby portion of the screen to draw your attention to three points. Firstly, the storage we created on the Standby host was of Type ASM. Second, if we hadn't already created an Oracle home on the standby host, it's a handy reminder to do so before filling out the details here. Third, the unique database name is also worth a mention.
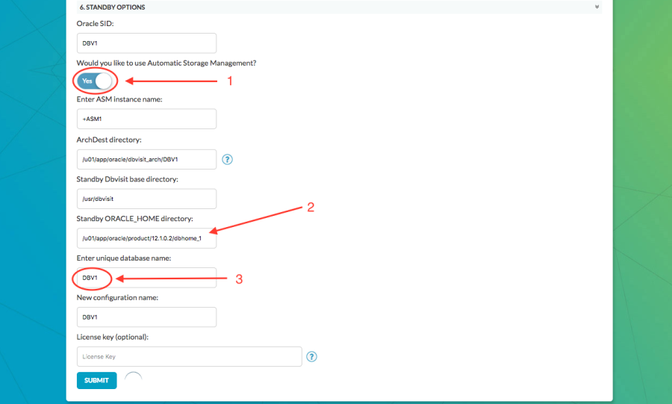
If you create the DB storage as we did earlier then the database unique name is the same as the database name by default.
[root@odas2 oracle]# odacli create-dbstorage -n DBV1 -r ASM
[root@odas2 12.1.0.2]# odacli list-dbstorages
ID Type DBUnique Name Status
---------------------------------------- ------ -------------------- ----------
e282c8f6-5533-4ca9-b8f9-778be71fff39 Asm DBV1 Configured
In the create-dbstorage command, there is the option (-u) to specify a different unique name. We didn't, so when entering a value in the Standby Configuration page, don't be tempted to specify a unique name here as it causes problems later when registering the database.
Here we specified a Unique Name in the "create configurations" of DBV1STBY. We could successfully create the standby database. However, we got the below error when we came to register it.
[root@odas2 ~]# odacli register-database -c OLTP -s odb1 -sn DBV1STBY.labarrow.fr -p
Password for SYS:
dbstorage not found. Please create db storage before registering DB
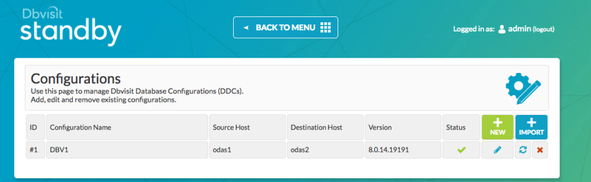
With the configuration successfully stored and a trial license applied to that configuration, we are ready to create the standby database on ODAS2 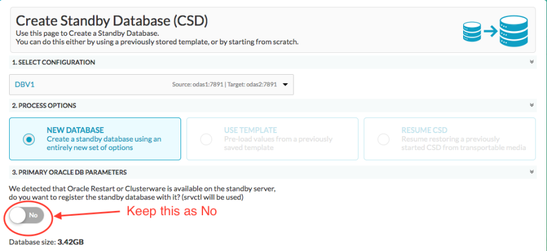
With the latest version of Dbvisit Standby 8, it automatically detects if Oracle Restart or Clusterware is available on the standby server. With an ODA machine, this is obviously present. However, in this case, we want to register the database with the odacli command line utility, not from here, so be sure to have this set to "No"
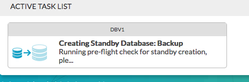

We can monitor the progress of the task via its icon on the "Active Task List" and watch each step until the Successful Task completion.
Before we can perform the registration of the standby database on the 2nd ODA machine we need to ensure that the database is opened in READONLY mode and before we do that we need to ensure there is a log gap of zero between the 2 databases.
Fortunately, this can easily be achieved with the GUI as shown below.
- View the current log gap
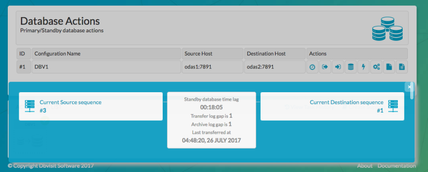
2. Send and Apply logs if required, the double check the log gap again.
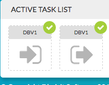
3. Select the database action icon
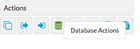
4. Choose "START READ-ONLY" for the database on Node 2
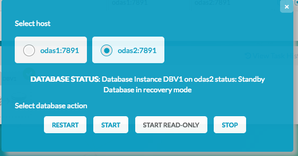
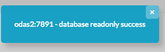
If you don't open the database as READONLY before attempting to register it, you get the error.
[root@odas2 tmp]# odacli register-database -c OLTP -s odb1 -sn DBV1.labarrow.fr -p
Password for SYS:
Failed to get oracle home for given contextError:BEGIN dbms_system.get_env('ORACLE_HOME',:ORACLE_HOME) ; END;
*
ERROR at line 1:
ORA-06550: line 1, column 7:
PLS-00201: identifier 'DBMS_SYSTEM.GET_ENV' must be declared
ORA-06550: line 1, column 7:
PL/SQL: Statement ignored
However, with the database in the correct mode:
[root@odas2 tmp]# odacli register-database -c OLTP -s odb1 -sn DBV1.labarrow.fr -p
Password for SYS:
{
"jobId" : "190be29a-449d-472e-a89a-bcb3db4b6224",
"status" : "Created",
"message" : null,
"reports" : [ ],
"createTimestamp" : "July 26, 2017 07:13:13 AM CEST",
"resourceList" : [ ],
"description" : "Database service registration with db service name: DBV1.labarrow.fr",
"updatedTime" : "July 26, 2017 07:13:13 AM CEST"
}
[root@odas2 tmp]# odacli describe-job -i 190be29a-449d-472e-a89a-bcb3db4b6224
Job details
----------------------------------------------------------------
ID: 190be29a-449d-472e-a89a-bcb3db4b6224
Description: Database service registration with db service name: DBV1.labarrow.fr
Status: Success
Created: July 26, 2017 7:13:13 AM CEST
Message:
Task Name Start Time End Time Status
---------------------------------------- ----------------------------------- ----------------------------------- ----------
restore control file July 26, 2017 7:13:13 AM CEST July 26, 2017 7:13:38 AM CEST Success
move spfile to right location July 26, 2017 7:13:38 AM CEST July 26, 2017 7:13:44 AM CEST Success
register DB with clusterware July 26, 2017 7:13:44 AM CEST July 26, 2017 7:14:18 AM CEST Success
reset db parameters July 26, 2017 7:14:18 AM CEST July 26, 2017 7:14:52 AM CEST Success
Running DataPatch July 26, 2017 7:14:52 AM CEST July 26, 2017 7:14:52 AM CEST Success
configuring TDE July 26, 2017 7:14:52 AM CEST July 26, 2017 7:15:31 AM CEST Success
[root@odas2 tmp]# odacli list-databases
ID DB Name DB Version CDB Class Shape Storage Status DbHomeID
---------------------------------------- ---------- ------------ ------ -------- -------- -------- ------------ ---------------------------------------
d92a0b20-ead8-496a-b467-99c29abf491d DBV1 12.1.0.2 true OLTP odb1 ASM Configured 8de7a0d0-f916-485e-bac4-7a4e392d7f0b
Once registered, don't forget to stop and mount the standby ready for applying archive logs.
It is fair to say at this point the differences end and the running of the standby with our software is as seamless as if ODA was not a consideration.
We can send/apply logs and perform a graceful switchover.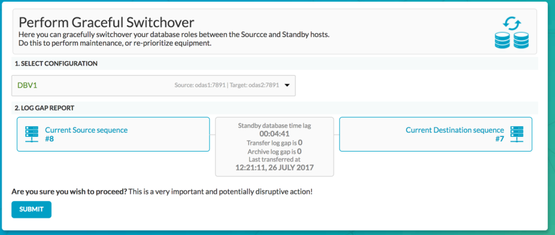
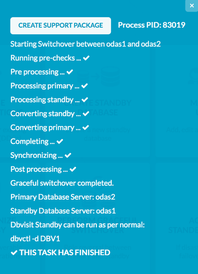
The configuration is automatically updated to reflect this switchover.

Using the ODA machines, both as a new technology and with our software, relatively straightforward.
2. Configuring Dbvisit Standby v8 between a Primary Oracle Database Appliance (ODA) and Standby DBaaS
We are now going to explore creating the standby database within a host that is a Database as a Service (DBaaS). This is also known as an Oracle Private Cloud. 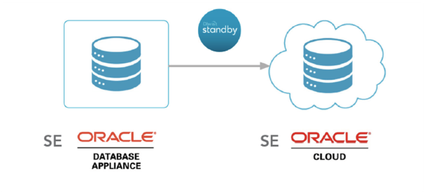
We'lll use the 2nd database created on ODAS1 (DBV2) as the primary and create a new Service within my Oracle Cloud account to act as the standby.
DBV2 is a small 12c Non-CDB database with ACFS filesystems and all the files residing on the /u02 mount point
[root@odas1 ~]# odacli list-databases
ID DB Name DB Version CDB Class Shape Storage Status DbHomeID
---------------------------------------- ---------- ------------ ------ -------- -------- -------- ------------ ---------------------------------------
f4ff4bb5-f102-4bef-8865-e05b4f777711 DBV1 12.1.0.2 true OLTP odb1 ASM Configured 6b4bd46b-6fea-473d-a49e-4dca8b9fdaa8
204fd4e5-ce81-4845-a027-5d154594a599 DBV2 12.1.0.2 false OLTP odb1 ACFS Configured ac865770-d73d-4afe-9cb9-a27f48d99e05

NAME
--------------------------------------------------------------------------------
/u02/app/oracle/oradata/DBV2/DBV2/datafile/o1_mf_sysaux_dqf3cpss_.dbf
/u02/app/oracle/oradata/DBV2/DBV2/datafile/o1_mf_system_dqf3dsx9_.dbf
/u02/app/oracle/oradata/DBV2/DBV2/datafile/o1_mf_temp_dqf3gp2z_.tmp
/u02/app/oracle/oradata/DBV2/DBV2/datafile/o1_mf_undotbs1_dqf3fm0t_.dbf
/u02/app/oracle/oradata/DBV2/DBV2/datafile/o1_mf_users_dqf3ozko_.dbf
We created the following host (service): DBVCLD01 with Service Level of "Oracle Database Cloud Service" 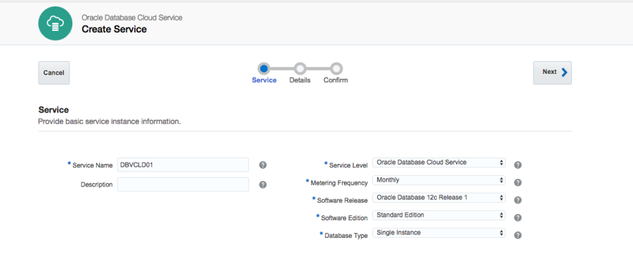
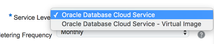
It's easier and quicker to accept this Service Level and drop the pre-created ORCL database than it is to opt for a Virtual machine as this is literally a 'bare bones' machine with no Oracle binaries or mounted filesystems.
Upload a private key created earlier with keygen and click create. The service takes around 20mins to complete.

Once completed, you can add access rules to make available the ports relevant to Dbvisit Standby v8. The defaults are port 7890 for dbvnet, 7891 for the agent and 4433 for the GUI/observer. We chose to create one rule (dbv_ports) covering the port range 4430-7899.
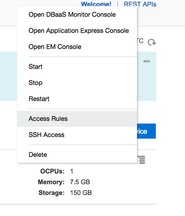
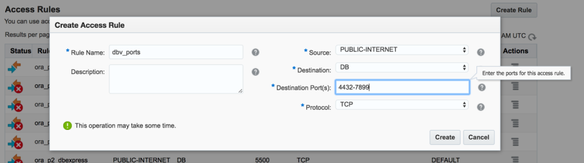
To access the host as root, simply connect as the opc user (who has sudo access) with the key that was uploaded when the service was created, and sudo -s to root. From here you can make the /usr/dbvisit directory and change the ownership to be oracle:oinstall. Also as root, edit the /etc/hosts file to add an entry for the primary node: ODAS1.
Lorraines-MacBook-Pro:~ landers$ ssh -i /Users/landers/Downloads/oraclecloud opc@dbvcld01
[opc@DBVCLD01 ~]$ sudo -s
[root@DBVCLD01 opc]# cd /usr
[root@DBVCLD01 usr]# mkdir dbvisit
[root@DBVCLD01 usr]# chown oracle:oinstall dbvisit
[root@DBVCLD01 usr]# vi /etc/hosts
It's also worth pointing out that on the Primary node, an entry pointing to the cloud host: dbvcld01 needs to be added to the /etc/hosts file and the firewall ports need opening on this side too. Then the binaries can be transferred and installed. As this cloud host is to be the standby server, it's best to install the dbvserver component here.
Lorraines-MacBook-Pro:Downloads landers$ scp -i oraclecloud dbvisit-standby8.0.14-el6.zip oracle@dbvcld01:/home/oracle
dbvisit-standby8.0.14-el6.zip 100% 70MB 2.5MB/s 00:28
[oracle@DBVCLD01 installer]$ ./install-dbvisit


– Full output truncated for display purposes


Component dbvserver installed.
Press ENTER to continue
-----------------------------------------------------------
Component Installer Version Installed Version
-----------------------------------------------------------
standby 8.0.14.19191 8.0.14.19191
dbvnet 2.0.14.19191 2.0.14.19191
dbvagent 2.0.14.19191 2.0.14.19191
dbvserver 2.0.14.19191 2.0.14.19191
-----------------------------------------------------------
What action would you like to perform?
1 - Install component(s)
2 - Uninstall component(s)
3 - Terminate
Your choice: 3
>>> Installation completed
Install log /tmp/dbvisit_install.log.201707250342.
[oracle@DBVCLD01 installer]$
Once the binaries are installed, start them up, including dbvserver for the GUI.
[oracle@DBVCLD01 standby]$ cd ../dbvnet
[oracle@DBVCLD01 dbvnet]$ ./dbvnet -d start
[oracle@DBVCLD01 dbvnet]$ cd ../dbvagent/
[oracle@DBVCLD01 dbvagent]$ ./dbvagent -d start
[oracle@DBVCLD01 dbvagent]$ cd ../dbvserver/
[oracle@DBVCLD01 dbvserver]$ ./dbvserver -d start
[oracle@DBVCLD01 dbvserver]$
Now we can proceed to use the GUI
and first enter details for the two hosts:
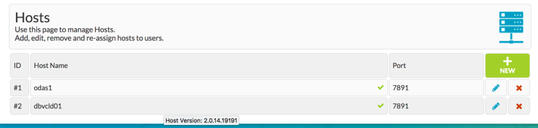
Then create a Database configuration. In this configuration, the filesystem is ACFS so I choose No for ASM: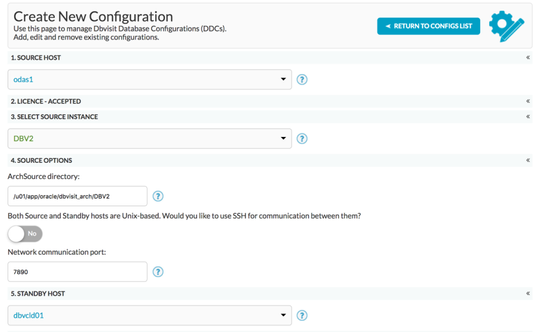
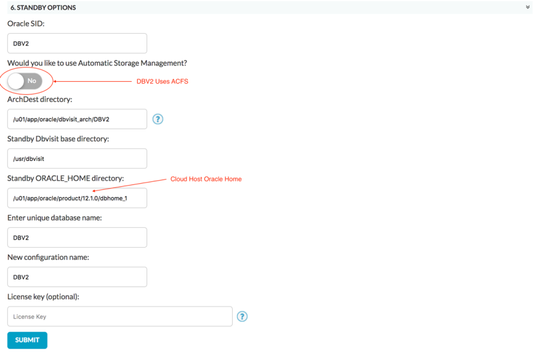
Once the configuration was saved, we created a new Standby Database, in this case, opting to register the Standby database with the clusterware services installed on the cloud host.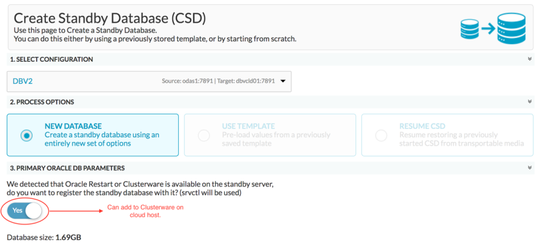
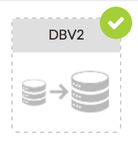
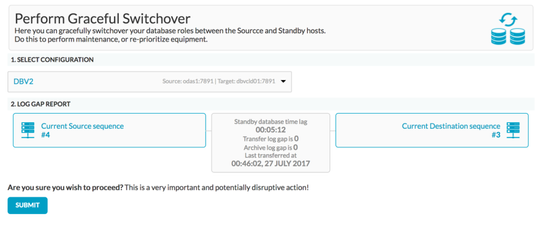
With the Standby created and in-sync, the final test was to perform a graceful switchover to show how easy it is to transition (role reversal) your primary database from being hosted on your ODA to a disaster recovery option hosted within the cloud. To do this, we first ensured the two databases were in sync by running a log gap report.

Then we opted for a graceful switchover.
Throughout the process, each step is displayed in real-time by clicking on the graceful switchover icon on the taskbar and once complete a successful tick appears.
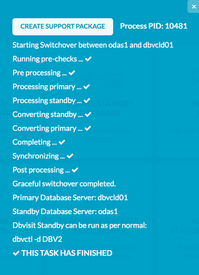

This can also be verified by the configurations tab, whereby the primary and standby destinations have been updated to reflect the switch.

Now your primary database is running from within your own Oracle Private cloud. The process is so slick you forget that the standby (or when it's a new a primary) is running in the cloud.
In summary, it was demonstrated that by using Dbvisit Standby v8 and Oracle Database Appliance customers using Oracle Standard Edition can easily achieve a solution that includes high performance hardware for your on-premise primary and standby databases or for an on-premise primary to a cloud hosted standby. All of this at a fraction of the cost of Exadata+Data Guard+Enteprise Edition. Even though we're already familiar with the Dbvisit Standby product, using the ODA commands or GUI didn't distract from the ease of managing your DR solution in this way.