Introduction
- Anton Els (Deactivated)
- Jakub Sejba
- Lorraine Anderson (Deactivated)
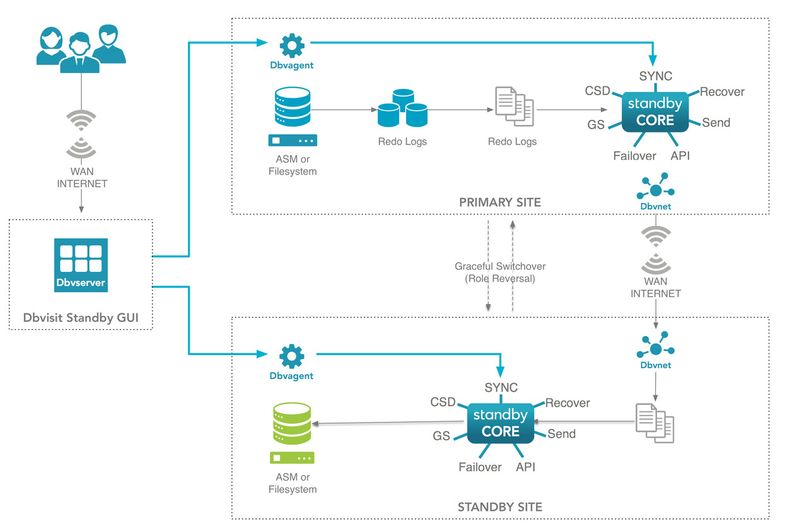
1. Architecture Overview
The following diagram is a high-level overview of the Dbvisit Standby version 8 architecture.
On this page:
Below is a short overview video of the Dbvisit Standby version 8 architecture:
For a more detailed overview of Dbvisit Standby version 8 - including a quick overview of the installation we recommend you review the following short Video.
The installation is done on Linux based environment, but the concepts discussed are similar for a Windows-based installation.
1.1. Dbvisit Standby Feature Summary
Dbvisit Standby functionality can be summarized as follows:
- Archive log extraction from the primary database
- Secure transfer of archive logs between primary and standby servers
- Apply of archive logs to the standby database
- Easy role reversal (switchover) between primary and standby databases
- Easy activation of a standby database in case of disaster
- Full support for Oracle Real Application Clusters (RAC)
- Support for one primary database having multiple standby databases
- Recover standby database using a delay (LAG)
- Recover standby to specified SCN or Timestamp
- Archive logs compression during transfer
- Archive log Management Module (AMM)
- Maintain archive logs on both primary and standby
- Delete logs older than a specified time
- Compress archive logs that have already been applied
- Automated process to create the standby database (CSD)
- Automated process to re-synchronize the standby database due to:
- Unrecoverable Archive log gap
- No-Logging operations
- Reporting options include:
- Archive log transfer gap reporting
- Archive log apply gap reporting
- Command line interface (CLI) and Graphical User Interface (GUI) is available
We can summarise the core functionality of Dbvisit Standby into three key processes:
1.2. Log Extraction
Dbvisit Standby will extract the primary database archive logs from the database archive destination.
The following steps form part of the log extraction process:
- The latest archive logs will be extracted to be shipped to the standby
- A "logswitch" will be forced if no new logs were generated since the last run
- Logs will be compressed if compression option is selected
- If configured, Dbvisit Standby can also manage the archive logs on the primary server; example purge logs older than a specified time
1.3. Transport
The second step in the process will be to copy these extracted archive logs to the standby site.
This transfer process is initiated from the primary server and the transfer process is secure.
The following steps form part of the log transfer process:
- The latest archive logs will be transferred using the Dbvisit Network (Dbvnet) or SSH (Unix Only)
- The connection between the primary and standby site is encrypted and secure by default
- Archive logs will be transferred in compressed format if required
- From version 7, Archive logs are renamed to a standard format as part of the transfer process and will be stored on the standby server in a new naming convention (example thread#_sequence#_resetlogs_id.arc)
- Checksum values are generated to ensure logs are transferred successfully
- Dbvnet is making use of port 7890 by default and this port should be open for communication (SSH is fully supported as a communication method between Primary and Standby on UNIX based systems)
1.4. Log Apply
The third step in the process is where Dbvisit Standby applies the transferred archive logs to the standby database.
The following steps form part of the log apply process:
- On the Standby Server, Dbvisit Standby will pick up the transferred archive logs and apply them to the standby database
- If configured, Dbvisit Standby can also manage the archive logs on the standby server; example purge logs older than a specified time
The above is only a summary of the core functionality of Dbvisit Standby which is to extract, send and apply logs.
2. Dbvisit Standby Components
Dbvisit Standby refers to the product "Dbvisit Standby" and does not refer to the standby database or standby server.
The Dbvisit Standby environment consists of the following components:
- It is important to note that the user running Dbvisit on Unix based systems MUST be the same user that is used to install and run the Oracle Database software.
- On Windows-based systems the user used, does not have to be the same user as the Oracle Home Owner, but MUST be in the ORA_DBA and Local Administrators group with "Log on as a service" permission (required for Dbvnet, Dbvagent, Dbvserver Windows Services)
Dbvnet (Dbvisit Networking)
| Dbvisit Standby Version 7 introduced a new component called Dbvnet.
The default port used by Dbvnet is 7890 and this port must be opened on both the primary and standby database servers to allow communication. On Windows, the Dbvnet windows service must be started and on Unix based systems the dbvnet process must be started on both the primary and standby servers. |
Dbvserver (Dbvisit Standby GUI)
| This is a Web server that provides the web interface to Dbvisit.
Dbvserver is using port 4433 by default and you must use HTTPS to connect to it. The default username is "admin" and password is "admin". It is recommended to change this password. The Dbvserver process will communicate with the Dbvagent (Agent) process on port 7891 by default. It is important to note though that the Agent will communicate with Dbvserver on port 4433. To allow for communication between the webserver and the agent, port 7891 must be open on the agent side and the agent started (service running in windows and dbvagent started from the command line on Unix) |
Dbvagent (Dbvisit Agent)
| The Dbvisit Agent is used to manage the Standby core background processes as well as managing the communication between the Dbvserver (Web-based interface) and the Dbvisit Standby core.
The Agent is making use of port 7891 by default. During installation, a passphrase is provided to which is used to allow the Dbvserver (webserver) to establish a secure connection to the Agent. The Agent will communicate with the webserver on port 4433. |
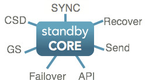
Standby Core (Dbvisit Standby Core and CLI)
| Dbvisit Standby also referred to as Standby, is the core of the Dbvisit Standby product.
The standby core component will be invoked by either the user manually or Dbvnet or Dbvagent depending on which process is executed. There are no specific port requirements for the Standby Core. |
Dbvisit Database Configuration (DDC file) | This is similar to the init.ora parameter file and contains the Dbvisit Standby settings for a specific primary and standby database pair. The DDC file is generated during setup for each database. The DDC file should only be edited on the primary server. |
Dbvisit Database Repository (DDR) | This repository contains the Dbvisit Standby tables used to manage the standby process. It is located outside the Oracle database in a small file under the DBVISIT_BASE/conf directory called <ddc>.db example if DDC name is PROD the file name will be "prod.db" The DDR is created during setup. |
Dbvisit Standby trace files | Each time the Dbvisit Standby executes, a trace file is generated. This trace file contains information about Dbvisit Standby processing and its environment. When an alert or error notification is sent by Dbvisit Standby, the trace file will be attached to the email so that this can be forwarded to Dbvisit support if needed. This trace file is used by the Dbvisit support team to diagnose issues. |


Dbvisit Standby version 8 uses a slightly new directory structure compared to previous versions.
The primary directory (DBVISIT_BASE) is by default id called "dbvisit" but it can be adjusted during installation - it contains five sub-directories, providing a logical grouping of the Dbvisit Standby components:
- Dbvnet - Networking
- Dbvserver - GUI
- Standby for CLI and Core Standby functionality
- Installer - used for installation configuration files
3. Dbvisit Standby Directory Structure
The following directory structure is used by Dbvisit Standby version 8:
When Installing Dbvisit Standby version 8 it is important to take note of the directory structure.
The default installation location on Unix based systems are /usr/dbvisit and on Windows-based systems: C:\Program Files\Dbvisit
The table below is an illustration of the full directory structure with all products installed.
It is however recommended that the Webserver component - Dbvserver not be installed on the database servers but on a separate system.
| Unix Based Systems | Windows Based Systems |
|---|---|
Dbvisit Standby Core Installation (Dbvnet, Dbvagent, Standby Core - CLI) /usr/dbvisit
├── dbvagent
│ ├── conf
│ ├── doc
│ └── log
├── dbvnet
│ ├── conf
│ ├── doc
│ ├── log
│ └── tmp
└── standby
├── conf
├── doc
├── gs
├── lib
├── log
├── pid
├── support
├── tmp
│ └── GS
└── trace
Dbvisit Standby GUI (Dbvserver) installation only: /usr/dbvisit
├── dbvserver
├── conf
├── doc
├── log
└── www
| Dbvisit Standby Core Installation (Dbvnet, Dbvagent, Standby Core - CLI) C:\Program Files\Dbvisit
├── dbvagent
│ ├── conf
│ ├── doc
│ └── log
├── dbvnet
│ ├── conf
│ ├── doc
│ ├── log
│ └── tmp
└── standby
├── conf
├── doc
├── gs
├── lib
├── log
├── pid
├── support
├── tmp
│ └── GS
└── trace
Dbvisit Standby GUI (Dbvserver) installation only: C:\Program Files\Dbvisit
├── dbvserver
├── conf
├── doc
├── log
└── www
|
4. Using Dbvisit Standby
After the installation of Dbvisit Standby, you can either use the Central Console or the Command Line Interface to create the Dbvisit Standby Configuration (DDC) file as well as the standby database.
Please make sure you have reviewed the Release Notes as well as the System Pre-requisites.
Below are a few key things to keep in mind:
- Communication between the Webserver and Agents is on port 7891. The Agent will send information back to the webserver on port 4433
- Communication between the Dbvnet Components are using port 7890
- Accessing the Central Console will be through HTTPS and using Port 4433
- The default Central Console user is "admin" with password "admin" - it is recommended to change this.
- Make sure that the following ports are open on local firewalls on the systems: 7890,7891 and 4433
The sections we recommend you review are as follow:
- Installation: Installing Dbvisit Standby
- For a step by step guide on installing on Windows-based systems: Installing Dbvisit Standby#5.InstallingDbvisitStandbyonWindows
- Once the installation is complete the next step would be to create a Dbvisit Standby Configuration (DDC) file. This can be done via the Command Line or using the Graphical Interface. For more details please review this section: Creating the DDC File
- Using the Graphical Interface: Using the Central Console - Dbvserver
- Using the Command Line Interface: Dbvisit Standby Command Line Interface (CLI)
- Creating a standby database is covered in this section: Create Standby Database (CSD)
- Graceful Switchover is discussed in this section: Graceful Switchover (GS)
- Scheduling shipping and applying of logs are discussed in this section: Dbvisit Standby Scheduling