Installing Dbvisit Standby
- Anton Els (Deactivated)
- Charmaigne Bezuidenhout (Deactivated)
- Deepika Kumar (Deactivated)
1. Introduction
This section will cover the prerequisites for installing Dbvisit Standby version 8, and take you through the detail steps of installing the Dbvisit Standby version 8 software.
2. Installation Prerequisites
Before installing Dbvisit Standby it is important to make sure that all prerequisites are met. If you fail to meet these prerequisites, Dbvisit Standby might not function as expected. It is therefore recommended to make sure you review this section in detail.
First, review the new Dbvisit Standby Architecture before you continue. As mentioned, Dbvisit Standby version 8 uses new architecture, with newly introduced components. For example, it is recommended that the new Web-Based user interface (dbvserver) is installed on its own system. (This may be a Physical server, Virtual Machine or even a Docker image. However, please note persistent storage is required for the Dbvserver installation folder where a repository is kept). More on the Dbvserver requirements will be covered in this section.
2.1. General Requirements
Before getting into the specific requirements for the primary and standby server, it is important to cover the requirements that apply to both the primary and standby server installations.
Below are a few key points to take into account with regards to the Primary Server configuration:
- The location of the Oracle software is called the ORACLE_HOME. In the Dbvisit Standby configuration, this variable is also called ORACLE_HOME.
- It is recommended that the database is listed in the /etc/oratab file if using UNIX installations.
- Dbvisit Standby should be installed as the same user that was used to install the Oracle Database Software.
- Using a local account on UNIX based systems are recommended - in most cases, this will be the "oracle" UNIX user account.
- If using Windows Based installations, the user account used to install and run Dbvisit Standby must be in the ORA_DBA windows group.
- Dbvisit Standby does support role separation, where the Oracle Database software is installed as one user - usually "oracle" and the Grid Infrastructure (ASM) software is installed as a different user - usually the "grid" user.
- If role separation is used, where the Grid Infrastructure software is installed and owned by the “grid” user, and the Oracle Database software is owned by the “oracle” use, Dbvisit Standby should be installed as the “oracle” user.
- NOTE: Avoid using passwords with the double quote character in it: "
- NFS: When using NFS based storage, it is recommended to review the supported options by Oracle - see MOS note 359515.1 for more details.
On this page:
2.1.1. Recommended Operating System Packages
Before installing the Dbvisit Standby it is recommended that the following operating system package (if using Linux) be installed prior to installing Dbvisit Standby version 8 Dbvserver component. In most installations, the packages would already be installed and no additional software would be required.
- glibc
- zlib
- libaio
Confirming if these packages are installed can be done using the "rpm -qa" command, example on Oracle Linux 7.2.
[root@dbv103 dbvserver]# rpm -qa|egrep 'zlib|glibc|libaio'
zlib-1.2.7-15.el7.x86_64
glibc-2.17-106.0.1.el7_2.8.x86_64
...
...
2.1.2. The Dbvisit Standby Base (DBVISIT_BASE)
The location into which Dbvisit Standby software is installed into is referred to as the Dbvisit Standby base, also known as the DBVISIT_BASE.
The default location is as follow:
| Unix Based Systems | Windows Based Systems |
|---|---|
| /usr/dbvisit | C:/Program Files/Dbvisit |
It is strongly recommended that you make use of the default location when installing Dbvisit Standby.
On Unix, it is important to pre-create this directory and make sure the owner and group used for this directory are the same as what was used for the Oracle Database Software installation. In most cases, this will be the Unix user "oracle" and group "oinstall" or "dba"
Note: It is recommended you have minimum 512MB of free space in this location to cater for the installation.
DBVISIT_BASE is also used to store active redolog during the switchover. Make sure, that there is also additional space available equal to the size of your redolog file
2.1.3. Network Connectivity
IPV6 is not supported. Please, ensure you are using only IPV4 protocol.
It is recommended to make sure that the primary and standby servers are aware of the others name and IP address. Using DNS entries or using entries in the “hosts” file can be used to do this.
The central web server (Dbvserver) should also be installed on a central location (its own server if possible) and this system must also be able to connect to the primary and standby servers.
Example entries in host file (note that xxx.xxx.xxx.xxx is IP addresses):
xxx.xxx.xxx.xxx     your_primary_server_name
xxx.xxx.xxx.xxx     your_standby_server_name
Dbvisit Standby version 8 makes use of Dbvnet by default for network communication between the primary and standby database servers, however, it is still possible (and fully supported) to make use of SSH for communication if required. Using SSH is only allowed and supported on UNIX based systems.
It is recommended that you make sure the following ports are open on each of the servers to allow for communication between them, as well as to allow the end user to connect to the Dbvisit Web GUI:
- Dbvisit Networking (Dbvnet)
- The default port used is 7890
- The default port used is 7890
- Dbvisit Agent (Dbvagent)
- Default port used is 7891
- Default port used is 7891
- Dbvisit GUI (Dbvserver)
- The default port used for HTTPS is 4433
- Note that HTTP is not an option and that HTTPS must be used.
- If SSH is used instead of Dbvnet, the default SSH port 22, should also be open and passwordless authentication (SSH equivalence) must already be configured. If SSH is used, the account running Dbvisit Standby must be the same as the Oracle database software owner.
Note: in most cases, you will need to allow these ports to be open in your IPTABLES configuration if you are using Linux, or you will have to update your Windows firewall settings if a Windows is used.
2.1.4. Network Connectivity when using Oracle RAC
Note that in Dbvisit Standby version 8, Oracle RAC configurations are treated differently.
If you want to upgrade from version 7 to version 8, we recommend you perform a clean new version 8 installation and create a new DDC file. This is due to a large number of changes Dbvisit Standby version 8 brings with regards to Oracle RAC configurations.
In Dbvisit Standby version 8, we recommend that you run Dbvisit Standby only on one of the Oracle RAC nodes and make use of shared storage.
For more detail please see these sections:
When installing Dbvisit Standby version 8 in an Oracle RAC configuration, the following will be required:
A new Virtual IP and Name for each of the Primary and Standby database clusters (if both are Oracle RAC, otherwise if the standby server is a single instance - single node server, no Virtual IP and Name will be required for the standby as the standby server details will be used as is).
Example, you have a 2 node Oracle RAC cluster with node1 and node2 with the following example IP configuration (extract from /etc/hosts)
192.168.1.11    node1.demo.net node1
192.168.1.12    node2.demo.net node2
192.168.1.13    node1-vip.demo.net node1-vip
192.168.1.14    node2-vip.demo.net node2-vip
10.0.1.11       node1-priv.demo.net node1-priv
10.0.1.12       node2-priv.demo.net node2-priv

# 192.168.1.15    racdb-scan.demo.net  racdb-scan  ## note these SCAN addresses should be in the DNS not hosts file
# 192.168.1.16    racdb-scan.demo.net  racdb-scan ## note these SCAN addresses should be in the DNS not hosts file
# 192.168.1.17    racdb-scan.demo.net  racdb-scan ## note these SCAN addresses should be in the DNS not hosts file
You will now configure Dbvisit Standby version 8 on this cluster which will run on only one of the nodes at a time - no need to run Dbvisit Standby on both RAC nodes.
Shared storage for the Dbvisit Standby installation will be used - example /usr/dbvisit might be using a shared ACFS filesystem.
To allow appropriate communication from the standby to the correct primary RAC node that is running the Dbvisit Standby version 8 software, a Virtual IP (name) is created, an example in the case above configuration the following can be added:
192.168.1.18 dbvracdb-vip.demo.net dbvracdb-vip
For more detail on creating this Virtual IP, please see the Oracle Documentation with regards to the command "appvipcfg"
Below is an example of the steps to create the Virtual IP on a Linux based RAC configuration and starting it on node1 (These commands are only executed on one of the nodes - example node 1 and is done as the "root" user)
appvipcfg create -network=1 -ip=192.168.1.18 -vipname=dbvracdb-vip -user=root
crsctl status resource dbvracdb-vip -p
crsctl setperm resource dbvracdb-vip -u user:oracle:r-x
crsctl setperm resource dbvracdb-vip -u user:grid:r-x
crsctl start resource dbvracdb-vip -n node1
2.1.5. Default TEMP Directory
When installing Dbvisit Standby and you may get the following error "Error: Can't locate libperl.so"
Example:
oracle@dbvlin103[/home/oracle/8.0/dbvisit/installer]: ./install-dbvisit
Error: Can't locate libperl.so
...........
Background Information:
When Dbvisit Standby is executing, including Dbvnet and Dbvserver, temporary files are extracted and used from the default system temp location.
On most Unix system this will be /tmp The problem, in this case, is that the /tmp mount point was mounted using the "noexec" option.
Using the mount command you can quickly review the settings:
oracle@dbvlin103[/home/oracle/8.0/dbvisit/installer]: mount |grep tmp
tmpfs on /dev/shm type tmpfs (rw,size=2G,rootcontext="system_u:object_r:tmpfs_t:s0")
tmpfs on /tmp type tmpfs (rw,noexec,size=2G)
In some cases where environments are locked down, this might be seen.
Solution:
There are two possible options to get past this.
1. Ask the system administrator to mount the /tmp filesystem without the "noexec" option.
2. Create a new temporary directory and set the TMPDIR environment variable to point to this location, example:
oracle@dbvlin103[/home/oracle/8.0/dbvisit/installer]: mkdir /home/oracle/tmp
oracle@dbvlin103[/home/oracle/8.0/dbvisit/installer]: export TMPDIR=/home/oracle/tmp
oracle@dbvlin103[/home/oracle/8.0/dbvisit/installer]: ./install-dbvisit
...
If using TMPDIR option you will need to make sure you update the .bash_profile or .profile or other environment configuration files to ensure that this path is set before you execute Dbvisit Standby processes.
2.2. Primary Server Requirements
When looking at installing the Dbvisit Standby product, you need to make sure that the required supported Oracle Database software is already installed and configured with a primary database running (started in an open read/write mode).
No outage is required for the installation of Dbvisit Standby.
It is however required that the primary database is in "archivelog" mode. If not you will need to enable this first - which will require an outage - as a restart of the database is required to enable this option.
For Oracle RAC environments, all the RAC instances must be running during the initial Dbvisit Standby installation and configuration.
Below are a few key points to take into account with regards to the Primary Server configuration:
- It is recommended that the database is listed in the /etc/oratab file if using UNIX installations.
- When using Windows-based installations, the Primary Database will be listed in the registry is created using the DBCA (Oracle Database Configuration Assistant). If the database was created manually with scripts, it might not be listed in the registry and will have to be manually added in Dbvisit Standby's configuration - more on this in the Creation of the Dbvisit Standby configuration file (DDC file).
Dbvisit Standby does not make use of the Oracle Listener for database connections. All connections to the database are local connections, for example:
SQL> connect / as sysdba
Connected.
The sys database account can also be used by Dbvisit, example:
SQL> connect sys/syspassword as sysdba
Connected.
If operating system authentication is not allowed and user (sys) authentication is used, the credentials should be specified in the Dbvisit Database Configuration (DDC) file.
NOTE: In case of either primary or standby databases use ASM storage, the user that installed Dbvisit Standby should be able to connect to the ASM instance as sysdba.
2.2.1. Archivelog Mode
To enable the use of a standby database, your primary database must be in archivelog mode. To determine if the database is in archive log mode run SQL command: "sql> archive log list"
Example:
SQL> archive log list;

 Database log mode Archive Mode
 Automatic archival Enabled
 Archive destination USE_DB_RECOVERY_FILE_DEST
 Oldest online log sequence 21568
 Next log sequence to archive 21571
 Current log sequence 21571
If the database is not in archivelog mode you can use the following to enable it. Please note this requires an outage. Also, make sure you have sufficient space in your fast/flash recovery area:
SQL > connect / as sysdba
SQL > shutdown immediate
SQL > startup mount
SQL > alter database archivelog;
SQL > shutdown immediate;
SQL > startup
For more details on enabling/disabling archivelog mode, please see the Oracle Documentation.
2.3. Standby Server Requirements
When looking at installing the Dbvisit Standby on the standby server, you need to make sure that the required supported Oracle Database software is already installed and configured.
Dbvisit Standby can be used to create the standby database for you once it is configured. But if you already have a standby database in place, you can configure Dbvisit Standby to update and maintain the standby database going forward - there will be no need to recreate this standby database.
Below are a few key points to take into account with regards to the Standby Server configuration:
- It is recommended that the database is listed in the /etc/oratab file. If you are looking at creating a new standby database, you may add its detail to the /etc/oratab file prior to using Dbvisit Standby to start the configuration.
- Dbvisit Standby should be installed as the same user that was used to install the Oracle Database Software.
- If you are planning on using ASM storage for the standby database and you are using role separation (meaning Oracle Database software is installed as the "oracle" Unix account and the Grid Infrastructure software is installed as the "grid" Unix account) you will need to make sure that the Oracle executable in the Oracle Database software home has the correct permissions. If you do not have the correct permissions you will potentially get ORA-15025 errors, as you will not be able to see the ASM storage when creating a new database manually. For more details see this the Oracle Support note: 1084186.1. The steps below can be followed to ensure the executable has the correct permission. These steps include running the setasmgidwrap command as the "grid" user:
root@dbvlin101[/u01/app/oracle/product/12.1.0/db_1/bin]: ls -altr oracle
-rwsr-s--x 1 oracle oinstall 282183593 Jul 28 17:49 oracle
root@dbvlin101[/u01/app/oracle/product/12.1.0/db_1/bin]: cd


root@dbvlin101[/root]: su - grid
grid@dbvlin101[/home/grid]: . oraenv
ORACLE_SID = [grid] ? +ASM
The Oracle base remains unchanged with value /u01/app/grid

grid@dbvlin101[/home/grid]: setasmgidwrap o=/u01/app/oracle/product/12.1.0/db_1/bin/oracle
grid@dbvlin101[/home/grid]: cd /u01/app/oracle/product/12.1.0/db_1/bin/


grid@dbvlin101[/home/grid]: ls –al oracle
-rwsr-s--x 1 oracle asmadmin 282183593 Jul 28 17:49 oracle
2.4. Central Console Requirements
From Dbvisit Standby version 8 the Web-Based Interface (GUI) is designed to manage multiple standby database configurations from one central location.
From version 8 when talking about the Central Console, we will refer to the Dbvisit Standby GUI also known as Dbvserver.
It is recommended that the Central Console be installed on a standalone server - ideally running Oracle Linux version 6 or higher. This can either be a physical server, Virtual Machine or even a Docker image (as long as persistent storage is used).
The key requirements for the system running the central console are:
- The system must be able to access all the servers that will take part in the Dbvisit Standby configuration (Primary and Standby servers)
- The default port 4433 will be used and must be allowed / accessible between all the systems.
- The Central Console will be accessing/managing the remote hosts (primary or standby servers) via the Dbvisit Agent which will be running on Port 7891 by default.
- Using the default recommended ports are recommended.
- The default protocol used by the Web Server is HTTPS and cannot be modified to HTTP.
- The recommended browsers for use with the Central Console are:
- Firefox
- Chrome
- Safari
- If configuring dbvserver on a Windows standalone server, the user account that will be used for installation must be granted a "Log on as a Service" permission and is a part of the Local Administrators group.
The latest versions of the browsers are recommended.
Please note that local virus software, security policies and configurations may interfere with the web-based interface - it is recommended that you review your settings if the central console is not displaying correctly.
Dbvisit Standby central console is tested with the latest base releases of the above browsers without any special add-ons or virus software configurations or security policies applied.
2.4.1. Recommended Operating System Packages
Before installing the Dbvisit Standby central console it is recommended that the following operating system package - if using Linux be installed prior to installing Dbvisit Standby version 8 Dbvserver component:
- glibc
- zlib
- libaio
2.5. E-Mail Notifications
Dbvisit Standby version 8 will have E-Mail notifications turned off by default. (SEND_MAIL_FLAG=N and SEND_MAIL_FLAG_DR=N)
Enabling email can easily be done. For more detail please see the E-Mail Notification Configuration.
2.6. Windows Environment Pre-requisites
If installing Dbvisit Standby onto a Windows Based environment (Microsoft Windows 2008 and above - 64bit) the following pre-requisite checks should be performed:
- The user installing Dbvisit Standby may be a Local or a Domain user.
- The user must be part of the following Local Groups
- Local Administrators
- ORA_DBA
- Users
- If using Oracle 12c - Oracle Home DBA group
- It is recommended that User Account Control be turned off - not strictly required, but highly recommended.
- The user will be granted the "Log On As Service" policy to allow the user to run the Dbvisit Standby Services
- When the Installer asks for the user that will be running the Dbvisit Services (Dbvnet, Dbvserver and Dbvagent) it is important that this user is in the Local Administrators and ORA_DBA Groups.
- If you are using Oracle 12c and during the Oracle Software installation you selected the option for Oracle to create a local account to own the Oracle Home and run the services - do not specify this user as the user to run the Dbvisit Standby services. Rather create a new local account with the above-mentioned permission and use it to then run Dbvisit Standby services.
- When using temporary backup directories (example d:\temp) during the Create Standby Database (CSD) or Synchronize Standby Database (SYNC) options, you need to make sure that these directories allow for FULL read/write permission for the user running Dbvisit Services as well as for the user that is running the Oracle Database services.
IMPORTANT
In the Dbvisit Standby version 8.0.02 initial release, there is only one way to schedule Dbvisit to send and apply logs, and this is using the Windows Scheduler.
An update will be released that will enable the option to create a new Windows service for each DDC which will then run as a kind of "background" process, which will then monitor the Oracle database if a primary and if logs are generated they will be detected and send to the standby. On the Standby a service will be created per DDC and when started, will review the ARCHDEST locations and if new logs arrive, they will automatically be applied.
Values will be configurable via the DDC file.
This new feature is available in Linux based installations from 8.0.02 (see dbvctl -d <DDC> -D start|stop|status) and is expected to be included in Windows as either the first or the second update.
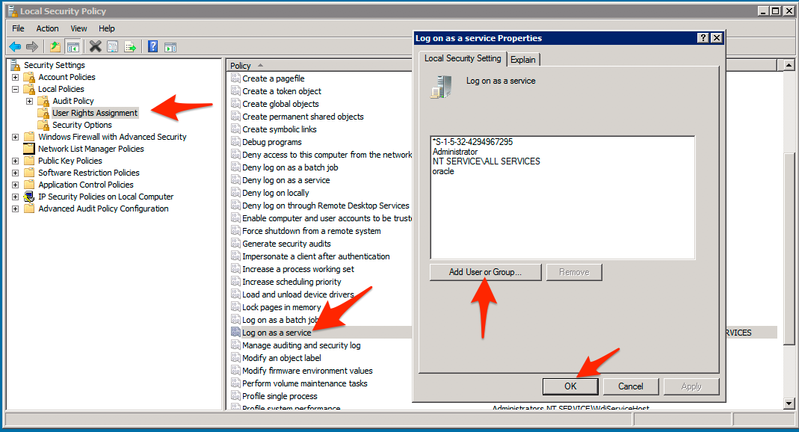
2.6.1. Log on as a Service
Important - when you install Dbvisit Standby and you specify the Windows user and password that will be used to run the Dbvisit Services, this user must have "Log on as a service" permission. Otherwise, you might end up with an error message "specify valid username and password". You can double check the permission as follow:

2.6.2. Directory Permissions
It is important to make sure that the directories used to store temporary backups - an example where the backups are stored during Create Standby Database (CSD) and Synchronise Standby Database (SYNC) have the Windows Oracle Homeowner added to have full read/write permission.
This also counts for the ARCHSOURCE and ARCHDEST locations. If these directories do not have correct permission, the CSD, SYNC or Graceful Switchover processes could fail with errors similar to:
Below is an extract from a trace file indicating the permission on the TEMP folder was not correct - the Oracle 12c Database Home Owner on Windows which in this example was the "oracle" user did not have sufficient permission on the temporary backup folder which was C:\Temp in this case.
20170116 18:43:54 main::cmn_cat: RMAN-00571: ===========================================================
20170116 18:43:54 main::cmn_cat: RMAN-00569: =============== ERROR MESSAGE STACK FOLLOWS ===============
20170116 18:43:54 main::cmn_cat: RMAN-00571: ===========================================================
20170116 18:43:54 main::cmn_cat: RMAN-03002: failure of restore command at 01/16/2017 18:43:54
20170116 18:43:54 main::cmn_cat: ORA-19963: error getting logical block size of file C:\TEMP\DBV_DEV_CSD_STDBY.CTL
20170116 18:43:54 main::cmn_cat: ORA-27041: unable to open file
20170116 18:43:54 main::cmn_cat: OSD-04002: unable to open file
20170116 18:43:54 main::cmn_cat: O/S-Error: (OS 5) Access is denied.
3. Installing Dbvisit Standby Core Components - Unix
Dbvisit Standby version 8 uses the same directory structure as was introduced in version 7. This directory structure is different in comparison to the previous version 5 and 6.
When Installing Dbvisit Standby version 8, using the default location is recommended: /usr/dbvisit. You can however still install version 8 into any other custom location, example /usr/dbvisit8.
It is recommended not to install Dbvisit Standby in the home directory of the Oracle Unix account (/home/oracle).
On Linux, it is possible to have both version 7 and 8 installed side by side, but only one should be run at a time.
3.1. The Dbvisit Standby Repository Overview
As with previous versions of Dbvisit Standby, version 8 makes use of a repository to store some key information. Making changes to this repository is not supported unless instructed by the Dbvisit Support Team.
Version 8 of Dbvisit Standby does not store the repository inside the Oracle database - as was done in previous versions.
In version 8 the repository is stored in an SQLite database which is created as part of the Dbvisit Standby Configuration (DDC) file creation and is located in the DBVISIT_BASE/standby/conf directory. The file will take the format of DB_NAME.db. If you have multiple standby databases, there will only be one repository per primary database.
It is possible to install a Dbvisit Standby version 8 into a new base directory, create a new DDC file and repository and once everything is up and running, disable and remove the older version.
3.2. Installation Steps (non-RAC configurations)
You can follow these basic steps discussed in this section to install Dbvisit Standby version 8. This section covers the installation of Dbvisit Standby on a Non-RAC environment (Single Instance configuration).
The Dbvisit Standby version 8 installation uses approximately 170MB of disk space, but as trace files and log files will be stored in this location, 512MB free space is the recommended minimum.
In version 8 the default installation location is /usr/dbvisit, it is also known and referred to as the Dbvisit Base (DBVISIT_BASE) directory.
Step 1: Create "Dbvisit Base" Directory
The first step is to create the Dbvisit Base directory. This is the directory into which Dbvisit Standby will be installed into. The default location is /usr/dbvisit
This directory should be owned by the Oracle Database software owner.
The following steps can be executed as the "root" user to create the directory and set correct permission:
oracle@dbvlin101[/root]:# cd /usr
oracle@dbvlin101[/usr]# mkdir dbvisit
oracle@dbvlin101[/usr]# chown -R oracle:oinstall dbvisit
oracle@dbvlin101[/usr]# ls -ald /usr/dbvisit
drwxr-xr-x 2 oracle oinstall 6 Jun 24 11:46 /usr/dbvisit
Step 2: Download Latest Software
The first step is to download the latest available version from the Dbvisit web site http://www.dbvisit.com
Once the software is downloaded, you can copy it to a temporary location on your server.
The Dbvisit Standby software is available for different Operating Systems as noted on the download web page. Please check the Dbvisit Standby v8 Support Matrix for supported versions.
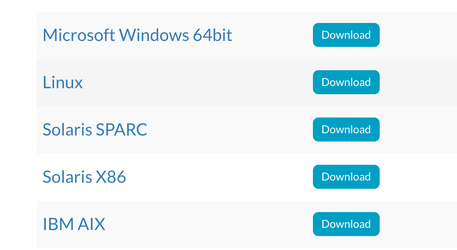
Unless specified all installation files are for 64bit installations (x86_64)
Important:
- Do not install Dbvisit Standby as the Unix "root" user.
- When you download the installer, please make sure you download it into a temporary folder and that the installer is run from there. Do not extract and run the installer from the location where you want the files to be installed.
In this example, we create a temporary directory called 8.0 in /home/oracle and copy the software download into this directory.
oracle@kiwi101[/home/oracle]: mkdir 8.0
oracle@kiwi101[/home/oracle]: cd 8.0
oracle@kiwi101[/home/oracle/8.0]:
Now copy the installer file into the /home/oracle/8.0 location and continue with the steps below.
We now have the following structure:
oracle@kiwi101[/home/oracle/8.0]: ls -al *.zip
-rw-r--r-- 1 oracle oinstall 73135790 Jun 24 11:06 /home/oracle/8.0/dbvisit-standby8.0.01-el7.zip
Step 3: Extract Software Install Package
The next step is to extract the software downloaded in the previous step as well as updating the install-dbvisit file permission to allow the execution option.
First use "unzip" to uncompress the downloaded software package, followed by using the "tar -xf" command to extract the archive. The steps are shown below:
oracle@dbvlin101[/home/oracle/8.0]:
oracle@dbvlin101[/home/oracle/8.0]: unzip dbvisit-standby8.0.01-el7.zip
Archive:  dbvisit-standby8.0.01-el7.zip
  inflating: dbvisit-standby8.0.01-el7.tar

oracle@dbvlin101[/home/oracle/8.0]: ls -al
total 271080
drwxr-xr-x   2 oracle oinstall        78 Jun 24 11:45 .
drwx------. 11 oracle oinstall      4096 Jun 10 10:41 ..
-rw-r--r--   1 oracle oinstall 204441600 Jun 24 11:05 dbvisit-standby8.0.01-el7.tar
-rw-r--r--   1 oracle oinstall  73135790 Jun 24 11:06 dbvisit-standby8.0.01-el7.zip

oracle@dbvlin101[/home/oracle/8.0]: tar xf dbvisit-standby8.0.01-el7.tar
oracle@dbvlin101[/home/oracle/8.0]: ls -al
total 271088
drwxr-xr-x   3 oracle oinstall       127 Jun 24 11:45 .
drwx------. 11 oracle oinstall      4096 Jun 10 10:41 ..
drwxr-x---   7 oracle oinstall        80 Jun 24 11:05 dbvisit
-rw-r--r--   1 oracle oinstall 204441600 Jun 24 11:05 dbvisit-standby8.0.01-el7.tar
-rw-r--r--   1 oracle oinstall  73135790 Jun 24 11:06 dbvisit-standby8.0.01-el7.zip
-rw-r--r--   1 oracle oinstall        37 Jun 24 11:05 INSTALL.txt
-rw-r--r--   1 oracle oinstall      3811 Jun 24 11:05 README.txt
Step 4: Start The Dbvisit Installer
The next step in the process is to start the Dbvisit Standby installer. Once you have extracted the tar archive, you will notice a new "dbvisit" directory.
In this directory, you will find an "installer" directory which contains the installation script to be executed.
oracle@dbvlin101[/home/oracle/8.0]: cd dbvisit
oracle@dbvlin101[/home/oracle/8.0/dbvisit]: ls -l
total 0
drwxr-x---  6 oracle oinstall  62 Jun 24 11:05 dbvagent
drwxr-x---  6 oracle oinstall  60 Jun 24 11:05 dbvnet
drwxr-x---  6 oracle oinstall  63 Jun 24 11:05 dbvserver
drwxr-xr-x  2 oracle oinstall  28 Jun 24 11:05 installer
drwxr-x--- 10 oracle oinstall 101 Jun 24 11:05 standby

oracle@dbvlin101[/home/oracle/8.0/dbvisit]: cd installer
oracle@dbvlin101[/home/oracle/8.0/dbvisit/installer]: ls -l
total 2688
-rwxr-x--- 1 oracle oinstall 2749132 Jun 24 11:05 install-dbvisit
To preview the full help of the installer and the arguments (parameters) that can be passed for automated installations - run ./install-dbvisit -h
oracle@dbvlin101[/home/oracle/8.0/dbvisit/installer]: ./install-dbvisit -h


>>> Installs Dbvisit products and components.

        Option to install product with all default values accepted:

            --batch-install

        Force option to reconfigure components and recreate configuration files:

            --force

        Available options and default values for batch installation:

            Installation directory? (default: /usr/dbvisit)
                --dbvisit-base /usr/dbvisit

            Components to install? (default: core)
                --components standby,dbvnet,dbvagent,dbvserver|all|core

            Local server to run Dbvnet? (default OS hostname)
                --dbvnet-local-host dbvlin1

            Dbvnet listening port number on local server? (default: 7890):
                --dbvnet-local-port 7890

            Remote server to run Dbvnet? (mandatory)
                --dbvnet-remote-host dbvlin2

            Dbvnet listening port number on remote server? (default: dbvnet-local-port):
                --dbvnet-remote-port 7890

            Dbvnet passfrase to encrypt network data transfers? (mandatory):
                --dbvnet-passphrase abc123

            Local server to run Dbvagent? (default OS hostname)
                --dbvagent-local-host dbvlin1

            Dbvagent listening port number on local server? (default: 7891):
                --dbvagent-local-port 7891

            Dbvagent passfrase to encrypt network data transfers? (mandatory):
                --dbvagent-passphrase abc123

            Local server to run Dbvserver? (default OS hostname)
                --dbvserver-local-host dbvlin1

            Dbvserver listening port number on local server? (default: 4493):
                --dbvserver-local-port 4493


*** Exit code -1
>>> Install log
Note - the dbvisit-install script must have the execute permission for the Oracle Unix software owner - which in this example is the "oracle" Unix account.
Below is the detailed output of the installation process.
In summary, the following are performed:
- Start the installer using -./install-dbvisit command
- Provide the DBVISIT_BASE directory - /usr/dbvisit (default)
- This location is important when upgrading an existing installation (discussed in the next section) - if upgrading a version 7 installation make sure you select the same base folder into which Dbvisit Standby version 7 is installed, example if it was installed in /usr/dbvisit and you want to upgrade it - make sure to select /usr/dbvisit here.
- It is possible to install into any new Dbvisit Base location, but the recommended default value of /usr/dbvisit is recommended.
- Note - Do not attempt to upgrade version 5 or 6 installations - you must first upgrade them to version 7 before you can update to version 8 - or perform a clean new installation.
- Once the Dbvisit Base location is provided, the installer will review the currently installed software versions - if already installed. A summary screen is displayed showing if any current version is already installed in this base location and if so what the version number is. For new installations such as the example below, the Installed version will show "not installed"
- The first menu is displayed provides 3 options - Install, Uninstall and Terminate. Enter "1" to start the installation process.
- The second menu is now displayed with 6 options. The default is to select option 1 which will install the Dbvisit Standby Core components which include - Dbvisit Standby CLI, Dbvnet and the Dbvagent. This is the recommended option to select.
- Note - if you are looking at using the Dbvserver (Web Based) user interface it is recommended that you install this as a separate component on its own server. It is, however, possible to install it on the same location as the other components, but please note that as of version 8 the web-based interface is considered a central console to manage multiple Dbvisit Standby configurations and having it installed on any of the Database servers where Dbvisit Standby is configured is not recommended. This is due to the fact that in case of a disaster this system might be usable - which means you web-based front-end is not available. Therefore having it installed on a separate configuration (host) is recommended.
- In the example below only the 3 core components are installed. The next section will cover the installation of the Web-Based interface (GUI - Dbvserver).
- Once option 1 is selected the installation will continue to the next step
- Dbvnet is configured first and the following information is required:
- The local host where you are currently installing - hostname should be provided, this could be a hostname alias, but it must be able to resolve to an IP address located on the local server
- The local dbvnet port - The default recommended value is 7890
- The remote server (example the standby server if this host is the primary) - hostname should be provided, this could be a hostname alias, but it must be able to resolve to an IP address of the remote server to be used.
- The remote dbvnet port - The default recommended value is 7890
- The last question is for a passphrase. This is an Alphanumeric string which will be used to secure connections (encrypt) between the Dbvnet components (servers)
- The passphrase used must be the same on all Dbvnet installations that will be communicating.
- The next set of questions relate to the Dbvagent.
- This is the component that will allow the Web-Based Interface (GUI) or also known as Dbvserver to interact with the Dbvisit Standby Core API. Each host that will be running Dbvisit Standby must have the dbvagent installed. The installer will ask for the following:
- The agent hostname: this is the local hostname which can be a host alias that resolves to a local IP address on the server.
- The agent port: This is the port on which the agent will listen for secure connections from the web-based interface. The default and recommended value is 7891
- The agent passphrase: The passphrase to be used for the agent is Alphanumeric and will be used by the GUI to establish a secure connection to the agent.
- This is the component that will allow the Web-Based Interface (GUI) or also known as Dbvserver to interact with the Dbvisit Standby Core API. Each host that will be running Dbvisit Standby must have the dbvagent installed. The installer will ask for the following:
- Once all values are provided the installation will continue.
- If you have version 7 installed, the old executables will be replaced (removed) once the new ones are installed.
- A log file of the installation is created and may be requested by support if required.
In most cases just accepting the default values are recommended
Step 4.1. Example Installation
Below is an example installation process.
[oracle@dbv103 8.0]$ ls
dbvisit-standby8.0.01-el7.zip
[oracle@dbv103 8.0]$ unzip dbvisit-standby8.0.01-el7.zip
Archive: dbvisit-standby8.0.01-el7.zip
inflating: dbvisit-standby8.0.01-el7.tar
[oracle@dbv103 8.0]$ tar xf dbvisit-standby8.0.01-el7.tar
[oracle@dbv103 8.0]$ ls -l
total 275360
-rw-r--r-- 1 oracle oinstall 37 Sep 5 04:45 INSTALL.txt
-rw-r--r-- 1 oracle oinstall 3811 Sep 5 04:45 README.txt
drwxr-x--- 7 oracle oinstall 4096 Sep 5 04:45 dbvisit
-rw-r--r-- 1 oracle oinstall 208005120 Sep 5 04:45 dbvisit-standby8.0.01-el7.tar
-rw-r--r-- 1 oracle oinstall 73948821 Sep 5 04:48 dbvisit-standby8.0.01-el7.zip
[oracle@dbv103 8.0]$ cd dbvisit/installer/
[oracle@dbv103 installer]$ ls
install-dbvisit
[oracle@dbv103 installer]$ ./install-dbvisit
-------------------------------------------------------------------------------
Welcome to the Dbvisit software installer.
-------------------------------------------------------------------------------
It is recommended to make a backup of our current Dbvisit software
location (Dbvisit Base location) for rollback purposes.
>>> Please specify the Dbvisit installation directory (Dbvisit Base).
The various Dbvisit products and components - such as Dbvisit Standby,
Dbvisit Dbvnet will be installed in the appropriate subdirectories of
this path.
Enter a custom value or press ENTER to accept default [/usr/dbvisit]:
> /usr/dbvisit
DBVISIT_BASE = /usr/dbvisit
-------------------------------------------------------------------------------
Component Installer Version Installed Version
-------------------------------------------------------------------------------
standby 8.0.01.17287 not installed
dbvnet 1.0.01.17319 not installed
dbvagent 1.0.01.17319 not installed
dbvserver 1.0.01.17319 not installed
-------------------------------------------------------------------------------
What action would you like to perform?
1 - Install component(s)
2 - Uninstall component(s)
3 - Terminate
Your choice: 1
Which component do you want to install?
1 - Core Components (Dbvisit Standby Cli, Dbvnet, Dbvagent)
2 - Dbvisit Standby Core (Command Line Interface)
3 - Dbvnet (Dbvisit Network Communication)
4 - Dbvagent (Dbvisit Agent)
5 - Dbvserver (Dbvisit Central Console)
6 - Exit Installer
Your choice: 1
-------------------------------------------------------------------------------
Summary of the Dbvisit STANDBY configuration
-------------------------------------------------------------------------------
DBVISIT_BASE /usr/dbvisit
Press ENTER to proceed to continue
-------------------------------------------------------------------------------
About to configure DBVISIT DBVNET
-------------------------------------------------------------------------------
>>> Please specify the Local host name to be used by Dbvnet on this server.
Dbvnet will be listening on the local IP Address on this server which
resolve to the host name specified here.
If using a cluster or virtual IP make sure the host name or alias
specified here resolve to the IP address local to where dbvnet is installed.
Enter a custom value or press ENTER to accept default [dbv103]:
> dbv103
>>> Please specify the Local Dbvnet PORT to be used.
Dbvnet will be listening on the specified port for incomming connections
from remote dbvnet connections. Please make sure that this port is not
already in use or blocked by any firewall. You may choose any value
between 1024 and 65535, however the default of 7890 is recommended.
Enter a custom value or press ENTER to accept default [7890]:
> 7890
>>> Please specify the Remote host name to be used by Dbvnet.
By default Dbvnet will use this remote hostname for any remote
connections. Dbvnet must be installed and configured on the specified
remote host. If using a cluster or virtual IP make sure the host name or alias
specified here resolve to the IP address local to where dbvnet is installed.
If you are unsure about the remote host name during installation, use the
default value which will be the current local hostname.
Enter a custom value or press ENTER to accept default [dbv103]:
> dbv104
>>> Please specify the Remote Dbvnet PORT to be used.
Dbvnet will connect to the remote server on this specified port.
On the remote host Dbvnet will be listening on the specified port for incomming
connections. Please make sure that this port is not already in use or blocked
by any firewall. You may choose any value between 1024 and 65535, however the
default of 7890 is recommended.
Enter a custom value or press ENTER to accept default [7890]:
> 7890
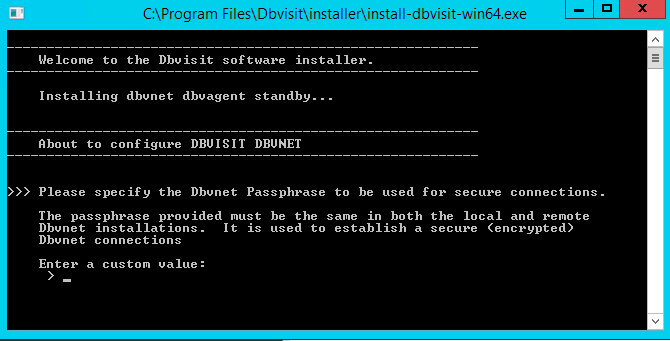
>>> Please specify the Dbvnet Passphrase to be used for secure connections.
The passphrase provided must be the same in both the local and remote Dbvnet
installations. It is used to establish a secure (encrypted) Dbvnet connections
Enter a custom value:
> kiwi123
-------------------------------------------------------------------------------
Summary of the Dbvisit DBVNET configuration
-------------------------------------------------------------------------------
DBVISIT_BASE /usr/dbvisit
DBVNET_LOCAL_HOST dbv103
DBVNET_LOCAL_PORT 7890
DBVNET_REMOTE_HOST dbv104
DBVNET_REMOTE_PORT 7890
DBVNET_PASSPHRASE kiwi123
Press ENTER to proceed to continue
-------------------------------------------------------------------------------
About to configure DBVISIT DBVAGENT
-------------------------------------------------------------------------------
>>> Please specify the host name to be used for the Dbvisit Agent.
The Dbvisit Agent (Dbvagent) will be listening on this local address. If you are
using the Dbvserver (GUI) - connections from the GUI will be established to the
Dbvisit Agent. The Dbvisit Agent address must be visible from the Dbvserver (GUI)
installation.
If using a cluster or virtual IP make sure the host name or alias
specified here resolve to the IP address local to where dbvnet is installed.
Enter a custom value or press ENTER to accept default [dbv103]:
> dbv103
>>> Please specify the listening PORT number for Dbvagent.
The Dbvisit Agent (Dbvagent) will listening on the specified port for incomming
requests from the GUI (Dbvserver). Please make sure that this port is not
already in use or blocked by any firewall. You may choose any value
between 1024 and 65535, however the default of 7891 is recommended.
Enter a custom value or press ENTER to accept default [7891]:
> 7891
>>> Please specify passphrase for Dbvagent
Each Dbvisit Agent must have a passpharse specified. This passphrase does not have
to match between all the servers. It will be used to establish a secure connection
between the GUI (Dbvserver) and the Dbvisit Agent.
Enter a custom value:
> kiwi123
-------------------------------------------------------------------------------
Summary of the Dbvisit DBVAGENT configuration
-------------------------------------------------------------------------------
DBVISIT_BASE /usr/dbvisit
DBVAGENT_LOCAL_HOST dbv103
DBVAGENT_LOCAL_PORT 7891
DBVAGENT_PASSPHRASE kiwi123
Press ENTER to proceed to continue
-------------------------------------------------------------------------------
About to install Dbvisit STANDBY
-------------------------------------------------------------------------------
Component standby installed.
Press ENTER to continue
-------------------------------------------------------------------------------
About to install Dbvisit DBVNET
-------------------------------------------------------------------------------
Component dbvnet installed.
Press ENTER to continue
-------------------------------------------------------------------------------
About to install Dbvisit DBVAGENT
-------------------------------------------------------------------------------
Component dbvagent installed.
Press ENTER to continue
-------------------------------------------------------------------------------
Component Installer Version Installed Version
-------------------------------------------------------------------------------
standby 8.0.01.17287 8.0.01.17287
dbvnet 1.0.01.17319 1.0.01.17319
dbvagent 1.0.01.17319 1.0.01.17319
dbvserver 1.0.01.17319 not installed
-------------------------------------------------------------------------------
What action would you like to perform?
1 - Install component(s)
2 - Uninstall component(s)
3 - Terminate
Your choice: 3
>>> Install log /tmp/dbvisit_install.log.201609050448
3.3. Starting Standby Core Components (Dbvagent and Dbvnet)
Following the installation of Dbvisit Standby Core components (dbvnet, dbvagent and the standby core - command line interface), you need to start the two components: Dbvnet and Dbvagent.
This can easily be done by running the following commands:
- For Dbvnet: ./dbvnet -d start from the DBVISIT_BASE/dbvnet directory.
- For Dbvagent: ./dbvagent -d start from the DBVISIT_BASE/dbvagent directory.
Once the command is executed, you can use the "ps -ef|egrep 'dbvagent|dbvnet' | grep -v grep" command to show the process running.
Example - Starting Dbvnet:
[oracle@dbv101 dbvisit]$ cd dbvnet
[oracle@dbv101 dbvnet]$ ls
conf  dbvnet  doc  log
[oracle@dbv101 dbvnet]$ ./dbvnet -d start
[oracle@dbv101 dbvnet]$ ps -ef|grep dbvnet|grep -v grep
oracle     120     0  0 11:09 ?        00:00:00 ./dbvnet -d start
Example - Starting Dbvagent:
[oracle@dbv101 dbvisit]$ cd dbvagent
[oracle@dbv101 dbvagent]$ ls
conf  dbvserver  doc  log
[oracle@dbv101 dbvagent]$ ./dbvagent -d start
[oracle@dbv101 dbvagent]$ ps -ef|grep dbvagent|grep -v grep
oracle     120     0  0 11:09 ?        00:00:00 ./dbvagent -d start
3.4. Stopping Standby Core Components (Dbvagent and Dbvnet)
Stopping the core components Dbvnet and Dbvagent can easily be done by running the following commands:
- For Dbvagent: ./dbvagent -d stop from the DBVISIT_BASE/dbvagent directory.
- For Dbvnet: ./dbvnet -d stop from the DBVISIT_BASE/dbvnet directory.
Once the command is executed, you can use the "ps -ef|egrep 'dbvagent|dbvnet' | grep -v grep" command to show the process running.
Example - Stopping Dbvagent:
[oracle@dbv101 dbvisit]$ cd dbvagent
[oracle@dbv101 dbvagent]$ ls
conf  dbvserver  doc  log
[oracle@dbv101 dbvagent]$ ./dbvagent -d stop
[oracle@dbv101 dbvagent]$ ps -ef|grep dbvagent|grep -v grep
[oracle@dbv101 dbvagent]$
Example - Stopping Dbvnet:
[oracle@dbv101 dbvisit]$ cd dbvnet
[oracle@dbv101 dbvnet]$ ls
conf  dbvnet  doc  log
[oracle@dbv101 dbvnet]$ ./dbvnet -d stop
[oracle@dbv101 dbvnet]$ ps -ef|grep dbvnet|grep -v grep
[oracle@dbv101 dbvnet]$
4. Installing Dbvisit Standby Central Console (Dbvserver)
This section will cover the installation process for the Dbvisit Standby Central Console (Dbvserver) or web-based user interface - also referred to as the Graphical User Interface (GUI).
In Dbvisit Standby version 8 it is recommended that the GUI be installed on its own server - Oracle Linux 6 or 7 is recommended.
Important
The Dbvisit Standby version Central Console will not be able to manage Dbvisit Standby version 6 or 7 configurations. Only version 8.0.x is supported.
4.1. Examples
4.1.1. Installing Dbvserver (GUI)
Make sure that the libaio package is installed on the Linux system - for more detail see the pre-requisite checks.
The example below will show the installation of the Dbvserver (Dbvisit Standby version 8.0.x Web-Based Interface) onto a standalone system.
No other Dbvisit Standby components need to be installed on this system - only the Dbvserver component.
During the installation 4 key questions are asked:
- The Dbvisit Base (DBVISIT_BASE) or default location for the installation is required - the default value of /usr/dbvisit is recommended
- The next menu option will ask which options you want to install, select "5" to install Dbvserver
- You will be asked for the server name to use (the default value provided should be sufficient unless you use multiple network interfaces and want to specify a specific alias - note it must be in the /etc/hosts file - Note: do not specify IP address but a hostname or alias.
- The default Port for Dbvserver to run on - the default is HTTPS on port 4433 (using the default is recommended)
The example below highlight the steps for installing Dbvisit Standby version 8 central console:
[oracle@dbv103 8.0]$ ls -l
total 72208
-rw-r--r-- 1 oracle oinstall 73933964 Aug 30 09:21 dbvisit-standby8.0.01-el7.zip
[oracle@dbv103 8.0]$ unzip dbvisit-standby8.0.01-el7.zip
Archive:  dbvisit-standby8.0.01-el7.zip
  inflating: dbvisit-standby8.0.01-el7.tar
[oracle@dbv103 8.0]$ ls -l
total 275328
-rw-r--r-- 1 oracle oinstall 207994880 Aug 30 09:13 dbvisit-standby8.0.01-el7.tar
-rw-r--r-- 1 oracle oinstall  73933964 Aug 30 09:21 dbvisit-standby8.0.01-el7.zip
[oracle@dbv103 8.0]$ tar xf dbvisit-standby8.0.01-el7.tar
[oracle@dbv103 8.0]$ ls -l
total 275340
-rw-r--r-- 1 oracle oinstall        37 Aug 30 09:13 INSTALL.txt
-rw-r--r-- 1 oracle oinstall      3811 Aug 30 09:13 README.txt
drwxr-x--- 7 oracle oinstall      4096 Aug 30 09:13 dbvisit
-rw-r--r-- 1 oracle oinstall 207994880 Aug 30 09:13 dbvisit-standby8.0.01-el7.tar
-rw-r--r-- 1 oracle oinstall  73933964 Aug 30 09:21 dbvisit-standby8.0.01-el7.zip
[oracle@dbv103 8.0]$ cd dbvisit
[oracle@dbv103 dbvisit]$ ls -l
total 20
drwxr-x---  6 oracle oinstall 4096 Aug 30 09:13 dbvagent
drwxr-x---  5 oracle oinstall 4096 Aug 30 09:13 dbvnet
drwxr-x---  5 oracle oinstall 4096 Aug 30 09:13 dbvserver
drwxr-xr-x  2 oracle oinstall 4096 Aug 30 09:13 installer
drwxr-x--- 10 oracle oinstall 4096 Aug 30 09:13 standby
[oracle@dbv103 dbvisit]$ cd installer
[oracle@dbv103 installer]$ ls -l
total 2772
-rwxr-x--- 1 oracle oinstall 2837448 Aug 30 09:13 install-dbvisit

[oracle@dbv103 installer]$ ./install-dbvisit

-------------------------------------------------------------------------------
    Welcome to the Dbvisit software installer.
-------------------------------------------------------------------------------

    It is recommended to make a backup of our current Dbvisit software
    location (Dbvisit Base location) for rollback purposes.

>>> Please specify the Dbvisit installation directory (Dbvisit Base).

    The various Dbvisit products and components - such as Dbvisit Standby,
    Dbvisit Dbvnet will be installed in the appropriate subdirectories of
    this path.

    Enter a custom value or press ENTER to accept default [/usr/dbvisit]:
     > /usr/dbvisit
    DBVISIT_BASE = /usr/dbvisit

    -------------------------------------------------------------------------------
    Component      Installer Version   Installed Version
    -------------------------------------------------------------------------------
    standby        8.0.01.17287        not installed
    dbvnet         1.0.01.17291        not installed
    dbvagent       1.0.01.17291        not installed
    dbvserver      1.0.01.17291        not installed

    -------------------------------------------------------------------------------

    What action would you like to perform?
       1 - Install component(s)
       2 - Uninstall component(s)
       3 - Terminate

    Your choice: 1

    Which component do you want to install?
       1 - Core Components (Dbvisit Standby Cli, Dbvnet, Dbvagent)
       2 - Dbvisit Standby Core (Command Line Interface)
       3 - Dbvnet (Dbvisit Network Communication)
       4 - Dbvagent (Dbvisit Agent)
       5 - Dbvserver (Dbvisit Central Console)
       6 - Exit Installer

    Your choice: 5

-------------------------------------------------------------------------------
    About to configure DBVISIT DBVSERVER
-------------------------------------------------------------------------------


>>> Please specify the host name to be used for Dbvserver


    The Dbvisit Web Server (Dbvserver) will be listening on this local address.
    If using a cluster or virtual IP make sure the host name or alias
    specified here resolve to the IP address local to where Dbvserver is installed.
    If you are unsure about the remote host name during installation, use the
    default value which will be the current local hostname.

    Enter a custom value or press ENTER to accept default [dbv103]:
     > dbv103


>>> DBVSERVER LOCAL PORT

    Please specify the listening port number for Dbvserver on the local server

    You may choose any value between 1024 and 65535.  The default recommended
    value is 4433.

    Note: if you can not access this port after the installation has
    finished, then please double-check your server firewall settings
    to ensure the selected port is open.
    Enter a custom value or press ENTER to accept default [4433]:
     > 4433

-------------------------------------------------------------------------------
    Summary of the Dbvisit DBVSERVER configuration
-------------------------------------------------------------------------------
    DBVISIT_BASE /usr/dbvisit
    DBVSERVER_LOCAL_HOST dbv103
    DBVSERVER_LOCAL_PORT 4433

    Press ENTER to proceed to continue

-------------------------------------------------------------------------------
    About to install Dbvisit DBVSERVER
-------------------------------------------------------------------------------
    Component dbvserver installed.

    Press ENTER to continue

    -------------------------------------------------------------------------------
    Component      Installer Version   Installed Version
    -------------------------------------------------------------------------------
    standby        8.0.01.17287        not installed
    dbvnet         1.0.01.17291        not installed
    dbvagent       1.0.01.17291        not installed
    dbvserver      1.0.01.17291        1.0.01.17291

    -------------------------------------------------------------------------------

    What action would you like to perform?
       1 - Install component(s)
       2 - Uninstall component(s)
       3 - Terminate

    Your choice: 3
>>> Install log /tmp/dbvisit_install.log.201608301046
Once Dbvserver (The Central Console) is installed you will have the following directory structure in the /usr/dbvisit directory (the example below is using the Unix "tree" command to show the directory structure and files):
[oracle@dbv103 installer]$ cd /usr/dbvisit

[oracle@dbv103 dbvisit]$ ls -l
total 4
drwxr-x--- 5 oracle oinstall 4096 Aug 30 10:46 dbvserver
[oracle@dbv103 dbvisit]$ tree .
.
`-- dbvserver
    |-- conf
    |   |-- dbvserver.conf
    |   `-- dbvserver.db
    |-- dbvserver
    |-- doc
    |   `-- README.txt
    `-- log

4 directories, 4 files
[oracle@dbv103 dbvisit]$
4.1.2. Starting Dbvserver
Following the installation of the Web-Based Interface - Dbvserver, you can start it.
This can easily be done by running: ./dbvserver -d start from the DBVISIT_BASE/dbvserver directory.
Once the command is executed, you can use the "ps -ef|grep dbvserver|grep -v grep" command to show the process running.
[oracle@dbv103 dbvisit]$ cd dbvserver
[oracle@dbv103 dbvserver]$ ls
conf  dbvserver  doc  log
[oracle@dbv103 dbvserver]$ ./dbvserver -d start

[oracle@dbv103 dbvserver]$ ps -ef|grep dbvserver|grep -v grep
oracle     120     0  0 11:09 ?        00:00:00 ./dbvserver -d start
4.1.3. Testing Access to the GUI
By default, Dbvserver will be configured to use PORT 4433 using HTTPS.
You can navigate to the login screen using the URL of format https://<your-server-name>:4433
It is important to make sure that port 4433 is not blocked by your local firewall
The login screen should now be visible in your browser
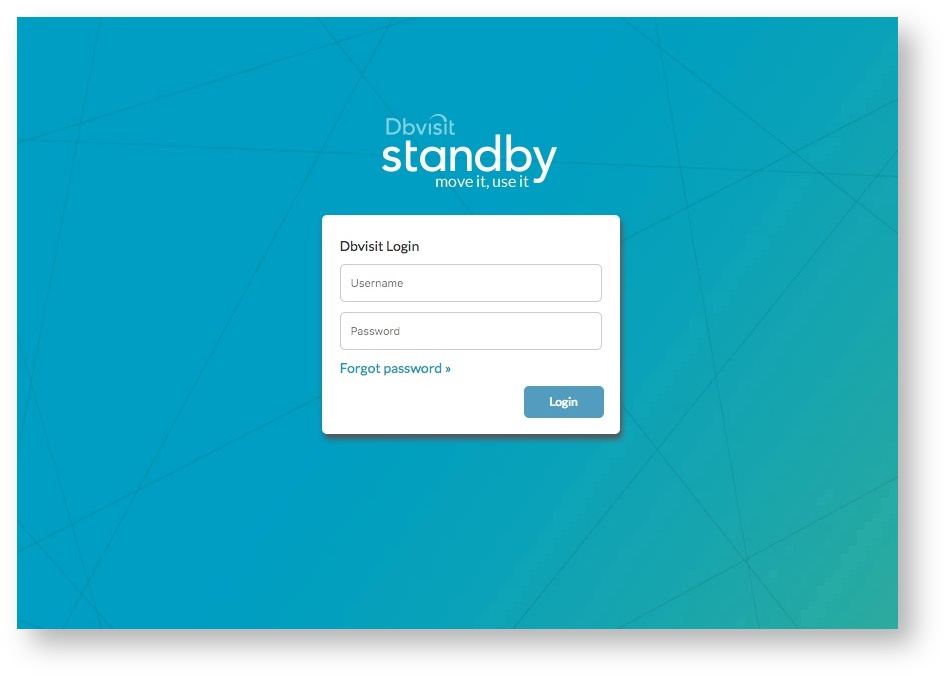
The default username is "admin" and the password "admin"
It is recommended to change this after the first login
Once you have logged in the main Dbvisit Standby version 8 screen will be displayed as seen in the example below:
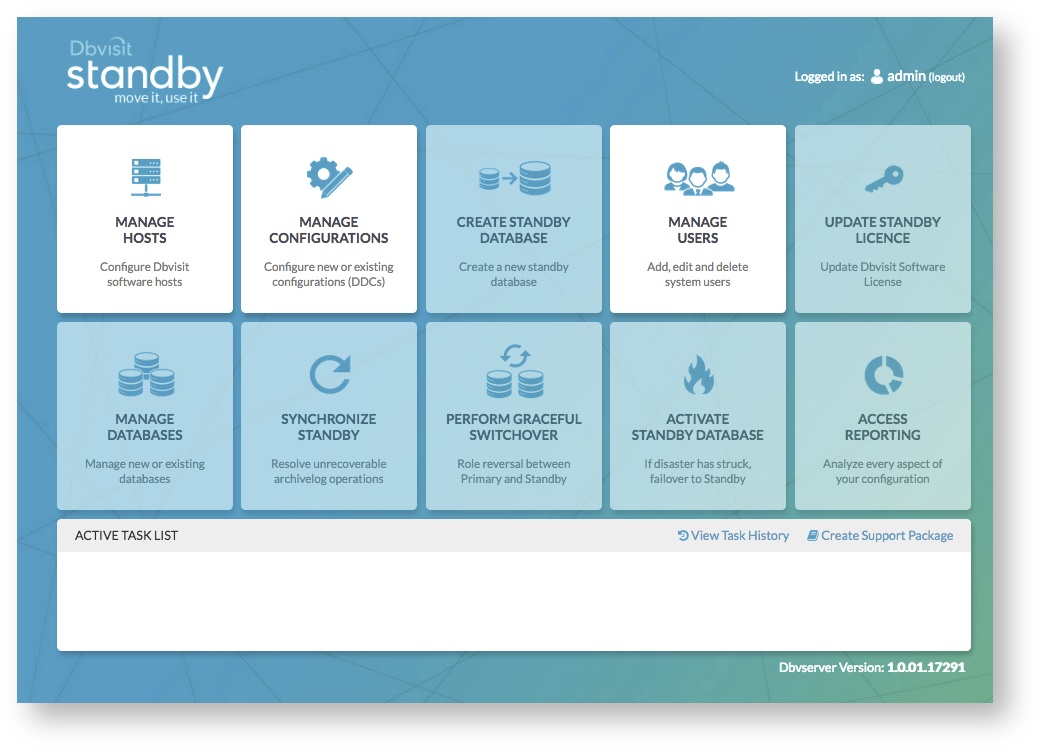
As you have not configured anything yet, most of the options will be disabled and will appear "greyed out" as seen above.
4.1.4. Next Steps
To allow you to manage Primary-Standby configurations with the Dbvisit Standby version 8 web-based interface, you must have the Dbvisit Standby version 8 Core options (Dbvnet, Dbvagent and Standby Core) installed on both the primary and standby database servers.
Once they are installed, the Dbvagent must be started which will listen on the default port 7891 for incoming connections from the web-based interface (dbvserver).
If you have the Dbvisit Agents running on the primary and standby servers, you can navigate to the "Manage Hosts" option in the GUI to add these hosts to the web interface. Once they are known to the web interface, you will be able to either import, upgrade or create Dbvisit Standby configuration files - DDC files. Once you have a DDC file registered with the Web interface, you will be allowed to perform other functions such as "Create Standby Database (CSD)".
4.1.5. Testing Network Connectivity
When installing Dbvisit Standby, it is important that once the installation on the Primary and the Standby servers are complete and all required processes are started (Dbvnet, Dbvagent and Dbvserver) that we then test the network connectivity between the primary and standby.
This process can help confirm that network communication is working before you continue creating DDC files or if upgrading - performing the DDC file upgrade.
The command to test connectivity is: dbvctl -f system_readiness
A series of questions will be asked, for example, the remote server name. We recommend you run this command on the primary as well as the standby to ensure network connectivity is working prior to continuing with creating or upgrading DDC files.
Example:
Below is an example using the "system readiness" function:
[oracle@dbv1 /usr/dbvisit/standby]$ ./dbvctl -f system_readiness

Please supply the following information to complete the test.
Default values are in [].

Enter Dbvisit Standby location on local server: [/usr/dbvisit]:
Your input: /usr/dbvisit

Is this correct? <Yes/No> [Yes]: Yes

Enter the name of the remote server: []: dbv2
Your input: dbv2

Is this correct? <Yes/No> [Yes]: Yes

Enter Dbvisit Standby location on remote server: [/usr/dbvisit]:
Your input: /usr/dbvisit

Is this correct? <Yes/No> [Yes]: Yes

Enter the name of a file to transfer relative to local install directory
/usr/dbvisit: [standby/doc/README.txt]:
Your input: standby/doc/README.txt

Is this correct? <Yes/No> [Yes]: Yes

Choose copy method:
1)   /usr/dbvisit/dbvnet/dbvnet
2)   /usr/bin/scp
Please enter choice [1] : 1

Is this correct? <Yes/No> [Yes]: Yes

Enter port for method /usr/dbvisit/dbvnet/dbvnet: [7890]:
Your input: 7890

Is this correct? <Yes/No> [Yes]: Yes
-------------------------------------------------------------
Testing the network connection between local server and remote server dbv2.
-------------------------------------------------------------
Settings
========
Remote server                                          =dbv2
Dbvisit Standby location on local server               =/usr/dbvisit
Dbvisit Standby location on remote server              =/usr/dbvisit
Test file to copy                                      =/usr/dbvisit/standby/doc/README.txt
Transfer method                                        =/usr/dbvisit/dbvnet/dbvnet
port                                                   =7890
-------------------------------------------------------------
Checking network connection by copying file to remote server dbv2...
-------------------------------------------------------------
Trace file /usr/dbvisit/standby/trace/230_dbvctl_system_readiness_201611172115.trc

File copied successfully. Network connection between local and dbv2 correctly configured.

[oracle@dbv1 /usr/dbvisit/standby]$
5. Installing Dbvisit Standby on Windows
Dbvisit Standby version 8 is fully supported on MS Windows 2008 and above (64bit).
Before installing the software, please make sure you have reviewed the pre-requisite steps in section 2.5.WindowsEnvironmentPre-requisites discussed earlier in this document.
The steps for Installing Dbvisit Standby version 8 on Windows is easy and no outage is required.
We do recommend that before you install software into a production environment, that you always test it first in your development or test environment to make sure you are familiar with the process and required pre-requisite steps.
In this section, we will now review the installation process.
5.1. Step 1 - Download the latest version
We recommend that you stay up to date with the latest versions being released. Updates for Dbvisit Standby software is released on a regular basis to make sure enhancements and fixes are available quickly.
To download the latest version please see the Dbvisit website - www.dbvisit.com
5.2. Step 2 - Start the Installer
Before you start the installer it is again important to make sure that the user account you are running the installer as and that will be used to run the Dbvisit Standby software must be in the Local Administrators, Users and ORA_DBA Windows Groups. Failing to do this can lead to errors during installation. Disabling User Access Control is also recommended.
We recommend you create a new Local Windows account that have the above-mentioned permissions and that this account is used to run the Dbvisit Standby software (it's Services and Windows Schedules).
In the example we will discuss below a new Local account called "dbvisit" is created with the relevant groups assigned. UAC was also disabled.
Before you continue, review the following checklist:
- Is the port 4433 open for the Central Console
- Is port 7890 used by Dbvnet open and available
- Is port 7891 used by the Dbvisit Agent (dbvagent) open and available.
The above ports should be added to the Windows Firewall to allow the Dbvisit Standby components to communicate. If you have a firewall between your Primary and Standby (DR) datacenter please make sure that these ports can be used - especially the Dbvnet port 7890.
Also, review any AntiVirus software application installed and make sure these do not block the Dbvisit Standby software components.
The recommended method for installing Dbvisit Standby version 8 is to install the core components (Dbvnet, Dbvagent and Dbvisit Standby CLI) on the Database Servers and then install the Central Console (Dbvserver) onto its own small system (Virtual Machine or Physical Hardware or even a Docker container). This allows you then to manage one or more primary/standby configurations from one central location. You may however still install the Central Console together with the Core components for small environments.
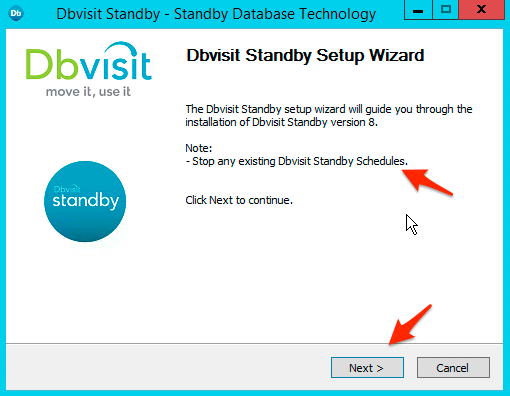
Once the installer is launched the following screen will be displayed. As highlighted, please make sure you have stopped your schedules prior to running the installer.
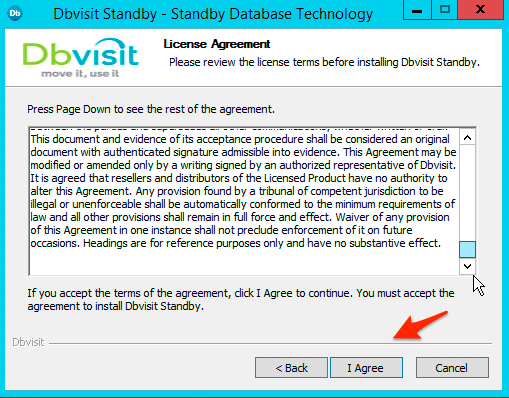
5.3. Step 3 - Accept the license agreement
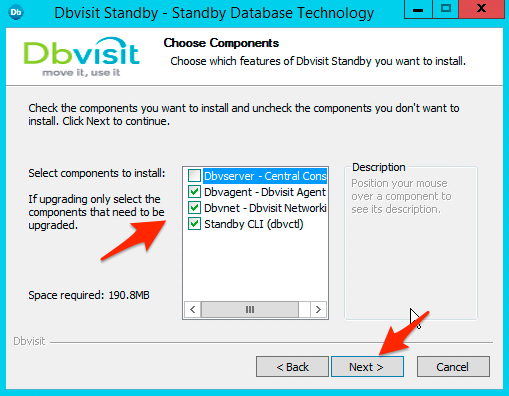
5.4. Step 4 - Select components to install
In this example, the Dbvisit Standby Core components are selected for installation.
These include: Dbvnet, Dbvagent and Dbvisit Standby CLI
You can install the Central Console (Dbvserver) on this system if required - but it is recommended not to use multiple Central Console installations for the same configuration.
If you do install the Central Console on the Database Server - we recommend you install it onto the Standby Database server.
This way if the primary server is unavailable during a disaster, you can still access the Central Console from the standby server.
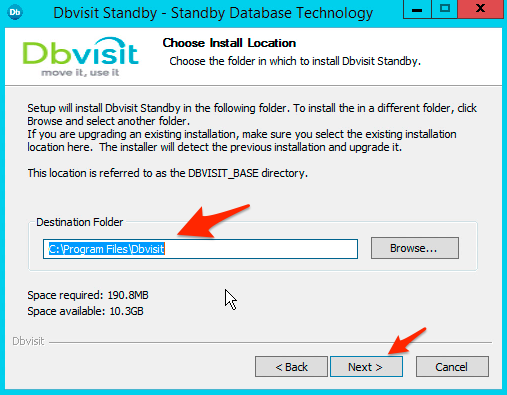
5.5. Step 5 - Select Dbvisit Base (Installation Destination)
The next step is to select the destination for the Dbvisit Standby installation - also known as the DBVISIT BASE location.
The default location on Windows is C:\Program Files\Dbvisit
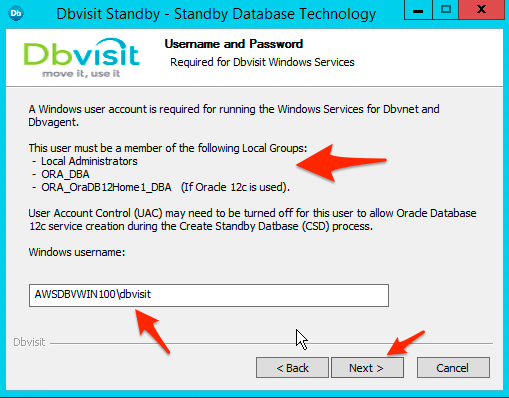
5.6. Step 6 - Provide the Windows user account
During step 6 you will be requested to provide the Windows user account that will run Dbvisit Standby.
We recommend you create a dedicated local or domain account that has the required permission on the primary and standby servers as mentioned earlier.
This user must have Local Administrator, Users and ORA_DBA group assigned.
If you are using Oracle 12c do not specify the Oracle Home user here, rather use another account that has the correct groups assigned.
The Database Services will still be created to run under the Oracle Home user.
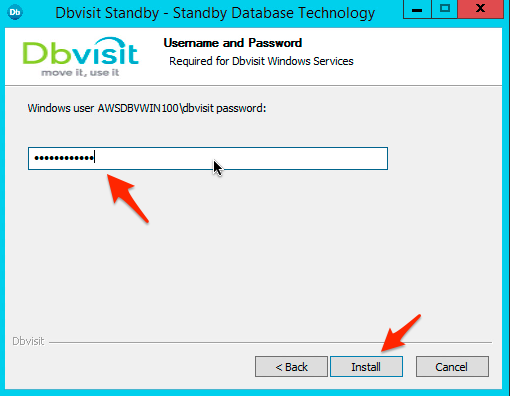
5.7. Step 7 - Provide the Windows user Password
Please make sure you enter this password correctly. The value cannot be empty.
If this password is not entered correctly, the Dbvserver, Dbvnet and Dbvagent services will fail to start.
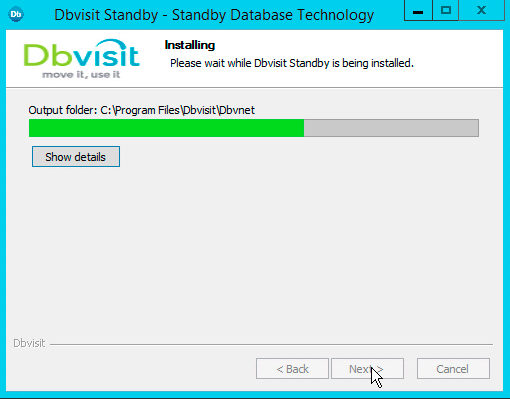
5.8. Step 8 - Progress indicator
The installation will now start and should take only a few seconds to a minute to complete.
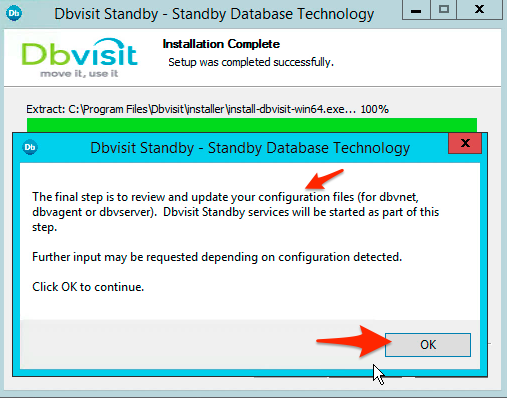
5.9. Step 9 - Software installed confirmation
Once all the software is installed, a confirmation window will be displayed.
5.10. Step 10 - Installer script is executed
The installer script will automatically be executed. During this process, the configuration files for Dbvnet, Dbvagent and Dbvserver will be reviewed.
If no software has been installed before the installer script will prompt the user for input. If the installer detects an earlier installation, depending on the version no questions may be asked.
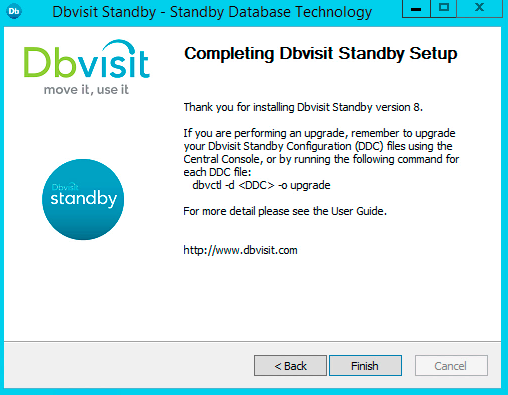
5.11. Step 11 - Installation Complete
Once the installer script has finished, the installation process is complete.
You can now click on Finish.
Repeat the same process on the secondary (standby or primary) system.
It is important that the Dbvisit Standby software on both the primary and standby systems match.
5.12. Next Steps
The next step once the software is installed on both primary and standby systems is to configure the Dbvisit Standby Configuration (DDC) file.