Upgrading Dbvisit Standby - Windows
- Anton Els (Deactivated)
If upgrading from version 5.3.x or 6.0.x to 7.0.x
Please note the following if upgrading from earlier versions to version 7:
1. Upgrading of Dbvisit Standby software needs to be done on both the primary server and standby servers.
2. For Oracle RAC, the upgrade needs to be done for each node.
3. You may want to create a backup of the Dbvisit Standby install directory for rollback purposes. (all Dbvisit software is contained within the main directory).
4. Existing 7.0 license keys are automatically applied to the new software (this is if you are upgrading from a current version 7 update to a later update, example 7.0.10 to 7.0.50)
5. Existing 5.3.x and 6.0.x license keys are NOT valid for 7.0. Contact Dbvisit Sales to obtain 7.0 license keys if you have current Dbvisit support. A support contract is required to obtain license keys for later versions of Dbvisit Standby.
6. Your current Dbvisit Database Configuration (DDC) configurations will be upgraded and a new configuration (DDC) file will be created. A backup of the original DDC file will be created.
Upgrade Steps
Note that the following steps apply if you are upgrading from version 5.3.x or 6.0.x or 7.0.x to the latest version 7 update. Example you would follow these upgrade steps if you are updating from 7.0.10 to 7.0.50.
The upgrade steps for Dbvisit Standby in a single or cluster (Oracle RAC) configuration are the same. Where different steps are required this will be highlighted.
Recommended: Before starting the upgrade, it is recommended that the standby database is up to date with the primary database (this is not required, but recommended - all archive logs in the Dbvisit Standby ARCHDEST on the standby server should have been applied to the standby)
When upgrading you will run the installation process exactly the same as you would perform a new installation, with the exception that you need to make sure you specify the location of the current Dbvisit Standby installation during the installation, known as the Dbvisit Base directory. For example, if you currently have Dbvisit Standby already installed in "C:\Program Files (x86)\dbvisit" you will need to make sure that during the installation process that you specify this location as your installation location.
On a high level the upgrade process can be seen as:
- Stop your Dbvisit Standby schedules on all systems
- Stop Dbvserver (GUI) if you are using it
- Stop Dbvnet (Dbvisit Networking)
- Download and Install the new Dbvisit Standby version 7 (making sure you select the previous versions, installation directory during installation)
- Update the Dbvisit Standby Repository
- Update the Dbvisit Standby Configuration files (Only required if already on Version 7 and updating to a later version - 7.0.x)
- Recommended: remove any temp (*.dbv) files in the DBVISIT_BASE/standby/tmp directory
- Start Dbvserver and Dbvnet if you did not select the auto start during the installation of the new software
- Start your Dbvisit Standby schedules
The next section will provide a more detail overview of the upgrade steps.
In Dbvisit Standby version 7 the Archive logs are renamed when they are copied to the standby server (in the Dbvisit ARCHDEST location).
Before upgrading, make sure the standby have already applied all the archive logs that was available in the Dbvisit standby ARCHDEST.
New archive logs in this location will have the new naming convention:
<thread>_<sequence>_<resetlogs_id><STANDBY_ARCHIVELOG_NAME_EXTENSION>
Where STANDBY_ARCHIVELOG_NAME_EXTENSION defaults to .arc
Example: 1_45628_ 812975118.arc
Upgrading the Primary Server
This steps should be performed on all the primary servers if Oracle RAC is used
Step 1: Stop your Dbvisit Standby schedules, Dbvserver (GUI) and Dbvnet
It is recommended that before you start the upgrade that the standby database are up to date with the primary database - meaning all archive logs in the Dbvisit Standby ARCHDEST on the standby server should be applied to the standby.
This is not a strict requirement, but recommended.
Stopping the Schedules
All schedules should be disabled on all servers involved in the Dbvisit Standby configuration.
- If you make use of the Windows scheduler for Dbvisit, it is recommended to disable/stop these schedules before performing the upgrade.
- If you are using the Dbvisit Scheduler - available in the web based GUI, you will need to first login to the current GUI installation and disable all schedules on all primary and standby nodes. The Scheduler menu can be found under the "Run" main menu option.
If you are already making use of Dbvisit Standby version 7 and upgrading to a new update of version 7, please make sure you stop both Dbvserver (GUI) and Dbvnet (Networking) before you start the upgrade process.
If you are upgrading from a version prior to version 7, example version 6.0.54 then you only need to stop Dbvserver (GUI) as Dbvnet was not part of previous releases.
Stop the Dbvisit Standby schedule(s) (If using the Dbvserver schedule, these will be automatically stopped).
It is recommended to stop the Dbvserver and Dbvnet (if previously installed) Windows Services prior to starting the upgrade process
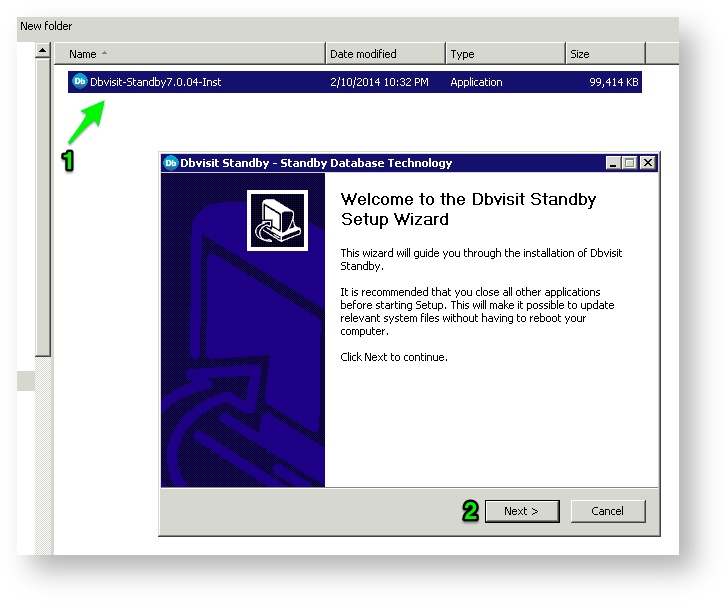
Step 2: Start the Installer
Double click on the Dbvisit Standby installation executable. Click on Next when the Welcome screen is presented:
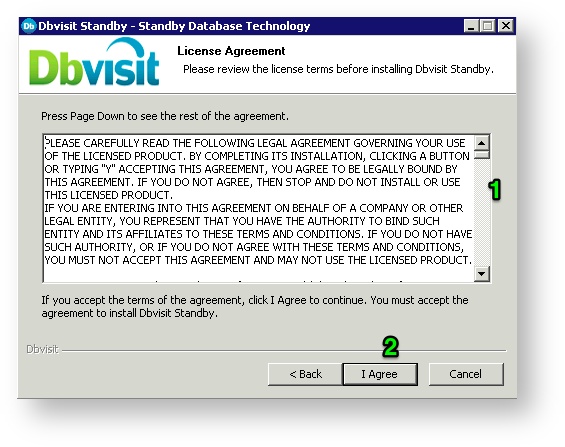
Step 3: Review and Accept the license terms.
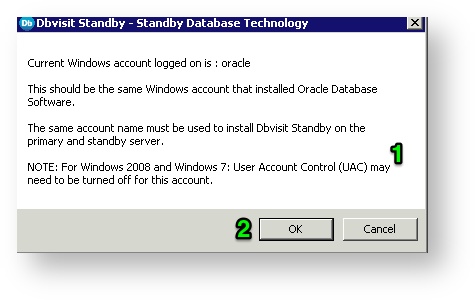
Step 4: Review Installation Owner
Please ensure that the account that is used to install Dbvisit Standby is the same account that installed the Oracle software.
For Windows 2008 and higher it is recommended that the User Account Control (UAC) be turned off.
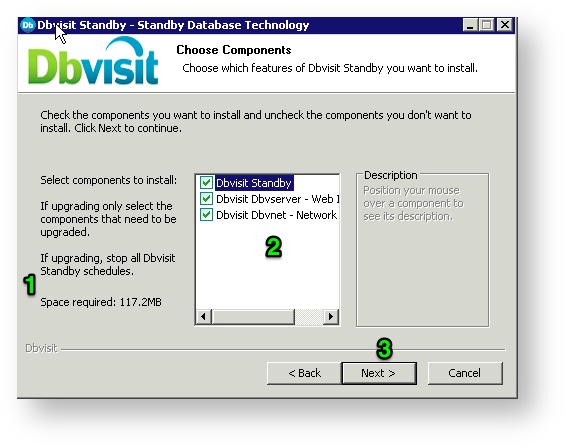
Step 5: Choose Components to Install
For new Installations and Upgrades it is recommended to select all components in the list (Dbvnet, Dbvserver and Standby)
Step 6: Installation Location
You will be prompted for the installation location for all components, known as the DBVISIT_BASE location in version 7.
Please ensure it is the same location as where the current Dbvisit Standby you would like to upgrade is installed.

Step 7: Installer will pickup if previous version was installed
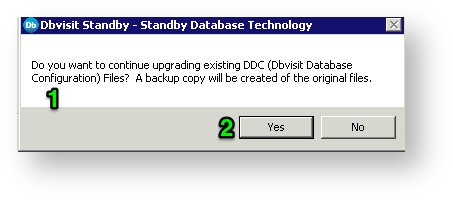
Important
It is important to state YES to this question as Dbvisit Standby will then automatically upgrade the DDC files.
If you specify NO, you will have to create new version 7 DDC files for your configuration.

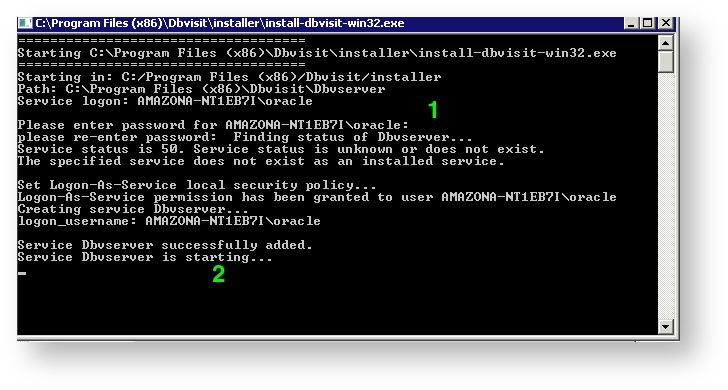
Step 8: Creating the Dbvserver Windows Service
The Dbvisit Standby installer will ask you for the password of the currently connected user.
This user you are using to install the Dbvisit Software must be in the ORA_DBA Windows Group
Provide the password as requested and the Service creation will start:
Windows 2003 and 2008 has a 30second limit for services to be started. If the Dbvserver Service does not start within this 30seconds the startup will be terminated and an message similar to the one below will be displayed:
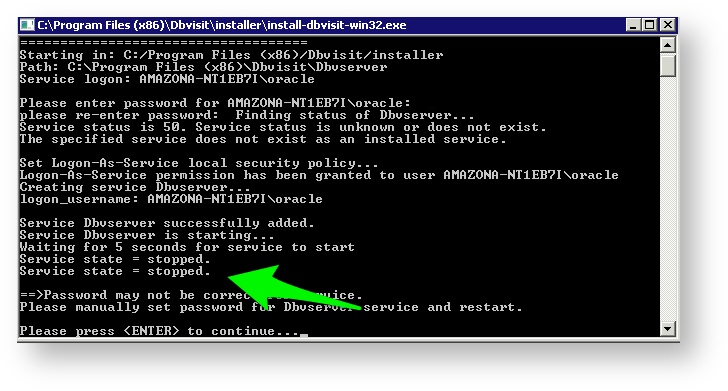
Press <ENTER> to continue. Note that the Dbvisit Standby Installer will attempt a restart of this service.
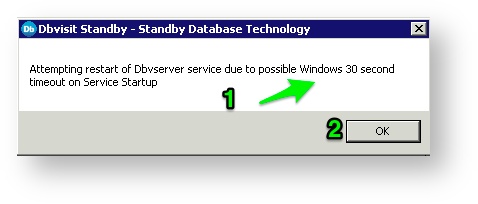
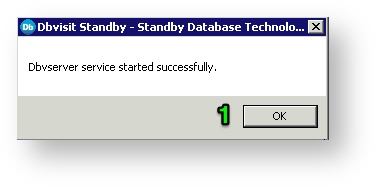
The installer will attempt a second restart of the service and will display an update on the status of the service.
Step 9: Creating the Dbvnet Windows Service
The first step will be the stopping and removing of any previous installed Dbvnet Services if they exist.
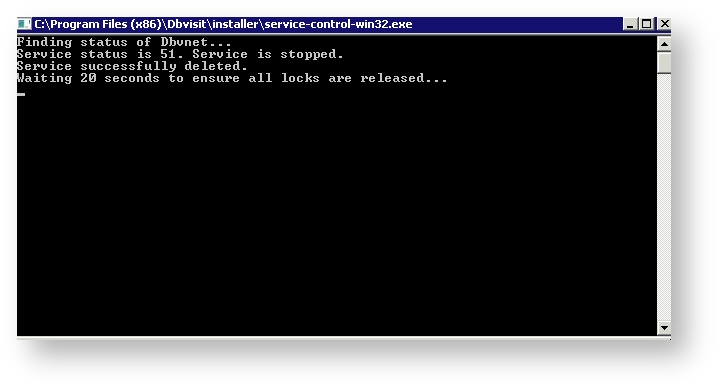
The Dbvnet Software will be installed in the DBVISIT_BASE/dbvnet sub directory.
It is important to note the windows service might not start on first attempt due to the Windows 30 Second restriction.
If this does happen the Installer will attempt the restart of the Dbvnet service.
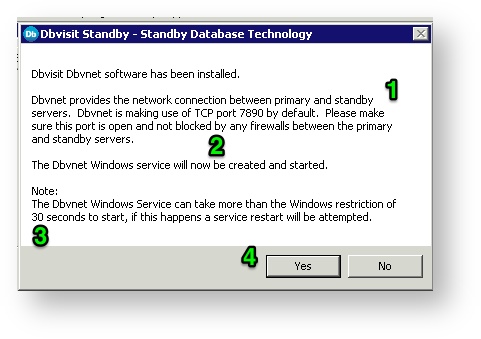
Click on "Yes" above to star the Dbvnet Service Creation. You will be asked for the password of the user you are logged on as.
Provide the password as requested and the Dbvnet service creation will start.

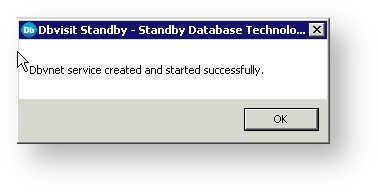
Once the Dbvnet Service creation is complete the following message will be displayed.
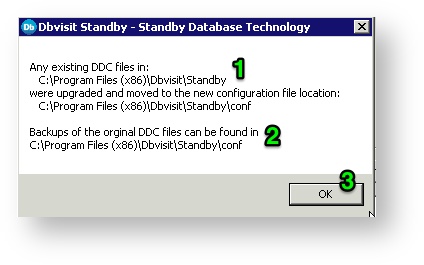
Step 10: Updating (upgrading) the DDC files
The next step is the updating of the DDC files.
A backup copy of the DDC files will be created in the DBVISIT_BASE/standby/conf directory prior to the update.
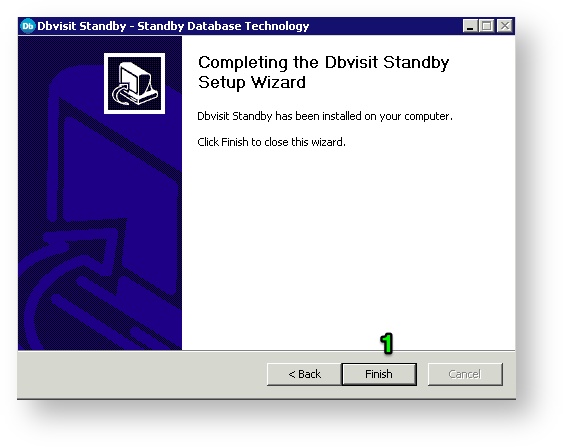
Step 11: Completing the Dbvisit Standby Setup Wizard
The Dbvisit Standby Setup Wizard can be closed.
IMPORTANT
It is recommended to clean up any old temporary files (*.dbv) located in the DBVISIT_BASE/standby/tmp directory when performing an upgrade. (example dbvisit base: C:\Program Files (x86)\dbvisit\standby\tmp)
These files are removed during normal operation, but there was a known bug in earlier versions up to 7.0.14 where the files in this directory was not always cleaned. This was resolved in version 7.0.16 and later.
Repeat Installation on Standby Server
Dbvisit Standby needs to be installed on the Primary server as well as on the Standby server.
Before you continue with the next step you need to make sure you follow Step 1 to 4 above on all the servers in the standby configuration. When doing this, it is important to make sure the Dbvnet password provided during installation is the same on all the servers where you are installing Dbvnet. This password is used for secure communication and if different passwords are used between the primary and standby servers, you will not be able to establish a connection between these servers using Dbvnet.
IMPORTANT
It is recommended to clean up any old temporary files (*.dbv) located in the DBVISIT_BASE/standby/tmp directory when performing an upgrade. (example dbvisit base: C:\Program Files (x86)\dbvisit\standby\tmp)
These files are removed during normal operation, but there was a known bug in earlier versions up to 7.0.14 where the files in this directory was not always cleaned. This was resolved in version 7.0.16 and later.
Updating the Dbvisit Standby Repository and Dbvisit Configuration files (if required)
When upgrading the Dbvisit Standby version from 5.3.x or 6.0.x to version 7 you will only need to update the Dbvisit Standby Repository, but not the Dbvisit Database Configuration (DDC) files, as they would have been upgrade as part of the software installation (upgrade) process.
If you are upgrading an existing version 7.0.x installation, you need to update both the Dbvisit Database Configuration (DDC) file as well as the Dbvisit Standby Repository.
Updating the Dbvisit Database Configuration (DDC) file - (only if upgrading an existing version 7.0.x)
This step can either be performed from the Command Line Interface (CLI) - indicated by  , or the Web based (GUI) interface - indicated by
  .
.
Using the CLI is recommended and it is listed blow:
Using CLI to update DDC
To update the DDC file from the command line use option 6 from the dbvisit_setup menu and follow the onscreen instructions.
Below is an example
This step is the same on Windows and Linux platforms. Start the "dbvisit_setup.exe" command on Windows and "dbvisit_setup" command on Linux.
./dbvisit_setup

=========================================================
Dbvisit Standby Database Technology (7.0.01.11204)
 http://www.dbvisit.com
=========================================================
=>dbvisit_setup only needs to be run on the primary server.
Is this the primary server? <Yes/No> [Yes]:
=========================================================

 Dbvisit Standby Database Technology (7.0.01.11204)
 http://www.dbvisit.com
 Dbvisit Database setup
 Default values will be shown in []

Options:
 1) New Dbvisit Database setup (combines options 2,3,4)
 1a) New Dbvisit RAC Instance setup (combines options 2,3,4)

 2) New Dbvisit Database configuration (DDC) file setup
 3) New Dbvisit Archive Management Module (AMM) setup
 4) New Dbvisit Database repository (DDR) setup

 5) Manage Dbvisit Database repository (DDR)
 6) Update Dbvisit Database configuration (DDC) file

 7) Create Standby Database (and template)
 8) Synchronize Standby Database

 9) Uninstall Dbvisit Database repository (DDR)
 E) Exit

=========================================================
Please enter choice : 6

------------------------------------------------------------------------------
=>Updating Dbvisit Database configuration (DDC) file.
Choose database:
The following Oracle database(s) have a Dbvisit Database configuration (DDC)
file on this server:

DDC
===
1) testdb
2) Return to menu

Please enter choice : 1
Is this correct? <Yes/No> [Yes]:

------------------------------------------------------------------------------
Would you like to review all the variables? <Yes/No> [Yes]:

=====10 Generic Settings=====
1) COMPRESS=dbvisit
2) CP=/usr/bin/scp
3) DBVNET_PORT=7890
4) ORACLE_HOME=/u01/app/oracle/product/11.2.0/dbhome_1
5) ORACLE_SID=testdb
6) ORATAB=/etc/oratab
7) OWNER=oracle
8) PATH=/usr/local/bin:/bin:/usr/bin:/usr/X11R6/bin:/usr/sbin:/sbin
9) RSH=/usr/bin/ssh
10) SEND_HEARTBEAT_TIME24=0700
11) UNCOMPRESS=dbvisit
12) ZIP_EXTENSION=.gz

=====15 RAC Settings=====
13) RAC=No
14) RAC_TAKEOVER=Yes
15) RAC_TAKEOVER_FORCE=No
16) RAC_TAKEOVER_SID=

=====20 Primary Server Settings=====
17) DBPASSWD=******
18) DBUSER=dbvisit
19) DBVISIT_BASE=/usr/local/dbvisit
20) ENCRYPT_PASSWDS=No
21) LEAVE_COMPRESS_SOURCE=No
22) LOGSWITCH=N
23) ORACLE_SID_ASM=+ASM
24) SOURCE=dbvlin101
25) SYNCH_DBVISIT_INSTALL=Yes

=====25 Sys Logon Settings=====
26) SYS_LOGON=
27) SYS_LOGON_STRING=
28) SYS_USER=
29) _SYS_PASSWD=

=====30 Standby Server Settings=====
30) ARCHDEST=/u01/app/oracle/archive/testdb
31) DBVISIT_BASE_DR=/usr/local/dbvisit
32) DESTINATION=dbvlin102
33) LEAVE_COMPRESS_DEST=N
34) MAX_TIMES_TRIED=4

=====30 Standby Server Settings=====
35) ORACLE_HOME_DR=/u01/app/oracle/product/11.2.0/dbhome_1
36) ORACLE_SID_ASM_DEST=+ASM
37) ORACLE_SID_DEST=testdb
38) SSH_PORT=22

=====40 Mail Settings=====
39) ADMINS=oracle@dbvlin101
40) MAILCFG_FROM=oracle@dbvlin101
41) MAILCFG_FROM_DR=oracle@dbvlin102
42) MAILCFG_MAIL_CLIENT=sendmail
43) MAILCFG_SMTP_SERVER=
44) MAILCFG_SMTP_SERVER_DR=
45) SUCCESSMAIL=No
46) SUCCESSMAIL_DR=No

=====50 Primary Archive Log Management Settings=====
47) ARCHSOURCE_BACKUP_COUNT=0
48) ARCHSOURCE_MANAGEMENT=Yes
49) DAYS_TO_KEEP_ARCHSOURCE=2
50) DELETE_ARCHSOURCE=Y
51) FRA_THRESHOLD_ARCHSOURCE=90


=====50 Primary Archive Log Management Settings=====
52) NUM_ARCHSOURCE_TO_KEEP=0
53) THRESHOLD_ARCHSOURCE=90

=====60 Standby Archive Log Management Settings=====
54) ARCHDEST_MANAGEMENT=Yes
55) DAYS_TO_KEEP_ARCHDEST=2
56) DELETE_ARCHDEST=Y
57) NUM_ARCHDEST_TO_KEEP=0
58) THRESHOLD_ARCHDEST=90

Are these variables correct? <Yes/No> [Yes]: Yes
Redisplay all variables again? <Yes/No> [No]: No
------------------------------------------------------------------------------

=>Writing Dbvisit Database configuration (DDC) file.
Dbvisit Database configuration (DDC) file
/usr/local/dbvisit/standby/conf/dbv_testdb.env already exists. Are you sure you
want to override? (a backup copy will be make) <Yes/No> [Yes]:

=>Dbvisit Database configuration (DDC) file
/usr/local/dbvisit/standby/conf/dbv_testdb.env renamed up to:
/usr/local/dbvisit/standby/conf/dbv_testdb.env.201308221525.

=>Dbvisit Database configuration (DDC) file
/usr/local/dbvisit/standby/conf/dbv_testdb.env updated.
Please press <Enter> to continue...
Following the above steps the current DDC file will be upgraded.
Updating the Dbvisit Standby Repository
The GUI or command line can be used to update the repository.
Note: There are no crucial information stored in the repository and it can be recreated if required, but if this is done any historical information used for reporting in the GUI will be lost as well as any Create Standby Database (CSD) Templates. The process explained in this section is used to upgrade the repository keeping all historical information and CSD templates.
Using the GUI to update the Dbvisit Standby Repository
- To update the Dbvisit Database Repository (DDR) file go to Home > Setup > Update Dbvisit > Manage Dbvisit Repository > select Database from drop-down menu and click Check Dbvisit Repository.
- If the DDR needs to be upgraded, select Upgrade Dbvisit Repository
- Repeat upgrade of DDC and DDR for all databases on this primary server.
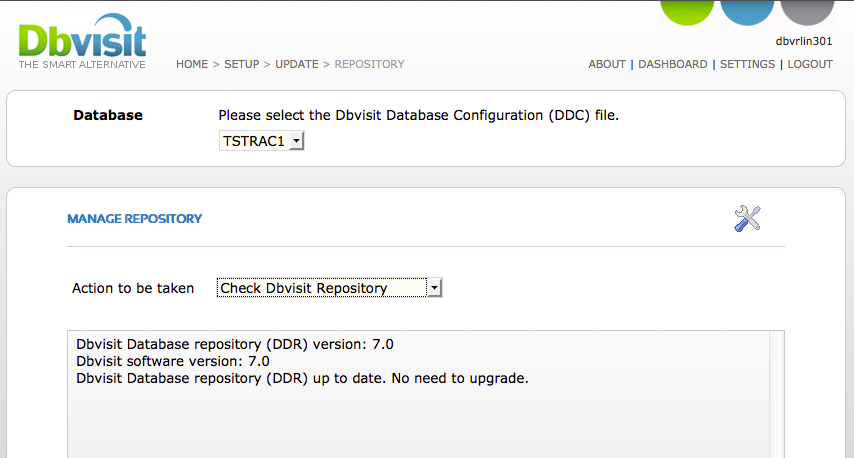
Using CLI to update Dbvisit Standby Repository
- To update the Dbvisit Standby Repository from the command line interface run the dbvisit_setup menu option and select option 5.
- The first step is to run a check if the repository does require an update. If it does, select the upgrade option, otherwise select "r" to return to the menu.
- Below is an example showing you how to check if the Dbvisit Standby Repository require an update.
Below is an example
This step is the same on Windows and Linux platforms. Start the "dbvisit_setup.exe" command on Windows and "dbvisit_setup" command on Linux.
oracle@dbvrlin301[/usr/dbvisit/standby]: ./dbvisit_setup

=========================================================
Dbvisit Standby Database Technology (7.0.01.11204)
 http://www.dbvisit.com
=========================================================
=>dbvisit_setup only needs to be run on the primary server.
  Is this the primary server? <Yes/No> [Yes]:
=========================================================
 Dbvisit Standby Database Technology (7.0.01.11204)
 http://www.dbvisit.com
 Dbvisit Database setup
 Default values will be shown in []

Options:
 1) New Dbvisit Database setup (combines options 2,3,4)
 1a) New Dbvisit RAC Instance setup (combines options 2,3,4)

 2) New Dbvisit Database configuration (DDC) file setup
 3) New Dbvisit Archive Management Module (AMM) setup
 4) New Dbvisit Database repository (DDR) setup

 5) Manage Dbvisit Database repository (DDR)
 6) Update Dbvisit Database configuration (DDC) file

 7) Create Standby Database (and template)
 8) Synchronize Standby Database

 9) Uninstall Dbvisit Database repository (DDR)
 E) Exit

=========================================================
Please enter choice : 5
=========================================================
Maintain Dbvisit Database repository (DDR)
 Default values will be shown in []

Options:
 1) Upgrade Dbvisit Database repository (DDR)
 2) Downgrade Dbvisit Database repository (DDR)
 3) Check version of Dbvisit Database repository (DDR)
 r) Return to main menu
=========================================================
Please enter choice : 3

------------------------------------------------------------------------------
=>Checking Dbvisit Database repository (DDR) version.


Choose database:
The following Oracle database(s) have a Dbvisit Database configuration (DDC)
file on this server:
DDC
 ===
1) TSTRAC1
2) Return to menu

Please enter choice : 1

Is this correct? <Yes/No> [Yes]: Yes
Database TSTRAC1 is up.
Dbvisit Database repository (DDR) version: 7.0
Dbvisit software version: 7.0

Dbvisit Database repository (DDR) up to date. No need to upgrade.
Please press <Enter> to continue...

=========================================================
Maintain Dbvisit Database repository (DDR)
 Default values will be shown in []

Options:
 1) Upgrade Dbvisit Database repository (DDR)
 2) Downgrade Dbvisit Database repository (DDR)
 3) Check version of Dbvisit Database repository (DDR)
 r) Return to main menu
=========================================================
Please enter choice :
Completing the upgrade
The last step in the upgrade process is to run Dbvisit Standby manually on the primary. If using Oracle RAC you should run Dbvisit Standby on ALL the primary nodes; once Dbvisit Standby has been run on the primary server, run it on the standby server. This step can be performed from either the command line or the GUI.
Through the command line interface (CLI):
To run Dbvisit Standby from the command line, execute the following command first on the primary node followed by the running it on the standby server: dbvisit <DDC>
Through the web based graphical user interface (GUI):
To execute Dbvisit (run it) from the GUI on the primary server, login as the admin user (default) and navigate to the “Run Interactive” screen:
- Select Home -> Run -> Run Interactive
- Ensure you are on the primary tab, if not select it
- From the top drop down option, select the database
- Select “Default (transfer archive log) option as your “Run Action”
- Click on Run
To execute Dbvisit (run it) from the GUI on the standby server, login as the admin user (default) and navigate to the “Run Interactive” screen:
- Select Home -> Run -> Run Interactive
- Ensure you are on the standby tab, if not select it
- From the top drop down option, select the database
- Select “Default (apply archive log) option as your “Run Action”
Once you have completed a successful run from both the primary and standby side, you can now move on to the final step, which is to re-enable your schedules.
Restarting your Schedules
Once you have completed the upgrade and you can run Dbvisit Standby successfully manually, you can re-enable your Dbvisit Standby schedules disabled in Step 1.