Running Dbvisit (Sending and Applying Logs) via the GUI
Running Dbvisit for both the Primary and Standby server can be done from the GUI server interface.
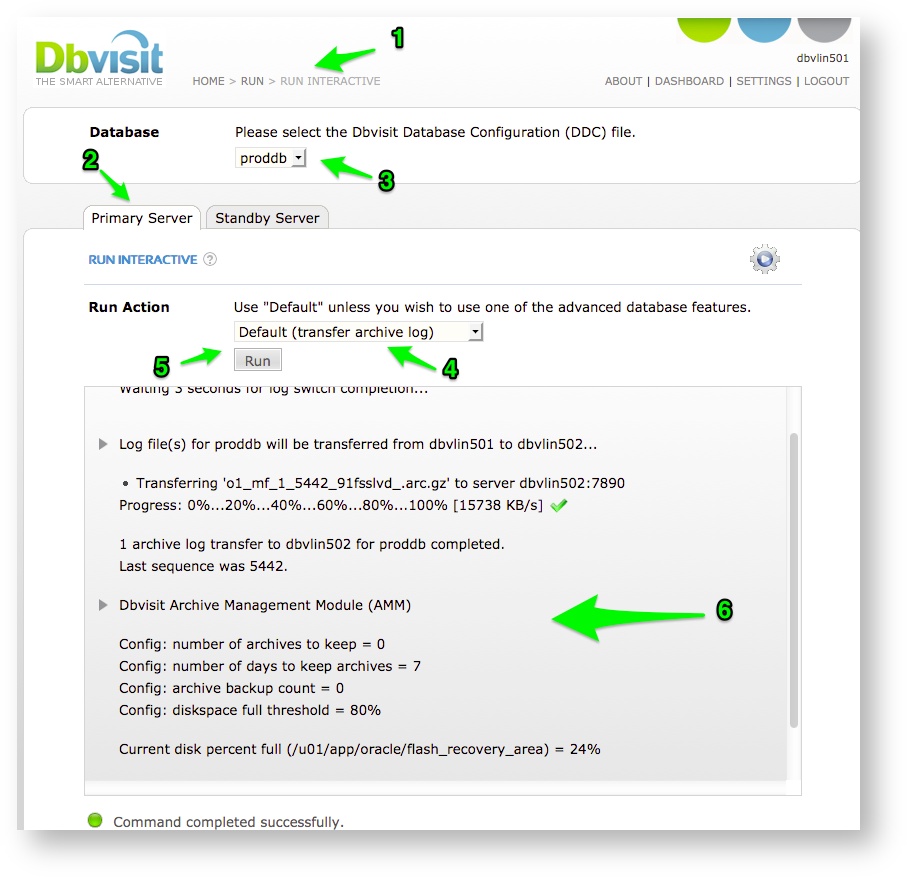
Navigate from the Main menu to the Run Interactive screen (Home->Run->Run Interactive).
From this screen you can select your DDC and from the “Run Action” drop down selection pick the “Default (transfer archive log)” when on the primary and “Default (apply archive log)” when on the standby.
If using Oracle RAC
Note that if you are using Oracle RAC on the primary side with a single instance standby, you have to schedule (run Dbvisit Standby) on both primary nodes. You will have a DDC file per node and you have to make sure you schedule/run dbvisit standby on each of the primary nodes. All the archive logs for the particular node (thread) will then be shipped to the standby server.
On the standby server, you only have to run Dbvisit Standby for ONE of the DDC files and not both. When starting the recovery process using the one DDC file, all archive logs from both threads will be applied as needed during the recovery.
Example if you have a RAC database called PROD with two nodes and you have dbv_PROD1.env and dbv_PROD2.env as the DDC files, you will schedule on node one to run dbvisit standby for PROD1 and on node 2 the PROD2 DDC will be scheduled. On the standby you can then schedule only one of the DDC files, example just run for the DDC PROD1.
Sending Logs (Primary Server):
To send logs to the standby server via the GUI interface:
- Navigate to the "Run"->"Run Interactive" screen from the Main Menu.
- Select the primary tab
- Select the Database you want to transfer archive logs for
- Specify the "Run Action" as - "Default (transfer archive log)"
- Click on the "Run" button to start the process. (see details and output below)
When Dbvisit Standby is executed to send Archive Logs to the Standby database the process can be summarised as follow:
- If RUN_INSPECT=Y is set in the DDC file, Dbvisit Standby will execute a "silent" log gap report, where it will connect to the standby database and obtain the current status (Archive and Transfer log gap information). This information is then stored in the internal Dbvisit Standby Repository (located in the primary database). This information is used for reporting purpose and this option can be disabled by setting RUN_INSPECT=N in the DDC file for the database. This can improve the speed of running Dbvisit as these steps will be excluded, But by disabling this reporting data (GRAPHS) used in the GUI (Dbvserver) reporting section will not have sufficient information.
- Dbvisit Standby will next inspect the DDC file and compare it with the DDC file located on the Standby server. Note that the primary database server DDC file is seen as the master copy, and if it is found that the standby database server DDC file is different, it will be overwritten with a copy from the primary server.
This can be disabled by setting SYNCH_DBVISIT_INSTALL=N and SYNCH_ENV_FILE_ONLY=N in the database configuration (DDC) file.
IMPORTANT: Setting the above values to N is not recommended and should only be done on recommendation from Dbvisit Support
- Dbvisit Standby will start sending the required archive logs to the standby server in sequential format (based on sequence number).
- By default:
- If an archive log was generated since the last run this log will be shipped to the standby database and no additional "logswitch" will be performed.
- If NO archivelogs were generated since the last run, a "logswitch" will be executed on the database which will start the creation of a new archivelog that will then be transferred to the standby server.
- Forcing a logswitch:
- If you want to ensure the gap between the primary and standby server is similar to the scheduled gap, you can set the LOGSWITCH=Y in the DDC file. This will force Dbvisit Standby to execute a logswitch on every execution on the primary server. Note that this can cause additional overhead on the database server depending on current system load and I/O subsystem (especially slow I/O subsystem - storage)
- Archive logs will be compressed before being send to the standby server if the COMPRESS variable is set in the DDC file.
- Compression:
- By default compression of the archive logs are enabled
- gzip is used for compression on Linux (COMPRESS=/bin/gzip) and Dbvisit Standby's internal compression "dbvisit" is used on Windows (COMPRESS=dbvisit)
- The default uncompress values will be set to gunzip (UNCOMPRESS=/bin/gunzip) on Linux and Dbvisit Standby's internal uncompress will be used on Windows (UNCOMPRESS=dbvisit)
- To disable compression, set COMPRESS=N
- The compression settings are specified in the DDC file on the primary server.
- ARCHDEST
- The ARCHDEST location is used by Dbvisit Standby and is not the same location as the database Archive Destination or Recovery Area. It must be a single filesystem with sufficient space for the logs.
- This location should be created on both the Primary and Standby servers and should have read/write permission for both the "oracle" and "grid" accounts if ASM role separation is used.
- This must be on an Oracle supported filesystem, i.e. ext3. Common Internet Filesystem (CIFS) is not supported.
- Dbvisit Standby will transfer the Archive logs to the ARCHDEST location on the standby server as specified in the DDC file.
- If ASM storage is used on the primary:
- Archive logs will be copied out of the ASM storage to the ARCHTMP directory as specified by the DDC file. ARCHTMP will be the same as the specified ARCHDEST location by default, but can be specified to be a different location if required.
- Compression:
- By default:
- Once the transfer is complete, the Dbvisit Standby Archivelog Management Module (AMM) will start
- This process will review the AMM settings (as specified in the DDC file) and this process will execute the required steps.
- For more details see the AMM section later in this guide.
Applying Logs (Standby Server):
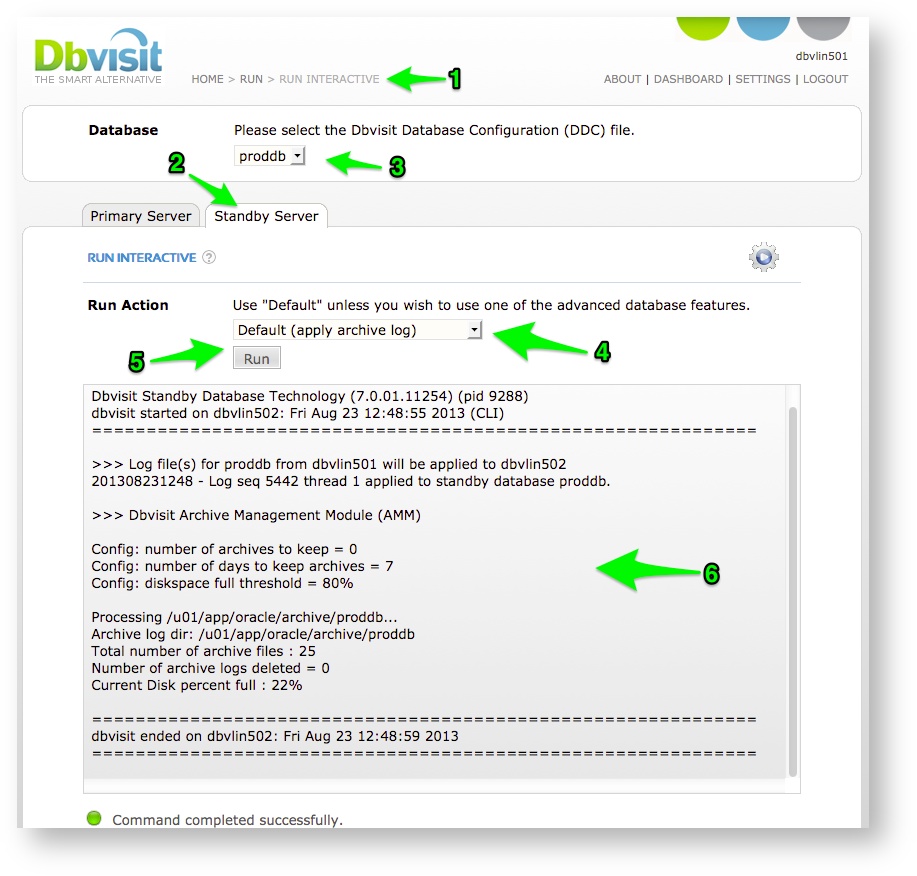
The process to apply logs are similar to the sending of logs, but the Standby server tab should be used.
In summary the steps are:
- Navigate to the "Run"->"Run Interactive" screen from the Main Menu.
- Select the Standby tab
- Select the Database you want to apply archive logs to
- Specify the "Run Action" as - "Default (apply archive log)"
- Click on the "Run" button to start the process. (see details and output below)
When executed on the standby server to apply the logs the process can be summarised as follow:
- Archive logs located in the Dbvisit ARCHDEST location will be applied to the standby database
- If the archive logs are compressed (based on the COMPRESS value in the DDC file), they will be automatically uncompressed (based on the UNCOMPRESS value in DDC file) after which they will be applied to the standby database.
- Once all archive logs available in the ARCHDEST location was applied, will Dbvisit Standby execute the Dbvisit Standby Archivelog Management Module (AMM) which will manage the ARCHDEST location on the standby database server.

